background image


www.trikdis.com 


  14     


March, 2019 


Ethernet communicator E16T 

Follow the instructions below if the security control panel will be controlled with the 

E16T 

output OUT, 

turning on/off the control panel keyswitch zone.  

1.


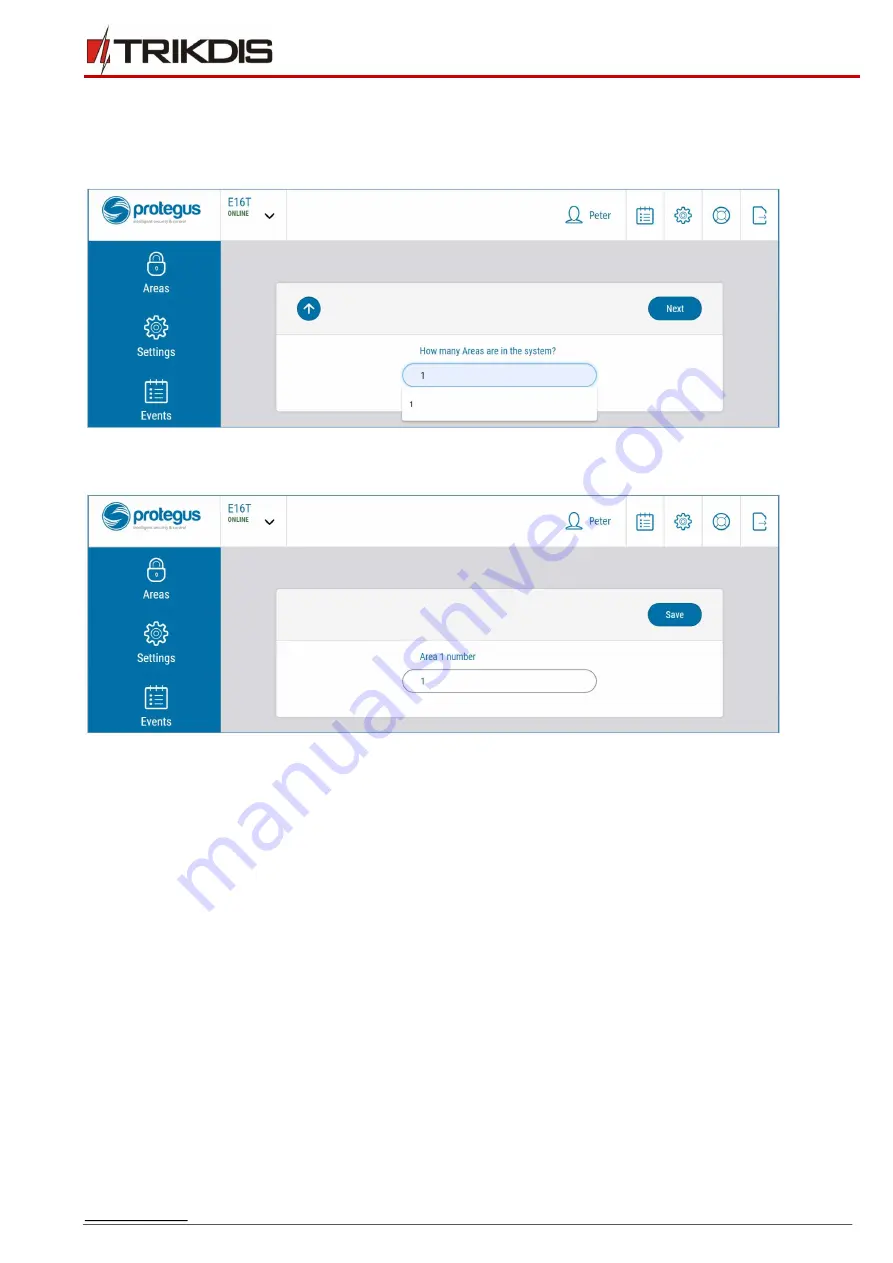
In the new window, click "Areas" in the side menu. In the window that opens, specify the area of the 

alarm system 1 (communicator has one OUT output) and press "Next. 


2.


In the new window, identify what is the number for each of the specified areas in the security system 

and press 

Save


3.


In the side menu press 

Settings

  and  in the  newly opened  window press 

Settings

.  Select the  box 

Arm/Disarm


with


PGM

 and specify which area the output will control. One output OUT can control 

only one area.


4.


Select 

Level

 or 

Pulse

, depending on the type of control panel keyswitch zone. You can also change 

the duration of the pulse interval if it is required for the connected control panel


5.


For  additional  security,  you  can  select 

Use  Application  password  for  ARM/DISARM

.  Then  after 

pressing the button to arm/disarm the alarm system, a window for entering the app password will 

open.  

Summary of Contents for E16T

Page 1: ...www trikdis lt UAB Trikdis Draugystės g 17 LT 51229 Kaunas Lietuva 370 37 408 040 info trikdis lt Ethernet communicator E16T User manual March 2019 ...

Page 2: ...CS FOR WIRING INPUTS 11 3 3 CONNECT LAN CABLE 11 3 4 SCHEMATIC FOR WIRING A RELAY AND LED 12 4 PROGRAMMING THE CONTROL PANEL 12 4 1 PROGRAMMING HONEYWELL VISTA LANDLINE DIALER 12 4 1 1Special settings for Honeywell Vista 48 panel 12 5 REMOTE CONTROL 13 5 1 ADDING THE SECURITY SYSTEM TO PROTEGUS APP 13 5 2 ADDITIONAL SETTINGS TO ARM DISARM THE ALARM SYSTEM USING CONTROL PANEL S KEYSWITCH ZONE 13 5 ...

Page 3: ...refully in order to avoid mistakes that can lead to malfunction or even damage to the equipment Disconnect the power supply before making any electrical connections Changes modifications or repairs not authorized by the manufacturer shall void your rights under the warranty Please act according to your local rules and do not dispose of your unusable alarm system or its components with other househ...

Page 4: ...connected to control panel s landline dialer with 2 or 4 wires When connected with 4 wires the landline between the panel and communicator will be monitored Sends events to monitoring station receiver Sends events to TRIKDIS software or hardware receivers that work with any monitoring software Can send event messages to SIA DC 09 receivers Connection supervision by polling to IP receiver every 30 ...

Page 5: ... NO EOL 2 2 kΩ type Output 1 OC type commutating voltage up to 30 V and current up to 0 15 A Operating environment Temperature from 10 C to 50 C relative humidity up to 80 at 20 C Dimensions 88 x 62 x 26 mm Weight 80 g 1 2 Communicator elements 1 Light indicators 2 Frontal case opening slot 3 Terminal for external connections 4 USB Mini B port for communicator programming 5 Ethernet connection RJ4...

Page 6: ...ght status Description NETWORK Green solid Communicator is connected to the Internet Off Not connected to the LAN DATA Yellow solid There are unsent events in the buffer memory Green blinkings Messages are sent from the security control panel POWER Green blinkings Power supply is on with sufficient voltage Yellow blinkings Power supply is not sufficient 11 5 V TROUBLE Red solid LAN connection prob...

Page 7: ...or s settings If requested enter the Administrator or Installer 6 digit code in the pop up window Below we describe what settings need to be set for the communicator to begin sending events to the Central Monitoring Station and to allow the security control to be controlled with the Protegus app 2 1 Settings for connection with Protegus app In the System Settings window 1 Select Security panel mod...

Page 8: ... application factory default 123456 After finishing configuration click the button Write F5 and disconnect the USB cable For more information about other E16T settings in TrikdisConfig see chapter 7 TrikdisConfig window description 2 2 Settings for connection with Central Monitoring Station In System settings window 1 Enter Account number provided by the Central Monitoring Station 4 characters 0 9...

Page 9: ...ey that is set in the receiver 9 Recommended Configure the Backup Channel Settings 10 TCP protocol select which encoding protocol will be use TRK for TRIKDIS receivers DC 09_2007 or DC 09_2012 for universal receivers 11 Encription enabled if TCP protocol SIA DC09_2012 is selected encryption can be enabled 12 DC 09 encryption key enter encryption key that is set in the receiver 13 DC 09 receiver No...

Page 10: ...to enter it when adding the system to Protegus app default password 123456 After finishing configuration click the button Write F5 and disconnect the USB cable For more information about other E16T settings in TrikdisConfig see chapter 7 TrikdisConfig window description 3 Installation and wiring 3 1 Schematics for wiring the communicator to the security control panel Following the provided schemat...

Page 11: ...ommunicator has two input terminals IN1 IN2 for connecting NO NC EOL type circuits Default input setting NO The input type can be changed in the TrikdisConfig window Event summary Connect the input according to the selected input type NO NC EOL as shown in the schemes below 3 3 Connect LAN cable ...

Page 12: ...he control panel s keypad enter these sections and set them as described 41 enter monitoring station receiver telephone number 43 enter control panel s account number 47 set the Tone dial to 1 and enter the number of dial attempts 48 use default setting 48 must be set to 77 49 Split Dual message 49 must be set to 5 50 delay for sending burglary alarm events optional Default value is 2 0 With it th...

Page 13: ...rowser version www protegus eu login 2 Log in with your user name and password or register and create a new account 3 Click Add new system and enter the E16T s MAC number This number can be found on the device and the packaging sticker After entering press Next 5 2 Additional settings to arm disarm the alarm system using control panel s keyswitch zone Important The control panel zone to which the ...

Page 14: ...e specified areas in the security system and press Save 3 In the side menu press Settings and in the newly opened window press Settings Select the box Arm Disarm with PGM and specify which area the output will control One output OUT can control only one area 4 Select Level or Pulse depending on the type of control panel keyswitch zone You can also change the duration of the pulse interval if it is...

Page 15: ...the action to arm or to disarm the alarm system 3 If asked enter the user code or Protegus password 6 Remote configuration Important Remote configuration will work only when E16T 1 Protegus service is enabled The service activation is described in chapter 7 3 Reporting window 2 Power supply is connected POWER LED flashes green 3 E16T connected to the Internet LAN cable connected The NETWORK indica...

Page 16: ...dow opens enter the six digit administrator code value In order for the program to remember the code check the box next to Remember Password 6 Set the necessary settings and when finished click Write F5 7 TrikdisConfig window description 7 1 TrikdisConfig status bar description After connecting the E16T and clicking Read F4 TrikdisConfig will provide information about the connected device in the s...

Page 17: ...municator Ethernet settings settings group Internal MAC unique communicator identifier code Select Use DHCP checkbox for communicator to register automatically to the network o If automatic registration is unsuccessful enter Internal IP address subnet Mask Gateway address and DNS service manually Access settings group There are two access levels administrator and installer when configuring the E16...

Page 18: ...n via a wired internet IP connection Messages can be sent via the primary or backup channel The backup communication channel will be used when the primary communication channel is interrupted Messages to the monitoring station are transmitted with encryption and password protection To receive and transmit messages to the monitoring program a TRIKDIS receiver is required For connection over IP soft...

Page 19: ...he DC 09_2007 or DC 09_2012 encoding for universal receivers is selected in the TCP protocol field Encryption enabled if the DC09_2012 TCP protocol is selected then encryption can be enabled DC09 2012 encryption key indicates the encryption key DC09 2012 receiver No receiver s number is indicated DC 09 line No specify the receiver line number Use time stamp the time will be included in the message...

Page 20: ...Contact ID enter the event code or leave the default value Upon entering the event the event code will be sent to Protegus and CMS Zone No enter the zone number and it will be sent in messages Type select input types NO NC EOL Enable Alarm select Alarm to receive report when event occurs Enable Restore select Restore to receive report when input line will restore Internal event description setting...

Page 21: ...ely arm disarm the security system remotely by using the Protegus app 9 Manual firmware update Note When the communicator E16T is connected to TrikdisConfig the program will automatically offer to update the device s firmware if updates are present Updates require an internet connection Antivirus software firewall or strict access to internet settings can block the automatic firmware updates E16T ...

Page 22: ...www trikdis com 22 March 2019 Ethernet communicator E16T 5 Press Update F12 6 Wait for the update to complete ...

Reviews: