Due to continuous improvement, Triatek reserves the right to change product specifications without notice.
Triatek reserves the right to change product specifications without notice.
HMS-1650 BASIC PROGRAMMING
HMS-1650
-
33
-
selected analog input. Moving the sash from fully closed to fully open
should result in a change for the selected analog input on the
Analog
Inputs Real-Time View
screen.
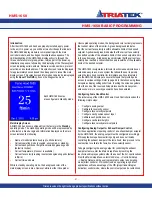
Calibrating Sash Position Sensor
To begin calibrating the sash position sensor, enter the Main Setup
Menu by touching the touchscreen display anywhere other than one of
the hot-spot locations. From the
Main Setup Menu
, select
Unit Setup
-->
Sash Setup
-->
Field Calibration
. At the initial field calibration
screen, the sash should be moved to the fully closed position. Move
the slider to represent the actual sash height in the fully closed position
(default is zero), and click the Next button to proceed to the next field
calibration screen. Move the sash to the fully open position, measure
the actual height of the sash opening, and enter the measured value
using the slider. Click the
Next
button to complete the field calibration
of the sash position sensor. Proceed with the next section to configure
the sash height settings of the HMS-1650.
Configuring Sash Height Settings
The HMS-1650 monitors sash height for alarming purposes, if this unit
has been equipped with a sash position sensor (POS-100). The
Sash
High Position
specifies the height at which the HMS-1650 will sound
an audible alarm if the sash is left at or above this position for an
extended period of time, specified as the
Sash High Delay
setting. The
Sash Low Mute Level
specifies the height below which the HMS-1650
will mute the audible alarm if it has been activated due to high face
velocity conditions.
To begin configuring these sash settings, enter the
Main Setup Menu
by touching the touchscreen display anywhere other than one of the
hot-spot locations. From the
Main Setup Menu
, select
Unit Setup
-->
Sash Setup
-->
Sash Heights
. Enter the
Sash High Position
,
Sash High
Delay
, and
Sash Low Mute Level
using the popup numeric keypad on
the touchscreen display. The sash heights should be entered in inches,
while the sash high delay should be entered in seconds. Proceed with
the next section to configure the face velocity alarm setpoints of the
HMS-1650.
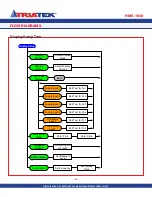
Calibrating the Sash Control Feature
The HMS-1650 features a comprehensive closed-loop control scheme
using both sash control and sidewall sensing. The sash control is
activated automatically anytime the sash moves, and immediately
positions the exhaust damper at the position calibrated to provide the
required face velocity at the sash opening. This provides an immediate
response to the moving sash to adjust the exhaust damper accordingly.
Once the sash stops moving, the PID control loop resumes using
the sidewall sensor to fine tune the face velocity to meet the target
setpoint.
Selecting the
Sash Control
option on the
Sash Setup
menu invokes the
sash width configuration screen, where the width of the sash opening
may be specified in inches. This width is used in conjunction with the
height of the sash opening to calculate the effective flow in cfm.
After entering the sash width, click the
Next
button to advance to the
first calibration screen where the sash should be moved to the closed
position. Wait for the face velocity to stabilize near the current setpoint,
and then click the
Next
button to advance to the next calibration
screen. Move the sash to the quarter open position, wait for the face
velocity to resume the target setpoint, and then click the
Next
button to
advance to the next calibration screen. Move the sash to the half open
position, wait for the face velocity to resume the target setpoint, and
then click the
Next
button to advance to the next calibration screen.
Move the sash to the three-quarter open position, wait for the face
velocity to resume the target setpoint, and then click the
Next
button to
advance to the next calibration screen. Move the sash to the full open
position, wait for the face velocity to resume the target setpoint, and
then click the
Next
button to invoke the calibration results screen.
Configuring Face Velocity Alarm Setpoints
The HMS-1650 features a comprehensive alarm facility that includes
both audible and visual capabilities. To begin configuring the alarm
setpoints for the face velocity, enter the
Main Setup Menu
by touching
the touchscreen display anywhere other than one of the hot-spot
locations. From the
Main Setup Menu
, select
Unit Setup
-->
Controller
Setup
-->
Next
-->
Alarm Limits
. Enter the
High Alarm
,
High Warning
,
Low Warning
, and
Low Alarm
setpoints for the current operating
mode (
Occupied
or
Unoccupied
) using the popup numeric keypad on
the touchscreen display. Alarm setpoints are unavailable for standby
mode. The default settings for the face velocity alarm setpoints are 150
fpm, 130 fpm, 90 fpm, and 75 fpm.
Changing Fume Hood Operating Mode
The HMS-1650 fume hood controller can be set for occupied,
unoccupied, and standby modes of operation. To change the mode
of operation, select
Unit Setup
-->
Hood Setup
-->
Operating Mode
and the user is prompted to select one of three modes. Changing the
mode of operation automatically selects the pre-programmed setpoints
and alarm limits associated with each mode. To quickly change the
operating mode from the main display without entering the user
menus, the
Hood Status
hotspot may be used to invoke the
Operating
Triatek reserves the right to change product specifications without notice.


