TRENDnet TWG-431BR User Manual Download Page 24


© Copyright 2019 TRENDnet. All Rights Reserved. 


16


TRENDnet User’s Guide


TWG-431BR 

Virtual LANs (VLANs) 

System> VLAN Setup 


Your router supports 802.1Q tagged VLANs as well inter-VLAN routing. VLANs can be 
assigned different IP address interfaces in which the router can route between VLAN IP 
subnets.  The router supports up to 7 802.1Q tagged VLANs.  

Note: 

The default VLAN must be assigned as Native to access the router management 

interface. 


Enable an 802.1Q tagged VLAN 

Your router supports 802.1Q VLAN tagging/trunking to other 802.1Q VLAN devices such 
as managed switches.  


1. Log into your router management page (see “

Access your router management page

” 

on page 7). 


2. Click on 

System 

and click 

VLAN Setup


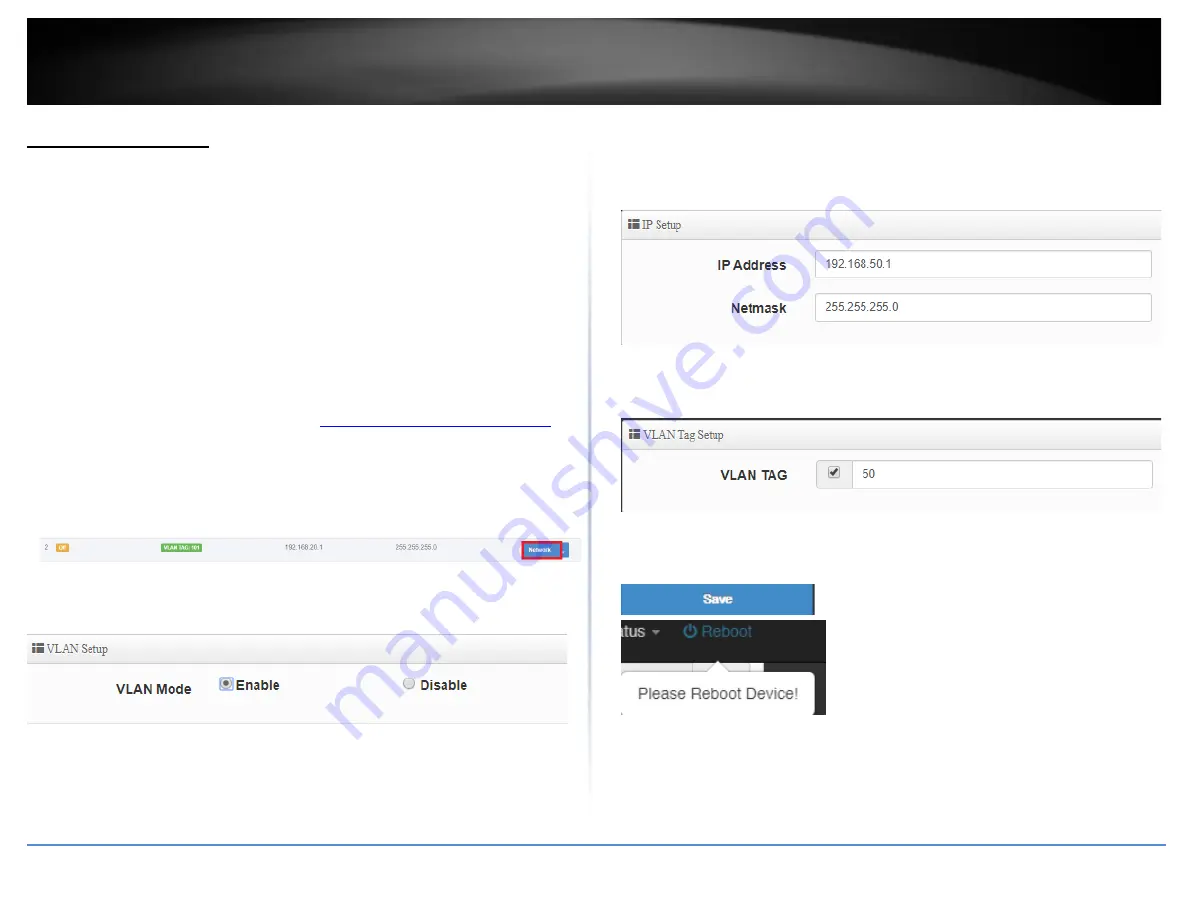
3. Under VLAN #2, click 

Network


4. For the VLAN Mode, select 

Enable. 


5. Under IP Setup, enter the 

IP Address 

and 

Subnet Mask 

for the new VLAN. 

Ex: We will enter the interface IP address as 192.168.50.1 and subnet mask 
255.255.255.0.  


6. Under VLAN Tag Setup, enter the VLAN tag/VID of the new VLAN. 

Ex: We will enter the tag/VID 50 for the new VLAN.  


7. Click 

Save 

at the bottom. Then click 

Reboot 

at the top right


to commit the changes. 


Note: 

If using multiple WAN mode, under Specify WAN Port, you can select which WAN 

to direct the outbound traffic for the VLAN. 


Summary of Contents for TWG-431BR

Page 1: ......

Page 2: ...th Control 23 Dynamic DNS 25 Wake on LAN WoL 26 USB Mode 27 Firewall security settings 28 Virtual server Port forwarding 28 IP filtering 29 MAC filtering 31 IM P2P application filtering 32 DMZ Host 34...

Page 3: ...configuration settings 69 Reboot your router 69 Scheduled automatic reboot 70 Console access 71 Router Default Settings 71 Reset your router to factory defaults 71 Upgrade your router firmware 72 SNMP...

Page 4: ...le router The VPN router features advanced management high availability QoS VLAN VPN and other capabilities to ensure optimal performance scalability and protection of your network Advanced SPI NAT an...

Page 5: ...Console port Rack Mount Design Sturdy metal housing with rack mount brackets included Online Firmware Updates Automatic notification of firmware updates Management Supports web browser HTTP HTTPS CLI...

Page 6: ...All Rights Reserved TRENDnet User s Guide TWG 431BR 3 Product Hardware Features Front Panel View Rear Panel View RJ 45 Console Port USB 3 0 Port Gigabit Ports 1 5 Reset Button LED Indicators Power Po...

Page 7: ...e Flow None USB 3 0 Port Allows for an optional USB storage device flash drive external HDD etc to be connected and used for configuration backup and export logging FAT32 NTFS format only Gigabit Port...

Page 8: ...Copyright 2019 TRENDnet All Rights Reserved TRENDnet User s Guide TWG 431BR 5 Applications...

Page 9: ...entilation Install the Router on a sturdy level surface that can support its weight or in an EIA standard size equipment rack For information on rack installation see the next section Rack Mounting Wh...

Page 10: ...o your modem 2 Connect a network cable from Port 1 Active LAN your router to your computer 3 Connect the includes power adapter from a power outlet to your router power port and push the Power On Off...

Page 11: ...ick Save at the bottom of the page Note After clicking Save the changes you made to the router will not take effect until you reboot the unit You can also make additional changes then save and reboot...

Page 12: ...ction column on the right 12 Under IP setup configure the router IP address settings match the requirements of your network 13 After you have configured the IP address settings you need to configure t...

Page 13: ...eboot at the top right corner and click the Reboot button 16 Click the System tab at the top then click WAN Setup 17 The WAN1 interface of the router is set to Dynamic IP also known as DHCP by default...

Page 14: ...Dnet All Rights Reserved TRENDnet User s Guide TWG 431BR 6 20 After you save your changes the device will prompt you to reboot in the top right corner 21 Click Reboot in the top right corner then clic...

Page 15: ...address http 192 168 10 1 Your router will prompt you for a user name and password 2 The default User Name and Password are below User Name admin Password admin Saving and applying router configuratio...

Page 16: ...ecommended to set the router date and time for scheduling functions and logging functions for monitoring and troubleshooting 1 Log into your router management page see Access your router management pa...

Page 17: ...gement page see Access your router management page on page 7 2 Click on Advanced and click Time Policy 3 Next to entry 1 click Edit next to the new schedule entry in the list Comment Enter a name for...

Page 18: ...agement page with the new IPv4 address settings In the router configuration page the LAN settings are set as VLAN1 settings Note When changing the LAN IPv4 address the DHCP server IP range does not ch...

Page 19: ...first IP address of the DHCP pool is 192 168 50 120 End IP Enter the ending value of DHCP IPv4 address range e g If your LAN IPv4 address is 192 168 50 1 entering 200 will define the last IP address...

Page 20: ...tings before automatically requesting a new lease IP address settings from the internal DHCP server DHCP Client List Displays a list of the current DHCP clients leases Clicking Fixed will add the clie...

Page 21: ...se and renew the IPv4 address settings in order to obtain the new IP address settings Comment Enter a description or name for the DHCP reservation e g trendnetpc IPv4 Address Enter the IPv4 address to...

Page 22: ...ault mode for the interfaces is 1 x LAN 4 x WAN In this mode NAT throughput performance will have a performance limitation of 200Mbps per WAN interface 1 Log into your router management page see Acces...

Page 23: ...ess transmission overhead and smaller routing tables Easier configuration of addressing Note In order to use IPv6 Internet connection settings it is required that your ISP provide you with the IPv6 se...

Page 24: ...her 802 1Q VLAN devices such as managed switches 1 Log into your router management page see Access your router management page on page 7 2 Click on System and click VLAN Setup 3 Under VLAN 2 click Net...

Page 25: ...ecting to the untagged VLAN ports PVID 50 on the managed web smart will obtain 192 168 50 x 255 255 255 0 address settings and use the VLAN 50 IP interface 192 168 50 1 as the Internet gateway and gat...

Page 26: ...Access your router management page on page 7 2 Click on Advanced click on IP Routing Rule Setup and next to the first entry click Edit 3 Review the Routing section Service Select Enable to enable the...

Page 27: ...ers on your network to access the other network If you have other routing devices that support dynamic routing protocol you can enable these routing protocols on your router to learn and automatically...

Page 28: ...is option configures that static route to an external IP network and specify the gateway IP address If choosing this option enter the Gateway IP address e g 192 168 10 2 o Interface This option config...

Page 29: ...n IP Routing Setup 3 Review the OSPF Routing section Service Check Enable to enable the OSPF routing protocol Router ID Click the drop down and select which interface IP to assign as the OSPF router I...

Page 30: ...is option configures that static route to an external IP network and specify the gateway IP address If choosing this option enter the Gateway IP address e g 192 168 10 2 o Interface This option config...

Page 31: ...locate to the VLAN in kilobits per sec It is important to set this value accurately Note This should not be the total bandwidth allocated by your ISP but a portion you would like to allocate only for...

Page 32: ...Copyright 2019 TRENDnet All Rights Reserved 24 TRENDnet User s Guide TWG 431BR 4 Click Save at the bottom Then click Reboot at the top right to commit the changes...

Page 33: ...WAN interface 1 Sign up for one of the DDNS available service providers list under Server Address e g no ip com dyndns org etc 2 Log into your router management page see Access your router management...

Page 34: ...ngs below Type Clicking the drop down list allows you to specify a schedule when to send to a WoL message to wake up your WoL device Daily Weekly Monthly MAC Address Enter the MAC address of the WoL d...

Page 35: ...Log to CSV Sets the USB mode to export logging to csv file 4 Click Save at the bottom Then click Reboot at the top right to commit the changes 5 To initiate the function connect the USB storage devic...

Page 36: ...UDP Interface Click the drop down list to select the external WAN interface s to allow ALL WAN WAN1 2 3 4 WAN For example choosing WAN1 will only allow the port forward to work on inbound connection...

Page 37: ...tering rule Policy Specifies whether the IP filter rule will allow or deny the traffic Deny or Pass Protocol Click the drop down list to select the protocol for the service to filter All TCP UDP or IC...

Page 38: ...IP Group Click the drop down the select an IP address or IP address range group You can create predefined IP address groups under Advanced IP Group Destination Port Enter the destination port for the...

Page 39: ...Access your router management page on page 7 2 Click on Advanced and click on Access Control 3 Review the settings below Active Select Enable to enable the access control rule Comment Enter the name o...

Page 40: ...otocol Click the drop down list to select the protocol for the service to filter ANY TCP UDP ICMP Content Filter Domain Filter IP P2P or IM Select IP P2P or IM to select from a list of predefined appl...

Page 41: ...Copyright 2019 TRENDnet All Rights Reserved 33 TRENDnet User s Guide TWG 431BR 4 Click Save at the bottom Then click Reboot at the top right to commit the changes...

Page 42: ...thod and will open your local area network to greater threats from Internet attacks It is recommended to use port forwarding instead to limit rules to specific ports services only If using multi WAN m...

Page 43: ...ts 2 5 1 LAN Port 1 or multi WAN mode Note Please note that performance throughput is limited of up to 200Mbps per WAN connection in multi WAN mode o 1 WAN 4 LAN Port 1 WAN Ports 1 4 LAN Ports 2 5 Not...

Page 44: ...outer will attempt to keep all future sessions originating from that device source IP on the same WAN interface Source Destination IP based In this mode if a device sends traffic through the router to...

Page 45: ...IP address IP Address to Ping Enter an Internet IP address to send ping requests used to verify the Internet link status Ping Interval Click the drop down list to set the time interval between consecu...

Page 46: ...p your router with Router Limits Advanced Router Limits 1 Log into your router management page see Access your router management page on page 7 2 Click on Advanced and click on Router Limits 3 Click t...

Page 47: ...ur router management page If the pairing code does not match you can click Auto Detect to automatically copy the router pairing code into the field or you can manually enter the correct pairing code A...

Page 48: ...splays the groups and devices assigned to each group Content filters and scheduling can be assigned for each group By default new devices are assigned to the Guest group New groups can be created and...

Page 49: ...s to block access Exceptions This setting allows you to configure exceptions and allow access Options o Safe Search Enables this setting enforces the use safe search to be enabled for Google and Bing...

Page 50: ...This page will display provide support on information on the Router Limits web management system and allow you to submit support tickets if needed You can access and manage your Router Limits account...

Page 51: ...ternet Protocol Security VPN This type of VPN can be used for either Site to Site VPN or Client Server VPN however the most common application for this type is a Site to Site VPN This type of VPN can...

Page 52: ...your PPTP VPN clients are able to access the Internet and the router LAN network via full tunneling If the LAN IP address is entered PPTP VPN clients will be allowed to access router LAN and not the I...

Page 53: ...Copyright 2019 TRENDnet All Rights Reserved 45 TRENDnet User s Guide TWG 431BR 10 Click Save at the bottom Then click Reboot at the top right to commit the changes...

Page 54: ...Start button and click the Settings icon Start Button Settings icon 2 Click Network Internet 3 Click VPN in the left panel 4 Under VPN click Add a VPN connection 5 Click the VPN provider drop down li...

Page 55: ...rongly recommended to enable L2TP VPN server with IPsec instead of L2TP VPN only due to the higher degree of security offered and supported on most modern computers and mobile devices Setting up the L...

Page 56: ...6 Click Save at the bottom 7 Click on System click on PPTP L2TP Account Setup and click Create Account 8 Under Account Setup enter the User Name and Password for the L2TP account e g User1 9 Under Ro...

Page 57: ...are able to access the Internet and the router LAN network via full tunneling If the LAN IP address is entered L2TP VPN clients will be allowed to access router LAN and not the Internet 5 In the Remot...

Page 58: ...lick Reboot at the top right to commit the changes Setting up the L2TP VPN client Windows with IPsec encryption PSK Note This procedure provides a basic example how to setup L2TP with IPsec VPN and es...

Page 59: ...r Status Overview under Network in the IPv4 status section 8 Click the VPN type drop down list and select L2TP IPsec with pre shared key 9 Enter the IPsec pre shared key PSK 10 Click the Type of sign...

Page 60: ...Example VPN Router A WAN1 Internet IP Address 10 10 10 10 VPN Router B WAN1 Internet IP Address 10 10 10 20 Make sure the LAN IP network on each VPN router is a different IP subnet Note Changing the L...

Page 61: ...mote ID Type select IP Address 9 In the Remote Subnets field enter the remote LAN IP subnet e g 192 168 100 0 24 You can add additional local subnets if needed e g 192 168 100 0 24 192 168 120 0 24 10...

Page 62: ...TWG 431BR 13 For the IKE Policy IKE Mode Main IKE Authentication SHA1 and DH Group DH2 14 For the IPsec Policy ESP Authentication SHA1 and Perfect Forward Secrecy Enable DH Group DH2 15 Click Save at...

Page 63: ...ype select IP Address 7 In the Local Subnets field enter the local LAN IP subnet e g 192 168 100 0 24 You can add additional local subnets if needed e g 192 168 10 0 24 192 168 120 0 24 8 For the Remo...

Page 64: ...gs will be the following 12 For the DPD setting select Enable 13 For the IKE Policy IKE Mode Main IKE Authentication SHA1 and DH Group DH2 14 For the IPsec Policy ESP Authentication SHA1 and Perfect F...

Page 65: ...6 For the Local ID Type select IP Address 7 In the Local Subnets field enter the local LAN IP subnet e g 192 168 100 0 24 You can add additional local subnets if needed e g 192 168 10 0 24 192 168 120...

Page 66: ...Then click Reboot at the top right to commit the changes 7 Next to Client configuration files click Export to download the configuration files for the VPN client computer Note Please do not change th...

Page 67: ...sion for your operating system from the following URL https openvpn net index php open source downloads html Note Please note there is also a link in the description in the router management page unde...

Page 68: ...60 TRENDnet User s Guide TWG 431BR 7 At the choose components window click Next 8 At the install location window click Install 9 At the prompt to install the TAP Windows adapter click Install 10 At t...

Page 69: ...rom the router to the following path without any sub folders C Program Files OpenVPN config 13 Double click on the OpenVPN GUI shortcut on your desktop to start the OpenVPN Client software 14 The Open...

Page 70: ...cessful you will receive the notification below in the bottom right corner You will be able to access resources securely from your router LAN network over the Internet such as shared folders media fil...

Page 71: ...ave different WAN IP Internet connections possibly to the same ISP or different ISPs the example below will explain how to configure LAN side High Availability Important Note Configure the routers for...

Page 72: ...he state of the high availability setup is set to Master by default 8 In the Virtual IP Setup list under VLAN1 click on Edit 9 For the Service select Enable 10 Under Virtual IP Settings for the Virtua...

Page 73: ...d click on VLAN Setup 4 Under VLAN1 in the list click on Network 5 Change the IP Address to 192 168 10 2 and click Save at the bottom of the page 6 Click on System and click on High Availability 7 For...

Page 74: ...an 8 character password in the Password field 11 Click Save at the bottom Then click Reboot at the top right to commit the changes 12 Connect the routers to the network and verify the high availabili...

Page 75: ...to the router management page on the selected local interfaces The default HTTPS management port can be modified Please note that modifying the port will affect HTTPS access from all allowed interface...

Page 76: ...click on Network Utility 3 Review the settings below Network Utilities Ping Utility This tool conducts a basic ping connectivity test to a host IP address or domain name o IP Domain Enter the destinat...

Page 77: ...management page see Access your router management page on page 7 2 Click on Maintenance then click on Profile Setting 3 Next to Load Settings From PC click Choose File or Browse 4 A separate file navi...

Page 78: ...age on page 7 2 Click on System and click on Management 3 Click the Automatic reboot by schedule drop down list and select the schedule used for the automatic device reboot function Click Apply to sav...

Page 79: ...8 10 101 192 168 199 Default WAN Mode 4 WAN Ports 2 5 1 LAN Port 1 Reset your router to factory defaults Maintenance Profile Setting You may want to reset your router to factory defaults if you are en...

Page 80: ...e firmware using a laptop computer ensure that the laptop is connected to a power source or ensure that the battery is fully charged Disable sleep mode on your computer as this may interrupt the firmw...

Page 81: ...agement and SNMP trap receivers You can configure the SNMP management settings following the steps below 1 Log into your router management page see Access your router management page on page 7 2 Click...

Page 82: ...ays the current operation mode of the router System Name Displays the current system name to the device This can be modified under System Management System Time Displays the current router time System...

Page 83: ...page see Access your router management page on page 7 2 Click on Status and click on Local System Log Note You can click Refresh to refresh the current logging display or clear to completely delete al...

Page 84: ...ter management page see Access your router management page on page 7 2 Click on System and click on SMTP 3 Review the settings below Note You can configure the external SMTP server to use to send out...

Page 85: ...Key Exchange IKE Main Mode Aggressive Mode Pre shared Key DH Groups 1 2 5 14 IPsec Protocols ESP PFS DH Groups 1 2 5 14 DPD Local Remote ID IP Address FQDN IPsec NAT Traversal SSL VPN Encryption AES...

Page 86: ...o 4 receivers Scheduled automatic reboot Scheduled Wake on LAN WoL Internal logging or send logging to external syslog server Manual or online firmware upgrade and notification Backup and restore conf...

Page 87: ...TCP IPv4 and then click Properties d Then click Obtain an IP address automatically and click OK Windows XP 2000 a Go into the Control Panel double click the Network Connections icon b Right click the...

Page 88: ...s and your IP address settings displayed Note If you are experiencing difficulties please contact your computer or operating system manufacturer for assistance How to configure your network settings t...

Page 89: ...our operating system on configuring your network settings can be used as general guidelines however it is strongly recommended that you consult your computer or operating system manufacturer directly...

Page 90: ...t expressly approved by the party responsible for compliance could void the user s authority to operate this equipment This device complies with Part 15 of the FCC Rules Operation is subject to the fo...

Page 91: ...the defective product or there is no comparable model available we will refund the depreciated value of the product If a product does not operate as warranted during the applicable warranty period TRE...

Page 92: ...GLECT IMPROPER INSTALLATION OR TESTING UNAUTHORIZED ATTEMPTS TO REPAIR OR MODIFY OR ANY OTHER CAUSE BEYOND THE RANGE OF THE INTENDED USE OR BY ACCIDENT FIRE LIGHTNING OR OTHER HAZARD LIMITATION OF LIA...

Page 93: ......

Reviews: