


© Copyright 2014 TRENDnet. All Rights Reserved.
TRENDnet User’s Guide
TEW-721BRM
37
Note:
Please refer to the device documentation to determine which ports and
protocols are required.
Protocol Type:
Select the protol to assign the rule.
Public IP:
Enter the public IP that will have access to your device (you can enter
0.0.0.0 or * for all IP)
Private IP:
Enter the IP address of the device to forward the port. (e.g.
192.168.10.101)
.
Note:
You should assign a static IP address to the device or use DHCP reservation to
ensure the IP address of the device does not change.
Schedule -
Click the drop-down list assign a pre-defined schedule when the virtual
server is activated or inactive.
Note
: To define a schedule, see the “Create schedules” section.
4. To save changes, click
Apply
.
Example: To forward TCP port 80 to your IP camera
1. Make sure to configure your network/IP camera to use a static IP address or you can
use the DHCP reservation feature (see “Set up DHCP reservation” on page 53).
Note:
You may need to reference your camera documentation on configuring a static
IP address.
1. Log into your router management page (see “Access your router management page”
on
3. Click on
Advanced
, click on
NAT
, and click on
Virtual Server
.
4. In the predefine pull down list, select the entry named
WEB (80)
. In the
ID
drop-
down list. Click << button.
6. Under
Private IP
, enter the IP address assigned to the camera. (e.g.
192.168.10.101
)
7. Click
Apply
to save changes.
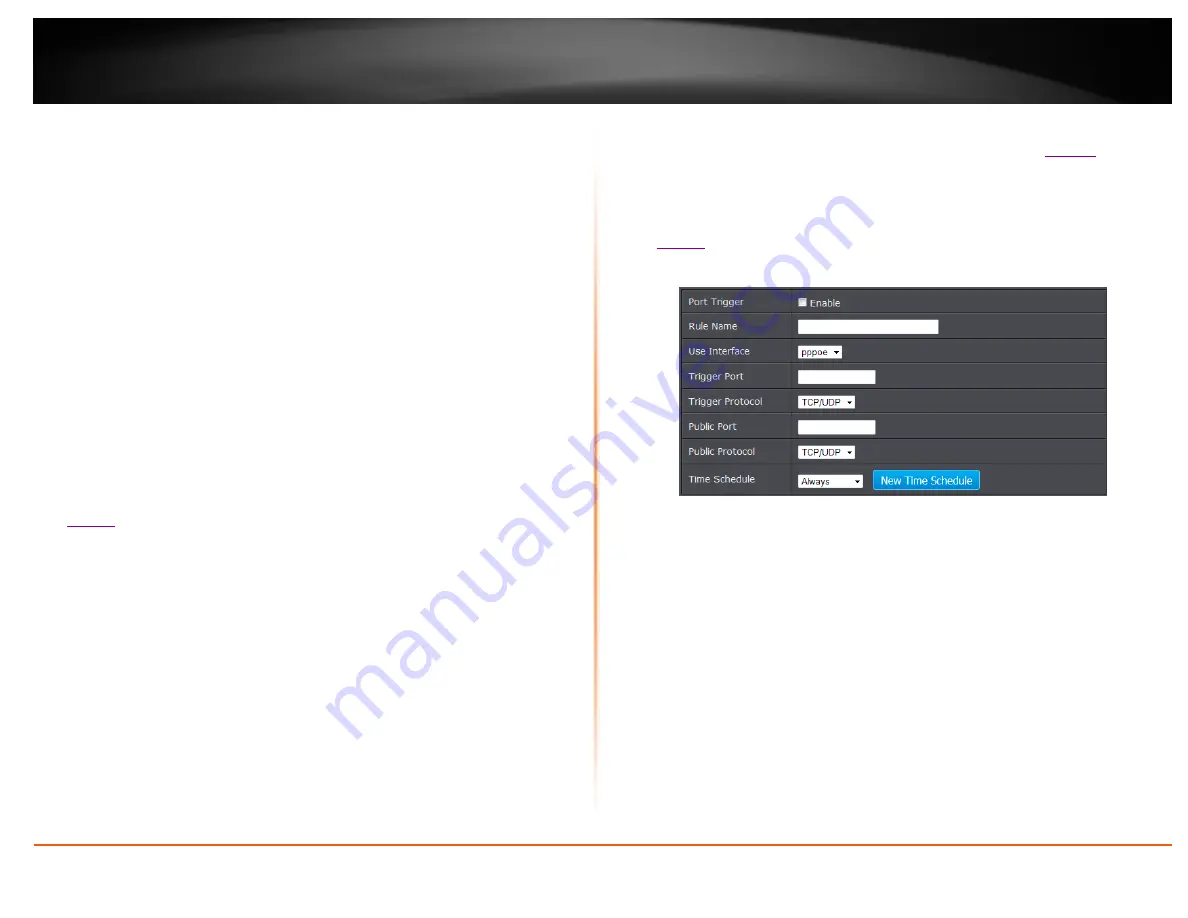
Port Trigger
Advanced > NAT > Port Trigger
Special applications (also called port triggering) is typically used for online gaming
applications or communication applications that require a range of ports or several
ports to be dynamically opened on request to a device on your network. The router will
wait for a request on a specific port or range of ports (or trigger port/port range) from a
device on your network and once a request is detected by your router, the router will
forward a single port or multiple ports (or incoming port/port range) to the device on
your network. This feature is not typically used as most devices and routers currently
use UPnP (Universal Plug and Play) to automatically configure your router to allow
access for applications. See “Enable/disable UPnP on your router” on
Note:
Please refer to the device documentation to determine if your device supports
UPnP first, before configuring this feature.
1. Log into your router management page (see “Access your router management page”
2. Click on
Advanced
, click on
NAT
, and click on
Port Trigger
option and click
Add.
3. Review the port trigger settings and click
Apply
to save setting.
Port Trigger:
Select to enable option.
Rule Name:
Enter the name to assign rule.
Trigger:
Port or port range requested by the device.(e.g.
2000-2001 or 2000)
Note:
Please refer to the device documentation to determine which ports are
required.
Use Interface:
Select the interface to apply rule
Trigger
Ports:
Port(s) forwarded to the device. (e.g.
2000-2038,2069,2081,2200-
2210)
Trigger Protocol:
Select protocol to apply on rule
Public Port:
Enter the public port to assign on the rule
Public Protocol:
Select the public protocol to apply on rule.
Time Schedule:
Select the time schedule to activate rule. Select
Always
to have
rule always activated or click
New Time Schedule
to create a new time schedule.
Note:
Please refer to the device documentation to determine which ports are required.
Summary of Contents for TEW-721BRM
Page 1: ...TRENDnet User s Guide Cover Page...
Page 64: ......