background image

Routine Operation

RMWH-SVX001C-EN

39 

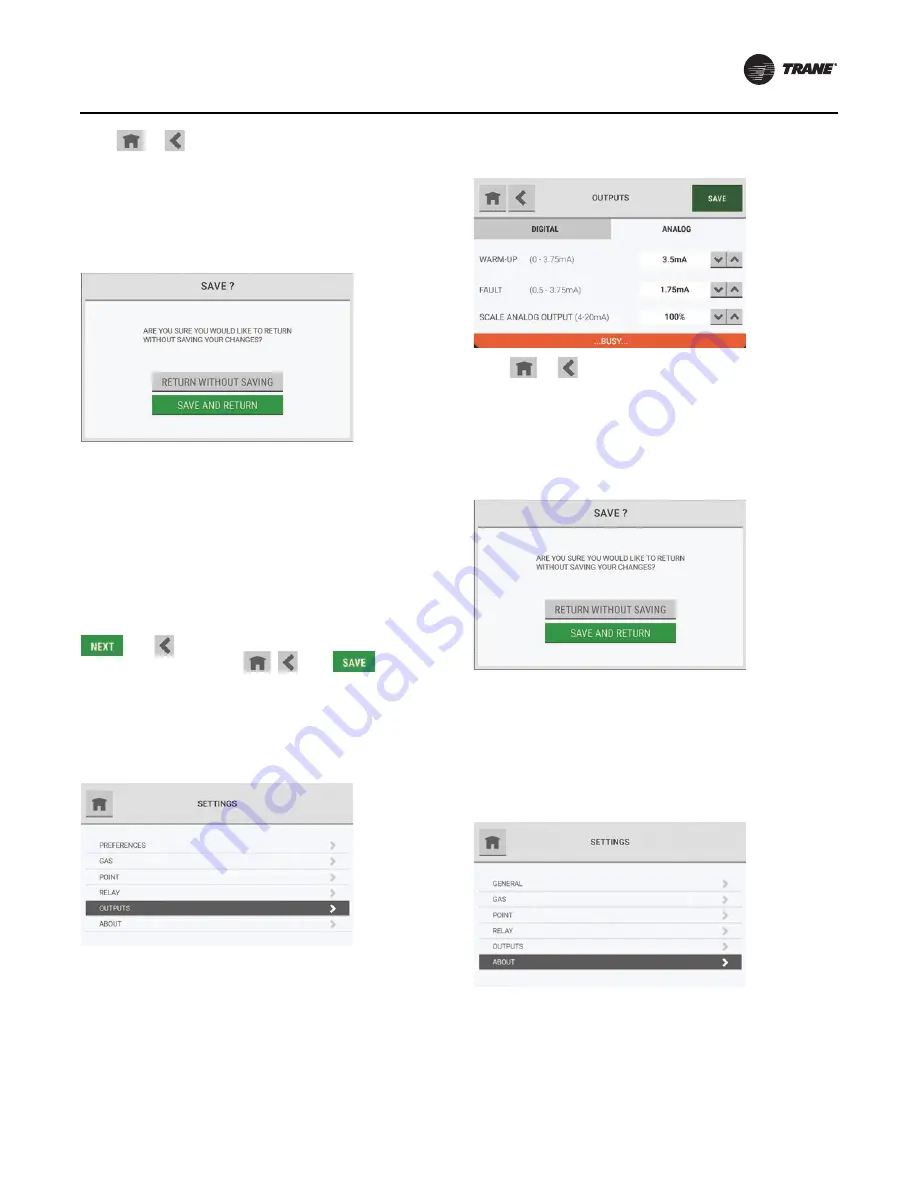
If the 

 or 

 button is selected while the 

Busy


message shows, a pop-up asks whether to abandon the 
configuration changes.

To return to the 

Configure Relays

 screen without 

saving the changes, select 

Return without Saving

.

To save the changes and return to the 

Configure 

Relay

 screen, select 

Save and Return

.

When the configuration changes have been saved, the 

Settings

 screen shows.

Communications Output

Use the 

Outputs

 option to change the configuration 

settings for digital and analog outputs.

Except for the buttons that show in the screen headers, the 
screens and steps used to change the output settings are 
the same as those used during the initial setup.

During the initial setup, the screen headers show the 

 and 

 buttons. During routine operation, the 

screen headers show the 

, and 

 buttons.

When a change is made to the configuration, the 

Save


button becomes active.

On the 

Settings

 screen, select 

Outputs

.

To adjust the output configuration settings, go to 

“Communications Output,” p. 22

, and do 

Step 1

 to 

Step 3

.

While the configuration is being updated, a 

Busy

 message 

shows at the bottom of the 

Outputs

 screen.

If the 

 or 

 button is selected while the 

Busy


message shows, a pop-up asks whether to abandon the 
configuration changes.

To return to the 

Outputs

 screen without saving the 

changes, select 

Return without Saving

.

To save the changes and return to the 

Outputs

 screen, 

select 

Save and Return

.

When the configuration changes have been saved, the 

Settings

 screen shows.

About

The 

About

 option shows information about the device 

and its component parts.

On the 

Settings

 screen, select 

About

.

Summary of Contents for TruSense RMWH

Page 1: ...on starting up and servicing of heating ventilating and air conditioning equipment can be hazardous and requires specific knowledge and training Improperly installed adjusted or altered equipment by an unqualified person could result in death or serious injury When working on the equipment observe all precautions in the literature and on the tags stickers and labels that are attached to the equipm...

Page 2: ...ment that is used in these service procedures In addition some states or municipalities may have additional requirements that must also be adhered to for responsible management of refrigerants Know the applicable laws and follow them WARNING Proper Field Wiring and Grounding Required Failure to follow code could result in death or serious injury All field wiring MUST be performed by qualified pers...

Page 3: ...upersede these policies Non Trane personnel should always follow local regulations Introduction RMWH SVX001C EN 3 Copyright This document and the information in it are the property of Trane and may not be used or reproduced in whole or in part without written permission Trane reserves the right to revise this publication at any time and to make changes to its content without obligation to notify a...

Page 4: ...ion 19 Relay Configuration 21 Communications Output 22 Calibration 24 Initial Setup 25 Routine Operation 25 Starting Calibration 25 Stopping Calibration 26 Zero Gas Calibration 26 Span Gas Calibration 27 Unsuccessful Calibrations 29 Routine Operation 30 Dashboard Overview 30 Point Details 30 Point Hold 30 Automatic Point Hold 30 Manual Point Hold 30 Predictive Warnings 31 Cautions Warnings and Ala...

Page 5: ...pment 55 Strobe 55 External Horn 55 External Alarm Activation Station 56 External Alarm Silencing Station 56 Appendix C Default Settings 57 Alarm Setpoints 57 Relays 57 Output 57 Appendix D MODBUS Holding Registers 58 TruSense RMWH Refrigerant Monitor MOD BUS RTU Holding Registers 58 RESET Button Actions 60 Unit Status Flags 60 Channel Status Flags 61 Gas Types 61 Appendix E BACnet Objects 62 TruS...

Page 6: ...evice Make sure the sample inlet lines to the device are clean and noncondensing Avoid any installation where condensation can collect Condensation can clog or block sample lines which will prevent the device from receiving new or fresh gas samples in the area being monitored Install and maintain end of line filters in all sample inlet lines Refer to End of Line Filters p 13 The only absolute meth...

Page 7: ...lity to adjust the gas of interest in the field The device offers three levels of alarm caution warning and alarm that are all configurable through the intuitive touchscreen display Fault and service notifications provide alerts when servicing is necessary Audible and visual indications such as horns and strobes provide alerts about refrigerant leaks Digital communications can be transmitted using...

Page 8: ...onal 3 Relay wiring cutout 4 Approval and unit identification label Figure 4 Left side of device 1 Latches lockable with padlock 2 Signal wiring cutouts Figure 5 Bottom of device 1 Sample line identification labels 2 Internal alarm sounder 3 Calibration port 4 IP rated vent 5 Exhaust port do not block 1 2 3 4 1 1 2 3 4 5 1 2 ...

Page 9: ...er clockwise or counterclockwise Optional External Horn An optional external horn can be mounted in a location away from the device to provide an audible indicator of a gas leak For a list of approved parts and how to order them refer to Ordering Information p 52 For installation instructions refer to Appendix B Installation of Optional Equipment p 55 Optional External Alarm Activation and Silenci...

Page 10: ...ault of 100 percent full scale setting 0 016 mA 1 ppm refer to the following table Table 1 Scale analog output 4 20 mA Output mA Gas Concentration ppm 4 0 5 63 6 125 7 188 8 250 9 313 10 375 11 438 12 500 13 563 14 625 15 688 16 750 17 813 18 875 19 937 20 1000 Table 2 Analog output settings Warm up Default 3 5 mA User adjustable between 0 and 3 75 mA Calibration non configurable 3 0 mA Fault Defa...

Page 11: ... Trane of any shortages immediately 5 Keep the original packaging in case it is necessary to return the device for service 6 Release the two latches on the left side of the device 7 Open the enclosure 8 Carefully inspect the internal components and assemblies for damage or shortages If damage has occurred file the appropriate claim with the shipping carrier immediately 9 Before installation and us...

Page 12: ...on monitoring Due to installation and application variations each system must be analyzed individually Do a smoke test of the mechanical room to determine the flow pattern and allow for optimal placement of the sample lines For a list of approved parts and how to order them refer to Ordering Information p 52 Keep the total line length of a point including the sample line and exhaust line at less t...

Page 13: ...ing to the device clean all tubing with compressed air or nitrogen to remove debris The device has Swagelok compression fittings for connections to the sample and exhaust lines These fittings accept the hard and soft tubing specified in Tubing Material p 12 Do the following procedure to connect the sample and exhaust lines 1 Remove the cap from the compression fitting 2 Insert the tubing fully int...

Page 14: ...ip on the right side of the TruSense RMWH Refrigerant Monitor device and the grounding point protective earth The wire length cannot be longer than 6 ft 2 m The TruSense RMWH Refrigerant Monitor Wiring Diagram Figure 11 gives the details of the wiring requirements for the device Figure 11 TruSense RMWH refrigerant monitor wiring diagram ...

Page 15: ...isconnect electrical power 2 Install a circuit breaker for the incoming power connections of the device a Put the circuit breaker in a location that is near the device and easy to access b Clearly mark the circuit breaker as the disconnecting unit for the device 3 If applicable remove the locking mechanism 4 Release the two latches on the left side of the device 5 Open the enclosure 6 Attach the E...

Page 16: ...ializing process If an error occurs during start up a pop up identifies the specific problem Language Date Time Password 1 On the Initial Setup screen select Language Date Time Password 2 On the Language Setup screen select the appropriate language then select Next When a language is selected the change is instantaneous 3 On the Date Time Setup screen select the Date tab The date format can be MM ...

Page 17: ...r editable screens If password protection is disabled the Create Password and Verify Password fields are inactive Note If password protection is enabled do the following a Select the Create Password field and use the alphanumeric keypad pop up to enter a value Select to accept the value b Select the Verify Password field and use the alphanumeric keypad pop up to enter a value Select to accept the ...

Page 18: ...t the Name field and use the alphanumeric keypad pop up to assign a name with up to 18 characters Select to accept the value The entire 18 characters will only show on the Point Detail screen Only 10 characters will show on the Point Configuration screen 5 Select Save 6 Repeat Step 1 through Step 5 until all of the necessary points have been configured 7 On the Point Configuration screen select Ne...

Page 19: ...ns warnings and alarms the default setpoint settings will be used for the selected gas 3 Select the Setpoints tab 4 Select the Edit button for Caution Warning or Alarm as applicable Note If the Setpoints tab is selected but a gas has not been selected the options on the Configure Gas screen will be inactive The options for the configuration settings for cautions warnings and alarms are identical 5...

Page 20: ... on the Configure Gas screen will be inactive Only one gas can be assigned to a single point Points that have already been assigned a gas are not available for selection 13 Select Save 14 Repeat Step 1 through Step 13 for each gas to be configured Note The Reset tab is not used during the initial setup For information about the Reset tab refer to Gas Configuration p 36 15 When all applicable gases...

Page 21: ...d and use the alphanumeric keyboard pop up to enter a value Relay names can have eight characters The title in the pop up header changes to show the assigned name 3 Select Energized or De energized for the relay state 4 Do the following to test the relay a Select ON b Make sure the equipment connected to the relay operates as expected c Select OFF 5 Select Save The updated settings for the relays ...

Page 22: ... the alphanumeric keypad pop up to enter a value Select to accept the value c Select a baud rate for the connection d Select the RS485 Termination check box e Select Done 4 If BACnet is selected do the following a Select Edit b Select the MAC Address field and use the alphanumeric keypad pop up to enter a value Select to accept the value c Select the Instance Number field and use the alphanumeric ...

Page 23: ...nitial Setup RMWH SVX001C EN 23 8 The Initial Setup screen shows that all initial setup steps are complete Select Finished to confirm the configuration settings and move to the Initial Calibration screen ...

Page 24: ...es that gas measurements are as accurate as possible Although the TruSense RMWH Refrigerant Monitor sensor is factory calibrated it is recommended that calibration be performed at initial startup and at regular intervals to ensure that the sensor is fully functional and improve the accuracy of the device There are two types of calibration zero gas calibration and span gas calibration Zero gas cali...

Page 25: ...ton until the initial calibration is completed Select Calibrate to re open the Initial Calibration screen and select Calibrate Now Routine Operation WARNING Risk of Asphyxiation Failure to follow instructions below could cause inaccurate readings and improper gas monitoring which could result in death or serious injury Make sure to remove the cap from the exhaust port before operating the device S...

Page 26: ...er tubing from the calibration port then select Next on the device touchscreen 3 On the Canceled screen select Done 4 On the bottom of the device install the pin in the calibration port Zero Gas Calibration 1 Connect the zero gas scrubber tubingto the calibration port 2 On the device touchscreen select Next A progress bar shows during the zero gas calibration 3 When zero gas calibration is complet...

Page 27: ...alibration 1 Close the cylinder valve 2 If applicable remove the zero gas cylinder or zero gas scrubber tubing from the calibration port 3 On the Span Gas Calibration screen select the applicable span gas Note A maximum of seven gases show on the Select Gas screen six user selected gases and one universal gas Synthetic R 134A 4 On the gas cylinder label find the concentration for the gas 5 On the ...

Page 28: ...her gas select Select Another Gas Repeat Step 3 through Step 11 b To return to the Results screen select Back c To go to the next step select Continue 13 Close the span gas cylinder valve 14 On the Set Reminder screen select the applicable button for the calibration interval At the selected interval a pop up will signal the need for calibration 15 Select Next 16 On the bottom of the device install...

Page 29: ...alibration select Repeat Calibration ii To return to the previous calibration values select Close b For span gas calibrations i To do a span gas calibration for another gas select Select Another Gas ii To retry the span gas calibration select Repeat Calibration iii To return to the previous calibration values select Close If Close is selected on the dashboard a gray check mark indentifies the poin...

Page 30: ...lose the detail pop up and return to the dashboard select the X at the top right corner To hold and lock onto a point for an extended period manually in the point detail pop up select Hold Point Hold Automatic Point Hold During routine operation when any sample point detects gas that results in a caution warning alarm C W A the device automatically holds that sample point for an additional four ga...

Page 31: ...oting or replace a part not that there is a critical issue with the flow rate sensor or pump To acknowledge the predictive warning and return to the dashboard select Acknowledge Acknowledging the predictive warning triggers a notification that shows on the Diagnostics button on the dashboard A corresponding notification also shows on the Diagnostics screen For information about diagnostics refer t...

Page 32: ... a detail pop up While the gas reading is above the event threshold the Reset button on the detail pop up is hidden and the event cannot be resolved When the gas reading goes below the event threshold the Reset button is active Select Reset to resolve the event and return to the dashboard The point tile on the dashboard shows in its normal state and the event is considered resolved A corresponding...

Page 33: ... the device no longer monitors for gas It is critical that the fault be repaired as quickly as possible in order to re establish gas monitoring A critical fault causes the following to occur The fault relay trips The device cannot monitor for gas The 4 20 mA output decreases to the user specified fault level All modules except the main board and display shut down All point tiles show on the dashbo...

Page 34: ...how in chronological order When there are 100 events in the list and a new event occurs the oldest event is deleted to make space for the new event to show Use the scroll bar to move through the list of events Select any event on the Alarms tab to see a pop up with event details Faults The Faults tab shows a list of all fault events for the device The last 100 events show in chronological order Wh...

Page 35: ...tion to change the settings for the language date and time password and brightness of the device display On the Settings screen select Preferences The Preferences screen shows the current values for the settings Select the Edit button for the setting to change Language Date and Time and Password Note If the date setting is changed after the initial set up configuration the predictive maintenance l...

Page 36: ...figured gas go to Step 1 in Reset Tab p 36 While the configuration is being updated a Busy message shows at the bottom of the Configure Gas screen If the or button is selected while the Busy message shows a pop up asks whether to abandon the configuration changes To return to the Gas screen without saving the configuration changes select Return without Saving To save the configuration changes and ...

Page 37: ...Reset Tab p 38 Note When a change is made to the configuration the Save button becomes active 4 To change the point state select Enable or Disable If Disable is selected the Create Point Name field is inactive 5 To change the point name select the name field and use the alphanumeric keypad pop up to assign a name with up to 18 characters Select to accept the value The entire 18 characters will onl...

Page 38: ...Select Cancel to return to the Point Configuration Point screen When the configuration changes have been saved the Settings screen shows Relay Configuration Use the Relay option to change the relay configuration settings or test a relay Note Except for the buttons that show in the screen headers the screens and steps used to change the relay configuration settings are the same as those used during...

Page 39: ...itial setup the screen headers show the and buttons During routine operation the screen headers show the and buttons When a change is made to the configuration the Save button becomes active On the Settings screen select Outputs To adjust the output configuration settings go to Communications Output p 22 and do Step 1 to Step 3 While the configuration is being updated a Busy message shows at the b...

Page 40: ...Routine Operation 40 RMWH SVX001C EN Use the scroll bar to see all of the available information ...

Page 41: ... four points If more than four points are enabled additional tabs show the points in groups of four The flow rate for each point shows below the point name A directional arrow indicates the trending behavior of the flow rate for a point The arrow is green only when the trend is static The arrow is gray in other situations becausea positiveornegative trendindicatesa change in the system To see a de...

Page 42: ... 6 month interval The graph is divided into quadrants Each quadrant indicates a particular sensor status The top left quadrant is associated with normal performance To see details about sensor performance select the text box The bottom left and top right quadrants show predictive warnings in yellow When the highlighted section shows below the trend line it identifies the Poor threshold To see deta...

Page 43: ...tion or Cancel to cancel it Pump Performance 1 On the dashboard select the Diagnostics button 2 On the Diagnostics screen select Pump Performance The Pump Performance screen shows a graph that plots pump performance over time To see details about pump performance select the text box To reset the pump performance baseline select Reset In the Warning pop up select Reset to continue the reset functio...

Page 44: ...ondition but that may impact the general performance of the device A notification of the event shows on the Diagnostics screen For information about diagnostics refer to Diagnostics p 41 A notification shows on the Diagnostics button on the dashboard until the error is resolved 1 On the dashboard select the Diagnostics button 2 On the Diagnostics screen select Diagnostic Log A list shows the devic...

Page 45: ...Diagnostics RMWH SVX001C EN 45 To see details about an error select it ...

Page 46: ...o ensure the power can not be inadvertently energized When necessary to work with live electrical components have a qualified licensed electrician or other individual who has been trained in handling live electrical components perform these tasks WARNING Risk of Asphyxiation Failure to follow instructions below could cause inaccurate readings and improper gas monitoring which could result in death...

Page 47: ...fy that no power is present with a voltmeter To prevent electrical shock the circuit board cover must be in place when power is on 1 Disconnect electrical power to the device 2 If applicable remove the locking mechanism 3 Release the two latches on the left side of the device 4 Open the enclosure 5 Attach the ESD wrist strap to the ESD connection point inside the enclosure 6 Twist the Luer locks o...

Page 48: ... no power is present with a voltmeter To prevent electrical shock the circuit board cover must be in place when power is on 1 Disconnect electrical power to the device 2 If applicable remove the locking mechanism 3 Release the two latches on the left side of the device 4 Open the enclosure 5 Attach the ESD wrist strap to the ESD connection point inside the enclosure 6 Turn the top of the fuse hold...

Page 49: ... device Use a soft lint free cloth The cloth can be dry or lightly dampened with a mild detergent The detergent must have neutral pH Do not use acidic or alkaline cleaners or organic chemicals such as paint thinner acetone toluene xylene propyl or isopropyl alcohol or kerosene Enclosure Use a soft lint free cloth The cloth can be dry or lightly dampened with a mild detergent ...

Page 50: ...A R407C R407F R410A R422A R422D R427A R507 R1233zd E R1234yf R1234ze R 513A R 514A Measuring Range 0 1000 ppm Sensitivity minimum detection 1 ppm for all listed gases Accuracy linearity 0 50 ppm 1 ppm 51 1000 ppm 10 of reading Sensor Response Time 90 of gas reading 70 sec Relays 5 Form C 8A 250 Vac resistive SPDT Audible Alarm 95 5 dB A at 24 in 61 cm maximum Communication Outputs 4 20 mA sourcing...

Page 51: ...place them if necessary Strobe will not signal during an alarm event 1 Check the user settings for strobe activation Refer to Gas Configuration p 36 2 Make sure the strobe wires are connected to the strobe connector 3 Contact Trane Customer Service Internal buzzer will not signal during an alarm event 1 Check the user settings for buzzer horn activation Refer to Gas Configuration p 36 2 Make sure ...

Page 52: ...n to breathe causing possible asphyxiation or other serious health risks Some gases may be flammable and or explosive Failure to follow instructions below could result in death or serious injury Use only genuine Trane replacement parts when performing any maintenance procedures provided in this manual Do not repair or alter the device beyond the scope of these maintenance instructions Repairs shou...

Page 53: ...OL00175 CHARGED CANISTER COMPRESSED DRY NITROGEN TOL00171 CHARGED CANISTER CFC 11 30 PPM TOL00173 CHARGED CANISTER HCFC 123 30 PPM TOL00416 CHARGED CANISTER HCFC 123 50 PPM TOL02848 CHARGED CANISTER HCFC 123 100 PPM TOL00174 CHARGED CANISTER HFC 134A 30 PPM TOL03901 CHARGED CANISTER HFC 134A 100 PPM TOL00172 CHARGED CANISTER HCFC 22 30 PPM TOL03216 CHARGED CANISTER HCFC 22 100 PPM TOL04038 CHARGED...

Page 54: ... 2 Correct electrical connections and wiring Correct voltage 100 240 Vac 50 60 Hz 200 VA maximum Through a dedicated circuit breaker Approved three conductor wire minimum 16 AWG rated 300 Vac at 221 F 105 C Conduit hubs and hardware that are suitable for fiberglass enclosures 3 Correct tubing for sample lines 4 End of line filters installed in sample lines 5 No end of line filter installed in exha...

Page 55: ...re and the supplied locknut 11 Tighten the locknut so the strobe is attached securely to the device 12 Insert the wires for the strobe into the Phoenix connector on the circuit board marked STROBE Make sure each wire is inserted into the correct connector terminal 13 Use a small flathead screwdriver to tighten the screws on the Phoenix connector and secure the wires 14 Install the circuit board co...

Page 56: ...SD connection point inside the enclosure 6 Follow the wiring instructions supplied with the alarm activation station 7 Insert the wires for the alarm activation station into the Phoenix connector marked PULL on the circuit board Make sure the wires are inserted correctly 8 Use a small flathead screwdriver to tighten the screws on the Phoenix connector and secure the wires 9 Disconnect the ESD wris...

Page 57: ... are 1 2 and 5 percent of full scale range Non latching Horn and strobe if applicable enabled Relays The default setting for the internal fault relay is the energized state All other relays alarm warning caution and horn are set to de energized Output The default setting for digital output is None The factory default settings for analog output are 3 5 mA for Warm up and 2 0 mA for Fault ...

Page 58: ...nnel Status Flags p 61 2 Reserved 40017 Read 0 3 Gas Number Channel 3 40018 Read Refer to Gas Types p 61 3 Gas Conc 40019 Read ppm 3 Status 40020 Read Refer to Channel Status Flags p 61 3 Reserved 40021 Read 0 4 Gas Number Channel 4 40022 Read Refer to Gas Types p 61 4 Gas Conc 40023 Read ppm 4 Status 40024 Read Refer to Channel Status Flags p 61 4 Reserved 40025 Read 0 5 Gas Number Channel 5 4002...

Page 59: ...Conc 40055 Read ppm 12 Status 40056 Read Refer to Channel Status Flags p 61 12 Reserved 40057 Read 0 13 Gas Number Channel 13 40058 Read Refer to Gas Types p 61 13 Gas Conc 40059 Read ppm 13 Status 40060 Read Refer to Channel Status Flags p 61 13 Reserved 40061 Read 0 14 Gas Number Channel 14 40062 Read Refer to Gas Types p 61 14 Gas Conc 40063 Read ppm 14 Status 40064 Read Refer to Channel Status...

Page 60: ...me 13 40105 Read In days from 1970 R 427A Span Cal Time 14 40106 Read In days from 1970 R 507 Span Cal Time 15 40107 Read In days from 1970 R 513A Span Cal Time 16 40108 Read In days from 1970 R 514A Span Cal Time 17 40109 Read In days from 1970 R 1233zd E Span Cal Time 18 40110 Read In days from 1970 R 1234yf Span Cal Time 19 40111 Read In days from 1970 R 1234ze Appendix D MODBUS Holding Registe...

Page 61: ...if any configured C W A is set and not acknowledged yet 0x0020 New Set if any of C W A is set and not acknowledged yet 0x0040 Hold Set if any of C W A is in hold state acknowledged latching alarm below threshold 0x0080 Fault Set if failure is reported 0xFF00 Reserved Gas Types Value Name Gases 0 R 11 1 R 12 2 R 22 3 R 123 4 R 134A 5 R 401A 6 R 404A 7 R 407A 8 R 407C 9 R 407F 10 R 410A 11 R 422A 12...

Page 62: ...20 Read Refer to Channel Status Flags p 65 3 Reserved Analog Input 21 Read 0 4 Gas Number Channel 4 Analog Input 22 Read Refer to Gas Types p 65 4 Gas Conc Analog Input 23 Read ppm 4 Status Analog Input 24 Read Refer to Channel Status Flags p 65 4 Reserved Analog Input 25 Read 0 5 Gas Number Channel 5 Analog Input 26 Read Refer to Gas Types p 65 5 Gas Conc Analog Input 27 Read ppm 5 Status Analog ...

Page 63: ...ber Channel 13 Analog Input 58 Read Refer to Gas Types p 65 13 Gas Conc Analog Input 59 Read ppm 13 Status Analog Input 60 Read Refer to Channel Status Flags p 65 13 Reserved Analog Input 61 Read 0 14 Gas Number Channel 14 Analog Input 62 Read Refer to Gas Types p 65 14 Gas Conc Analog Input 63 Read ppm 14 Status Analog Input 64 Read Refer to Channel Status Flags p 65 14 Reserved Analog Input 65 R...

Page 64: ...ut 104 Read In days from 1970 R 422D Span Cal Time 13 Analog Input 105 Read In days from 1970 R 427A Span Cal Time 14 Analog Input 106 Read In days from 1970 R 507 Span Cal Time 15 Analog Input 107 Read In days from 1970 R 513A Span Cal Time 16 Analog Input 108 Read In days from 1970 R 514A Span Cal Time 17 Analog Input 109 Read In days from 1970 R 1233zd E Span Cal Time 18 Analog Input 110 Read I...

Page 65: ...y configured C W A is set and not acknowledged yet 0x0020 New Set if any of C W A is set and not acknowledged yet 0x0040 Hold Set if any of C W A is in hold state acknowledged latching alarm below threshold 0x0080 Fault Set if failure is reported 0xFF00 Reserved Gas Types Value Name Gases 0 R 11 1 R 12 2 R 22 3 R 123 4 R 134A 5 R 401A 6 R 404A 7 R 407A 8 R 407C 9 R 407F 10 R 410A 11 R 422A 12 R 42...

Page 66: ......

Page 67: ......

Page 68: ...are committed to using environmentally conscious print practices Trane by Trane Technologies NYSE TT a global climate innovator creates comfortable energy efficient indoor environments for commercial and residential applications For more information please visit trane com or tranetechnologies com RMWH SVX001C EN 21 Aug 2020 Supersedes RMWH SVX001B EN Jun 2018 ...

Reviews: