background image

TracVision M5/M7 User’s Guide

33

Chapter 3 - Settings

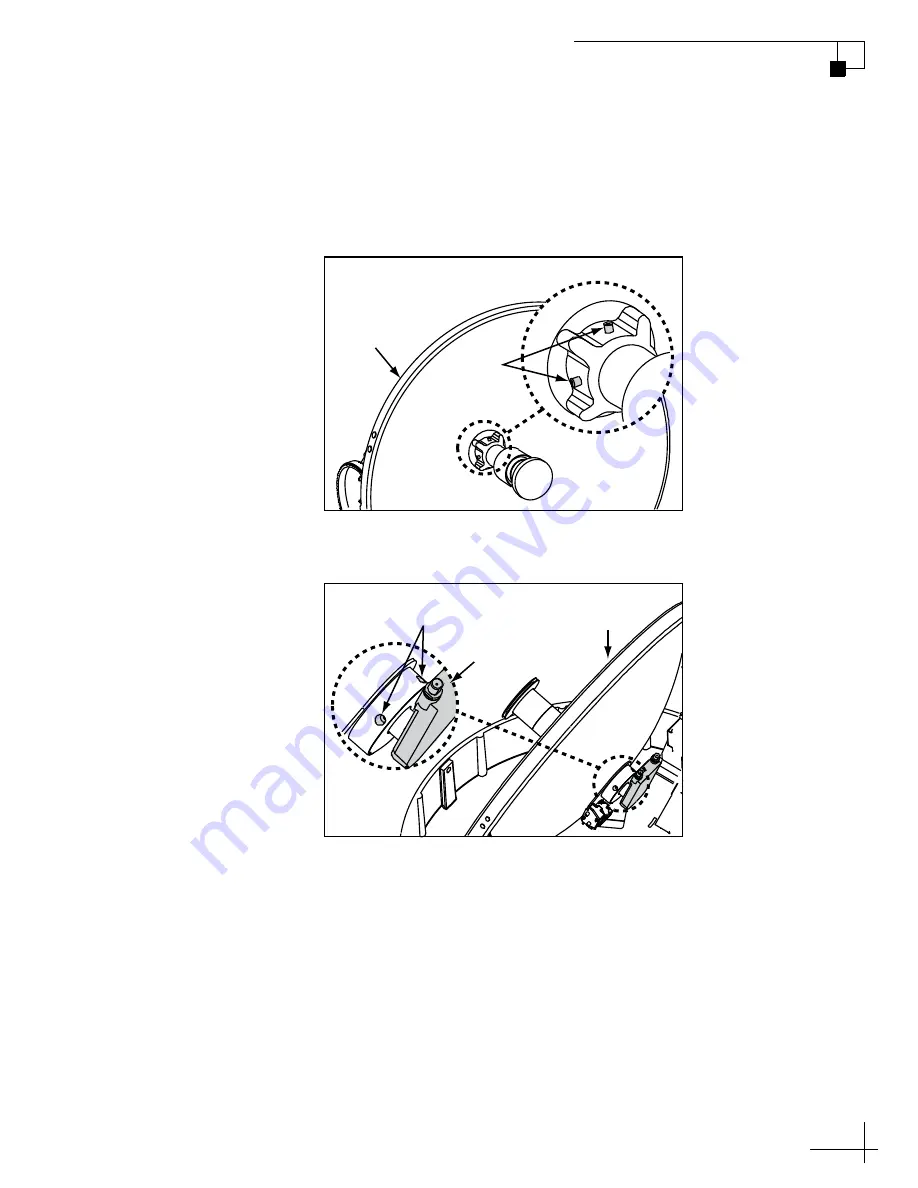
4. Using a 2 mm allen hex key, loosen the two M4 socket 

set screws securing the LNB. The location of the screws 

varies according to TracVision model; refer to 

Figure 3-4 or Figure 3-5.

Figure 3-4  TracVision M5 Set Screws

Figure 3-5  TracVision M7 Set Screws

Reflector

M4 Socket

Set Screws

M4 Socket

Set Screws

Reflector

LNB

Summary of Contents for M7

Page 1: ...TracVision M5 M7 User s Guide TracVision M5 M7 Switchplate Configuration ...

Page 2: ...ed installation information please refer to the TracVision M5 M7 Installation Guide Please direct questions comments or suggestions to KVH Industries Inc KVH Europe A S 50 Enterprise Center Kokkedal Industripark 2B Middletown RI 02842 5279 USA 2980 Kokkedal Denmark Tel 1 401 847 3327 Tel 45 45 160 180 Fax 1 401 849 0045 Fax 45 45 160 181 E mail info kvh com E mail info kvh dk Internet www kvh com ...

Page 3: ...es Inc DVB Digital Video Broadcasting is a registered trademark of the DVB Project DIRECTV is an official trademark of DIRECTV Inc DISH Network is an official trademark of EchoStar Communications Corporation ExpressVu is a property of Bell ExpressVu a wholly owned subsidiary of Bell Satellite Services All other trademarks are the property of their respective owners ...

Page 4: ...ging Channels and Switching Between Satellites Linear Versions 19 Receiver Requirements 21 Product Care 23 3 Settings Connecting a PC to the Maintenance Port 27 Setting Sleep Mode 29 Setting Latitude and Longitude 30 Setting the LNB Skew Angle Linear Versions 31 Determining Which Satellites are Configured for Tracking 36 DISH 1000 Setup 38 DISH 500 ExpressVu Setup 43 European Tri Sat Setup 46 Conf...

Page 5: ...emedies for Operational Issues 57 Technical Support 61 A Wiring Diagrams Wiring Diagram for One or Two Receivers 65 Wiring Diagram for Three or Four Receivers Circular Version 66 Wiring Diagram for Three or Four Receivers Linear Quad Output LNB Version 67 B Position Grids European Position Grid 71 North American Position Grid 72 ...

Page 6: ... M7 User s Guide 1 Chapter 1 Introduction 1 Introduction This chapter provides a basic overview of this manual and your TracVision system Contents Using this Manual 3 System Overview 5 Circular and Linear Versions 7 ...

Page 7: ...ams appendix for information on connecting additional receivers The user and or servicing technician should refer to the Troubleshooting chapter to help identify the cause of a system problem Notifications Used in this Manual This manual uses the following notifications to call attention to important information NOTE Notes contain useful information about system settings TIP Tips contain helpful i...

Page 8: ...ision system Text Example Description HALT Bold text in capital letters indicates a command to be entered via a PC X Bold text in italicized capital letters indicates a variable portion of a PC command Document Description Installation Guide Complete product installation instructions Product Registration Form Details on registering the product Warranty Statement Warranty terms and conditions Conte...

Page 9: ...x A on page 63 Antenna Unit The antenna unit houses the antenna positioning mechanism LNB low noise block and control elements within a radome Weathertight connectors join the power signal and control cabling from the belowdecks units Switchplate The switchplate controls power to the antenna via the On Off switch The switchplate includes a maintenance port DB9 connector allowing you to connect a P...

Page 10: ... Tracking and Switching Your TracVision M5 M7 system tracks your selected satellites as long as the vessel is located within the selected satellites coverage area During installation your TracVision system should have been set up to track your desired satellites allowing you to switch between them quickly and easily Satellite Library The TracVision M5 M7 system includes a pre programmed library of...

Page 11: ...ise cross pattern the TracVision antenna s receiving element called an LNB low noise block must be oriented in the same way to optimize reception This orientation adjustment is referred to as the LNB s skew angle Figure 1 3 illustrates how skew determines the amount of a linear signal the LNB collects The more signal the better the reception Figure 1 3 How Skew Works Circular Linear Signals transm...

Page 12: ...example if your antenna is tracking the PAS 9 satellite for Sky Mexico programming the ideal skew setting ranges from 30 to 70 depending upon your location within the satellite s coverage area see Figure 1 4 Figure 1 4 Approximate Skew Settings for the PAS 9 Satellite For complete details about adjusting the LNB s skew see Setting the LNB Skew Angle Linear Versions on page 31 70 65 60 55 50 45 40 ...

Page 13: ... need to know to operate the TracVision system Contents Receiving Satellite TV Signals 11 Turning the System On Off 12 Changing Channels and Switching Between Satellites Circular Versions 13 Changing Channels and Switching Between Satellites Linear Versions 19 Receiver Requirements 21 Product Care 23 ...

Page 14: ...atellite coverage information Simply visit our website at www kvh com footprint Figure 2 1 Location and Coverage Area of DIRECTV 101 Satellite In addition since TV satellites are located above the equator the TracVision antenna must have a clear view of the sky to receive satellite TV signals Anything that stands between the antenna and the satellite can block the signal resulting in lost receptio...

Page 15: ...n on your satellite TV receiver and TV 3 Set the switchplate s Power switch to the On position Figure 2 3 Switchplate Power Switch 4 Wait one minute for system startup Turning Off the System Follow the steps below to turn off your TracVision system 1 Set the switchplate s Power switch to the Off O position 2 Turn off your satellite TV receiver and TV Avoid turning the vessel or changing TV channel...

Page 16: ...ations satellite switching occurs automatically while you change channels using the primary receiver s remote control Find your selected service and configuration in the following sections for complete details NOTE The primary receiver is the receiver connected to the antenna s RF1 connector DISH 1000 Required for TurboHD Service When the TracVision M5 M7 system is configured for DISH 1000 you can...

Page 17: ...ivers The antenna switches between satellites automatically as you change channels using the primary receiver s remote control The primary receiver is the receiver connected to the antenna s RF1 cable see Figure 2 6 If an optional secondary receiver is connected you can use its remote control to switch between the channels on the currently selected satellite Figure 2 6 DISH 1000 Primary Receiver S...

Page 18: ... between your selected satellites using a PC or an optional MultiSat Control Panel MCP KVH Part 01 0260 02 You can use the receivers remote controls to switch between the channels on the currently selected satellite NOTE Refer to Switching Between Installed Satellites Using a PC on page 51 for more information on using a PC Figure 2 7 DISH 1000 Manual Mode Receiver PC MCP Controls RF2 Grounding Bl...

Page 19: ...de operation Figure 2 8 lists each Dual Sat service configuration the satellites tracked for each service and the available satellite switching modes Figure 2 8 Dual Sat Modes Service Satellites Tracked Switching Mode s DIRECTV DIRECTV 101 and 119 Auto or Manual DISH 500 DISH 119 and 110 Auto or Manual ExpressVu ExpressVu 91 and 82 Auto or Manual Custom Selected by user Manual ...

Page 20: ...ted to the antenna s RF1 cable see Figure 2 9 If an optional secondary receiver is connected you can use its remote control to switch between the channels on the currently selected satellite NOTE Custom service configurations must use Manual mode Figure 2 9 Dual Sat Automatic Mode Receiver Controls RF2 Secondary Receiver optional Changes channels on current satellite RF2 Automatically switches sat...

Page 21: ...l MultiSat Control Panel MCP KVH Part 01 0260 02 You can use the receivers remote controls to switch between the channels on the currently selected satellite NOTE Refer to Switching Between Installed Satellites Using a PC on page 51 for more information on using a PC Figure 2 10 Dual Sat Manual Mode Receiver PC TV SAT Switch MCP Controls RF2 Grounding Block RF1 Switchplate Antenna Multiswitch All ...

Page 22: ...s the primary receiver is set up for DiSEqC communicatons and a multiswitch is not installed With DiSEqC set up the primary receiver sends satellite switching commands to the antenna as necessary when you change channels using the primary receiver s remote control The primary receiver is the receiver connected to the antenna s RF1 cable see Figure 2 11 NOTE To enable automatic switching the receiv...

Page 23: ...NOTE Does not support European Tri Sat configurations NOTE Refer to Switching Between Installed Satellites Using a PC on page 51 for more information on using a PC Figure 2 12 Manual Mode Receiver PC TV SAT Switch MCP Controls Quad output version shown All Receivers Changes channels on current satellite Antenna Multiswitch Switchplate MCP Used to Switch Satellites PC OR OR Other Indicators Both bl...

Page 24: ...ensure compatibility with your TracVision M5 M7 system be sure to use a KVH validated receiver for your selected service type see Figure 2 13 Figure 2 13 KVH Validated U S and Canadian Receivers NOTE For information on connecting different receiver models please contact KVH Technical Support at 1 401 847 3327 Standard definition receivers DIRECTV DISH ExpressVu D12 D11 D10 311 3100 4100 High defin...

Page 25: ...tem does not include a multiswitch you can configure the receiver s to enable automatic satellite switching TracVision systems with a multiswitch installed require switching satellites using the MCP which does not require receiver configuration To configure the receivers for automatic switching the satellites must be set up in the receiver in the same order they were set up in the TracVision syste...

Page 26: ...y wash the exterior of the antenna dome with fresh water and mild detergent Avoid harsh cleansers and volatile solvents such as acetone and do not spray the dome directly with high pressure water If you wish to paint the dome use only non metallic automotive paint without a primer coat Any paint that contains metal will block satellite signals and impair reception ...

Page 27: ...e Maintenance Port 27 Setting Sleep Mode 29 Setting Latitude and Longitude 30 Setting the LNB Skew Angle Linear Versions Only 31 Determining Which Satellites are Configured for Tracking 36 DISH 1000 Setup 38 DISH 500 ExpressVu Setup 43 European Tri Sat Setup 46 Configuring the Antenna to Track Different Satellites 48 Switching Between Installed Satellites Using a PC 51 ...

Page 28: ...HyperTerminal Enter commands in the Wizard s Antenna Comms window You do not need to flash the antenna to enter commands 1 Set the switchplate s power switch to the Off O position Figure 3 1 Switchplate Power Switch and Maintenance Port 2 Connect a serial data cable from the maintenance port DB9 connector located on the switchplate to the serial port on your PC TIP If your computer does not have a...

Page 29: ...p HyperTerminal to echo typed characters Select Properties from the File menu select ASCII Setup at the Settings tab then select Echo typed characters locally at the ASCII Setup window 4 Set the switchplate s power switch to the On position see Figure 3 1 on page 27 Wait one minute for system startup NOTE If antenna startup data does not start scrolling in the HyperTerminal window check the back o...

Page 30: ...ain or enters Search Mode to find the satellite Follow the instructions below if you wish to change the Sleep Mode setting NOTE Sleep Mode is enabled by default 1 Connect a PC to the maintenance port as described in Connecting a PC to the Maintenance Port on page 27 Then type the following commands in the HyperTerminal window 2 Type HALT then press Enter 3 Type DEBUGON then press Enter 4 Type the ...

Page 31: ...oximate latitude and longitude using the Position Grids provided in Appendix B on page 69 1 Connect a PC to the maintenance port as described in Connecting a PC to the Maintenance Port on page 27 Then type the following commands in the HyperTerminal window 2 Type HALT then press Enter 3 Type the following GPS command then press Enter GPS XX D YYY Z 4 Type ZAP then press Enter to restart the antenn...

Page 32: ...to Figure 1 4 on page 8 for the approximate skew setting for the PAS 9 satellite Determining the Skew Angle Follow the steps below to determine the skew angle for the selected satellite s 1 Connect a PC to the maintenance port as described in Connecting a PC to the Maintenance Port on page 27 Then type the following commands in the HyperTerminal window 2 Type HALT then press Enter 3 Type DEBUGON t...

Page 33: ...wer to all wired components including receivers 2 Using a Phillips head screwdriver remove the screws securing the radome Then remove the radome and set it aside in a safe place 3 Locate the LNB assembly on the back of the antenna reflector Figure 3 3 Location of LNB on Back of Antenna Reflector CAUTION To avoid bodily injury be sure to turn off the antenna and disconnect power to all wired compon...

Page 34: ...sen the two M4 socket set screws securing the LNB The location of the screws varies according to TracVision model refer to Figure 3 4 or Figure 3 5 Figure 3 4 TracVision M5 Set Screws Figure 3 5 TracVision M7 Set Screws Reflector M4 Socket Set Screws M4 Socket Set Screws Reflector LNB ...

Page 35: ...ints if the skew angle is greater than 15 you need to subtract 180 to get the equivalent negative skew angle and set the LNB to that angle instead For example if the skew angle is determined to be 30 set the skew to 150 Figure 3 6 TracVision M5 LNB Skew Angle Adjustment Be sure to keep the LNB fully inserted into the choke feed to ensure optimum performance IMPORTANT 0 Skew Positive Skews Negative...

Page 36: ...rews to secure the LNB in place Apply 9 in lbs 1 Nm of torque if possible 7 Reinstall the radome 8 Restore power to the TracVision system NOTE For more information about how skew works see LNB Skew Angle on page 7 Be sure to keep the LNB fully inserted into the choke feed to ensure optimum performance IMPORTANT 0 Skew Positive Skews Negative Skews 0 10 20 40 50 7 0 8 0 30 9 0 6 0 50 10 20 30 40 6 ...

Page 37: ...ico programming is located on the Pas 9 satellite Sky Mexico configurations use NONE as the name of Satellite B Configuration Installation Names Positions Satellite A Satellite B Satellite C DISH 1000 61 ECHO_119 ECHO_110 ECHO_61 DISH 1000 129 ECHO_119 ECHO_110 ECHO_129 DISH 500 ECHO_119 ECHO_110 DIRECTV Dual Sat DSS_101 DSS_119 ExpressVu EXPRESSTV EXPRESSVU Sky Mexico PAS_9 NONE Europe WB Tri Sat...

Page 38: ...rrently configured for tracking are displayed Type ZAP then press Enter to restart the antenna Wait one minute for system startup Figure 3 9 Example DISH 1000 61 Mode Displayed NOTE Displayed results for DISH 1000 Tri Sat configurations display the individual satellites configured for tracking not the trisat commands used during installation TIP The order the satellites are reported in reflects th...

Page 39: ...SH 1000 Satellite Coverage Areas DISH 1000 129 Setup Follow the steps below to set up the TracVision system for DISH 1000 129 use Install the DISH 1000 129 Satellites Via a PC 1 Connect a PC to the maintenance port as described in Connecting a PC to the Maintenance Port on page 27 Then type the following commands in the HyperTerminal window 2 Type HALT then press Enter 3 Type SATINSTALL TRISAT DIS...

Page 40: ...4 Set the switchplate s power switch to the On position to apply power to the TracVision antenna Wait one minute for system startup Figure 3 11 Switchplate Power Switch 5 Using the receiver s remote go to the Point Dish Signal Strength screen press MENU 6 1 1 on most models 6 Choose Check Switch then press SELECT 7 Choose Test then press SELECT 8 Wait at least 15 minutes before proceeding Disregar...

Page 41: ... 1000 satellite coverage area see Figure 3 10 on page 38 DISH 1000 61 Setup The following instructions explain how to configure the TracVision system for DISH 1000 61 use Install the DISH 1000 61 Satellites Via a PC if required If your TracVision system is currently configured for DISH 1000 129 and you wish to configure DISH 1000 61 instead follow the steps below to install the DISH 1000 61 satell...

Page 42: ...r one at a time to the RF1 cable and perform the steps below Then once you have completed this process for each receiver you can reconnect them as desired 1 Dock the vessel in a blockage free area 2 Ensure the receiver you wish to configure is connected to the TracVision system s RF1 cable 3 Turn on the TV and receiver 4 Set the switchplate s power switch to the On position to apply power to the T...

Page 43: ...t Steps 5 9 Figure 3 14 DISH 1000 61 Results on TV Screen 11 Exit the menu and allow the receiver to download the program guide NOTE You do not need to perform this procedure again unless you add another receiver you reconfigured a receiver s for home use or you move to a different DISH 1000 satellite coverage area see Figure 3 10 on page 38 Port 1 2 3 Satellite 119 110 61 Trans OK OK OK Status Re...

Page 44: ...L command from the table below then press Enter NOTE If you only wish to track one of the satellites listed above type NONE to substitute the second satellite For example ExpressVu subscribers who wish to track just the 91 satellite should type SATINSTALL EXPRESSTV NONE 4 Enter the vessel s latitude and longitude into the antenna using the GPS command as explained in Setting Latitude and Longitude...

Page 45: ...4 Set the switchplate s power switch to the On position to apply power to the TracVision antenna Wait one minute for system startup Figure 3 15 Switchplate Power Switch 5 Using the receiver s remote go to the Point Dish Signal Strength screen press MENU 6 1 1 on most models 6 Choose Check Switch then press SELECT 7 Choose Test then press SELECT 8 Wait at least 15 minutes before proceeding Disregar...

Page 46: ...n page 43 an error message will appear on the TV This is normal Figure 3 16 DISH 500 Second Check Switch Results on TV Screen Figure 3 17 ExpressVu Second Check Switch Results on TV Screen 11 Exit the menu and allow the receiver to download the program guide NOTE You do not need to perform this procedure again unless you add another receiver or you reconfigured a receiver s for home use Port 1 1 2...

Page 47: ...e You will need this information if you need to adjust the TracVision system s skew angle See Setting the LNB Skew Angle Linear Versions on page 31 for more information on setting the skew angle NOTE To enable automatic switching the receiver must be set up to match the TracVision system s satellite settings Refer to Linear Receiver Configuration on page 22 for more information 1 Connect a PC to t...

Page 48: ...se the table below to enter the following SATINSTALL command 4 Type ZAP then press Enter to restart the antenna Wait one minute for system startup For Group Type Europe WB SATINSTALL TRISAT EWB Europe SATINSTALL TRISAT EUR Scandinavia SATINSTALL TRISAT SCN ...

Page 49: ...iguration instructions For European Tri Sat setups refer to European Tri Sat Setup on page 46 TIP Be sure to only install satellites that your TracVision M5 M7 can track in your geographic location For your convenience KVH provides links to several websites that offer satellite coverage information Simply visit our website at www kvh com footprint Figure 3 19 Circular Satellite Library NOTE Recept...

Page 50: ...stallation Name 26 0 E ARABSAT 19 2 E ASTRA1 28 2 E ASTRA2N 28 2 E ASTRA2S 7 0 E EUTEL_W3A 30 0 W HISPASAT 13 0 E HOTBIRD 13 0 E HOTBIRDWB 7 0 W NILESAT 160 0 E OPTUSD1 156 0 E OPTUSC1 58 0 W PAS_9 110 5 E SINOSAT 5 0 E SIRIUS 0 8 W THOR 42 0 E TURKSAT1C Linear Systems Only For optimal performance you might need to adjust the skew angle if you change satellites For information on setting the skew ...

Page 51: ...tenance Port on page 27 Then type the following commands in the HyperTerminal window 2 Type HALT then press Enter 3 Type the following SATINSTALL command then press Enter SATINSTALL X Y 4 Type ZAP then press Enter to restart the antenna Wait one minute for system startup Figure 3 21 Example Eutelsat W3A and Hotbird NOTE Linear Versions Only To ensure proper operation the satellites must be set up ...

Page 52: ...ver controlled satellite switching 1 Connect a PC to the maintenance port as described in Connecting a PC to the Maintenance Port on page 27 Then type the following commands in the HyperTerminal window 2 Type the appropriate command below to switch to your desired satellite then press Enter DISH 1000 and European Tri Sat setups only TIP To determine which satellites are installed and in which sate...

Page 53: ...ooting This chapter identifies potential basic problems along with their possible causes and solutions It also explains how to get technical support Contents Five Simple Checks 55 Troubleshooting Matrix 56 Causes and Remedies for Operational Issues 57 Technical Support 61 ...

Page 54: ...cessive dirt or moisture on the antenna dome Dirt buildup or moisture on the dome can reduce satellite reception Clean the exterior of the dome periodically Is it raining heavily Heavy rain or snow can weaken satellite TV signals Reception should improve once the inclement weather subsides Is everything turned on and connected properly Make sure your TV and receiver are both turned on and set up f...

Page 55: ...for short intervals x x x x x x x System works at dock but not on the move x x System will not find satellite x x x x x x x x x x Snowy television picture x x x x Pixelating television picture x x x x x x x x S a t e l l i t e c o v e r a g e i s s u e S a t e l l i t e s i g n a l b l o c k e d R a d a r i n t e r f e r e n c e C A U S E S A N D R E M E D I E S SYMPTOM I n s u f f i c i e n t p o...

Page 56: ...ation Receiver Fault Your satellite TV receiver might be set up incorrectly or defective First check the receiver s configuration to ensure it is set up for the desired programming In the case of a faulty receiver refer to your selected receiver s user manual for service and warranty information Linear Versions Only Improper Receiver Configuration To ensure proper operation the receiver s must be ...

Page 57: ...te coverage information Simply visit our website at www kvh com footprint Figure 4 2 Location and Coverage Area of DIRECTV 101 Satellite Satellite Signal Blocked Since TV satellites are located above the equator the TracVision antenna must have a clear view of the sky to receive satellite TV signals Anything that stands between the antenna and the satellite can block the signal resulting in lost r...

Page 58: ...might be invalid which might cause the TracVision M5 M7 system to track improperly To solve this problem simply turn off the TracVision M5 M7 system for at least ten seconds Then turn on the TracVision system ensuring the vessel is either motionless or traveling in a straight line for the first minute after startup Insufficient Power If the power cable to the antenna unit is more than 50 ft 15 m l...

Page 59: ...you visit www kvh com wheretogetservice Type of Multiswitch Used If your TracVision system s configuration requires a multiswitch an active powered multiswitch must be used to ensure proper antenna performance Refer to the Wiring Diagrams in Appendix A on page 63 for detailed information and recommended multiswitch models Cable Unwrap If your vessel makes several consecutive circles in the same di...

Page 60: ...al assistance please call or visit your local authorized TracVision dealer or distributor To find a KVH authorized dealer near you visit www kvh com wheretogetservice If you need help finding an authorized technician please contact KVH Technical Support Please have your antenna serial number handy before you call North South America Australia Phone 1 401 847 3327 E mail techs kvh com Mon Fri 9 am ...

Page 61: ...ing to the number of receivers installed and the TracVision system configuration circular linear and dual quad output For installation instructions refer to the TracVision M5 M7 Installation Guide Contents Wiring Diagram for One or Two Receivers 65 Wiring Diagram for Three or Four Receivers Circular Version 66 Wiring Diagram for Three or Four Receivers Linear Quad output LNB Version 67 ...

Page 62: ...L HDMI OUT PHONE JACK RF REMOTE ANTENNA AC 120V 60 Hz Satellite In Receiver 1 USB S VIDEO OUT COMPONENT OUT AUDIO OUT VIDEO OUT CAUTION OFF AIR IN SATELLITE IN DIGITAL AUDIO OUT OPTICAL HDMI OUT PHONE JACK RF REMOTE ANTENNA AC 120V 60 Hz Satellite In Receiver 2 Controls satellite selection Switchplate 12 VDC Vessel Power Antenna RF1 Data RF2 Power Vessel AC Ground Grounding Block Circular Sky Mexi...

Page 63: ...E IN DIGITAL AUDIO OUT OPTICAL HDMI OUT PHONE JACK RF REMOTE ANTENNA AC 120V 60 Hz Satellite In Receiver 4 USB S VIDEO OUT COMPONENT OUT AUDIO OUT VIDEO OUT CAUTION OFF AIR IN SATELLITE IN DIGITAL AUDIO OUT OPTICAL HDMI OUT PHONE JACK RF REMOTE ANTENNA AC 120V 60 Hz Satellite In Receiver 3 USB S VIDEO OUT COMPONENT OUT AUDIO OUT VIDEO OUT CAUTION OFF AIR IN SATELLITE IN DIGITAL AUDIO OUT OPTICAL H...

Page 64: ...B S VIDEO OUT COMPONENT OUT AUDIO OUT VIDEO OUT CAUTION OFF AIR IN SATELLITE IN DIGITAL AUDIO OUT OPTICAL HDMI OUT PHONE JACK RF REMOTE ANTENNA AC 120V 60 Hz Satellite In Receiver 1 USB S VIDEO OUT COMPONENT OUT AUDIO OUT VIDEO OUT CAUTION OFF AIR IN SATELLITE IN DIGITAL AUDIO OUT OPTICAL HDMI OUT PHONE JACK RF REMOTE ANTENNA AC 120V 60 Hz Satellite In Receiver 2 USB S VIDEO OUT COMPONENT OUT AUDI...

Page 65: ...endix B Position Grids Appendix B Position Grids This appendix contains European and North American position grids for determining your approximate latitude and longitude Contents European Position Grid 71 North American Position Grid 72 ...

Page 66: ...proximate Latitude and Longitude 1 2 3 4 11 7 6 5 8 9 10 12 13 14 16 15 17 18 19 20 21 22 23 24 Grid Latitude Longitude 1 2 3 4 5 6 7 8 9 10 11 12 13 14 15 16 17 18 19 20 21 22 23 24 7 W 7 E 22 E 45 E 7 W 7 E 22 E 7 W 7 E 22 E 40 E 7 W 7 E 22 E 7 W 7 E 7 W 7 E 22 E 37 E 7 W 7 E 22 E 37 E 67 N 67 N 67 N 65 N 63 N 63 N 63 N 57 N 57 N 57 N 55 N 53 N 53 N 50 N 47 N 47 N 43 N 43 N 43 N 43 N 36 N 36 N 3...

Page 67: ...sition grid and table in Figure B 2 Figure B 2 Approximate Latitude and Longitude Grid Latitude Longitude 1 2 3 4 5 6 7 8 9 10 11 12 13 14 15 16 17 18 19 20 125 W 110 W 90 W 70 W 55 W 125 W 110 W 90 W 70 W 50 W 125 W 110 W 90 W 70 W 125 W 110 W 90 W 75 W 83 W 78 W 55 N 55 N 55 N 55 N 55 N 45 N 45 N 45 N 45 N 45 N 40 N 40 N 40 N 40 N 32 N 32 N 32 N 32 N 27 N 27 N ...

Page 68: ... 1 401 849 0045 E mail info kvh com Internet www kvh com KVH Europe A S Kokkedal Industripark 2B 2980 Kokkedal Denmark Phone 45 45 160 180 Fax 45 45 160 181 E mail info kvh dk Internet www kvh com Copyright 2006 KVH Industries Inc KVH and TracVision are registered trademarks of KVH Industries Inc ...

Reviews: