


84
85
Netw
ork/
USB memor
y
Converting files created with Microsoft
®
PowerPoint
®
This process provides presentations without using a computer by converting
presentation files created with Microsoft
®
PowerPoint
®
into JPEG files, storing them on a
USB memory device, and displaying them in a slide show.
To use this conversion mode, Microsoft
®
PowerPoint
®
must be installed on the
computer.
Only static images are supported by this process. Animation and audio are not
supported.
Presentation files created with Microsoft
®
PowerPoint
®
usually
consist of several slides. For this reason, the tool creates a
folder with the name specified in step (5), below, and file for
each slide is created in the folder (starting with slide001.jpg).
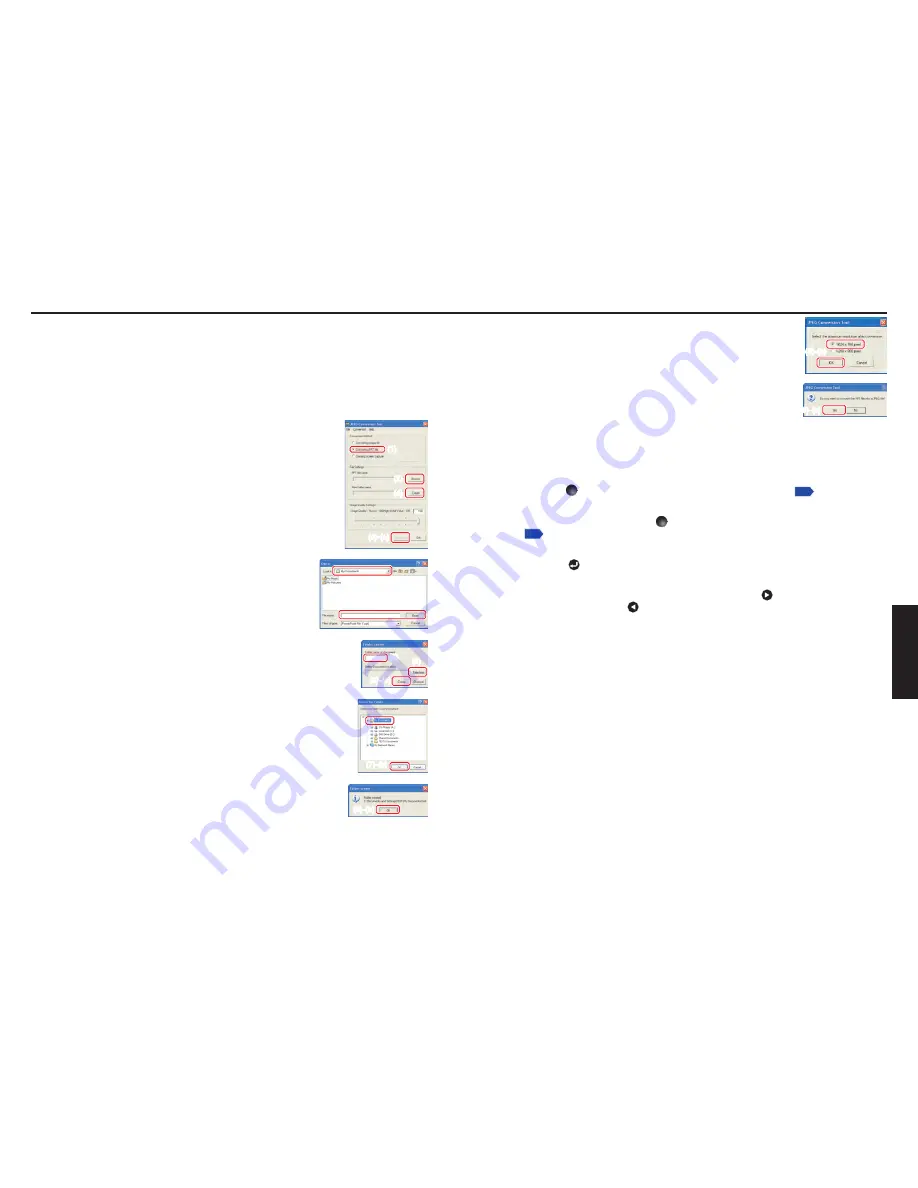
(1) In the
Conversion Method
field, select
Converting PPT file
.
() In the
File settings
field, click the
Browse
button for
PPT
File Name
.
The
Open
dialog box appears.
() In the
Open
dialog box:
(a) Specify the location of the file to be converted; and
(b) Select the PowerPoint
®
presentation file to convert,
then click the
Open
button.
(4) In the
JPEG Conversion Tool
window, in the
File
settings
field, click the
Create
button for
New folder
name
.
The
Folder create
dialog box appears.
(5) In the
Folder create
dialog box, in the
Folder Name of
document
of document field, specify a folder name of 1
characters or less.
(6) In the
Folder create
dialog box, click the
Selection
button.
The
Browse for Folder
dialog box appears.
(7) In the
Browse for Folder
dialog box:
(a) Specify the location in which to save the folder; and
(b) Click the
OK
button.
(8) In the
Folder create
dialog box:
(a) Click the
Create
button.
A confirmation dialog box appears;
(b) Click the
OK
button.
•
•
(1)
()
(4)
(9)-(a)
(1)
()
(4)
(9)-(a)
()-(b)
()-(a)
(6)
(8)-(a)
(6)
(8)-(a)
(5)
(5)
(7)-(a)
(7)-(b)
(7)-(b)
(8)-(b)
(8)-(b)
(9) (a) In the
JPEG Conversion Tool
window, click the
Conversion
button.
(b) The resolution selection dialog box appears. Select a
desired resolution and click the
OK
button.
(c) A confirmation dialog box opens. Click
Yes
.
The computer begins to convert the file. When it finishes,
a message appears informing you that “
a JPEG file has
been created
”.
Making a presentation with converted JPEG files
(1) Copy the folder created by the
JPEG Conversion Tool
, and/or its contents, onto a
USB memory device.
() Use step
1
in “
Playing a slide show from a thumbnail list
”
p.80
to display a list
of thumbnails.
() Follow the instructions in step
2
in “
Playing a slide show from a thumbnail list
”
p.80
to find the thumbnail of the first slide, Slide001.jpg, and move the orange
frame to it. (Select Slide001.jpg)
(4) Press the button on the remote control. An enlarged view of the first slide
appears on the screen. This starts the presentation.
(5) To continue to the next slide, click the remote control’s button. To go back to the
previous slide, click the button.
(9)-(c)
(9)-(c)
(9)-(b)
(9)-(b)
How to use the JPEG Conversion Tool (Continued)
Summary of Contents for TLP-WX200
Page 53: ......


