


82
83
Netw
ork/
USB memor
y
For MPEG files
3
Displaying video
Pressing the button while a file is selected plays only the video image in full-
screen view. Pressing the button again pauses the video image.
To return to the thumbnail list display screen, press the
RETURN
button.
4
Fast-forwarding and rewinding video images
Pressing the buttons while a video image is displayed fast-forwards or rewinds
the video image.
( : Fast-forward; : Rewind)
Notes
The thumbnail display and slide order are listed from the shortest file name to the
longest. If two file names have the same number of characters, they are ordered
numerically if numbers are used in the file name, and alphabetically otherwise.
It is possible to give presentations without using a computer by converting presentations
created with Microsoft
®
PowerPoint
®
into JPEG files using the
JPEG Conversion Tool
,
and storing them on a USB memory device.
p.83
Note, however, that functions such as animation effects and hyperlinks cannot be used,
so the converted file should be tested before the actual presentation.
Freeze function cannot be used during slide show or automatic play.
A slide show is terminated when the input is switched to another.
With some USB memory devices, the slideshow playback may stop midway. If you
encounter this, use another USB memory device because the current one is not
supported.
Pressing the
GUIDE
button on the remote control with a slide or video image displayed
displays the slideshow operation guide.
When you operate the projector using the USB memory card reader/writer, up to 4
media types are supported.
•
•
•
•
•
•
•
•
•
How to use the JPEG Conversion Tool
The
JPEG Conversion Tool
converts JPEG files not supported by the projector, image files
in other formats, Microsoft
®
PowerPoint
®
files, and other similar files into JPEG files. The
JPEG files converted with this tool can be displayed by sending them using the wireless
LAN
p.66
, or saving them on a USB memory device.
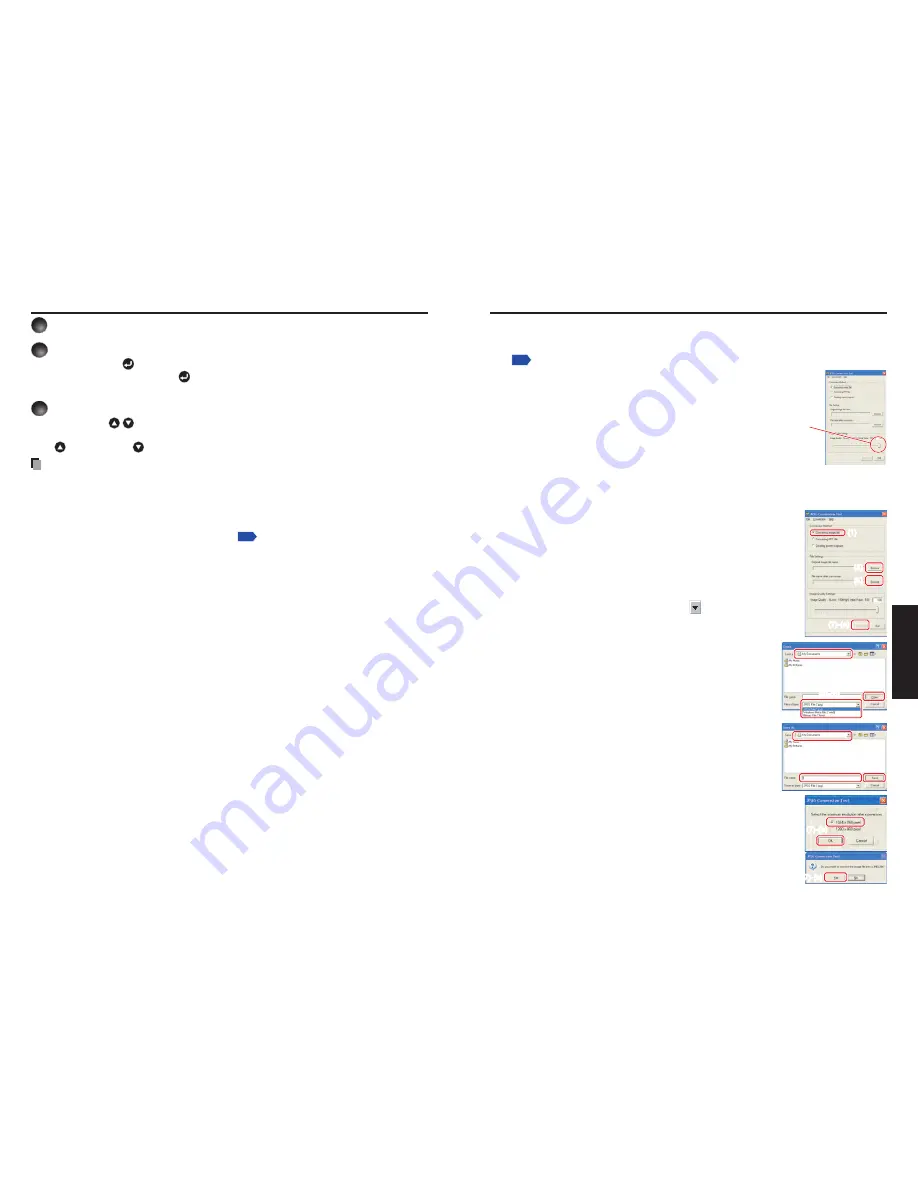
Launching the JPEG Conversion Tool
The window shown in the figure to the right appears on the
computer screen.
Drag the
Image Quality Settings
slider to the left or right to set
the image quality of the file after conversion. Lower values create
smaller files, but will lower the image quality. (It is not possible to
restore the quality of an image after it has been lowered.)
Converting an image file
This takes JPEG files created with compression formats not supported by the projector, for
example, Windows
®
metafiles (wmf), and bitmapped files (bmp), and converts into JPEG
files.
(1) In the
Conversion Method
field, select
Converting image
file
. (Status on launch)
(2) In the
File settings
field, click the
Browse
button for
Original
Image File Name
.
The
Open
dialog box appears.
(3) In the
Open
dialog box:
(a) Specify the location of the file to be converted; and
(b) In the
Files of Type
field, click the
button to select the
file format. A list of files of that format appear in the
Open
dialog box.
(4) In the
Open
dialog box, select the file to convert, then
click the
Open
button.
(5) In the
JPEG Conversion Tool
window, in the
File
settings
field, select
Browse
for
File name after
conversion
. The
Save As
dialog box appears.
(6) In the
Save As
dialog box:
(a) Specify the location in which to save the converted
file;
(b) Enter a file name of up to 8 characters in the
File
Name
field; and
(c) Click the
Save
button.
(7) (a) In the
JPEG Conversion Tool
, click the
Conversion
button.
(b) The resolution selection dialog box appears. Select a
desired resolution and click the
OK
button.
(c) A confirmation dialog box opens. Click
Yes
.
The computer converts the file. When it finishes a
message appears informing you that “
a JPEG file has
been created
”.
■
■
(1)
(2)
(5)
(7)-(a)
(1)
(2)
(5)
(7)-(a)
(3)-(b)
(3)-(b)
(3)-(a)
(4)
(6)-(b)
(6)-(c)
(6)-(a)
(7)-(c)
(7)-(c)
(7)-(b)
(7)-(b)
Projecting images stored in a USB memory device (Continued)
Summary of Contents for TLP-WX200
Page 53: ......


