4.12 System Board
4 Replacement Procedures
4.12 System Board
Removing the System Board
NOTE:
Be carful of the eject button for the PC card. It can be damage when removing the
board. Make sure it is pushed in.
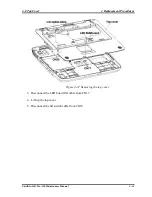
Remove the system board according to the following procedures and Figures 4-29.
1. Remove the M2.5x4 black flat-head screws for securing the HDD tray.
2. Remove the HDD tray.
3. Remove the hotkey board SUMI-card from CN8.
NOTE:
The switch can be easily removed if you tweeze the prongs on the button
together.
4. Remove the lever of the wireless kill switch.
5. Remove two M2.5x4 black flat-head screws for securing the system board.
6. Remove the system board.
Figure 4-29 Removing the system board
Satellite A60/ Pro A60 Maintenance Manual
4-43
Summary of Contents for Satellite Pro A60 Series
Page 10: ...x Satellite A60 Pro A60 Maintenance Manual ...
Page 11: ...Chapter 1 Hardware Overview ...
Page 12: ...1 Hardware Overview 1 ii Satellite A60 Pro A60 Maintenance Manual ...
Page 35: ...2 Troubleshooting 2 Chapter 2 Troubleshooting 2 i Satellite A60 Pro A60 Maintenance Manual ...
Page 65: ...Chapter 3 Diagnostic Programs ...
Page 68: ......
Page 134: ...Chapter 4 Replacement Procedures 4 1 ...
Page 135: ...4 Replacement Procedures 4 ii Satellite A60 Pro A60 Maintenance Manual ...
Page 141: ......
Page 202: ...6000 1 次 Appendices ...
Page 203: ...Appendices App ii Satellite A60 Pro A60 Maintenance Manual ...
Page 211: ...Appendices Apx A Handling the LCD Module A 6 Satellite A60 Pro A60 Maintenance Manual ...
Page 221: ......
Page 223: ......
Page 225: ......
Page 229: ......
Page 231: ......
Page 235: ......
Page 237: ......
Page 239: ......
Page 250: ......
Page 252: ......
Page 254: ......
Page 256: ......
Page 262: ......
Page 264: ......

