background image

4.SCAN FUNCTIONS

Setting Up Scan Options    101

4 SCAN FUNCTIONS

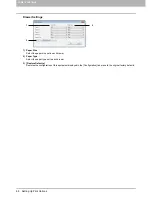
8) [Pre-Scan]

Pre-scans the original.

9) [Scan]

Scans the original. 

10) Measurement unit

Select [Inch], [mm], or [Pixel] to change the measurement unit.

11)

Opens the advanced scan dialog.

 P.101 “Advanced scan dialog”

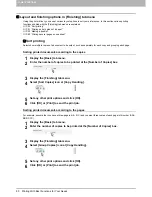
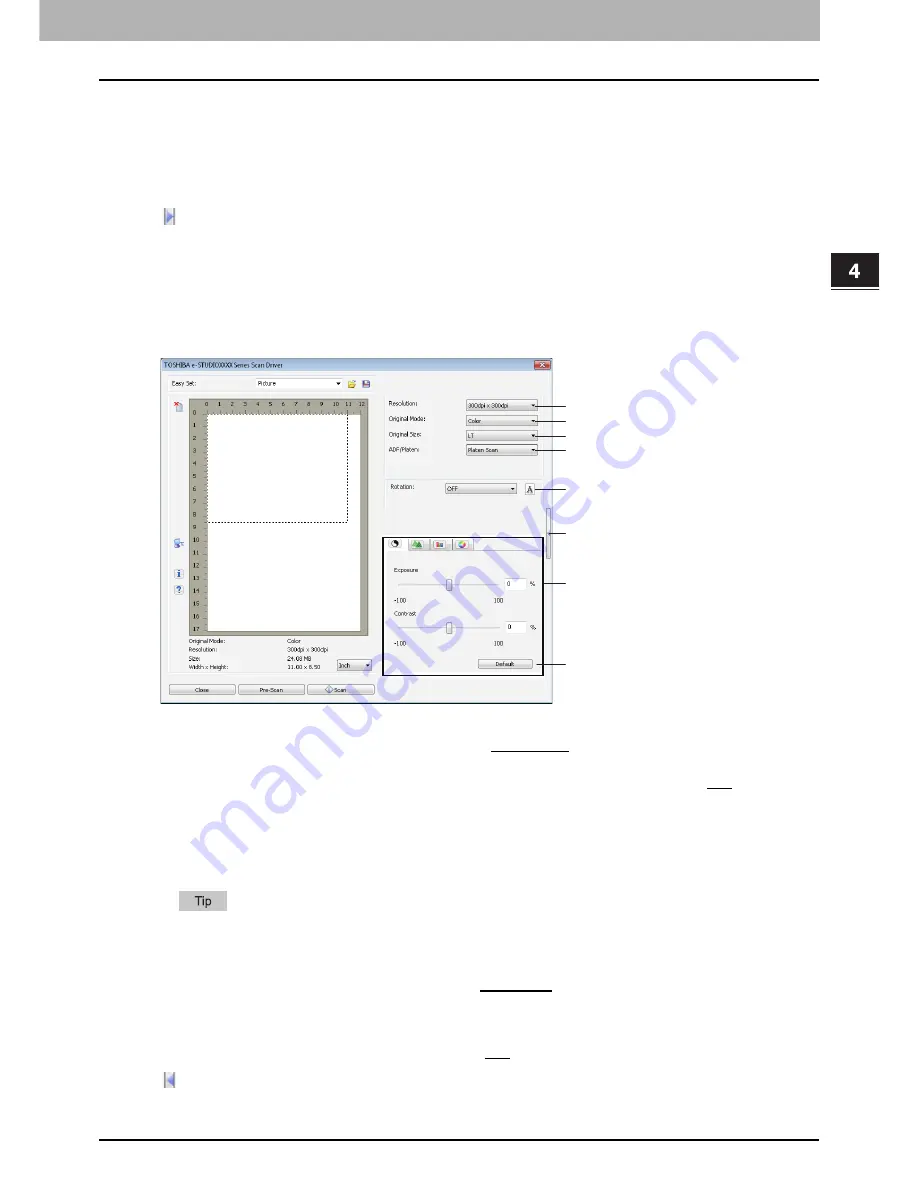
Advanced scan dialog

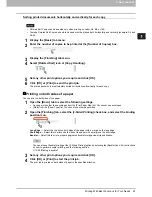
You can click the triangle that faces right on the right-hand side of the basic scan dialog box to make scanning settings. 
The default settings are underlined.

1) Resolution

Sets the horizontal and vertical resolution as dots per inch: 

150 x 150 dpi

, 300 x 300 dpi, or 600 x 600 dpi.

2) Original Mode

Sets the original mode to fit the original image such as text only or the mixture of text and photos: 

Text

, Text/Photo, 

Gray, or Color.

3) Original Size

Sets the original document size or the scanning area.
Select the original size from the pull-down list.
The displayed items differ depending on the installed options and destinations.

When [600 x 600 dpi] is selected in [Resolution] and [Color] is selected in [Original Mode], only [A5-R] or [ST-R] can 
be selected.

4) ADF/Platen

Selects the equipment on which the originals are placed: 

Platen Scan

, ADF Scan, or Duplex Scan.

The displayed items differ depending on the installed options and destinations.

5) Rotation

Rotates the imaged clockwise by 90 degrees, counterclockwise by 90 degrees, or by 180 degrees. This option takes 
effect on the image to scan but not on the preview image: 

OFF

, Right 90, Left 90, or 180.

6)

Closes the advanced scan dialog and return to the basic scan dialog.

 P.100 “Basic scan dialog”

1
2
3

5

7

6

8

4

Summary of Contents for e-studio2007

Page 1: ...MULTIFUNCTIONAL DIGITAL SYSTEMS User s Guide ...

Page 2: ... 2013 TOSHIBA TEC CORPORATION All rights reserved Under the copyright laws this manual cannot be reproduced in any form without prior written permission of TTEC ...

Page 3: ... or B4 LD or LG size can only be placed in a landscape direction therefore R is not added to these sizes Screens In this manual the screens and the operation procedures in Windows are described for Windows 7 The details on the screens may differ depending on how the equipment is used such as the status of the installed options the OS version and the applications The illustration screens used in th...

Page 4: ...eration of the e STUDIO2007 2307 2507 Select and read the manual best suited to your needs This manual is the User s Guide Safety Information Printouts This manual describes the necessary precautions for use For your added security be sure to read this manual first Quick Guide Printouts This manual describes the components preparations basic operations and troubleshooting for the equipment User s ...

Page 5: ...characteristics of the toner to be used and enables you to print images of an optimal quality If you are using a toner cartridge other than the one we recommend the equipment may not be able to detect whether it is installed or not Therefore even if the toner cartridge is correctly installed the error message ERROR TONER appears on the LCD screen and printing may not be performed You may also not ...

Page 6: ......

Page 7: ...OPY FUNCTIONS Basic Copy Procedure 34 Acceptable originals 34 Copying originals 35 Copy Settings 41 Adjusting the exposure 41 Selecting the original mode 42 Selecting the paper 43 Enlarging or reducing the copy size 45 Sorting pages 48 Copying two or four pages on each sheet 50 Copying both sides of a card on a sheet 52 Erasing the shadow on edges 53 Copying right and left pages separately 54 Shif...

Page 8: ...can to E Mail 104 Procedure for Scan to E Mail 104 Scan to File 107 Procedure for Scan to File 107 Scan to USB Memory 109 Procedure for Scan to USB Memory 109 Scan Settings 112 Selecting the color mode 112 Selecting the resolution 112 Scanning the 2 sided originals 113 Selecting the original size 113 Scanning different sizes in one go 114 Selecting the original mode 114 Selecting the orientation 1...

Page 9: ...isfeeds within the Paper Feed Unit 146 Paper misfeeds within the Paper Feed Pedestal 147 Replacing Toner Cartridge 148 When a message for replacement appears 148 Before Calling Service Technician 151 General operation 151 Toner related items 151 Original Paper related items 152 Image trouble 152 Chapter 7 MAINTENANCE AND INSPECTION Regular Cleaning 154 Cleaning Charger 155 Chapter 8 Appendix e STU...

Page 10: ...8 CONTENTS ...

Page 11: ...Turning on 18 Saving energy when not in use Energy saving mode 18 Preparation 2 Loading Paper 20 Acceptable paper types 20 Recommended paper 21 Loading paper in the drawer Paper Feed Unit 22 Loading paper in the drawers of Paper Feed Pedestal 25 Loading paper on the bypass tray 27 Loading an envelope on the bypass tray 29 Preparation 3 Registering Paper Size and Type 32 ...

Page 12: ...ngs to use the various functions on this equipment P 14 Control panel 5 Toner cartridge For the recommended toner cartridges refer to the Safety Information P 148 Replacing Toner Cartridge 6 Front cover Open this when you replace the toner cartridge P 148 Replacing Toner Cartridge 7 Drawer Place up to 250 sheets of plain paper 80 g m2 or 20 lb Bond P 22 Loading paper in the drawer Paper Feed Unit ...

Page 13: ... how to use the Fax functions see the following manual Fax Guide 16 Network interface connector Use this connector when connecting this equipment to a network 17 USB terminal 4 pin Connect to your PC using a commercially available USB cable Use a USB2 0 Hi Speed certified cable USB cable supporting the USB2 0 Hi Speed mode 480 Mbps of transfer speed certified by the USB Implementers Forum Connect ...

Page 14: ...ray Place special paper such as thick paper overhead transparencies or tracing paper P 27 Loading paper on the bypass tray P 29 Loading an envelope on the bypass tray 4 Automatic Duplexing Unit optional Install this to make it possible to print on both sides of paper 5 USB port Connect a USB device to store scanned data 2 3 1 4 5 ...

Page 15: ...isted below Contact your service technician or service representative for details Main body Automatic Duplexing Unit MD 0106 Reversing Automatic Document Feeder MR 3027 Platen Cover KA 2507PC Fax Unit GD 1330 Paper Feed Unit MY 1043 Drawer Module MY 1044 Paper Feed Pedestal KD 1039 Desk MH 2507 ...

Page 16: ...1 RESOLUTION button Use this to select the resolution for sending a fax Available only when the Fax Unit optional is installed 2 PAUSE button Use this to sustain sending a fax Available only when the Fax Unit optional is installed 3 MULTI button Use this to send a fax to multiple destinations Available only when the Fax Unit optional is installed 5 4 3 2 1 13 14 17 19 21 22 18 20 23 24 25 26 12 11...

Page 17: ...ERGY SAVER button Enters into the energy saving mode 13 FUNCTION CLEAR button Restores all the selected functions to the defaults 14 CLEAR STOP button Clears the number entered with the digital keys such as the number of copies as well as cancels scanning or copying the original 15 START button Starts the copying scanning or faxing operation 16 Digital keys Enters numbers such as the number of cop...

Page 18: ...e of an error 24 DATA lamp This lamp blinks while print data is being received or fax data is being sent and received 25 LCD screen Confirms each menu and error messages P 17 Main screen Copy 26 DRAWER button lamps Use this button to select a drawer or the bypass tray to be used as a paper source The lamp of the paper source currently selected is lit The lamp blinks when the selected drawer or tra...

Page 19: ...r messages 2 Paper size Displays the paper size specified for the drawer or the bypass tray 3 Copy quantity Displays the number of copies 4 Scroll icon Displays or that you can press on the current screen or menu 5 Original mode Displays the mode to copy the original 6 Exposure Displays the copy density 7 Reproduction ratio Displays the reproduction or zoom ratio to copy A4 1 READY 100 AUTO EXPOSU...

Page 20: ... Saving energy when not in use Energy saving mode To reduce power consumption the equipment automatically enters into the energy saving mode when a specified period of time has passed since its last use Types of energy saving mode Low power mode SAVING ENERGY appears on the LCD screen The equipment automatically enters into low power mode when a specified period of time elapses Sleep mode The LCD ...

Page 21: ...s for energy saving mode The energy saving mode is canceled under the following conditions When ENERGY SAVER START COPY SCAN or FAX on the control panel is pressed For the low power mode Press ENERGY SAVER START COPY SCAN or FAX For the sleep mode Press ENERGY SAVER When printing or scanning is performed from a PC connected with this equipment When fax data is received ...

Page 22: ... 80 g m2 17 20 lb Bond A B format A3 A4 A4 R A5 R B4 B5 B5 R FOLIO LT format LD LG LT LT R ST R COMP 13 LG 8 5 SQ K format 8K 16K 16K R 250 sheets 80 g m2 20 lb Bond Paper Feed Unit Plain paper 64 80 g m2 17 20 lb Bond A B format A3 A4 A4 R A5 R B4 B5 B5 R FOLIO LT format LD LG LT LT R ST R COMP 13 LG 8 5 SQ K format 8K 16K 16K R 250 sheets 80 g m2 20 lb Bond Paper Feed Pedestal Plain paper 64 80 ...

Page 23: ...Note the following points when storing paper Wrap the paper in its packaging to prevent it from gathering dust Do not expose the paper to direct sunlight Do not store the paper in a humid location Store the paper on a flat surface to prevent it from becoming curled or creased Paper type Product name Plain paper A B format TGIS Paper Mondi LT format TIDAL Hammermill 80 g m2 20 lb Bond K format Clas...

Page 24: ...er in the drawer and Paper Feed Unit in the same procedure For the acceptable paper see the following pages P 20 Acceptable paper types 1 Turn the power of the equipment ON 2 Pull out the drawer carefully 3 Press down the paper plate Press it down until you hear a click sound and it is no longer lifted up ...

Page 25: ...ltiple feeding could occur Be careful not to cut your fingers The printable side may be noted on its packaging 5 Move the end guide to the trailing edge of the paper while pushing its lower part in the direction of the arrows Do not allow any gap between the paper and the end guide in the drawer When placing LD size paper To place LD size paper in the drawer the end guide needs to be removed Move ...

Page 26: ...h your fingers in the drawer when closing it This could cause injury Register the paper size into the equipment When you load paper in the drawer for the first time register the paper size Be sure to register it correctly otherwise it could cause a paper misfeed For the registration see the following pages P 32 Preparation 3 Registering Paper Size and Type Be sure to register the paper size each t...

Page 27: ...ptable paper types 1 Turn the power of the equipment ON 2 Pull out the drawer carefully 3 Pull out the trailing guide while pushing its lower part to the direction of the arrow Then reinstall the guide at the position of the desired paper size The paper size is indicated on the bottom inner surface of the drawer 4 Push the right side of the side guide lock to unlock it ...

Page 28: ...acked paper does not exceed the line indicated inside of the guide P 20 Acceptable paper types Fan the paper well before loading it in the drawer otherwise multiple feeding could occur Be careful not to cut your fingers Place the paper face up The printable side may be noted on its packaging 7 Adjust the side guides Be sure that a gap of approx 0 5 mm 0 02 1 0 mm 0 04 or less in total is left betw...

Page 29: ...T R ST R COMP 13 LG 8 5 SQ K format 8K 16K R For example to copy an A5 size original place the original on the original glass in A5 portrait orientation and paper on the bypass tray in A5 landscape orientation A5 R To enlarge an A4 size original to A3 place the original on the original glass in A4 portrait orientation and A3 paper on the bypass tray The illustrations below are example of loading A...

Page 30: ... lb Bond can be loaded Be sure that the height of the stacked paper does not exceed the indicators of the side guides If paper other than plain is used set it one sheet at a time Fan the paper well before loading it on the bypass tray otherwise multiple feeding could occur Be careful not to cut your fingers Do not push the paper forcibly into the entrance of the bypass feeder otherwise it could ca...

Page 31: ...urled wrinkled or folded envelopes 2 Extremely thick or thin envelopes 3 Wet or damp envelopes 4 Torn envelopes 5 Envelopes which include the contents 6 Non standard size envelopes ones with a special shape 7 Envelopes with eyelets or windows 8 Envelopes sealed with adhesive paste or tape 9 Partly opened or perforated envelopes 10 Envelopes with special coating on the surface 11 Envelopes with glu...

Page 32: ... well to prevent the flap from rolling upward Correct bent corners of the envelope 2 Open the bypass tray 3 Pull the paper holding lever out and then load the envelope face down on the bypass tray Place the envelope with its flap side at the front as shown below Do not copy or print on the back of envelopes otherwise it may cause a paper misfeed or soil them or the inside of the equipment 2 1 ...

Page 33: ...1 PREPARATION Preparation 2 Loading Paper 31 1 PREPARATION 4 Align the side guides to the edges of the envelope and then push back the lever 2 1 ...

Page 34: ...e When you load or change paper a pop up window appears Follow the instructions to register the items below in the equipment For the drawer the paper size For the bypass tray the paper size and type You can also register the paper size for the drawer in the USER FUNCTIONS menu P 129 User Functions Menu List ...

Page 35: ...ize 45 Sorting pages 48 Copying two or four pages on each sheet 50 Copying both sides of a card on a sheet 52 Erasing the shadow on edges 53 Copying right and left pages separately 54 Shifting the pages to the right or left 55 Copying on one or both sides 56 Adding a page number and date time on the copied paper 59 Copying different sizes in one go 60 Image direction 61 Confirming the current func...

Page 36: ...ned data Precautions for Reversing Automatic Document Feeder Do not use the following types of original as they may cause a paper misfeed or damage to the equipment Originals that are folded or curled Originals with carbon copies Originals that have been taped pasted or cut out Originals that have been clipped or stapled Originals with holes or tears Originals that are damp Overhead transparencies...

Page 37: ...lace the original on the original glass and close the Platen Cover or the Reversing Automatic Document Feeder to start copying If a shadow of the folds or wrinkles appears on copies although you smooth out them adjust the exposure or use the BACKGROUND ERASE function When you place a booklet type original strong light may leak out while copying Do not look directly at the original glass When you p...

Page 38: ...than 50 originals 80 g m2 20 lb Bond at once and make sure the thickness of the stack of originals does not exceed 9 5 mm regardless of their size To prevent long originals A3 B4 A4 R LD LG COMP or 8K from sliding out raise the paper exit stopper When you have finished using the stopper lift it slightly and slide it back in To prevent misfeeding do not leave originals or turn OFF ON the equipment ...

Page 39: ...y not be able to use some combinations of functions P 162 Copying Function Combination Matrix 5 Press START to start copying To stop or resume copying press CLEAR STOP during copying Press OK or CANCEL according to the message displayed on the LCD screen When the copying has finished press FUNCTION CLEAR to clear the set copy functions and return to the main screen Copy ...

Page 40: ...g after approx 3 seconds have passed The receiving tray can hold up to 100 sheets If the excessive paper error occurs the lamp blinks and an error message is displayed on the LCD screen Remove the paper from the tray and press START to resume copying When you use overhead transparencies remove them one by one every time they are ejected Otherwise they could be curled and not be good for projection...

Page 41: ...It can work as the EXPOSURE button for Europe and the Americas or the ID CARD button for regions other than Europe and the Americas Just press the button to access the EXPOSURE or ID CARD function so that you can change the copy density or you can copy the front and back of a card on a sheet of paper P 41 Adjusting the exposure P 52 Copying both sides of a card on a sheet For Europe and the Americ...

Page 42: ...st press the button to access the ORIGINAL MODE function so that you can change the original mode P 42 Selecting the original mode For Europe and the Americas For regions other than Europe and the Americas AUTO EXPOSURE TEXT PHOTO A4 1 READY 100 ORIGINAL MODE TEXT PHOTO TEXT PHOTO AUTO EXPOSURE TEXT PHOTO A4 1 READY 100 ORIGINAL MODE TEXT PHOTO TEXT PHOTO ...

Page 43: ...ctly access this function by pressing The button operation varies depending on the region For Europe and the Americas P 39 Using the EXPOSURE or ID CARD function quickly 1 Press COPY 2 Press or to select the item displayed on the LCD screen and then press 3 Press or to select the setting item 4 Adjust the density as follows For AUTO Press OK For manual 1 Press or to increase or decrease the densit...

Page 44: ...ickly 1 Press COPY 2 Press or to select the item displayed on the LCD screen and then press 3 Press or to select the setting item and then press OK Menu Functions Settings Description ORIGINAL MODE TEXT PHOTO Text and photographs mixed TEXT Text only or text and fine illustration only PHOTO Photographs only BACKGROUND ERASE Dark background is placed A4 1 READY 100 AUTO EXPOSURE TEXT PHOTO ...

Page 45: ...g Press OK Menu Functions Settings Description DRAWER Drawer 1 XX Drawer 2 XX Drawer 3 XX Drawer 4 XX Uses the drawer as the paper source The variable XX indicates the paper size Bypass XX Uses the bypass tray as the paper source Available only when the paper is loaded on the bypass tray The variable XX indicates the paper size APS Automatic Paper Selection Detects the size of the original and sel...

Page 46: ...he LCD screen automatically changes so that you can easily set the paper size and type for the bypass tray 1 Press or to select the paper size and then press OK 2 Press or to select the paper type and then press OK Remove the paper from the bypass tray after copying is finished The paper source automatically changes back to the drawer BYPASS A3 A4 A4 R BYPASS PAPER TYPE PLAIN THICK1 THICK2 ...

Page 47: ...m ratio and then press OK You can keep pressing the button to adjust the ratio quickly Menu Functions Settings Description ZOOM Manual zoom 25 100 400 Adjusts the ratio manually FIXED ZOOM A B format 50 A3 A5 71 A3 A4 71 A4 A5 141 A4 A3 141 A5 A4 200 A5 A3 300 400 LT format 50 A3 A5 60 LG ST 65 LD LT 65 LT ST 78 LD LG 78 LG LT 100 LT LG 121 LG LD 129 LT LD 129 ST LT 154 ST LG 200 ST LD 300 400 K f...

Page 48: ... ZOOM A B format 50 A3 A5 71 A3 A4 71 A4 A5 141 A4 A3 141 A5 A4 200 A5 A3 300 400 LT format 50 A3 A5 60 LG ST 65 LD LT 65 LT ST 78 LD LG 78 LG LT 100 LT LG 121 LG LD 129 LT LD 129 ST LT 154 ST LG 200 ST LD 300 400 K format 50 A3 A5 54 8K A5 64 A3 16K 69 8K 16K 71 A3 A4 71 A4 A5 76 16K A5 76 8K A4 91 A3 8K 91 A4 16K 108 16K A4 108 8K A3 129 A4 8K 129 A5 16K 138 16K 8K 141 A4 A3 141 A5 A4 152 16K A3...

Page 49: ...G 78 LG LT 100 LT LG 121 LG LD 129 LT LD 129 ST LT 154 ST LG 200 ST LD 300 400 K format 50 A3 A5 54 8K A5 64 A3 16K 69 8K 16K 71 A3 A4 71 A4 A5 76 16K A5 76 8K A4 91 A3 8K 91 A4 16K 108 16K A4 108 8K A3 129 A4 8K 129 A5 16K 138 16K 8K 141 A4 A3 141 A5 A4 152 16K A3 182 A5 8K 200 A5 A3 300 400 P 46 Selecting a fixed zoom ratio AMS Detects the size of the original and automatically sets the optimum ...

Page 50: ...e copied pages in the same order as the original and eject all sets of copies in the same orientation ROTATE SORT When you make several sets of copies the copies can be sorted and made to exit alternately one set by one This is called alternation You need to place copy paper in one drawer in a landscape direction and place that of the same size in another drawer in a portrait direction in advance ...

Page 51: ...hen placing the original on the original glass After the first original is scanned the LCD screen shows NEXT ORIGINAL Make sure that SCAN NEXT PAGE is selected place the next original on the original glass and then press OK or START When all the originals have been scanned select FINISHED and then press OK or START CANCEL JOB is displayed if there is no operation for a certain period Menu Function...

Page 52: ...e the 2IN1 4IN1 function from USER FUNCTIONS COPY 2IN1 4IN1 P 130 User functions menu items This function is not available for some paper sizes If you have set the unavailable sizes the LCD screen shows the error message and you cannot use this function P 20 Preparation 2 Loading Paper P 32 Preparation 3 Registering Paper Size and Type 1 Press COPY 2 Press or to select the item displayed on the LC...

Page 53: ...nal in the same orientation as the one selected in ORIG ORIENTATION NEXT ORIGINAL When you place the original on the original glass this message appears Press or to select SCAN NEXT PAGE Select FINISHED when you have finished scanning your originals The size of the original selected in ORIGINAL SIZE is disabled if it is detected automatically For the detectable original sizes see the following pag...

Page 54: ...n and then press 3 Press or to select the setting item and then press OK 4 Follow the instructions on the LCD screen to use the ON function You are instructed to make the following settings SET FRONT OF ID CARD Place the front of a card face down on the original glass and then press START Make sure that you place the card in a landscape orientation within the frame of the original scale SET BACK O...

Page 55: ...2 to 0 6 in increments of 1 mm 0 04 1 Press COPY 2 Press or to select the item displayed on the LCD screen and then press 3 Press or to select the setting item 4 Set the setting as follows For OFF Press OK For ON 1 Press 2 Press or to increase or decrease the value for the area to erase 3 Press OK If you just press OK for ON the default value 7 mm 0 3 of this function is used Menu Functions Settin...

Page 56: ...nal glass The book margin width can be set between 8 to 30 mm 0 3 to 1 2 in increments of 1 mm 0 04 A4 B5 LT and 16K sizes are available for this function 1 Press COPY 2 Press or to select the item displayed on the LCD screen and then press 3 Press or to select the setting item 4 Set the setting as follows For OFF Press OK For ON 1 Press 2 Press or to increase or decrease the value for the book ma...

Page 57: ...mm 0 04 1 Press COPY 2 Press or to select the item displayed on the LCD screen and then press 3 Press or to select the setting item 4 Set the setting as follows For OFF Press OK For LEFT MARGIN or RIGHT MARGIN 1 Press 2 Press or to increase or decrease the value for the margin 3 Press OK If you just press OK for ON the default value 7 mm 0 3 of this function is used Menu Functions Settings IMAGE S...

Page 58: ...ginals into the both sides of paper so that you can save paper 1 1 SIMPLEX P 57 Copying on one side 1 2 DUPLEX P 58 Copying on both sides 2 2 DUPLEX P 58 Copying on both sides 2 1 SPLIT P 57 Copying on one side To scan 2 sided originals automatically the Reversing Automatic Document Feeder is required To copy on the both sides of paper the Automatic Duplexing Unit is required ...

Page 59: ... scanned the LCD screen shows NEXT ORIGINAL Make sure that SCAN NEXT PAGE is selected place the next original on the original glass and then press OK or START When all the originals have been scanned select FINISHED and then press OK or START CANCEL JOB is displayed if there is no operation for a certain period Menu Functions Settings Description 2 SIDED 1 1 SIMPLEX 1 sided original 1 sided copy 1...

Page 60: ... When placing the original on the original glass After the first original is scanned the LCD screen shows NEXT ORIGINAL Make sure that SCAN NEXT PAGE is selected place the next original on the original glass and then press OK or START When all the originals have been scanned select FINISHED and then press OK or START CANCEL JOB is displayed if there is no operation for a certain period Menu Functi...

Page 61: ...You can add a page number and date time on the copied paper 1 Press COPY 2 Press or to select the item displayed on the LCD screen and then press 3 Press or to select the setting item and then press OK Menu Functions Settings ANNOTATION OFF PAGE NO PAGE No DATE TIME A4 1 READY 100 1 1 SIMPLEX ANNOTATION OFF ...

Page 62: ...rawer When this function sets to ON the equipment is switched to the automatic paper selection mode In the automatic paper selection mode a copy is made on copy paper of the same size as the original Place paper whose sizes are the same as those of the originals in the corresponding drawers in advance 1 Press COPY 2 Press or to select the item displayed on the LCD screen and then press 3 Press or ...

Page 63: ...py normally the copied pages exit in a different direction alternately With this function you can make them all exit in the same direction 1 sided portrait original placed in a landscape direction 2 sided copy 2 sided open to left portrait original 1 sided copy 1 Press COPY 2 Press or to select the item displayed on the LCD screen and then press 3 Press or to select the setting item and then press...

Page 64: ...ng the current function settings 1 Press SETTINGS 2 Press or to scroll through the menu For details on the displayed functions and settings see the pages below P 124 Copy menu items 3 When you are finished with confirmation press SETTINGS again ...

Page 65: ...How to print 69 Status Monitor 71 Monitoring the print status and reporting print errors 71 Setting Up Print Options 72 How to set up 72 Print options 75 Printing With Best Functions for Your Needs 89 Layout and finishing options in Basic tab menu 89 Layout and finishing options in Finishing tab menu 90 Finishing options in Effect tab menu 94 ...

Page 66: ... on the Configuration tab after you installed the printer drivers P 64 Configuring options manually Configuring options manually Setting the Configuration tab manually You need to log in to Windows with the Administrator privilege 1 Click Start and select Devices and Printers The Printers folder appears For Windows Vista or Windows Server 2008 Click Start Control Panel Hardware and Sound and selec...

Page 67: ...nd Properties in the File menu If the password entry screen appears enter the administrator password The User Account Control dialog box appears Click Continue For Windows 7 some tab menus have a button in the printer driver properties To change the properties click on it If the properties cannot be changed ask your system administrator 3 Select the Configuration tab menu and set the following opt...

Page 68: ...for the drawer is fixed to Plain Drawer 3 Select the size of paper that is loaded in the Drawer 3 The paper type for the drawer is fixed to Plain Drawer 4 Select the size of paper that is loaded in the Drawer 4 The paper type for the drawer is fixed to Plain Bypass Tray Select the size and type of paper that is loaded in the Bypass Tray Setup items differ depending on the model and the option conf...

Page 69: ...teps below to access the printers folder on Windows 8 Windows Server 2012 1 Move the cursor to the upper right corner or lower right corner of the computer screen and then select Start in the menu that appears The Start screen appears 2 Right click in the blank area in the Start screen and then click All apps that appears The Apps screen appears ...

Page 70: ...3 PRINT FUNCTIONS 68 Before Using the Printer Driver 3 Click Control Panel The All Control Panel Items screen appears 4 Click Devices and Printers The Devices and Printers folder appears ...

Page 71: ...es the equipment for copying the printing starts after approx 30 seconds have passed since another user finishes the operation for copying How to print Once you have installed the printer driver and configured it properly you can print directly from most Windows applications Simply choose the Print command from your application You can print using the various functions by setting print options on ...

Page 72: ...tion 3 Setting the print options on each tab according to how you want to print Setting the print options varies depending on how you want to print a document P 75 Print options 4 Click OK to save the settings 5 Click Print to print a document ...

Page 73: ...status monitor icon appears in the notification area of the Windows taskbar The icon changes according to the status of the equipment is a Ready icon that indicates the equipment is ready to print is a Warning icon that prompts you to take action as soon as possible is an Error icon that prompts you to take a troubleshooting action soon If any error occurs the LCD screen also shows the error messa...

Page 74: ... the initial values of the options For example the paper size setting you most commonly use etc are settings you will not want to change every time you print It is convenient to set these options as initial values How to display 1 Click Start and select Devices and Printers For Windows Vista or Windows Server 2008 Click Start Control Panel Hardware and Sound and select Printers For Windows XP or W...

Page 75: ... the print options varies depending on how you want to print a document P 75 Print options 2 Click Save Profile in the Profile group The Profile Name dialog box appears 3 Enter the profile name and click OK The file name must be up to 63 characters long If you enter an existing profile name you are prompted to confirm whether you want to overwrite it If you want click OK If you try to save more th...

Page 76: ...ted on each tab To restore the default settings after you select the profile click Restore Defaults on each tab Selecting None on the Profile box will not restore them Deleting profile 1 Select the profile that you want to delete in the Profile box and click Delete The Confirm Delete dialog box appears 2 Click Yes to delete the selected profile ...

Page 77: ...or the Help of the OS to be used General tab Sharing tab Ports tab Advanced tab Color Management tab Security tab How to display 1 Click Start and select Devices and Printers The Printers folder appears For Windows Vista or Windows Server 2008 Click Start Control Panel Hardware and Sound and select Printers For Windows XP or Windows Server 2003 Click Start and select Printers and Faxes For Windows...

Page 78: ...such as toner save and so on P 86 Others tab Configuration tab Allows you to configure the device options of the equipment This tab is only displayed when the printer properties are accessed from the Printers folder P 87 Configuration tab 3 Preview window In the Preview window you can preview how a document will be printed under the current settings of the printer driver The image of a page to whi...

Page 79: ...line width may vary For detailed instructions on how to print with the Manual Scale setting see the following page P 89 Fitting images within paper size 4 Paper Source Selects a paper source to print a job in the most suitable paper size The figure on the right indicates the paper size set for each paper source When you select a paper source the chosen one is indicated with a green square in the f...

Page 80: ...er Thick1 Printing on thick 1 paper Thick2 Printing on thick 2 paper Transparency Printing on transparent sheets Thin Printing on the back side of thin paper When Drawer 1 to Drawer 4 is selected in the Paper Source box only Plain can be chosen in the Paper Type box When Envelope is selected in the Print Paper Size box Envelope will be displayed and you cannot change the paper type 6 Number of Cop...

Page 81: ... at the Number of Copies option Rotated Sort Copies can be selected only when Letter A4 B5 or 16K is selected at the Print Paper Size option When you use the Rotated Sort Copies option place copy paper of a desired size in two drawers portrait and landscape directions before you start printing Select one paper size from Letter A4 B5 and 16K and then place the selected paper in two drawers in diffe...

Page 82: ... one sheet The pages are reduced to fit the selected paper size automatically and printed 2 pages Prints images from 2 pages arranged on one sheet 4 pages Prints images from 4 pages arranged on one sheet 6 pages Prints images from 6 pages arranged on one sheet 8 pages Prints images from 8 pages arranged on one sheet 9 pages Prints images from 9 pages arranged on one sheet 16 pages Prints images fr...

Page 83: ...s option Select the check box and click Details to open the dialog box Select Units set the left right top and bottom margins and then click OK to enable them Margin Enter the value from 4 2 to 100 mm 0 17 to 3 94 inches Units Select the unit inch or mm for values Restore Defaults Restores the margins to the default settings If the application has the function to set margins be sure to set them in...

Page 84: ...t 1 2 Statement on Statement Select this to print a 1 2 Statement size booklet Every 2 pages are printed on Statement paper to fit on half a sheet 1 2 Comp on Comp Select this to print a 1 2 Computer size booklet Every 2 pages are printed on Computer paper to fit on half a sheet 1 2 13LG on 13LG Select this to print a 1 2 13 inch LG size booklet Every 2 pages are printed on 13 inch LG paper to fit...

Page 85: ...d graphics smoothly 3 Distinguish Thin Lines Select this check box to print thin lines clearly 4 Use Black for All Text Prints all texts in 100 black except white texts Effect tab The Effect tab contains print options that add effects to your print jobs such as Watermarks and Rotate printing 1 Watermark Selects the watermark to be used or edited The following values except None are the default wat...

Page 86: ...om the Watermark box and click it to delete a watermark P 96 Deleting a watermark The default watermarks can be deleted However once deleted they cannot be restored None cannot be deleted Print on First Page Only Prints a watermark on the first page only This setting will become available when any watermark is selected from the Watermark box 2 Rotate 180 Degrees Performs rotation printing of an im...

Page 87: ...to the text Italic Sets the italic style to the text Bold Italic Sets the bold and italic style to the text 8 Font Size Enter the font size for the watermark text The font size can be set from 6 to 300 pt in units of 1 pt 9 Angle Enter the degree of angle for rotating the watermark text The angle can be set from 90 to 90 degrees in units of 1 degree You can also set the degree of the angle by movi...

Page 88: ...ant to resume the settings set the printer driver from the Devices and Printers folder P 72 Setting initial values of print options 2 Toner Save Prints in the toner save mode When the toner save mode is enabled printing may become lighter 3 Do not Print Blank Pages Select this check box to ignore blank pages for printing If the watermark option is enabled all pages are printed even when the conten...

Page 89: ...onfiguring options manually 1 Model Selection This sets the model type 2 Option This option sets whether the following optional devices are installed Automatic Duplexing Unit Select this check box when the Automatic Duplexing Unit is installed This setting is selectable only when the model below is specified in the Model Selection box Drawers This sets the installation of drawers according to the ...

Page 90: ...ttings 1 Paper Size Select the paper size set in each drawer 2 Paper Type Select the paper type set in each drawer 3 Restore Defaults Restores the configuration of this equipment displayed in the Configuration tab menu to the original factory defaults 1 2 3 ...

Page 91: ... images within paper size Fitting images within paper size Automatically enlarges or reduces an image to fit into a specified paper size or manually set the scale to enlarge or reduce it Printing enlarged or reduced image to fit the specified paper size 1 Display the Basic tab menu 2 Select the document size on the Original Paper Size box Then select the paper size that you want to print at the Pr...

Page 92: ...Sorting printed documents according to the copies 1 Display the Basic tab menu 2 Enter the number of copies to be printed at the Number of Copies box 3 Display the Finishing tab menu 4 Select Sort Copies icon at Copy Handling 5 Set any other print options and click OK 6 Click OK or Print to send the print job Sorting printed documents according to the pages For example assume that you have a three...

Page 93: ...des of the paper 1 Open the Basic tab to select the following settings Any paper size other than envelopes from the Print Paper Size list You cannot use envelopes Plain from the Paper Type list You cannot use other paper sizes 2 Open the Finishing tab select the 2 Sided Printing check box and select the binding position icon Long Edge Select this to print on both sides of the paper with a margin o...

Page 94: ...e booklet Every 2 pages are printed on A5 paper to fit on half a sheet A6 Letter Half on Letter Select this to print a 1 2 Letter size booklet Every 2 pages are printed on Letter paper to fit on half a sheet LT on LD Select this to print a Letter size booklet Every 2 pages are printed on Ledger paper to fit on half a sheet Letter 1 2 LG on LG Select this to print a 1 2 Legal size booklet Every 2 p...

Page 95: ...er of web pages or review the narrative of a slide presentation using N up is not only convenient but conserves paper as well Printing multiple pages per sheet 1 Display the Finishing tab menu 2 Select how many pages you want to print on a single sheet at the Number of pages per Sheet box 2 pages Prints images from 2 pages arranged on one sheet 4 pages Prints images from 4 pages arranged on one sh...

Page 96: ...ch as TOP SECRET CONFIDENTIAL DRAFT ORIGINAL or COPY You can choose from several predefined watermarks or you can create and save your own custom watermarks Watermarks are text only Printing a watermark 1 Display the Effect tab menu 2 Select the watermark to be printed at the Watermark box You can create a new watermark if there is none you want to apply on the box P 95 Creating or editing a water...

Page 97: ... 6 To rotate the watermark enter the number of degrees in the Angle box You can enter from 90 degrees to 90 degrees in units of 1 degree in the Angle box You can also set the angle using the scroll bar 7 Select how the watermark text is printed from Solid Draw as Outline and Transparency Solid Prints a solid type of watermark Draw as Outline Prints an outline type of watermark Transparency Prints ...

Page 98: ... Needs Deleting a watermark You can delete the default watermarks However they cannot be restored by clicking Restore Defaults 1 Select the watermark that you want to delete at the Watermark box 2 Click Delete The Confirm Delete dialog box appears 3 Click Yes ...

Page 99: ...l 104 Scan to File 107 Procedure for Scan to File 107 Scan to USB Memory 109 Procedure for Scan to USB Memory 109 Scan Settings 112 Selecting the color mode 112 Selecting the resolution 112 Scanning the 2 sided originals 113 Selecting the original size 113 Scanning different sizes in one go 114 Selecting the original mode 114 Selecting the orientation 114 Selecting the compression ratio 115 Adjust...

Page 100: ...n after installation For the measurement system see the Windows Help P 98 How to scan How to scan Follow the steps below to scan the original 1 Place the original s P 35 Placing originals on the original glass P 36 Placing originals on the Reversing Automatic Document Feeder 2 Run your TWAIN compatible application and execute the image acquisition command You can usually execute the scan or image ...

Page 101: ...ONS 6 Save the scanned image in your application The saving command varies depending on the application You usually execute the Save or Save as command on the File menu If necessary modify the scanned image using the various graphic commands in your application ...

Page 102: ...alog Basic scan dialog When you execute the image acquisition command the following basic scan dialog appears 1 Easy Set The scan options can be saved P 103 Using the Easy Set feature 2 Clears the preview image 3 Preview screen The pre scanned image appears The dotted boundary shows the scanning area or the original size The image information appears under the preview screen 4 Opens the IO Type di...

Page 103: ...ext and photos Text Text Photo Gray or Color 3 Original Size Sets the original document size or the scanning area Select the original size from the pull down list The displayed items differ depending on the installed options and destinations When 600 x 600 dpi is selected in Resolution and Color is selected in Original Mode only A5 R or ST R can be selected 4 ADF Platen Selects the equipment on wh...

Page 104: ...e scroll bar or editing the field 100 to 100 RGB Adjustment is only available when Color is selected in Original Mode Saturation Adjusts the saturation of the image using the scroll bar or editing the field 100 to 100 Saturation is only available when Color is selected in Original Mode 8 Default Resets all the settings back to the defaults Scanning from the equipment on the network 1 Click on the ...

Page 105: ... Save Using the Easy Set file 1 Select the pre defined Easy Set file or click next to the Easy Set menu to select your Easy Set file The following two pre defined files are available When the Open dialog box appears select the folder select the target Easy Set file and then click Open 2 Click Pre Scan Deleting the Easy Set files You can delete the Easy Set files in the same way as for normal files...

Page 106: ...o E Mail 1 Place the original s For placing the originals see the pages below P 35 Copying originals A4 A3 A5 R B5 B5 R B4 A4 R and FOLIO LT LD LT R LG ST R and COMP sized originals can be scanned 2 Press SCAN 3 Press or to select E MAIL and then press 4 Press or to select ADDRESS and then press Scan to E mail Internet Send E mail to the Internet via SMTP server SMTP server SELECT SCAN TYPE E MAIL...

Page 107: ...ass perform the procedure from step 10 Menu Functions Settings Description FILE NAME MAX128 An initial file name can be changed P 120 Character entry FILE FORMAT PDF MULTI Stores your scan as a PDF file Select MULTI for saving several pages as a single file Select SINGLE for saving several pages as a separated single file for each page SINGLE TIFF MULTI Stores your scan as a TIFF file Select MULTI...

Page 108: ...xt one on the original glass Select SCAN NEXT PAGE using or and press OK Repeat step 10 until all the originals have finished being scanned 11 If there are no more originals select FINISHED using or The originals are stored by pressing the OK NEXT ORIGINAL SCAN NEXT PAGE FINISHED ...

Page 109: ... storing the scanned data to the client computers For details refer to the TopAccess Guide We recommend that you back up the data stored in the shared folder Delete documents stored in the shared folder when they are no longer needed 1 Place the original s For placing the originals see the pages below P 35 Copying originals A4 A3 A5 R B5 B5 R B4 A4 R and FOLIO LT LD LT R LG ST R and COMP sized ori...

Page 110: ...e finished being scanned 8 If there are no more originals select FINISHED using or The originals are stored by pressing the OK Menu Functions Settings Description FILE NAME MAX128 An initial file name can be changed P 120 Character entry FILE FORMAT PDF MULTI Stores your scan as a PDF file Select MULTI for saving several pages as a single file Select SINGLE for saving several pages as a separated ...

Page 111: ...this equipment even though the requirements below are met FAT16 or FAT32 format Single partition USB storage devices with multiple partitions are not supported 1 Place the original s For placing the originals see the pages below P 35 Copying originals A4 A3 A5 R B5 B5 R B4 A4 R and FOLIO LT LD LT R LG ST R and COMP sized originals can be scanned 2 Press SCAN 3 To store scans in a USB storage devic...

Page 112: ...omatic Document Feeder If originals are placed on the original glass perform the procedure from step 7 Menu Functions Settings Description FILE NAME MAX128 An initial file name can be changed P 120 Character entry FILE FORMAT PDF MULTI Stores your scan as a PDF file Select MULTI for saving several pages as a single file Select SINGLE for saving several pages as a separated single file for each pag...

Page 113: ...lace the next one on the original glass Select SCAN NEXT PAGE using or and press OK Repeat step 7 until all the originals have finished being scanned 8 If there are no more originals select FINISHED using or The originals are stored by pressing the OK NEXT ORIGINAL SCAN NEXT PAGE FINISHED ...

Page 114: ... and then press 3 Press or to select the setting item and then press OK Selecting the resolution You can select the resolution 1 Press SCAN 2 Press or to select the item displayed on the LCD screen and then press 3 Press or to select the setting item and then press OK Menu Functions Settings Description COLOR MODE BLACK Images in black and white GRAY SCALE Images containing both text and photos Th...

Page 115: ... the original size You can specify the original size 1 Press SCAN 2 Press or to select the item displayed on the LCD screen and then press 3 Press or to select the setting item and then press OK Menu Functions Settings Description SINGLE 2 SIDED SCAN SINGLE Scans only the front of the originals DUPLEX Scans both sides of the originals SELECT SCAN TYPE BLACK 300dpi SINGLE Menu Functions Settings De...

Page 116: ... to select the setting item and then press OK Selecting the orientation You can change the orientation of your scans Select the desired rotation pattern 1 Press SCAN 2 Press or to select the item displayed on the LCD screen and then press 3 Press or to select the setting item and then press OK Menu Functions Settings MIX ORIGINAL OFF ON SELECT SCAN TYPE SINGLE AUTO SIZES MIX ORIGINAL OFF Menu Func...

Page 117: ...ess SCAN 2 Press or to select the item displayed on the LCD screen and then press 3 Press or to select the setting item and then press OK Menu Functions Settings Description COMPRESS LOW Applies a low compression ratio and enhances the image quality MID Compresses the data with a moderate compression ratio and obtains an average image quality HIGH For a high compression ratio Suitable when you wan...

Page 118: ...the density as follows For AUTO Press OK For manual 1 Press or to increase or decrease the density level 2 Press OK Specifying E mail Addresses To specify e mail addresses for the Scan to E mail function you have the following options Up to 220 addresses can be specified P 116 Entering an e mail Addresses P 117 Selecting from the address book P 117 Searching the address book with single numbers P ...

Page 119: ...CH and then press 2 Using or select letters tab that you want to display Using or select the desired contact and then press OK 3 Press OK When setting CC ADDRESS you can specify additional e mail addresses If you want to view or delete the specified e mail addresses see the following page P 118 Viewing Deleting specified e mail addresses Searching the address book with single numbers 1 Press or to...

Page 120: ...dditional e mail addresses If you want to view or delete the specified e mail addresses see the following page P 118 Viewing Deleting specified e mail addresses Viewing Deleting specified e mail addresses You can view the specified e mail addresses contacts and groups and delete them from the list 1 On the E MAIL ADDRESS menu select TO or CC using or and then press If you select CC select REVIEW L...

Page 121: ...4 SCAN FUNCTIONS Scan Settings 119 4 SCAN FUNCTIONS 2 Select a listing you want to delete and then press CLEAR STOP 3 DELETE DESTINATION message appears select YES using or and then press OK ...

Page 122: ...f character to enter by pressing the digital key The input mode switches as follows each time the key is pressed Alphabet characters Numbers Entering characters Example To enter Chicago 1 Press to set the alphabet input mode 2 Press 2 a few times to enter C 3 Press to move the cursor to the right If you want to enter the character assigned to another digital key you can enter it without moving the...

Page 123: ...he assignment of characters in the character input mode is as follows Characters entered in the character input mode You can enter the characters displayed on the upper side of the digital keys Digital key Number of times the key is pressed 1 _ 1 2 A B C 2 a b c 3 D E F 3 d e f 4 G H I 4 g h i 5 J K L 5 j k l 6 M N O 6 m n o 7 P Q R S 7 p q r s 8 T U V 8 t u v 9 W X Y Z 9 w x y z 0 0 space _ ...

Page 124: ...T R The color mode and resolution settings can be changed on the scan setting screen For details see the following sections P 112 Selecting the color mode P 112 Selecting the resolution Color Mode Resolution Scan Speed Black 150 dpi A4 25 pages minute LT 24 pages minute 300 dpi 600 dpi Gray Scale 150 dpi A4 25 pages minute LT 24 pages minute 300 dpi 600 dpi Full Color 150 dpi 8 pages minute 300 dp...

Page 125: ... Copy menu items 124 Scan Menu List 125 Scan menu items 125 Network Menu List 127 Setting the Ethernet speed 127 Setting the TCP IP protocol 127 Setting the HTTP network service 128 User Functions Menu List 129 User functions menu items 130 ...

Page 126: ...py size FINISHING NON SORT SORT ROTATE SORT Sets the finishing mode for ejecting copies P 48 Sorting pages 2IN1 4IN1 OFF 2IN1 4IN1 Copies two or four originals onto one sheet of paper P 50 Copying two or four pages on each sheet ID CARD OFF ON Sets the ID card function P 52 Copying both sides of a card on a sheet EDGE ERASE OFF ON 4 to 15 mm 0 2 to 0 6 Sets the edge erase function P 53 Erasing the...

Page 127: ...SOLUTION SINGLE 2 SIDED SCAN ORIGINAL SIZE MIX ORIGINAL ORIGINAL MODE ROTATION COMPRESS EXPOSURE Menu Functions Settings Description and Reference Pages E MAIL ADDRESS TO ADDRESS CC ADDRESS REVIEW LIST You can select from the Address Book or directly enter the address P 104 Procedure for Scan to E Mail P 116 Specifying E mail Addresses INPUT ADDRESS SEARCH SINGLE NUMBER GROUP NUMBER FILE NAME MAX1...

Page 128: ...gs Description and Reference Pages COLOR MODE BLACK GRAY SCALE FULL COLOR Sets the color mode to scan the data P 112 Selecting the color mode RESOLUTION 600dpi 300dpi 150dpi Sets the resolution for the data to scan P 112 Selecting the resolution SINGLE 2 SIDED SCAN SINGLE DUPLEX Sets the type of originals to scan P 113 Scanning the 2 sided originals ORIGINAL SIZE AUTO SIZES A3 A4 A4 R A5 R B4 B5 B...

Page 129: ...the Ethernet speed If the network is not stable turn the power of the equipment OFF and then back ON Setting the TCP IP protocol You can set the TCP IP protocol that is commonly used in most network systems When using Web based utilities such as TopAccess or network features of this equipment such as network printing and network scanning you are required to set the TCP IP protocol In the TCP IP se...

Page 130: ...upported an appropriate IP address is assigned to this equipment by the auto IP addressing function However the auto IP addressing may not work properly if a router is placed in the network NO AUTO IP When TCP IP is set using only the DHCP server Select NO AUTO IP when the equipment is connected to a local area network with a DHCP server and you want to set the TCP IP not using the auto IP address...

Page 131: ...s or to scroll the menu and then press to select the settings for each function 5 Press or to select a setting and then press OK Continues to the next step if the selected setting has more options or values Exits from the menu if the selected setting has no more options or values At this point the operation is complete 6 Make option settings with or or enter characters using the digital keys and t...

Page 132: ...T PAPER JAM RECOVERY LCD CONTRAST NETWORK COMPLETE ETHERNET TCP IP HTTP SUPPLY NOTICE DESTINATION SETUP AUTO DETECT OTHER INFORMATION COPY EXPOSURE P 134 COPY ORIGINAL MODE MAXIMUM COPIES SORT MODE PRIORITY AUTO 2 SIDED MODE 2IN1 4IN1 ORIGINAL SIZE ORIG ORIENTATION PAGE LAYOUT BACKGROUND SHARPNESS SCAN COLOR MODE P 135 SCAN COMPRESS 2 SIDED SCAN ROTATION BLACK SETTING RESOLUTION ORIGINAL MODE EXPO...

Page 133: ...IONS ADDRESS BOOK E MAIL SINGLE NUMBER P 135 ADDRESS BOOK GROUP NUMBER PHONE BOOK SPEED DIAL GROUP DIAL ONE TOUCH DRAWER DRAWER 1 P 135 DRAWER DRAWER 2 DRAWER 3 DRAWER 4 INFORMATION COUNTER TOTAL COUNTER P 136 INFORMATION TONER REMAIN Menu Functions Reference Pages ...

Page 134: ... 45 60 75 90 105 120 135 150 Sets the time in seconds to clear the previous settings and return to the main screen POP UP DRAWER SET ENABLE DISABLE Sets whether to display a pop up message on the LCD screen in the following cases When the size of paper loaded in the drawer differs from setting When a paper misfeed occurs PAPER JAM RECOVERY ENABLE DISABLE LCD CONTRAST 3 Light to 3 Dark Sets the bri...

Page 135: ...PLY NOTICE 1 DESTINATION SETUP FAX NUMBER Sets the contact information for ordering supplies E MAIL AUTO DETECT OFF ON Sets whether to detect information automatically OTHER INFORMATION CUSTOMER NUMBER Sets other various contact information CONTACT NAME CONTACT TEL NUMBER SHIP TO NAME SHIP TO ADDRESS Menu Functions Settings Description ...

Page 136: ...GINAL SIZE A3 A4 A5 B4 B5 FOLIO 8K 16K LD LG LT COMP 13 LG ST 8 5SQ Sets the default setting for the original size when using the 2IN1 4IN1 function ORIG ORIENTATION Portrait Landscape Sets the default setting for the original orientation when using the 2IN1 4IN1 function PAGE LAYOUT 2IN1 Sets the order of the pages when using the 2IN1 4IN1 function 4IN1 BACKGROUND 4 to 4 Adjusts the density of th...

Page 137: ...00dpi 150dpi Sets the default setting for the resolution when GRAY SCALE is selected for the color mode setting FULL COLOR SETTING RESOLUTION 600dpi 300dpi 150dpi Sets the default setting for the resolution when FULL COLOR is selected for the color mode setting ORIGINAL MODE TEXT PHOTO TEXT PHOTO Sets the default setting for the original mode when FULL COLOR is selected for the color mode setting ...

Page 138: ...5 VARIOUS FUNCTIONS 136 User Functions Menu List INFORMATION Menu Functions Settings Description COUNTER TOTAL COUNTER Displays the total counter TONER REMAIN Displays the toner remaining information ...

Page 139: ...eds on the Reversing Automatic Document Feeder RADF 140 Paper misfeeds on the bypass tray 142 Paper misfeeds inside of the side cover 143 Paper misfeeds within the Paper Feed Unit 146 Replacing Toner Cartridge 148 When a message for replacement appears 148 Before Calling Service Technician 151 General operation 151 Toner related items 151 Original Paper related items 152 Image trouble 152 ...

Page 140: ... on the bypass tray has run out Load paper on the bypass tray P 27 Loading paper on the bypass tray TONER IS LOW There is only a little toner remaining in the toner cartridge There is still a little toner remaining in the toner cartridge Do not replace the toner cartridge until TONER EMPTY appears on the LCD screen The message may not appear because the toner remaining in the cartridge does not li...

Page 141: ... properly P 32 Preparation 3 Registering Paper Size and Type More misfed paper is still remaining after the release of a paper misfeed The side guides are aligned too tight or too loose to the paper The height of the stacked paper is exceeding the indicators in the drawer When removing misfed paper Observe the following precautions when you remove misfed paper Do not tear misfed paper Remove misfe...

Page 142: ...eed Paper misfeeds on the Reversing Automatic Document Feeder RADF 1 Open the upper cover 2 Open the transport guide and remove the original 3 Open the Reversing Automatic Document Feeder 4 Turn the dial to remove the misfed original ...

Page 143: ...6 TROUBLESHOOTING Paper Misfeed 141 6 TROUBLESHOOTING 5 Close the Reversing Automatic Document Feeder 6 Raise the feeder tray 7 Turn the dial to remove the misfed original 8 Lower the feeder tray ...

Page 144: ...ss tray 1 Pull the paper holding lever out and then pull out the misfed paper on the bypass tray 2 Check beneath the transport guide inside of the side cover Check if any paper is misfed under the transport guide behind the transfer unit P 143 Paper misfeeds inside of the side cover 1 2 ...

Page 145: ...not touch the fuser unit or the metal part around the unit If you touch the inside of the equipment this could cause burns or any injury to your hands 1 Open the side cover 2 Remove the misfed paper behind transfer unit Be sure not to touch the photoconductive drum when removing the misfed paper If you cannot see the misfed paper turn the dial green of the transfer unit to remove the misfed paper ...

Page 146: ...ed paper and remove it Be sure that the height of the stacked paper does not exceed the line indicated inside of the side guides 4 Close the drawer 5 Lay down the transfer unit and then press down the two fuser pressure release levers green until they come to a stop Press down the levers fully until they stop 6 Raise the transport guide 2 1 ...

Page 147: ...ser unit Pull the misfed paper up or down as shown below depending on its position Be sure not to touch the photoconductive drum when releasing the misfed paper 8 Return the transport guide and transfer unit to their original positions and then close the side cover Pulling it up Pulling it down ...

Page 148: ... the side cover and check if any paper is misfed behind the transfer unit P 143 Paper misfeeds inside of the side cover 2 Open the paper feed cover of the unit 3 Release the misfed paper 4 If it is difficult to find or remove the misfed paper open the drawer of the Paper Feed Unit 2 1 ...

Page 149: ... the stacked paper does not exceed the line indicated inside of the side guides Do not allow any gap between the paper and the end guide in the drawer 6 Close the paper feed cover of the unit and the side cover Paper misfeeds within the Paper Feed Pedestal 1 Open the paper feed cover of the Paper Feed Pedestal 2 Release the misfed paper 3 Close the paper feed cover of the Paper Feed Pedestal ...

Page 150: ...ions Before inserting a new toner cartridge check that the product name is T 2507 Do not touch the parts on the circuit board mounted on the toner cartridge because they may be damaged 1 Open the front cover 2 While holding down the green lever pull out the toner cartridge Never attempt to incinerate toner cartridges Dispose of used toner cartridges and waste toner boxes in accordance with local r...

Page 151: ...TING 3 Shake the new toner cartridge strongly with the label surface down to loosen the toner inside 4 Pull out the seal in the direction of the arrow 5 Insert the toner cartridge along the rail Insert the toner cartridge until you hear a click sound x10 x10 x10 ...

Page 152: ...r Hold the cleaning knob of the charger and pull it out toward you carefully until it stops Then reinsert it in its original position carefully Repeat this procedure two to three times Check if the cleaning knob is fully inserted after cleaning 7 Close the front cover ...

Page 153: ... be set simultaneously with others have been set Some copy functions cannot be set together with others P 162 Copying Function Combination Matrix The equipment is not recognized when it is connected to a PC using a USB cable The cable is not support the USB2 0 Hi Speed Use a USB2 0 Hi Speed certified cable The equipment is connected via a USB hub Connect the equipment with a PC directly by a USB c...

Page 154: ...mode The copy image is dark The copy density is set darker Make the density lighter if you use the manual copy density mode The copied image is stained The Platen Cover or the Reversing Automatic Document Feeder is not lowered fully Lower it fully to block outside light The original glass or platen sheet is dirty Clean them P 154 Regular Cleaning The copy density is set darker Make the density lig...

Page 155: ...7 MAINTENANCE AND INSPECTION Regular Cleaning 154 Cleaning Charger 155 ...

Page 156: ...ass Wipe it with a soft dry cloth If there are still stains remaining wipe it clean with a piece of soft cloth which has been moistened with water and then squeezed well Do not use liquids other than water such as alcohol organic solvents or neutral detergent 3 Guide 4 Platen sheet Clean the surface as follows depending on the staining Clean it with a soft cloth Clean it with a soft cloth lightly ...

Page 157: ... the charger following the procedure below 1 Open the front cover 2 Clean the charger Hold the cleaning knob of the charger and pull it out toward you carefully until it stops Then reinsert it in its original position carefully Repeat this procedure two to three times Check if the cleaning knob is fully inserted after cleaning 3 Close the front cover ...

Page 158: ......

Page 159: ...8 Appendix e STUDIO2007 2307 2507 Specifications 158 Continuous copying speed 159 Specifications of Options 160 Packing List 161 Copying Function Combination Matrix 162 Combination matrix 162 ...

Page 160: ... m2 17 20 lb Bond for continuous feed 52 63 g m2 14 lb Bond 16 lb Bond 81 163 g m2 21 lb Bond 90 lb Index for single feed Warm up time Approx 20 seconds First copy time A4 or LT portrait A4 Approx 7 0 seconds LT Approx 7 1 seconds Continuous copy speed See P 159 Continuous copying speed Multiple copying Up to 999 copies Excluded image width Copy Leading edge 3 0 2 0 mm 0 12 0 08 Trailing edge 2 0 ...

Page 161: ...er is used for the values of the specifications above The bypass copying speed is as listed above when specifying the paper size This specification varies depending on the copying conditions and the environment Paper size Paper source e STUDIO2007 e STUDIO2307 e STUDIO2507 A4 A5 R B5 LT ST R 1 Drawer 20 23 25 Bypass tray 20 23 25 A4 R B5 R LT R Drawer 19 19 19 Bypass tray 19 19 19 B4 FOLIO LG COMP...

Page 162: ...able Paper A3 A4 A4 R A5 R B4 B5 B5 R FOLIO LD LG LT LT R ST R COMP 13 LG 8 5 SQ 8K 16K 16K R Power weight 64 80 g m2 17 20 lb Bond Dimensions 221 mm 8 70 W x 368 mm 14 49 D x 712 mm 28 03 H Weight Approx 3 1 kg 6 8 lb Model name MY 1043 Acceptable paper size A3 A4 A4 R A5 R B4 B5 B5 R FOLIO LD LG LT LT R ST R COMP 13 LG 8 5 SQ 8K 16K 16K R Paper weight 64 80 g m2 17 20 lb Bond Maximum capacity 25...

Page 163: ...8 Appendix Packing List 161 Packing List Packing list Safety Information Quick Guide Power cable DVD ...

Page 164: ...al Page Auto Quantity AMS Manual Fixed Zoom Already setting Text Photo Drawer Original Mode Photo Bypass Original Mode Exposure Next setting 1 1 Simplex Yes Yes Yes Yes Yes Yes Yes Yes Yes Yes Yes Yes Yes No No No Yes Yes Yes Yes Yes Yes Yes Yes Yes Yes Yes 1 2 Duplex Yes Yes Yes Yes 8 Yes Yes Yes Yes Yes Yes Yes Yes Yes No No No Yes Yes Yes Yes Yes Yes Yes Yes Yes 2 1 Split Yes Yes Yes Yes Yes Ye...

Page 165: ...Y button 15 Copy Handling 79 90 91 Copy quantity 17 COUNTER 130 131 135 136 CUSTOMER NUMBER 133 D DATA lamp 16 DATE FORMAT 130 132 DATE TIME 130 132 DEFAULT GATEWAY 132 Default Menu Setting 86 DESTINATION SETUP 130 133 Digital keys 15 Direction of Print 80 93 Distinguish Thin Lines 83 Do not Print Blank Pages 86 Draw as Outline 85 95 Draw Borders Around Pages 80 93 DRAWER 124 131 135 Drawer 10 20 ...

Page 166: ...put Document Layout 82 92 P Packing list 161 PAGE LAYOUT 130 134 Paper exit stopper 11 Paper Feed Pedestal 10 20 Paper Feed Unit 10 20 PAPER JAM RECOVERY 130 132 Paper misfeed bypass tray 142 Paper misfeed RADF 140 Paper misfeed transfer unit 143 Paper size 17 20 Paper Source 77 Paper source 43 Paper Type 78 Paper types not acceptable 21 PAUSE button 14 PDF 125 126 PHONE BOOK 131 135 Plain paper 2...

Page 167: ...bels 20 Stopping 37 Storing paper 21 Style 85 SUBNET MASK 132 SUPPLY NOTICE 130 133 T TCP IP 130 132 TERMINAL ID 130 Thick paper 20 Thin 20 TIFF 125 126 TIMERS 130 132 TO ADDRESS 125 Toner cartridge 10 148 TONER EMPTY 148 TONER REMAIN 131 136 Toner Save 86 TOTAL COUNTER 131 136 Tracing paper 20 Transparencies 20 Transparency 85 95 TWAIN 98 U Units 85 USB 125 USB port 12 USB terminal 11 Use Black f...

Page 168: ...166 INDEX ...

Page 169: ...DP 2007 2307 2507 OME13001000 ...

Page 170: ...1 11 1 OSAKI SHINAGAWA KU TOKYO 141 8562 JAPAN MULTIFUNCTIONAL DIGITAL SYSTEMS User s Guide 2013 TOSHIBA TEC CORPORATION All rights reserved R130220N6501 TTEC Ver00 F 2013 05 ...

Reviews: