26
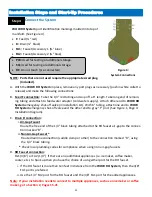
The drain saddle assembly should be installed above the P
-
trap on the vertical or horizontal tail-
piece (See Figure 10 below). Use the black
1/4”
saddle for the non air
-
gap RO faucet, or the white
3/8”
saddle for the air
-
gap RO faucet.
A.
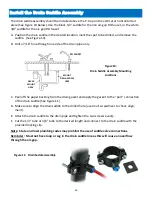
Position the drain saddle in the desired location, mark the spot to be drilled, and remove the
saddle. (See Figure 10).
B.
Drill a
7/16”
hole through one side of the drain pipe only.
C.
Peel off the paper backing from the drain gasket and apply the gasket to the
“
port
”
connection
of the drain saddle (See Figure 11).
D.
Make sure to align the drain saddle to the drilled hole (use small screwdriver to check align-
ment).
E.
Attach the drain saddle to the drain pipe and tighten the two screws evenly.
F.
Cut the
1/4”
tube or
3/8”
tube to the desired length and connect to the drain saddle with the
provided locking clip.
Note: State and local plumbing codes may prohibit the use of saddle valve connections.
Reminder: Must not have loop or sag in the drain saddle line as this will cause an overflow
through the air
-
gap.
Figure 11: Drain Saddle Assembly
Figure 10:
Drain Saddle Assembly Mounting
Locations
Install the Drain Saddle Assembly
MOUNT
DRAIN SADDLE
HERE
NEVER
MOUNT
HERE
RO FAUCET
Summary of Contents for WOW RO System
Page 4: ...4 Figure 1 Installation Diagram...
Page 5: ...5 Section 1 Installation Start up Procedures...
Page 8: ...8 Installation Kit Contents A B C D E F G H I G...
Page 17: ...17 Figure 7 Refrigerator Icemaker...
Page 24: ...24 Modular Expandability Parallel Processing...
Page 25: ...25 Section 4 Plumbing the Sink...
Page 29: ...29 Section 5 Maintenance...
Page 35: ...35 Section 6 Troubleshooting...

