23
When More Water is Needed / Desired
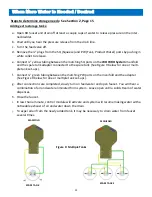
Steps to determine storage needs: See Section 2, Page 15
Adding extra storage tanks:
a.
Open RO faucet and drain off at least a couple cups of water to release pressure on the inter-
nal bladder.
b.
Wait until you hear the pressure release from the drain line.
c.
Turn the feed valve off.
d.
Remove the ¼
”
plugs from the SQ (Squeeze) and PW (Tank, Product Water) ports by pushing in
white collet to release.
e.
Connect ¼
”
yellow tubing between the matching SQ ports on the
WOW RO System
manifold
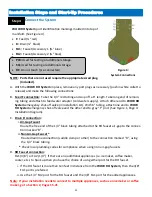
and the spare tank adapter connected to the spare tank (See Figure 9 below for one or multi-
ple tank set
-
ups).
f.
Connect ¼
”
green tubing between the matching PW ports on the manifold and the adapter
(See Figure 9 below for one or multiple tank set
-
ups).
g.
After connections are completed, slowly turn on feed water and open faucet. You will hear a
combination of air and water eliminated from system. Leave open until a solid stream of water
dispenses.
h.
Close the faucet.
i.
In less than a minute, control module will activate and system will resume making water with a
noticeable exhaust of air and water down the drain.
j.
To expel all air from the newly added tank, it may be necessary to drain water from faucet
several times.
MANIFOLD
SPARE TANK
MANIFOLD
SPARE TANKS
Figure 9: Multiple Tanks
Summary of Contents for WOW RO System
Page 4: ...4 Figure 1 Installation Diagram...
Page 5: ...5 Section 1 Installation Start up Procedures...
Page 8: ...8 Installation Kit Contents A B C D E F G H I G...
Page 17: ...17 Figure 7 Refrigerator Icemaker...
Page 24: ...24 Modular Expandability Parallel Processing...
Page 25: ...25 Section 4 Plumbing the Sink...
Page 29: ...29 Section 5 Maintenance...
Page 35: ...35 Section 6 Troubleshooting...

