background image

• Plastic can cause static sparks.  Never hang plastic to

enclose a spray area.  Do not use plastic drop cloths
when spraying flammable materials.

• Use lowest possible pressure to flush equipment.

GAS ENGINE (WHERE APPLICABLE)

Always place pump outside of structure in fresh air.  Keep all
solvents away from the engine exhaust.  Never fill fuel tank
with a running or hot engine.  Hot surface can ignite spilled
fuel.  Always attach ground wire from pump unit to a grounded
object, such as a metal water pipe.  Refer to engine owner’s
manual for complete safety information.

HAZARD: EXPLOSION HAZARD DUE TO INCOMPATIBLE

MATERIALS - Will cause severe injury or
property damage.

PREVENTION:

• Do not use materials containing bleach or chlorine.
• Do not use halogenated hydrocarbon solvents such as

mildewcide, methylene chloride and 1,1,1 -
trichloroethane.  They are not compatible with aluminum.

•  Contact your coating supplier about the compatibility of

material with aluminum.  

HAZARD: HAZARDOUS VAPORS -  Paints, solvents,

insecticides, and other materials can be
harmful if inhaled or come in contact with the
body.  Vapors can cause severe nausea,
fainting, or poisoning.

PREVENTION:

• Use a respirator or mask if vapors can be inhaled.  Read

all instructions supplied with the mask to be sure it will
provide the necessary protection. 

• Wear protective eyewear.
• Wear protective clothing as required by coating

manufacturer.

HAZARD:  GENERAL - This product can cause severe

injury or property damage.

PREVENTION:

• Read all instructions and safety precautions before

operating equipment.

• Always disconnect the motor from the power supply

before working on the equipment.

• Follow all appropriate local, state, and national codes

governing ventilation, fire prevention, and operation. 

• The United States Government Safety Standards have

been adopted under the Occupational Safety and Health
Act (OSHA).  These standards, particularly part 1910 of
the General Standards and part 1926 of the Construction
Standards, should be consulted.

• Use only manufacturer authorized parts.  User assumes

all risks and liabilities when using parts that do not meet
the minimum specifications and safety devices of the
pump manufacturer.

• Before each use, check all  hoses for cuts, leaks, abrasion

or bulging of cover.  Check for damage or movement of
couplings. Immediately replace the hose if any of these
conditions exist.  Never repair a paint hose. Replace it
with another grounded high-pressure hose.

• All hoses, swivels, guns, and accessories must be

pressure rated at or above 3200PSI/221 BAR.

• Do not spray outdoors on windy days.
• Wear clothing to keep paint off skin and hair.

Grounding Instructions

This product must be grounded. In the event of an electrical
short circuit, grounding reduces the risk of electric shock by
providing an escape wire for the electric current. This product
is equipped with a cord having a grounding wire with an
appropriate grounding plug. The plug must be plugged into an
outlet that is properly installed and grounded in accordance
with all local codes and ordinances.

DANGER

— Improper installation of the grounding plug can

result in a risk of electric shock.  If repair or replacement of the
cord or plug is necessary, do not connect the green grounding
wire to either flat blade terminal. The wire with insulation
having a green outer surface with or without yellow stripes is
the grounding wire and must be connected to the grounding
pin.

Check with a qualified electrician or serviceman if the
grounding instructions are not completely understood, or if you
are in doubt as to whether the product is properly grounded.
Do not modify the plug provided.  If the plug will not fit the
outlet, have the proper outlet installed by a qualified
electrician.
This product is for use on a nominal 120 volt circuit and has a
grounding plug that looks like the plug illustrated below. A
temporary adapter which looks like the adapter illustrated in
the figure below may be used to connect this plug to a 2 pole
receptacle as shown if a properly grounded outlet is not
available. 
The temporary adapter should be used only until a properly
grounded outlet as shown below can be installed by a qualified
electrician. The green colored rigid ear, lug, or the grounding
wire extending from the adapter must be connected to a
permanent ground such as a properly grounded outlet box
cover. Whenever the adapter is used, it must be held in place
by a metal screw.

Use only a 3-wire extension cord that has a 3-blade
grounding plug and a 3-slot receptacle that will accept the
plug on the product.  Make sure your extension cord is in
good condition.  When using an extension cord, be sure
to use one heavy enough to carry the current your
product will draw.  An undersized cord will cause a drop
in line voltage resulting in loss of power and overheating.
A 12 gauge cord is recommended.  If an extension cord is
to be used outdoors, it must be marked with the suffix W-
A after the cord type designation.  For example, a
designation of SJTW-A would indicate that the cord would
be appropriate for outdoor use.

NOTE: Do not use more than 50 feet of extension

cord.  If you need to paint further than 100
feet from your power source, use more paint
hose, not more extension cord.

CAUTION

Grounded Outlet

Grounding Pin 

Tab for
Grounding Screw 

Adapter

Metal Screw

Cover for grounded outlet box 

© Titan Tool Inc.  All rights reserved.

3

Summary of Contents for 440xc

Page 1: ...rinted in the U S A Do not use this equipment before reading this manual 440XC Airless Sprayer Owner s Manual For professional use only NOTE This manual contains important warnings and instructions Please read and retain for reference Model Number 120V Complete 700 2000 ...

Page 2: ...IEF PRESSURE described in the pump manual ALWAYS keep the tip guard in place while spraying The tip guard provides some protection but is mainly a warning device ALWAYS remove the spray tip before flushing or cleaning the system The paint hose can develop leaks from wear kinking and abuse A leak can inject material into the skin Inspect the hose before each use NEVER use a spray gun without a trig...

Page 3: ...int off skin and hair Grounding Instructions This product must be grounded In the event of an electrical short circuit grounding reduces the risk of electric shock by providing an escape wire for the electric current This product is equipped with a cord having a grounding wire with an appropriate grounding plug The plug must be plugged into an outlet that is properly installed and grounded in acco...

Page 4: ... and Priming the Pump for Latex Paint 1 Secure the return hose into a waste container 2 Place the suction tube into a container of the appropriate solvent 3 Turn the pressure control knob fully counterclockwise its lowest pressure setting 4 Turn the PRIME SPRAY valve down to the PRIME position 5 Move the ON OFF switch to the ON position 6 Slowly turn the pressure control knob clockwise to increase...

Page 5: ... 9 Unlock the gun by turning the gun trigger lock to the unlocked position 10 Turn the pressure control knob fully counterclockwise to its lowest pressure setting 11 Turn the PRIME SPRAY valve down to the PRIME position and trigger the gun into the waste container to be sure that no pressure is left in the hose 12 Lock the gun by turning the gun trigger lock to the locked position WARNING Trigger ...

Page 6: ...e start stroke release trigger pull trigger end stroke WARNING 6 Titan Tool Inc All rights reserved For corners and edges split the center of the spray pattern on the corner or edge and spray vertically so that both adjoining sections receive approximately even amounts of paint If conditions are windy angle the spray pattern into the wind to minimize drifting Work from ground to roof Do not attemp...

Page 7: ...and the pump hose and gun are clean 14 Move the ON OFF switch to the OFF position 15 Turn the PRIME SPRAY valve to PRIME Remove the siphon tube from the solvent container 16 Move the ON OFF switch to the ON position and allow the unit to pump itself dry through the return tube 17 Follow the Pressure Relief Procedure found in the Operation section of this manual 18 Unplug the unit and store in a cl...

Page 8: ...erse the spray tip with the lever and pull the trigger Once the obstruction comes out of the spray tip release the trigger reverse the spray tip back to the spray pattern setting and resume spraying Siphon Set Intake Screen NOTE Do not apply so much that it overflows and drips into the paint 8 Titan Tool Inc All rights reserved Replacing the Gun Filter 1 Move the gun trigger lock to the unlocked p...

Page 9: ...ol while spraying and are less likely to plug Liquid Shield Cleans and protects spray systems against rust corrosion and premature wear Part No Description 700 888 Case of 12 1 quart bottles 700 889 1 Quart Piston Lube Specially formulated to prevent materials from adhering to the piston rod which becomes abrasive to the upper seals Piston Lube will break down any material that may accumulate in t...

Page 10: ...h defective 6 Fuse in pump blow 1 Air leak in siphon hose 2 Insufficient pressure 1 No paint 2 Inlet screen clogged 3 Pump gun filter clogged 4 Pump will not prime material too heavy 1 Air leak in system 2 Air leak in siphon hose 3 Inlet valve not seating 4 Worn packings 5 Dirty or worn ball valves 6 Worn valve seats 7 Worn PRIME SPRAY valve 1 Pressure setting too low 2 Plugged filters 3 Spray tip...

Page 11: ...fluid viscosity Reduce hose length Clean gun and filter s Reduce number of guns using pump 1 Same as above 1 Clean or replace nozzle tip 1 Inspect for suction hose leak 2 Change to a smaller tip orifice size Install pulsation dampener in system or drain existing one Reduce number of guns using pump Remove restrictions in system clean tip screen if filter is used 1 Replace tip 2 Increase pressure T...

Page 12: ...AVERTISSEMENT DANGER RISQUES D EXPLOSION OU D INCENDIE Les vapeurs dégagées par le solvant ou la peinture sont explosives et inflammables et peuvent causer des corporels sérieux ou dommages matériels MESURES PRÉVENTIVES Veiller à éviter toute accumulation de vapeurs inflammables en vous assurant que la zone où la pulvérisation a lieu est suffisamment ventilée Veiller à éviter la présence de toute ...

Page 13: ...raccord orientable pistolet et accessoire utilisé avec cet appareil doit pouvoir fonctionner à une pression égale ou supérieure à 3 200 lb po2 221BAR Ne jamais pulvériser lorsqu il vente Porter des vêtements pour protéger la peau et les cheveux contre tout contact avec la peinture Instructions de mise à la terre Cet appareil doit être mis à la terre La mise à la terre réduit les risques d électroc...

Page 14: ...Debe proveerse un escape y aire fresco para hacer que el aire que está dentro del área de atomización se mantenga libre de acumulaciones de vapores inflamables Evite todas las fuentes de ignición como son las chispas electrostáticas llamas abiertas flamas de piloto objetos calientes cigarros y chispas que se generan al conectar y desconectar las extensiones o de apagadores de luz que estén funcion...

Page 15: ...nte eléctrica Este producto está equipado con un cable que tiene un alambre de conexión a tierra con un enchufe de conexión a tierra apropiado El enchufe se debe enchufar en una toma de corriente que se haya instalado y conectado a tierra debidamente de acuerdo con todos los códigos y estatutos locales PELIGRO Una instalación inapropiada del enchufe de conexión a tierra puede dar como resultado el...

Page 16: ...ng Attention label In French 1 313 1432 Wraparound 440XC label 1 Before performing any type of maintenance or service on the unit follow the Pressure Relief Procedure in the Operation section of this manual Additionally follow all other warnings to reduce the risk of an injection injury injury from moving parts or electric shock Always unplug the unit before servicing WARNING ...

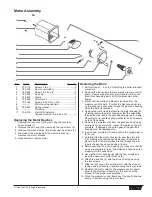
Page 17: ...the four screws that secure the motor housing 8 Carefully remove the motor housing so that the wires slide through the wire tube in the gear box housing one at a time Be careful not to lose the spring washer 9 as it sits loosely on top of the bearing 5 Remove the armature 10 from the gear box housing by pulling up on the armature Inspect the pinion on the old armature If damaged the pinion gear in...

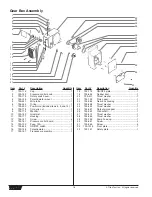
Page 18: ...777 Housing 1 12 700 141 Screw 4 13 700 161 Pressure control board 1 14 700 720 Fuse 10A 1 15 700 646 ON OFF switch 1 16 700 158 Potentiometer 1 17 700 197 Transducer assembly 1 Gear Box Assembly Item Part Description Quantity 18 700 775 ON OFF plate 1 19 700 645 Rubber boot 1 20 700 511 Thrust washer 1 21 700 732 Pinion gear 1 22 704 083 Gear box housing 1 23 700 688 Thrust washer 1 24 700 593 Th...

Page 19: ...ol board 13 to the gear box housing Remove the pressure control board 2 Disconnect the power cord 7 from the ON OFF switch 15 the pressure control board 13 and the grounding screw refer to the electrical schematic 3 Loosen the cord grip housing 11 and remove the power cord 7 4 Install the new cord in the reverse order of disassembly 5 Reinstall the pressure control board 13 and secure in position ...

Page 20: ...730 560 Foot valve assembly 1 24 730 535 Fluid section complete includes items 2 3 4 5 and 7 21 1 25 762 202 Packing tool not shown 1 Servicing Repairing the Fluid Section Before proceeding follow the Pressure Relief Procedure in the Operation section of this manual Additionally follow all other warnings to reduce the risk of an injection injury injury from moving parts or electric shock Always un...

Page 21: ...ump housing 5 by lightly tapping on top of piston assembly 22 Clean and inspect the piston rod for wear Replace if necessary 17 Remove the upper packings 4 and the lower packings 8 from the pump housing 5 and replace with a new set Always insert the packings with the raised side facing into the pump housing 18 Reattach the retainer 2 and make sure that the upper guide 3 is clean and undamaged 19 P...

Page 22: ...he PRIME SPRAY valve handle 14 and the cam base 12 3 Using a wrench loosen the valve housing 7 and remove Inspect the two valve o rings 5 and 6 4 Unscrew valve retainer 11 and remove the valve stem 9 5 Inspect the ball on end of the valve stem 9 and seat located in the valve housing 7 Clean or replace if damaged Inspect the stem o ring 8 6 When reinstalling screw the completed assembly into the fi...

Page 23: ... Assembly Item Part Description Quantity 1 765 126 Screw 4 2 700 674 End cap 4 3 704 092 Leg left includes items 2 and 4 1 4 700 781 Drip cup 1 5 700 069 Screw 2 6 700 761 Cord wrap 1 7 704 091 Leg right includes items 2 5 and 6 1 1 2 3 4 5 6 7 ...

Page 24: ... the factory if necessary are to be borne and prepaid by the End User Repaired or replaced equipment will be returned to the End User transportation prepaid THERE IS NO OTHER EXPRESS WARRANTY TITAN HEREBY DISCLAIMS ANY AND ALL IMPLIED WARRANTIES INCLUDING BUT NOT LIMITED TO THOSE OF MERCHANTABILITY AND FITNESS FOR A PARTICULAR PURPOSE TO THE EXTENT PERMITTED BY LAW THE DURATION OF ANY IMPLIED WARR...

Reviews: