


VoIP Business Phone Administrator Manual
Copyright © 2005 THOMSON
-All rights reserved
- Page 50
- Page 50 -
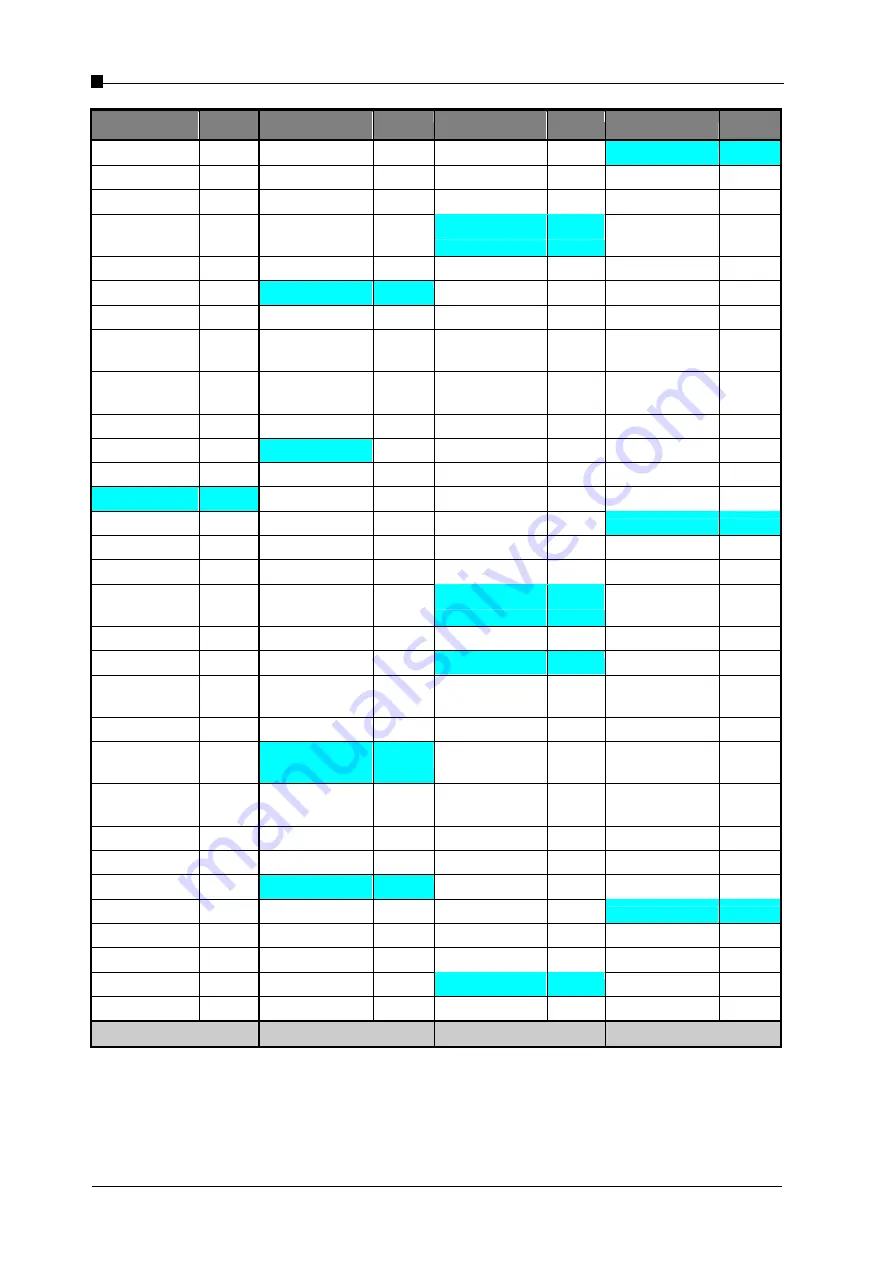
Country
GMT
Country
GMT
Country
GMT
Country
GMT
Bermuda
- 4.0 Guam
+ 10.0 Morocco
+ 0.0
T
6.0
Guatemala -
6.0
Moza
2.0
8.0
Bolivia
- 4.0 Guinea-Bissau
+ 0.0 M
6.5
Taji
6.0
Bosnia
Herze
1.0
0.0
N
Tanzania
+
3.0
Bo
2.0
Guyana -
3.0
N
1.0
Th
7.0
Brazil West
- 4.0
H
Nauru
+ 12.0 Togo
+ 0.0
Brazil East
- 3.0 Haiti
- 5.0 Nepal +
5.5
Tonga Islands
+ 13.0
British Virgin Islands
- 4.0 Honduras
- 6.0 Nethe
1.0
Trinidad and Tobago
- 4.0
8.0
Hong Kong
+ 8.0 Netherlands Antilles
- 4.0 T
1.0
Bu
2.0
H
1.0
New Caledonia
+ 11.0 Turkey
+ 2.0
Burkina Faso
+ 0.0
I
New Zealand
+ 12.0 Turkmenistan
+ 5.0
B
2.0
I
0.0
Nicaragua -
6.0
Turks and Caicos
- 5.0
C
India
+
5.5
N
1.0
12.0
Ca
7.0
Indonesia Central
+ 8.0 Niger Republic
+ 1.0
U
Ca
1.0
Indonesia East
+ 9.0 Norfolk Island
+ 11.5 Uganda
+ 3.0
Canada Central
- 6.0 Indonesia West
+ 7.0
1.0
U
2.0
Canada Eastern
- 5.0 Iran
+ 3.5
O
United Arab Emirates
+ 4.0
Canada Mountain
- 7.0 Iraq
+ 3.0 Oman +
4.0
United Kingdom
+ 0.0
Canada Pacific
- 8.0 Ireland
+ 0.0
P
Uruguay
-
3.0
Canada
Newfoundland
- 3.5 Israel
+ 2.0 Pa
5.0
USA Central
- 6.0
Cape Verde
- 1.0 Italy
+ 1.0 Palau +
9.0
USA Eastern
- 5.0
Cayman Islands
- 5.0
J
Panama, Republic
Of -
5.0
USA Mountain
- 7.0
Central African Rep
+ 1.0 Jamaica -
5.0
Papua New Guinea
+ 10.0 USA Pacific
- 8.0
Chad Rep
+ 1.0 Japan +
9.0
Paraguay -
4.0
USA Alaska
- 9.0
Chile
- 4.0 Jordan
+ 2.0 Peru -
5.0
USA Hawaii
- 10.0
China +
8.0
K
Philippines
+ 8.0 Uzbekistan
+ 5.0
Christmas Is.
- 10.0 Kazakhstan
+ 6.0 Poland
+ 1.0
V
Colombia
- 5.0 Kenya
+ 3.0 Portugal
+ 1.0 Vanuatu
+ 11.0
Congo
+ 1.0 Kiribati
+ 12.0 Puerto Rico
- 4.0 Vatican City
+ 1.0
Cook Is.
- 10.0 Korea, North
+ 9.0
Q
Venezuela
-
4.0
Costa Rica
- 6.0 Korea, South
+ 9.0 Qatar
+ 3.0 Vietnam
+ 7.0
z
next page
z
next page
z
next page
z
next page
Summary of Contents for ST2020
Page 1: ...Administrator Manual ...


