background image


 • IP 7000 BR 

23

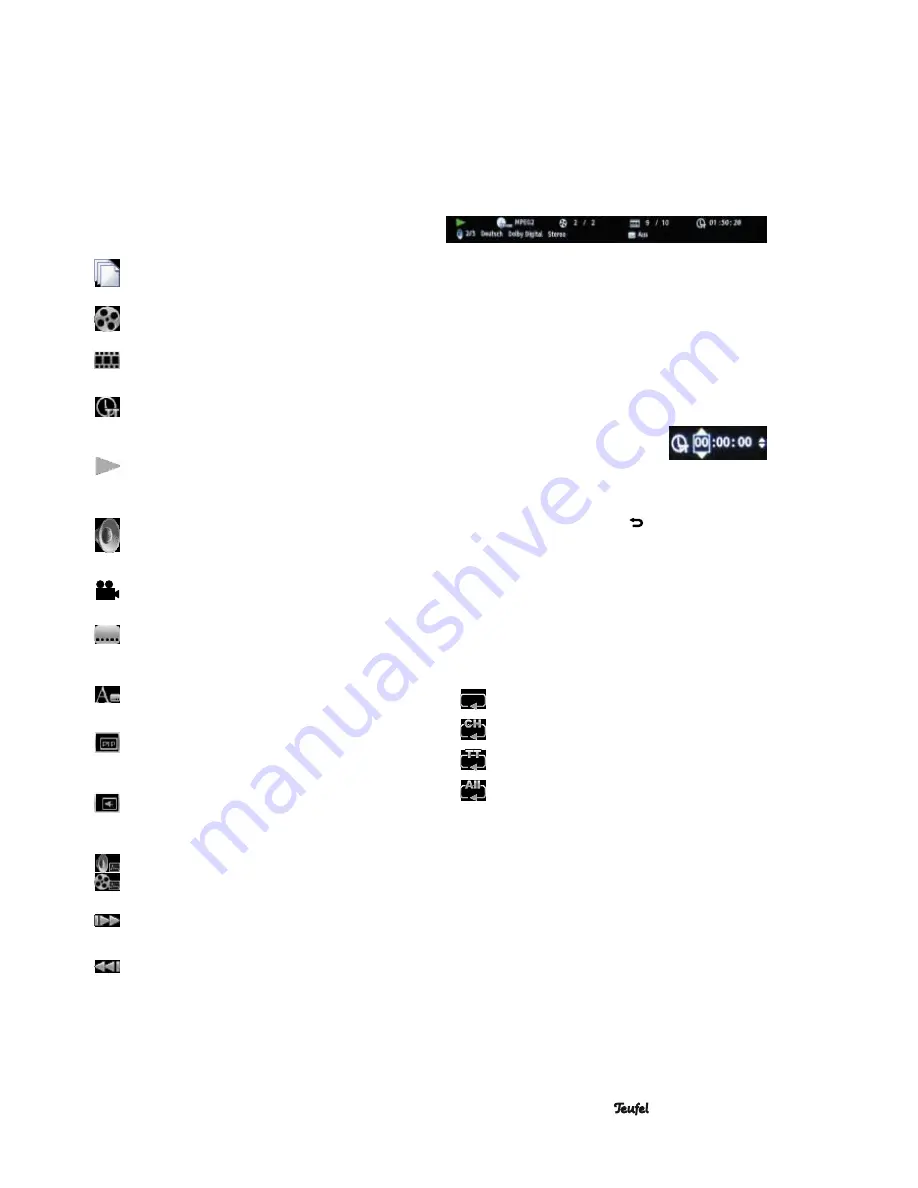
Video playback menu

You can access a menu with the “Program” button 

28

 dur-

ing video playback . Depending on the type of video, not 

all menu items are available .

•  With the navigation buttons 

33

 “

” and “

”, select the 

desired item and press the button 

34

 “ENTER” or the 

navigation button 

33

 “

” .

•  With the navigation buttons 

33

 “

” and “

”, you can 

now select an option and trigger it with the “ENTER” 

button 

34

 .

Number of the current file/number of files in this 

folder – you can select another file for playback .

Current track/ number of tracks – you can select 

another track .

Current chapter/total chapters – you can select 

another chapter .

Elapsed time – you can switch between track and 

chapter time and between elapsed time and 

remaining playback time .

(Playback) mode – select between normal or 

random playback, for everything, for a chapter 

(“CH”) or for tracks (TT) .

Audio – you can switch the audio track here (to the 

extent there are several tracks contained in the 

video) .

Angle of view – you can select another angle of 

view for the camera here (if available in the video) . 

Subtitles – you can switch the subtitles here (if there 

are multiple subtitles available in the video) or 

completely deactivate them .

Subtitle style – to the extent available on the BD, 

you can select how the subtitles will appear here .

Second video – to the extent available on the BD, 

you can start a second instance of video playback 

(picture in picture) .

Second tone – to the extent available on the BD, 

you can activate a second audio track (e .g . 

comments) .

Bit rate – displays the current transfer rate for the 

audio and video stream is (switch with the naviga-

tion buttons 

33

 “

” and “

”) .

Immediate search – will fast forward 30 seconds 

without audio .

Immediate playback – the movie will be reset by 8 

seconds .

Searching

With the search function, you can select a specific time, 

chapter and/or track (if available on the disc) .

•  Press the “SEARCH” button 

52

 . The info window will 

appear and the area 

e

 (elapsed time) is indicated by a 

blue rectangle: 

a

b

c

d

e

g

f

•  Select the desired area (

c

d

 or 

e

) with the navigation 

buttons 

33

 “

” and “

” .

You can switch between the total elapsed time (“TT” in 

the clock symbol) and the elapsed chapter time (“CH” 

in the clock symbol) in the area 

e

 with the navigation 

buttons 

33

 “

” and “

” .

•  Press the button 

34

 “ENTER” . Yellow arrows will 

appear in the selected area .

Switch between hours, minutes and seconds in the 

e


area with the navigation buttons 

33

 “

” and “

” . 

Change the value with the navigation 

buttons 

33

 “

” and “

” or enter a 

desired value with the number 

buttons 

30

 “1 . . .0” .

•  Finish by pressing the “ENTER” button 

34

 . Playback 

will start from the selected position .

•  To abort, press the button 

51

 “ ” or 

52

 “Search” 

several times until the info window disappears . It auto-

matically disappears after you press “ENTER” (in the 

previous step) or after 10 seconds of inactivity .

Repeat function

Switch the repeat functions by tapping the “REPEAT” but-

ton 

50

; you will see the selected function on the top left of 

the screen:

•  Off (no symbol) – normal playback, no repeat
• 

 repeat current file

• 

 repeat current chapter (only BD/DVD)

• 

 repeat current track (only BD/DVD)

• 

 repeat everything

Summary of Contents for IP 7000 BR

Page 1: ...Technical Description and Operating Instructions BluRay receiver IP 7000 BR ...

Page 2: ...e menu 14 Network menu 14 System menu 14 BD Live Storage 15 DivX VOD DRM 15 Security menu 15 Audio 15 Source 16 Quick setup 16 Special function buttons 17 RESOLUTION button 17 SURROUND button 17 TONE button 17 LIPSYNC button 17 SPEAKER LEVEL button 17 Buttons A B C D 17 Radio mode 18 Setting the radio stations 18 Station memory 18 Saving stations manually 18 Saving stations automatically 18 Select...

Page 3: ...al video format created by DivX LLC a subsidiary of Rovi Corporation This is an official DivX Certified device that plays DivX video Visit divx com for more information and software tools to convert your files into DivX videos ABOUT DIVX VIDEO ON DEMAND This DivX Certified device must be registered in order to play purchased DivX Video on Demand VOD movies To obtain your registration code locate t...

Page 4: ...ervice address Never touch the mains adapter with damp hands Danger Danger to children Children can become trapped in the packing film when playing and suffocate Do not allow children to play with the unit or the pack ing film Danger of suffocation Ensure that children do not remove small parts from the unit or take them off of the unit e g control knobs or plug adapters They could swallow the par...

Page 5: ... e g after transport condensation may occur inside of it In this case wait at least 2 hours before you connect and activate it Old used batteries may leak Remove the batteries from the remote control if you do not use them for a prolonged period of time Proper use Only use the unit as described in these operating instruc tions Any other use will be deemed as not in accordance with the instructions...

Page 6: ...14 VIDEO Output jack for the TV projector with FBAS video 15 Y CB PB CR PR Output jacks for TV projector with component video 16 LAN Network connection 17 HDMI 1 2 Input jacks for digital source devices with a HDMI connection 18 HDMI OUT Output jack for TV projector with a HDMI connection 19 AUX IN Input jacks for analogue audio source devices Item Name Description 20 AUX OUT Audio output jacks st...

Page 7: ...dio Switch between stereo mono 38 SPEAKER LEVEL Adjust the channel volume 39 TONE Adjust the sound 40 AUDIO Video Configure the audio track 41 Playback pause 42 PRESET Audio video Skip back forward Radio Access the station memory 43 A B C D Control buttons for BD programs 44 TUNE Fast rewind forward Radio Adjust the frequency 45 Stop playback 46 Open the disc compartment 47 SURROUND Surround setti...

Page 8: ...he room or slightly towards the listener Surround speakers The surround speakers are setup or hung to the side a or back b of the listener at a height of 1 20m to 2 10m There should be at least 100 cm distance to the listener Subwoofer The location of the subwoofer can be freely selected and does not influence the other speakers However do not place it in the corner of the room as this may result ...

Page 9: ...y use the HDMI output 18 as only the signals of HDMI inputs 1 and 2 are emitted here The HDMI inputs may not be used when connecting via one of the other outputs Inputs for source devices The receiver offers you two inputs for digital HDMI picture and audio sources HDMI 1 2 An optical and coaxial digital audio input and analogue audio input AUX IN are also available You can also connect the audio ...

Page 10: ...oduct contents Inserting batteries 1 Gently push on the ridged surface of the battery com partment cover on the back of the remote control and push the lid down Remove the cover 2 If necessary remove the old batteries please observe the notes on page 3 Insert the batteries according to the image on the battery compartment in the process make sure the polarity is correct 4 Place the cover back on t...

Page 11: ...n in the display panel 4 Playback of BD DVD CD a USB stick or media server DLNA is started in the main menu under the item My media see page 12 If you insert a CD DVD or BluRay disc it will start auto matically see page 19 You can switch to the audio signal of the TV set with the button 26 TV ARC Prerequisite The receiver is con nected to an ARC capable HDMI input of the TV the TV s CEC function t...

Page 12: ...her sub menus in the same manner and make settings 5 To return to the previous menu push the button 51 or the navigation button 33 several times My Media Select data storage devices servers and play lists for playback in this menu USB1 A USB stick or a USB hard drive connected to the USB port 2 see page 20 BluRay Disc DVD Video CDDA Data Disc A BD DVD or CD the designation depends on the type and ...

Page 13: ...ossible settings Auto automatic compensation YCbCr also referred to as YUV 4 4 4 should only be used with corresponding suitable TVs YCbCr422 also referred to as YUV 4 2 2 ideal for conventional HDMI televisions Full RGB 256 values per colour for PC monitors RGB values per colour from 16 to 235 for HDMI TV sets which display unclean colours with another setting HDMI Deep Colour Deep Colour expands...

Page 14: ...e games or quizzes Note A USB stick with approx 1 GB of free memory must be inserted in the USB port 2 Here you can specify whether BDs can use Internet ac cess Permitted All BDs allowed Partially Permitted Only BD Live content which has been certified approved by the content owner Prohibited Prevent access for all BDs Dlna The IP 7000 BD is a digital media player DMP that complies with the specif...

Page 15: ... open this menu Off This turns protection off All movies can be played back without restrictions KID SAFE Safe for kids G All children and general guidance PG Parental guidance PG 13 Parents guidance for children under 13 PGR Parental guidance recommended R Restricted viewing NC 17 No one 17 and under allowed ADULTS Adults only Audio You can activate the sound system of the IP 7000 BD in this menu...

Page 16: ...ion in the Deactivate position in order to hear sound from the receiver s speakers only This setting first takes effect the next time the IP 7000 BD is turned on Source You can configure the player one of the inputs or the radio receiver as a source here Note You can automatically start a CD DVD or BluRay disc by selecting BD you can start a data disc or USB playback from the main menu item My med...

Page 17: ...ic Dolby ProLogic II for music Not all melodies are generally available This depends on the available audio signal Also see menu AUDIO SURROUND page 15 TONE button With the button 39 Tone you can access sound control With the navigation buttons 33 and you can select the desired range Bass low tones Treble high tones With the navigation buttons 33 and you can configure the selected range from 10 dB...

Page 18: ...he RDS Display button 36 you can acti vate and deactivate the display of RDS information In stereo mode you may experience faults with weak stations In this case you should switch to mono mode by pushing the Stereo Mono button 37 Station memory Your radio can save 30 stations You can conveniently select the saved stations with the push of a button Saving stations manually Set the desired station a...

Page 19: ... other objects than BDs DVDs CDs 1 Access the main menu by pressing the MAIN MENU button 54 2 Press the button 8 or 46 The tray 6 will eject to the front 3 Carefully insert the BD DVD CD with the labelled side up in the tray recess 4 Press the button 8 or 46 or the playback button 9 or 41 The tray 6 will close and the disc will be read Depending on the setting and the disc playback will automatica...

Page 20: ...s If possible create backup copies of your music on your PC Connect and play back the USB device 1 Insert the USB stick or the plug of your USB device in the jack 2 The plug only fits the jack in one position A USB symbol will briefly appear on the screen 2 Access the main menu by pressing the button 54 MAIN MENU 3 Select the item My media with the navigation buttons 33 and and press the button 34...

Page 21: ...ur network for DLNA operation and DLNA operation must be activated see dlna in the Network menu on page 14 The IP 7000 BD automatically searches for DLNA servers on the network and displays them in the My media menu 1 Access the main menu by pressing the button 54 MAIN MENU 3 With the navigation buttons 33 and select the item My media and press the ENTER button 34 DLNA servers are listed with this...

Page 22: ... subtitles if available on the BD DVD Tap the button 37 SUBTITLE BD and DVD playback Access the BD DVD menu Press the button 53 DISC MENU Access the popup menu if available on the BD DVD Press the button 29 POPUP MENU Continue playback Press the button 29 POPUP MENU again Displaying information You can display an info window at the top of the screen with the DISPLAY button 36 a b c d e g f a Activ...

Page 23: ...the BD you can activate a second audio track e g comments Bit rate displays the current transfer rate for the audio and video stream is switch with the naviga tion buttons 33 and Immediate search will fast forward 30 seconds without audio Immediate playback the movie will be reset by 8 seconds Searching With the search function you can select a specific time chapter and or track if available on th...

Page 24: ...this Video playback Open the Video folder and the desired sub folder if necessary Open the desired video file Playback will start The possible functions are described in the section Playback functions on page Music playback Open the Music folder and the desired sub folder if necessary Open the desired music file The track and all subsequent music tracks located in the folder will be played The fol...

Page 25: ...BDs The movie is automatically played after the disc has been inserted After it stops a AVCHD disc symbol will appear on the main menu under the My media item The other functions are described in the section Play back functions on page 22 Playlist You can save multiple files from USB and disc media on the playlist which are played in order As soon as the USB or disc medium is removed the correspon...

Page 26: ...elicate surface of the case If possible only use plain water without any additives In case of stubborn marks a mild soap solution may be used In no circumstances should caustic cleaning products white spirit thinners petrol or similar be used for cleaning To clean your BluRays DVDs CDs Only use cleaners which have been exclusively approved for CDs to clean your CDs If necessary carefully wipe off ...

Page 27: ...rn on the television set An incorrect AV input has been selected on the television set Select a suitable AV input on the television e g HDMI 1 Incorrect HDMI resolution has been config ured on the receiver Check the settings and change if applicable see page 19 Resolution button and page 13 Display menu To obtain a picture cre ate a video connection to the TV set with the VIDEO jack 14 see page 9 ...

Page 28: ...tton 40 Audio and select an other audio language Receiver muted MUTE Press the button 35 to disable the mute function Playback speed has been accelerated or slowed down Switch to normal playback with the button 41 No or disrupted music playback Files with a format other than MP3 or WMA are located on the storage device Delete or skip the incorrect files File damaged The remote control is not worki...

Page 29: ...AC address 14 Media files 24 Media server 14 Music 24 Mute 11 N Network 10 14 NTSC 13 O optical 9 Optical 9 P PAL 13 Pan Scan 13 Password 15 Pillar box 13 Playback 22 Product contents 5 Q Quick setup 10 R Radio 18 RDS 18 Rear center 8 Remote control 7 Inserting batteries 10 Repeat 23 Repeat function 23 Resolution 17 S Saving stations automatically 18 manually 18 Selecting a source 11 Sensor button...

Page 30: ...o a collection point run by the communal authority or borough or run commercially so that they can be disposed of in an envi ronmentally friendly manner Please only hand in fully discharged batteries and re chargeable batteries labelled with Cd Cadmium Hg Mercury Pb Lead Disposal of the unit Used units must not be disposed of with house hold waste If the unit is no longer operational every consume...

Page 31: ... IP 7000 BR 31 ...

Page 32: ...ice department Lautsprecher Teufel GmbH Gewerbehof Buelowbogen Aufgang D1 10783 Berlin Germany Buelowstr 66 Tel 00800 200 300 40 toll free Fax 49 0 30 300930930 www teufelaudio com No liability is accepted for the accuracy of this information Tech nical changes typographical errors and other errors reserved ...

Reviews: