background image

ISU-689:2016/GB 

16 


In a winter time (due to the risk of freezing water in 
the system) the disconnection the boiler from 
electrical system is forbidden (if there is still water in 

                     the water system of the boiler).


Empty the boiler by means of a valve mounted inside the boiler 
(2.22).  

6. MAINTENANCE, INSPECTIONS, CHECKING OF THE 
OPERATION 
6.1. Inspection and maintenance 


The boiler should be regularly serviced and subjected to 
maintenance. At least once a year it is recommended to 
perform a service and it should be reviewed before 

                heating season. All service and maintenance works 
                should be performer by an authorized person. Only 
                original parts should be used for boiler repairs. At every 
                service and maintenance works the tightness of the gas 
                units and gas installation and correctness of the 
                protective systems should be checked. The warranty 
                does not cover above mentioned operations. 
 

6.1.1. Preparing the boiler for service  


Before each cleaning or replacement of components, 
ALWAYS disconnect the power supply as well as water 
and gas supply of boiler. The manufacturer is not liable 

                  for any damages caused by failure to follow the above 
                  recommendations. 


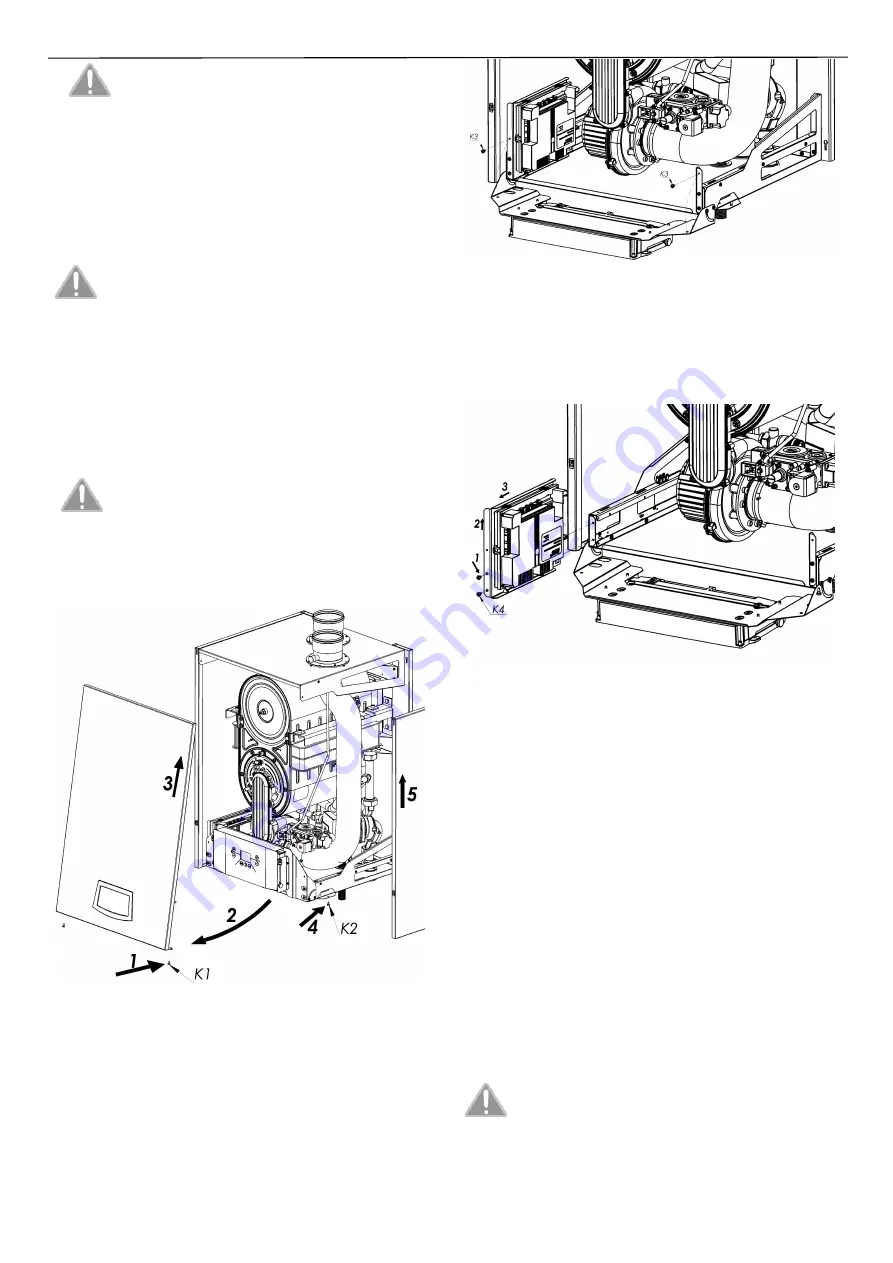
For easier maintenance, it is recommended to remove the casing as 
follows. 


Fig. 6.1.1.1 

 Removing the front cover 


Dismantling the front cover: 
1. Loosen the screws (K1),  
2. Pull the cover behind its lower edge to release from the latches,  
3. Move the cover up. 
Dismantling the side cover: 
4. Unscrew the screws K2. 
5. Move the cover up. 


Fig. 6.1.1.2 

 Deflecting the controller bracket 

 
In order to facilitate access to the boiler

’s interior

, the controller 

must be lowered together with the bracket on which it is mounted, 
for this purpose: 
1. Unscrew the screws (K3),  
2. Lower the bracket until locked. 


Fig. 6.1.1.3 

 Dismantling of the controller


If it is necessary to remove the controller (2.7) after removing the 
front cover and deflecting the console, you must:  
Remove all wires connected to the controller. 
1. Unscrew the screws (K4) 
2. Move the controller up and then pull out of the boiler. 
 

6.1.2. Maintenance of the combustion chamber, burner, 
ignition electrode and ionization electrode  


The interior of the combustion chamber, burner surface and the 
electrodes should be checked by visual inspection: 


the contaminated burner and the interior of the combustion 
chamber may be cleaned with a brush made of plastic, 


visible on the surface of the burner gaps and deformations 
disqualify burner - replace the burner, 


clean the electrodes with a plastic brush, 


deformed electrodes should be replaced, 


check the condition of insulators of all electrodes, 


clean dirty insulators, 


insulators with visible damages disqualify the electrodes 


to be replaced. 


Dirty burner and the interior of combustion chamber 
mean that the boiler regulation must be done.


Summary of Contents for ECOCONDENS CRYSTAL 100

Page 1: ...INSTRUCTION MANUAL INSTALLATION OPERATION AND MAINTENANCE Gas fired condensing central heating boilers SYSTEM BOILERS ECOCONDENS CRYSTAL 80 ECOCONDENS CRYSTAL 100...

Page 2: ...lters are not included in a basic boiler equipment An example of connecting a boiler to these systems is presented on fig 3 5 1 All defects caused by lack of filters on central heating or gas supply w...

Page 3: ...nnecting the boilers in the cascade system 10 4 BOILER ADJUSTMENT AND PRELIMINARY SETTING 10 4 1 INTRODUCTORY REMARKS 10 4 2 ADJUSTING THE BOILER TO COMBUST ANOTHER TYPE OF GAS 11 BOILER CAN BE ADJUST...

Page 4: ...esign and technical specifications of the boiler 2 2 1 Main units of the boiler 2 1 Flue gas water heat exchanger 2 2 Temperature limiter of flue gas 2 3 Temperature limiter of air collector 2 4 Ignit...

Page 5: ...parameter P06 If the heating water temperature exceeds 97 C an additional temperature limiter is activated the burner is turned off until the hot water temperature drops below 81 C The system of conti...

Page 6: ...he boiler from the SUMMER function CH only to the WINTER function CH and DHW A 3sec The entrance to the TEST mode B The reset the displayed error B 3sec Preview of the parameters C Turns on or off the...

Page 7: ...This prepared cables connect according to Fig 3 1 3 1 Fig 3 1 3 1 Wire colors L brown N blue PE yellow green If you need to replace the supply wire use a minimum cord of 3 x 0 75 mm2 The boiler supply...

Page 8: ...ing the back and bottom of the boiler Due to the heavy weight 2 people are required Fig 3 3 1 Mounting dimensions Mounting method on hooks Mounting method with hanger Fig 3 3 2 Mounting method Fig 3 3...

Page 9: ...n are not used as grounding the electrical installation Connect the outlet of safety valves to the floor drain to avoid flooding the room where the boiler is installed as a result of protection device...

Page 10: ...a blowing fan 3 The boiler is designed for cooperation with the flue gas air system with a diameter of 100 flue gas and air and in a collective cascade system where the flue gas exhaust from a single...

Page 11: ...he sum of the lengths of the flue gas air system when the elbow is mounted on the flue gas system or the air supply system to the boiler Table 3 8 3 1 Reduce the length of the installation elbows Exam...

Page 12: ...iler connection with PC MASTER and SLAVE communication connectors are not located in the control console casing Connectors appropriately described are located in bulk inside the boiler Fig 3 9 1 1 Des...

Page 13: ...r in tank EP External cascade pump ES Outdoor temperature sensor CS Temperature sensor in supply collector 3W three way valve Boilers cooperating in the cascade system are connected in series by a cab...

Page 14: ...ctrical installation was made in accordance with applicable regulations the correctness of connections between the boiler and the chimney was checked and confirmed by a qualified chimney service 4 3 B...

Page 15: ...mming mode is switched off 4 5 1 Preview of parameters value You can review the parameter values without the need of change To do this use the B 3sec button After starting LOCAL INSTALLATION mode the...

Page 16: ...ow pressure fill the installation with a filling valve mounted on the installation Start the boiler in the TEST service mode the boiler will start the circulation pump and start the ignition Due to la...

Page 17: ...de The symbol W11 shown on the picture will appear on the screen Press B button to activate the boiler 5 4 Diagnosis When the operation of the boiler will be incorrect the display shows the symbol E a...

Page 18: ...ctrical connections Error 96 description When the P14 parameter is set on a value other than zero the controller does not detect the presence of the sensor closed open Please check the sensor ES conne...

Page 19: ...ont cover 1 Loosen the screws K1 2 Pull the cover behind its lower edge to release from the latches 3 Move the cover up Dismantling the side cover 4 Unscrew the screws K2 5 Move the cover up Fig 6 1 1...

Page 20: ...gas 6 1 3 Thermal protection of the heat exchanger The heat exchanger is equipped with thermal protection BW1 and BW2 protecting against improper assembly of the exchanger If the exchanger is mounted...

Page 21: ...ceeding the limits of temperature protection against exceeding the pressure limits check whether vents are present with correct dimensions and operating according to the installed device In this regar...

Page 22: ...ELV Contact Thermal fuse item 2 2 Supply voltage from the controller SELV Activation temperature 115 C Return NTC sensor item 2 14 Supply item 2 15 Supply voltage from the controller SELV 12K 25 C 363...

Page 23: ...e the power level with D and E buttons by 1 use F button to set the min power or G button to set the max power The PWM signal for the cascade pump is selected according to the operation algorithm of b...

Page 24: ...g 7 2 3 2 1 Diagram of connecting boilers for DHW needs in divided configuration with one three way valve Diagram of connecting 4 boilers two of which are intended for heating DHW Each boiler is equip...

Page 25: ...E n v i r o n m e n t a l p r o t e c t i o n Emission of NOx natural gas Class Class NOx 6 Emissions of nitrogen oxides mg KWh 50 The pH of the condensate natural gas 5 Max amount of condensate natu...

Page 26: ...ly H Flue gas temperature limiter RELAY Relay of the pump 5A ALARM Error information connector PWM PWM pump control G1 Protection against heat exchanger overheating 2xF2 5A Fuses in control panel RT T...

Page 27: ......

Page 28: ......

Reviews: