background image


Falcon4 86M Cameras 

Contents  

  15 


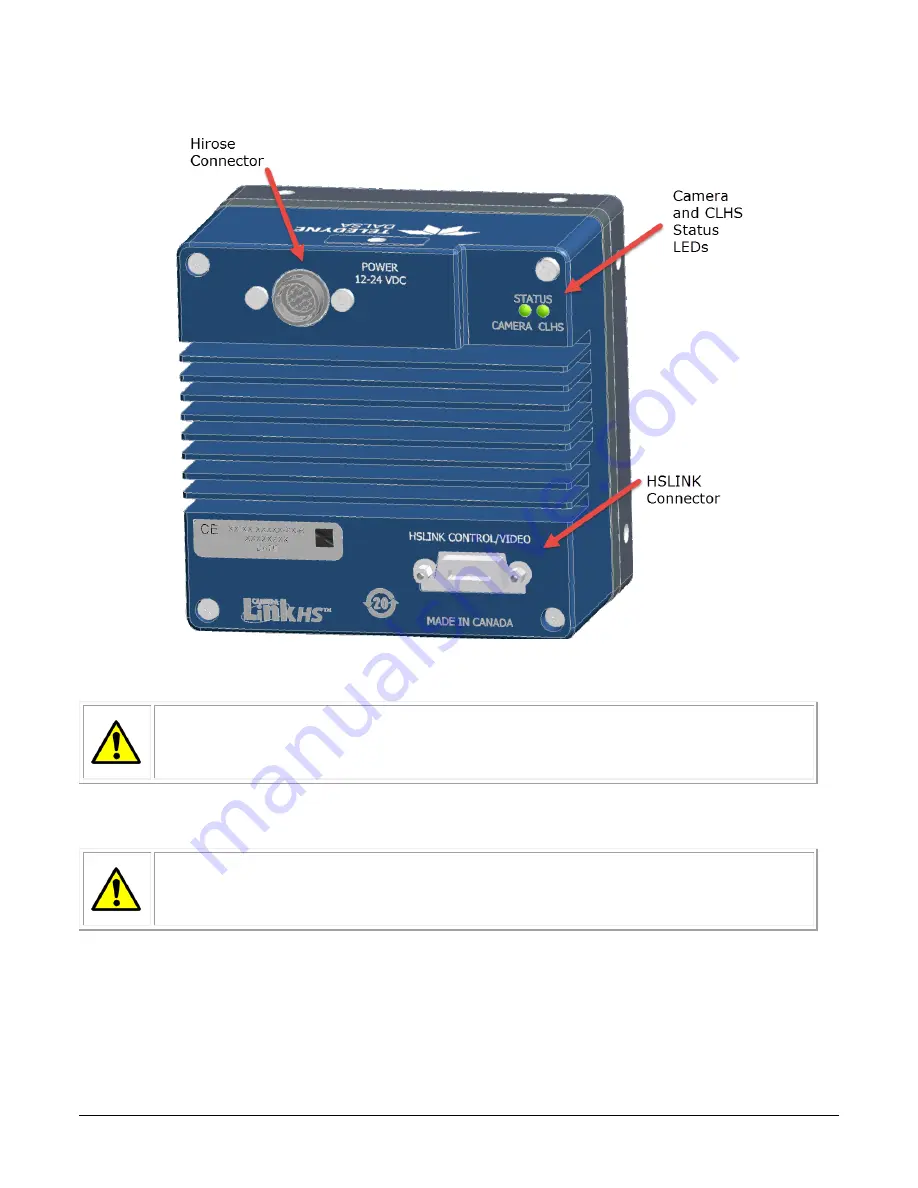
Figure 5: Input and Output, trigger, and Power Connectors 


WARNING! Grounding Instructions 

Static electricity can damage electronic components. It‘s critical that you discharge 

any static electrical charge by touching a grounded surface, such as the metal 

computer chassis, before performing handling the camera hardware. 


Power Connector 


WARNING:

 It is extremely important that you apply the appropriate voltages to 

your camera. Incorrect voltages may damage the camera. Input voltage 

requirement: +12 V to +24 V DC (± 5 %), 3.5 Amps. Before connecting power to 

the camera, test all power supplies. 

Summary of Contents for FA-S0-86M16-01-R

Page 1: ...Falcon4 86M Camera User s Manual FA S0 86M16 01 R and FA S1 86M16 00 R sensors cameras frame grabbers processors software vision solutions 03 032 20220 01 www teledynedalsa com ...

Page 2: ...dows 8 are trademarks of Microsoft Corporation All other trademarks or intellectual property mentioned herein belong to their respective owners Document date April 19 2017 Document number 03 032 20220 01 About Teledyne DALSA Teledyne DALSA is an international high performance semiconductor and electronics company that designs develops manufactures and markets digital imaging products and solutions...

Page 3: ...M PRECAUTIONS CLEANING 13 Precautions 13 Cleaning the Device 13 Electrostatic Discharge and the CMOS Sensor 13 SOFTWARE AND HARDWARE SETUP 14 RECOMMENDED SYSTEM REQUIREMENTS 14 SETUP STEPS OVERVIEW 14 Step 1 Install and Configure Frame Grabber and Software 14 Step 2 Connect Camera Link and Power Cables 14 Power Connector 15 Camera Link Data Connector 16 Input Signals Camera Link 16 Frame Start Tri...

Page 4: ...iagram 36 Dark Row Subtract Algorithm 36 Flat Field Correction Algorithm Description 37 General Notes on FFC calibration 37 An important note on window blemishes 38 How to do an FFC Setup in the Camera 38 Defective Pixel Detection and Replacement 40 Single Pixel Replacement 40 Defective Columns and Row Replacement 40 Median Filter 41 File Access via the CamExpert Tool 41 TECHNICAL SPECIFICATIONS 4...

Page 5: ...CLEANING THE SENSOR WINDOW 69 Recommended Equipment 69 Procedure 69 APPENDIX D INTERNAL FLAT FIELD CALIBRATION ALGORITHMS 70 Dark Row Subtract 70 Offset FPN Calibration 70 Gain PRNU Calibration 70 Color Camera Gain PRNU Calibration 71 APPENDIX E FILE FORMAT 74 FFC FILE FORMAT 75 CAMERA DEFECT MAP 76 CONTACT INFORMATION 78 SALES INFORMATION 78 TECHNICAL SUPPORT 78 REVISION HISTORY 79 INDEX 80 ...

Page 6: ...sor which enables high speed imaging at very large resolutions Global shutter technology removes the need for mechanical shutters which are limited in the number of open shut operations The Falcon4 camera is compliant with GenICam and CameraLink HS CLHS specifications delivering 12 and 16 bits of data In addition the M95 thread opening allows for your choice of lens Key Features Global shutter and...

Page 7: ...Cam support XML camera description file Embedded within camera Recommended Sapera LT including CamExpert GUI application and GenICam for Camera Link imaging driver Version 7 50 or later Camera Performance Specifications Table 4 Camera Performance Specifications Specifications Performance Resolution 10720 H x 8064 V Pixel Rate 1 38 Gpixel s Frame Rate 16 fps maximum Pixel Size 6 µm x 6 µm Bit Depth...

Page 8: ... global shutter color 73 rolling shutter color FFC enabled SEE nJ cm 30 global shutter mono 35 rolling shutter mono 64 global shutter color 56 rolling shutter color FFC enabled NEE pJ cm 64 global shutter mono 30 rolling shutter mono 133 global shutter color 44 rolling shutter color FFC enabled Antiblooming 600 x saturation Integral non linearity 3 From 10 90 of camera saturation DN digital number...

Page 9: ...1x gain 6 Row defect A group of more than 20 contiguous pixels along a single row that deviate from the neighboring columns by More than 15 at 50 saturation with Flat field correction ON and 1x gain More than 20 of saturation in dark and 1x gain 6 Cluster defect A grouping of 2 to 16 inclusive defective pixels at a given test condition A defective pixel is defined as 20 of saturation output when s...

Page 10: ...es micro lenses to improve the collection efficiency of the active pixel area The drawback to this is that the light collected varies with the angle of incidence as shown in the Angle of Incidence figure below Pixel Response Non Uniformity PRNU can be calibrated in the field and takes into account the lighting and lens effects and results in a more uniform output level Figure 1 Camera Spectral Res...

Page 11: ...ence Figure 2 Angular Response Flash Memory Size Table 7 Memory Camera Flash Memory Size FA S0 86M16 01 R 500 MByte program storage 8 000 MByte correction coefficients FA S1 86M16 00 R 500 MByte program storage 8 000 MByte correction coefficients ...

Page 12: ...032 CISPR 22 CISPR 32 FCC Part 15 and ICES 003 Class A Emissions Requirements EN 55024 and EN 61326 1 Immunity to Disturbance Shock Vibration The cameras meet or exceed the following specifications Random vibration per MIL STD 810F at 25 G2 HZ Power Spectral Density or 5 RMS Shock testing 75 G peak acceleration per MIL STD 810F ...

Page 13: ...ltiple frame grabbers with data rates exceeding those supported by Camera Link The camera includes a Camera Link HS connector capable of supporting data rates up to 2 1 Gbytes sec per second RXC TXC TX1 TX2 TX3 TX4 TX5 TX6 TXC RXC RX1 RX2 RX3 RX4 RX5 RX6 Data Lane 6 Data Lane 0 Command Channel Video Channel Link Camera C2 7M1 Frame Grabber C2 7M1 Figure 3 Single CLHS Connector Configuration The co...

Page 14: ...n support the full frame rate of the camera Sensor Block Diagram Pixel Readout Pixels are read from left to right top to bottom The data for each line is transferred from the sensor to 7 CLHS data lanes CLHS is a packet based protocol therefore the concept of taps or tap geometry does not apply the frame grabber reconstructs the images based on the information contained in the packet regardless of...

Page 15: ...f strong electromagnetic fields In addition avoid electrostatic charging violent vibration and excess moisture Though this camera supports hot plugging it is recommended that you power down and disconnect power to the camera before you add or replace system components Cleaning the Device To clean the device avoid electrostatic charging by using a dry clean absorbent cotton cloth dampened with a sm...

Page 16: ...mmends its Xtium PX8 CLHS series frame grabber or equivalent Follow the manufacturer s installation instructions A GenICam compliant XML device description file is embedded within the camera firmware allowing GenICam compliant application to know the camera s capabilities immediately after connection Installing Sapera LT gives you access to the CamExpert GUI a GenICam compliant application Sapera ...

Page 17: ... any static electrical charge by touching a grounded surface such as the metal computer chassis before performing handling the camera hardware Power Connector WARNING It is extremely important that you apply the appropriate voltages to your camera Incorrect voltages may damage the camera Input voltage requirement 12 V to 24 V DC 5 3 5 Amps Before connecting power to the camera test all power suppl...

Page 18: ...rder to reduce voltage drop Use high quality linear supplies in order to minimize noise Note If your power supply does not meet these requirements then the camera performance specifications are not guaranteed Camera Link Data Connector The camera uses a Camera Link HS SFF 8470 CX4 cable Input Signals Camera Link The camera accepts control inputs through the Camera Link HS SFF 8470 CX4 connector Th...

Page 19: ...ion Green slow blinking Calibration in progress Orange slow blinking Camera initializing Color of CLHS Status LED Meaning Off No power or hardware malfunction Orange solid The frame grabber is holding this device in reset preventing any communication Orange slow blinking The devices have established communication and determined that they are not interoperable and camera is initializing Red solid F...

Page 20: ...arch for Sapera devices installed on your system In the Devices list area on the left side of the GUI the connected frame grabber will be shown See image below Select the frame grabber device by clicking on its name Note The first time you set up the camera you will need to establish a communication link between the camera and frame grabber Instructions are available in Appendix B Camera Frame Gra...

Page 21: ...through the GUI For example under the Sensor Control menu in the camera window you can control the frame rate and exposure times Note the camera uses two instances of CamExpert One window controls the camera and one displays the output received from the frame grabber Also Note If CamExpert is running during a camera reset operation then you will have to reload the GUI window used to control the ca...

Page 22: ...as Figure 8 Two CamExpert windows shown one connected to the frame grabber and one connected to the camera At this point you are ready to start operating the camera in order to acquire images set camera functions and save settings ...

Page 23: ...e verification of timing or control parameters without the need to run a separate acquisition program Click on any parameter and a short description is displayed below the Category pane The same context sensitive help is available by clicking on the button then click on a camera configuration parameter Click on the button to open the help file for more descriptive information on CamExpert Note The...

Page 24: ...pane Allows viewing or changing all acquisition parameters supported by the acquisition device CamExpert displays parameters only if those parameters are supported by the installed device This avoids confusion by eliminating parameter choices when they do not apply to the hardware in use Display pane Provides a live or single frame acquisition display Frame buffer parameters are shown in an inform...

Page 25: ...ines its requirement or complexity The states vary from Beginner features required for basic operation of the device to Guru optional features required only for complex operations CamExpert presents camera features based on their visibility attribute CamExpert provides quick Visibility level selection via controls below each Category Parameter list Less More The user can also choose the Visibility...

Page 26: ... GUI shown in the following examples Parameters such as camera model firmware version sensor characteristics and so forth are read to uniquely identify the connected device The parameters used to select load and save user sets are grouped together under the Camera Information category Verify Temperature To determine the temperature at the camera use the Refresh Temperature feature The Device Tempe...

Page 27: ... camera case to force air flow over the camera s heat sink This accessory can be ordered from Teledyne DALSA The fan s electrical connection is via 2 pigtail wires The red wire is hooked to a 14 V to 24 V supply 150 mA max 100 mA typ The black wire is the power return With a 24 V supply the temperature on the sensor board will be about 25 degrees above ambient as measured by the sensor board tempe...

Page 28: ...e settings for reuse they must be saved to the camera s non volatile memory using the User Set Save parameter Previously saved user setting User Set 1 to 3 or the factory settings can be restored using the User Set Selector and User Set Load parameters Either the Factory or one of the User settings can be specified as the Default Set by selecting it in the User Set Default Selector The chosen set ...

Page 29: ...tion and save the coefficient set Change the FFC mode to ActiveAll Set the default selector to UserSet1 Save User Set 1 Power cycle the camera Reconnect to the camera through CamExpert The FFC mode will be Off when it should be ActiveAll Acquisition and Transfer Control Features Use the commands grouped under the Acquisition and Transfer Control category to choose the acquisition mode start and st...

Page 30: ...menu while the camera is not in acquisition mode Select live grab to see the pattern output The Test Pattern feature is available in the Image Format category Test Pattern Description Grey Horizontal Ramp Image is filled horizontally with an image that goes from the darkest possible value to the brightest The ramp repeats every 4096 horizontal pixels Grey Vertical Ramp Image is filled vertically w...

Page 31: ...rection Gain and Black Level Control Details Gain and black level adjustments are available in the cameras The analog black level and analog gain are factory calibrated and not adjustable by the user It is possible to optimize the image by adjusting the digital offset controls and gain controls The color camera features a per color gain ahead of the system gain block The user can evaluate gain and...

Page 32: ...ximately 50 DN the least responsive channel is achieved and the FPN coefficient is recalculated For a color camera the more responsive channels have about 130 DN output The Background Add is used to add this average level of signal back into the output value so that 0 light nominally results in 0 output The 2 step FPN is used to reduce errors in pixel values at low light level due to nonlinear pix...

Page 33: ...single frame due to cable bandwidth limitations Camera Features TriggerMode Off AcquisitionFrameRate 16 for example ExposureMode Timed ExposureTime 10000 for example Figure 11 Internally Programmable Frame Rate and Internally Programmable Exposure Time Default External Frame Rate and External Exposure Time Trigger Width In this mode EXSYNC sets both the frame period and the exposure time The risin...

Page 34: ...32 Contents Falcon4 86M Cameras Frame Time Frame Time Readout Time Readout Time Exposure Time Exposure Time User Exsync FVAL Figure 12 External Frame Rate and External Exposure Time Trigger Width ...

Page 35: ...xposure Time 1 frame rate 0 95 Note The maximum exposure time is dependent on the frame rate To increase maximum exposure time decrease the frame rate If using an internal exposure time with an external trigger it may be necessary to reduce exposure time to increase the frame rate Trigger Modes The camera s image exposures are initiated by a trigger signal The trigger event is either a programmabl...

Page 36: ... Internal Frame Rate The frame rate is dependent on the number of rows in read and the summing mode Frame rate takes priority over exposure time Maximum exposure time can be increased by lowering frame rate I O Block Diagram The following diagram describes the Input Output features of the camera and how they are related Figure 14 I O Module Block Diagram Opto Coupled Inputs The camera provides two...

Page 37: ...15 Opto coupled input Each input incorporates a signal debounce circuit following the opto coupler to eliminate short noise transitions that could incorrectly be interpreted as a valid pulse The duration is user programmable from 1 µs to 255 µs using CamExpert Opto Coupled Outputs The outputs are unpowered devices and require external power The simplified diagram below demonstrates the need for a ...

Page 38: ...Processing category Correction Function Block Diagram The following simplified block diagram shows the processing chain that is applied to the image data the flat field and defective pixel blocks are highlighted Note that each processing block can be activated and deactivated independently For example the FPN and PRNU coefficients can be applied independently or together using the flatfieldCorrect...

Page 39: ... y Where x y are the Flat Field Correction Pixel coordinates See the flatfieldCorrectionPixelXCoordinate and flatfieldCorrectionPixelYCoordinate features newPixelValue is the pixel value after Flat Field Correction is applied sensorPixelValue is the pixel value before Flat Field correction is applied FFCOffsetBase is one offset coefficient value to subtract from the sensorPixelValue this value is ...

Page 40: ... cleanliness is paramount The figure below shows an example of what can happen if a blemish is present on the sensor window when flat field correction is performed The blemish will cast a shadow on the wafer FFC will compensate for this shadow by increasing the gain Essentially FFC will create a white spot to compensate for the dark spot shadow As long as the angle of the incident light remains un...

Page 41: ...nfiguration will allow FFC calibration See ExposureMode TriggerMode OffsetX OffsetY Width Height 2 Settings such as frame rate exposure time etc are set as close as possible to the actual operating conditions Set system gain All Digital to 1 and background subtract to 0 as these are the defaults during FFC calibration See GainSelector Gain BlackLevelSelector and BlackLevel 3 Select correction acti...

Page 42: ...o adjacent pixels of the same color These three methods can be individually controlled Single Pixel Replacement This is a technique for the elimination of dead or hot pixels The camera uses the FFC coefficients to indicate which pixels need to be replaced If a pixel has a Gain PRNU coefficient that is greater than the defectivePixelReplacementGainThreshold then the pixel will be marked for replace...

Page 43: ...is described below for monochrome cameras Color cameras use the pixels of same color in the matrix 1 3X3 2D median filter algorithm a First step calculation the 5 elements median value Pm1 and Pm2 P1 P2 P3 P1 P3 P4 P5 P6 P5 Med P1 P3 P5 P7 P9 Pmx P7 P8 P9 P7 P9 P1 P2 P3 P2 P4 P5 P6 P4 P5 P6 Med P2 P4 P5 P6 P8 Pmc P7 P8 P9 P8 b Second step calculation the 3 elements median Med P5 Pmx Pmc Pm c Third...

Page 44: ...e camera memory location for the uploaded data This menu presents only the applicable data locations for the selected file type 4 Click the Browse button to open a typical Windows Explorer window 5 Select the specific file from the system drive or from a network location 6 Click the Download button to execute the file transfer from the Falcon4 7 Note that firmware changes require a device reset co...

Page 45: ...Falcon4 86M Cameras Contents 43 Technical Specifications Mechanicals ...

Page 46: ...0 Industrial scientific and medical equipment Radio frequency disturbance characteristics Limits and methods of measurement EN 61326 1 2013 Electrical equipment for measurement control and laboratory use EMC requirements Part 1 General requirements EN 55024 2010 Information technology equipment Immunity characteristics Limits and methods of measurement Further declare under our sole legal responsi...

Page 47: ...nd user sets can be saved and loaded to and from the camera s non volatile memory using the features grouped here Camera Information Feature Descriptions The following table describes these parameters along with their view attribute Display Name Feature Values Description Standard View Device Vendor Name DeviceVendorName Displays the device vendor name RO Beginner Device Model Name DeviceModelName...

Page 48: ... calibrated defaults UserSet1 to UserSet 4 UserSet1 to UserSet4 Select the user defined configuration UserSet1 to UserSet8 as the Power up Configuration User Set Selector UserSetSelector Selects the camera configuration set to load feature settings from or save current feature settings to The Factory set contains default camera feature settings User camera configuration sets contain features setti...

Page 49: ...ming Convention which was used to create the device s XML RO DFNC Invisible DFNC Minor Rev deviceDFNCVersionMinor Minor revision of Dalsa Feature Naming Convention which was used to create the device s XML RO DFNC Invisible Device FPAG Info deviceFPAGInfo FPGA version information date time DFNC Invisible ...

Page 50: ...e number of frames captured is specified by Acquisition Mode feature Beginner Acquisition Stop AcquisitionStop Stops the acquisition of the device at the end of the current frame s sequence Beginner Sensor Control Category The camera sensor controls as shown by CamExpert group sensor specific parameters Sensor Control Feature Descriptions The following table describes these parameters along with t...

Page 51: ... Control category Exposure Time ExposureTime Sets the exposure time in microseconds when the Exposure Mode feature is set to Timed Beginner Gain Selector GainSelector Selects which channel s gain is controlled when adjusting gain features Beginner All Digital DigitalAll Apply a digital gain adjustment to the entire image Digital Red Bayer Camera Only DigitalRed Digital Blue bayer Camera Only Digit...

Page 52: ... shutterMode Determines the exposure mode used by the sensor RW Guru Global Global All pixels integrate simultaneously and then held constant until they can be read This is at the cost of higher noise Rolling Rolling The rows of the sensor integrate light at slightly different times This can cause image artifacts Especially if the scene is moving ...

Page 53: ...0 CLHS trigger message from the FG Line1 Line1 General Purpose Input Line 1 Line2 Line2 General Purpose Input Line 2 Software Trigger TriggerSoftware Generate an internal trigger Available when the trigger mode is enabled and the trigger source is equal to Software W Beginner Trigger Delay TriggerDelay Specifies the delay in microseconds to apply after the trigger reception before activating it Po...

Page 54: ...al is high False False Selected signal is low Output Line Source outputLineSource Selects which internal signal or software control state to output on the selected line The pulse is defined by outputLinePulseDelay and outputLinePulseDuration RW Note the Line Mode feature must be set to Output DFNC Beginner Off Off The output line is open Software Controlled SoftwareControlled The value of the outp...

Page 55: ... is set to a general purpose input GPI RW Note This value is for both general purpose inputs i e setting this value sets it for both Line 1 and Line 2 DFNC Beginner 2 4V Threshold Threshold_2_4 2 4V threshold for TTL inputs Threshold_6_0 Threshold_6_0 6V threshold for 12V input Threshold_12_0 Threshold_12_0 12V threshold for 24V input Line Status All LineStatusAll Returns the current status of all...

Page 56: ...senting whether to apply to cached outputLineValue values W Value 0 Don t apply any value 1 Apply outputLineValue of Output1 2 Apply outputLineValue of Output2 3 Apply outputLineValue of Output1 and Output2 Note LineMode feature must be set to Output and outputLineSource is set SoftwareControlled DFNC Beginner ...

Page 57: ...tomatically adjusted are device specific The device will not restore these features when the flat field correction mode is changed from calibration mode to another mode It is not available for FactoryFlatfield1 Global Shutter Factory Flat Field FactoryFlatfield2 Rolling Shutter Factory Flat Field It is not available for external mode and it is not available for AOI smaller than 2048 horizontal Cur...

Page 58: ...e is 0 to 511 as float Read Write when in Calibration Mode Clear Coefficients flatfieldCalibrationClearCoefficient This feature is used to clear all the current FPN and PRNU coefficients in the selected Active Set W Read Write when in Calibration Mode DFNC Expert FPN calibration step No This feature selects the FPN calculation method RW Step 1 When the Offset Calibration is commanded the base FPN ...

Page 59: ...tnessHeight Determines the number of rows to include in the average used to set the PRNU targets for color sensors RW The minimum autoBrightnessHeight is 4 rows and the maximum is Height 4 The autoBrightnessheight is increased in multiples of 2 and if an odd number is entered the entry will be rounded down when possible Also the AutoBrightnessOffsetY may need to be decreased before increasing this...

Page 60: ... the FPNoffsetxy FFCGainxy is calculated under approximately 50 illumination and is the result of the following calculation FFCGainxy Target Average signalxy DarkRowSubtract FFCOffsetx y currentIntTime CalIntTime DeltaFPNxy It is recommended that the target be set 20 higher than the average scene value Color During operation the equation when enabled is correctedPixelValuex y sensorPixelValuex y D...

Page 61: ...ration mode method 1 RW It is specified as a percentage of the output range for example 2048 DN for 12 bits 50 Range is 0 to 100 as float All three colors need to be entered for the color camera and a single value entered for the monochrome camera It is recommended the flatfieldCalibrationTarget colorAverage 1 2 PRNU calculation method 2 uses image statistics to calculate the target values and fla...

Page 62: ...ser Flat Field 3 User configurable flat field sets Copy Coefficient to Active flatfieldCoefficientsCopyInCurrent Copies the currently selected by flatfieldCoeffiecientsCopySource to the Active Set Write when in Calibration Mode DFNC Expert Pixel Replacement Mode defectivePixelReplacementMode Enable or disable pixel replacement RW If Active If FPNx y defectivePixelReplacementOffsetThreshol d OR PRN...

Page 63: ...ears all Active rows and columns from being included in the defect replacement and sets them to Off FPN Base Defect Count flatfieldCalibrationFPNBaseDefectCount Reports the number of defect pixels detected in FPN base calibration DFNC Guru FPN Delta Defect Count flatfieldCalibrationFPNDeltaDefectCount Reports the number of defect pixels detected in FPN delta calibration DFNC Guru PRNU Defect Count...

Page 64: ...t Module is 0 This allows for correct FPN coefficient calculation RW Dark Row Defect Mask DarkRowDefectMask This is a mask which can exclude any dark row of the 16 dark rows at the bottom of the image sensor row 0 to 15 or at the top of the image sensor row 16 to 31 The bit mask is one hot and rows 0 15 16 and 31 are always marked as excluded Mandatory set bits are shown below Bit 31 Bit0 Mask 0x8...

Page 65: ...h in multiples of 32 pixels in pixels RW Beginner Height Height Height of the Image provided by the device in lines which ranges up to the SensorHeight in multiple of 2 rows RW Beginner Offset X OffsetX Horizontal offset from the Sensor Origin to the Area Of Interest in pixels RW Note Width must be reduced first The offset is a multiple of 32 pixels Beginner Offset Y OffsetY Vertical offset from t...

Page 66: ...Summing Mode summingMode Enables camera summing mode DFNC Guru Off Off The camera will output 1 frame at a time Active Active The camera will sum 2 or more frames and output the summed image Summing Count in frame summingCount Specifies the number of frames to sum Read Write when summingMode is Active Possible values are 2 to 8 in increments of 1 DFNC Guru Burst Mode summingBurst Enables camera su...

Page 67: ...port is defined as a command channel and may include the video channel carried by a cable RO Possible values are 0 to 4294967295 DFNC Beginner Avail Ports AvailPorts Number of ports available on this device RO DFNC Beginner Actual Device Config ActualDeviceConfig The current index of the device configuration RO DFNC Beginner Next Device Config NextDeviceConfig The next configuration of the device ...

Page 68: ...that allows user to test file transfer File Size FileSize Represents the size of the selected file in bytes Guru File Open Mode FileOpenMode Selects the access mode used to open a file on the device Guru Read Read Select READ only open mode Write Write Select WRITE only open mode File Operation Selector FileOperationSelector Selects the target operation for the selected file in the device This ope...

Page 69: ... FileInvalid The last file operation has completed unsuccessfully because the selected file in not present in this camera model File Operation Result FileOperationResult Displays the file operation result For Read or Write operations the number of successfully read written bytes is returned RO Guru File Access Buffer FileAccessBuffer Defines the intermediate access buffer that allows the exchange ...

Page 70: ...installation manual 2 Install Sapera LT and the Teledyne DALSA frame grabber driver 3 Connect the camera to the frame grabber refer to the camera installation manual 4 Start the CamExpert application In the Device tab select either the camera or frame grabber to adjust their parameters currently for GenCP cameras the camera and frame grabber parameters must be adjusted separately 5 Modify the came...

Page 71: ...ntamination using an ionized air gun Place the sensor under the microscope at a magnification of 5x to determine the location of any remaining contamination Clean the contamination on the sensor using one drop of E2 on a swab Wipe the swab from left to right or right to left but only in one direction Do this in an overlapping pattern turning the swab after the first wipe and with each subsequent w...

Page 72: ...in more stable images but with a small penalty in read noise Offset FPN Calibration Offset calibration is performed when the sensor is not exposed to light The camera supports a 2 step FPN calibration algorithm The first step measures the ADC offsets and photo site integration time dependent dark current The 2nd step is performed with a small amount of light 50 DN on the sensor which helps to line...

Page 73: ...If the calculated gain is less than 1 then the pixel is marked as defective A large number of marked pixels may indicate a poorly chosen target or exposure setting If the calculated pixel gain is not correctable i e greater than 4 it will be clipped at 4 Once the gain values are calculated the values are used to correct the image During camera operation the FPN and PRNU defect threshold is program...

Page 74: ...2 AverageGreenBlue Green pixels in the blue row TargetGreenRed 1 2 AverageGreenRed Green pixels in the red row The micro code then commands the FPGA to perform PRNU calculation Micro calculates the color gains and ensures they are stored with the coefficient set GainMaxColor 1 assume R for this example as easier to write the description GainGR AvgR AvgGR GainGB AvgR AvgGB GainB AvgR AvgB User Inte...

Page 75: ...ffsetY OffsetY 2 and autoBrightnessOffsetY Offsety Hieght 2 autoBrightnessHeight autoBrightnessOffsetx Trunc CustomerEnteredStatisticOffsetx 32 32 1 Width must first be reduced before the offsetx can be increased autoBrightnessOffsetx 10720 autoBrightnessWidth autoBrightnessWidth Trunc CustomerEnteredWidthx 32 32 64 10720 ...

Page 76: ...74 Contents Falcon4 86M Cameras Appendix E FILE FORMAT LUT file is downloaded uploaded as shown in the following figure ...

Page 77: ...width Width of area interest 36 Aoi height Height of area interest 40 Aoi left Left of area interest 44 Aoi top Top of area interest 48 Sensor width Width of sensor absolute region 52 Sensor height Height of sensor absolute region 56 Sensor left Left of sensor absolute region 60 Sensor top Top of sensor absolute region 64 Reserved for other Teledyne Dalsa cameras 164 nCalTime Measured exposure tim...

Page 78: ...ne can use other image processing software to view this target tiff file Camera Defect Map The camera defect map file is a Cabernet Defect Map File is a text file that contains information on row column and cluster defects found during the camera test There are two copies of the file loaded into the camera a factory version that the user has read only access to and a user version that can be overw...

Page 79: ...ound under rolling shutter No row defects found No column defects found Cluster Defects X Y Area Cluster1 523 4335 4 Cluster2 379 5332 7 Cluster3 3374 6515 7 Cluster4 3776 6636 97 Defects found under global shutter No row defects found No column defects found Cluster Defects X Y Area Cluster1 524 4335 6 Cluster2 379 5333 9 Cluster3 3374 6515 7 Cluster4 3776 6636 98 ...

Page 80: ... Fax 978 670 2010 Teledyne DALSA GMBH Felix Wankel Str 1 82152 Krailling Germany Tel 49 89 89 54 57 3 80 Fax 49 89 89 54 57 3 46 Asian Sales Teledyne DALSA Asia Pacific Ikebukuro East 13F 3 4 3 Higashi Ikebukuro Toshima ku Tokyo Japan Tel 81 3 5960 6353 Fax 81 3 5960 6354 Shanghai Industrial Investment Building Room G 20F 18 North Cao Xi Road Shanghai China 200030 Tel 86 21 64279081 Fax 86 21 6469...

Page 81: ...MS 00117 00 R listed Performance specifications table revised Cosmetic sensor specifications revised Angle of Incidence graph added Flash memory size values added Thermal management section added Gain and black level controls diagram revised Opto coupled outputs diagram revised Correction function block diagram revised Command listed revised to reflect current camera operation 19 April 2017 ...

Page 82: ...sh memory sizes 9 frame rate set 34 G grounding instructions 15 GUI overview 19 H humidity storage and operation 7 I I O control 51 image acquisition 30 Input Output control 51 interface mechanical 5 L LED definitions 17 line rate 34 M mean time between failures MTBF 7 mechanical camera 43 specifications 5 models 5 MTBF 7 O operating ranges 6 optocouplers 34 P performance specifications 5 power co...

Page 83: ...Index 81 T trigger modes 33 V visibility attribute 23 ...

Reviews: