4 Operation
Model 7300A
4-10
Teledyne Analytical Instruments
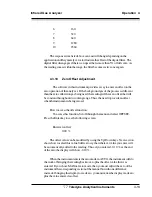
The self diagnostics are run automatically by the analyzer whenever the
instrument is turned on, but the test can also be run by the operator at will. To
initiate a self diagnostic test during operation, use the UP/DOWN key to scroll
through the MAIN MENU to the
SELFTEST
and Enter. The screen will follow
the running of the diagnostic.
RUNNING DIAGNOSTIC
Testing Preamp Cell
When the testing is complete, the results are displayed.
Power: OK Analog: OK
Cell: 2 Preamp: 3
The module is functioning properly if it is followed by
OK
. A number
indicates a problem in a specific area of the instrument. Refer to Chapter 5
Maintenance and Troubleshooting for number-code information. The results
screen alternates for a time with:
Press Any Key
To Continue...
Then the analyzer returns to the initial System screen.
4.3.6 The Model Screen
Scroll through the MAIN MENU to MODEL and Enter. The screen
displays the manufacturer, model, and software version information.
4.3.7 Checking Linearity with ALGORITHM
Use UP/DOWN control to select
ALGORITHM
, and
Enter
.
sel rng to set algo:
> Ø1 Ø2 Ø3 <
Use the UP/DOWN Control to select the range: 01, 02, or 03. Then press
Enter
.
Gas Use: CO2
Range: Ø 10%
Enter again.
Algorithm setup:
VERIFY SET UP
Use UP/DOWN key to select and
Enter
VERIFY
to check whether the
linearization has been accomplished satisfactorily.
Summary of Contents for 7300A
Page 4: ...iv Model 7300A Teledyne Analytical Instruments ...
Page 12: ...1 4 1 Introduction Model 7300A Teledyne Analytical Instruments ...
Page 26: ...2 Installation Model 7300A 2 14 Teledyne Analytical Instruments ...
Page 36: ...3 Start up and Theory of Operation Model 7300A 3 10 Teledyne Analytical Instruments ...
Page 80: ...5 Maintenance Model 7300A 5 10 Teledyne Analytical Instruments ...


