background image

OUT1

OUT2

25


Configuring the Outputs

The outputs are assigned the generic name OUT1 and OUT2. 

Using the «Auxiliary controls» menu of the TelecoHUB App it is possible to 

change the names of the function the outputs have been assigned to.

For example, if output OUT1 is connected to the living area light the name 

labels can be changed to “Living Area Light”, as can the status (“On” and 

“Off”) and function (“Switch On” and “Switch Off”) labels.

To configure the outputs use a smartphone that has been Bluetooth paired 

with the HUB:

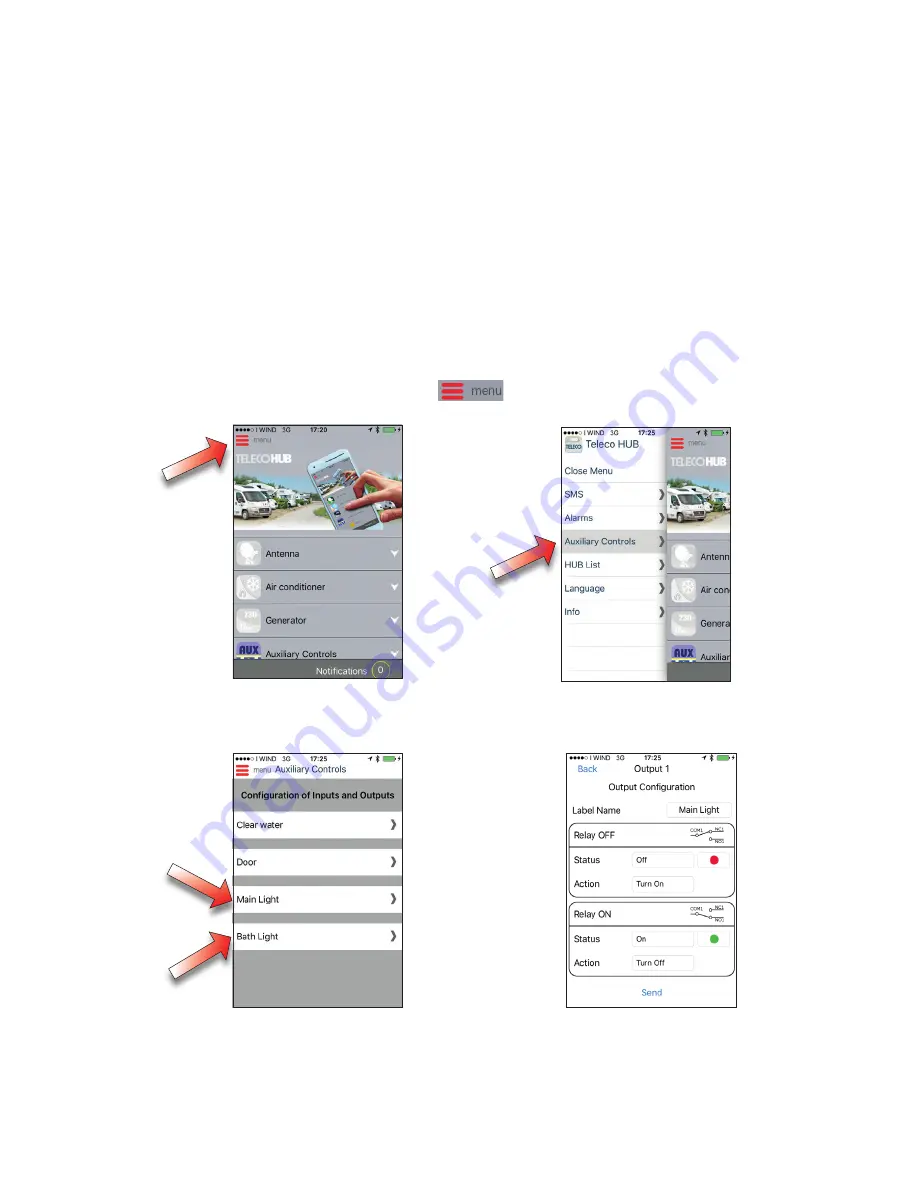
1.   Remain close to the HUB and open the TelecoHUB App on the 

smartphone (if the App is already open, scroll the screen down to force 

reconnection): the smartphone automatically connects to the HUB via 

Bluetooth

2.   Press Menu  

  and select the «Auxiliary Controls» item

3.    Press on the output you intend to configure, then carry out modifications 

and confirm by pressing “Send”

Summary of Contents for TIG3000B

Page 1: ...TELECO HUB I N S T A L L A T I O N G U I D E A N D U S E R M A N U A L GB...

Page 2: ...mal wear of parts f Spare part shipping between the customer and the service centre g Damage that may occur during transport transport associated risks are always considered to be the customer s respo...

Page 3: ...iring a smartphone for Bluetooth connection 15 Deleting the list of smartphones paired for Bluetooth connection 16 GSM connection 17 Inserting and removing the Micro SIM card 17 Configuring GSM connec...

Page 4: ...ble 3 Auxiliary inputs lead 4 Auxiliary outputs lead 5 Installation and use manual Technical characteristics Power supply 12 Volt 10 15 V DC Max consumption 300 mA SIM Card connector Micro SIM card Bl...

Page 5: ...no tracking 4 Blue LED BLUETOOTH Flashes briefly every 3 seconds when the HUB is able to connect via Bluetooth with one of the paired smartphones on when a smartphone is connected During the pairing...

Page 6: ...de the vehicle with your smartphone and checking there are no interruptions in Blueto oth connection with the HUB Make sure the Micro SIM slot remains accessible GSM external antenna optional The inte...

Page 7: ...wer supply cable to the consensus of the vehicle ignition console in many cases such consensus is loca ted on Pin 15 in the main terminal board so that whenever the engine is started this cable receiv...

Page 8: ...voltage 12 Volt 1 Connect the IN1 wires of the Auxiliary Input Lead to the first input you wish to control 2 Connect the IN2 wires of the Auxiliary Input Lead to the ends of the second input you wish...

Page 9: ...1 year of sale 2014 All InternetSat systems starting from serial number 1401B20001 year of sale 2014 All TeleSat systems starting from serial number 1401A40001 year of sale 2014 Not compatible with El...

Page 10: ...cluded in this order connect the GENERATOR connector of the HUB to the RJ11 connector at the rear of the panel of compatible generators Compatible models TIG3000B TIG3000G TIG3000D Note All the produc...

Page 11: ...dy on scroll the screen down to force reconnection Rapid configuration of the Bluetooth proximity connection 1 Install the TelecoHUB App on your smartphone 2 Activate Bluetooth on the smartphone 3 Pre...

Page 12: ...lready done so insert a Micro SIM card with its own phone number and sufficient credit in the slot shown in Fig 1 and power the HUB 2 Remain close to the HUB and open the TelecoHUB App on the smar tph...

Page 13: ...croll down and select Modify in the Authorised phones list section 6 Identify a free slot and click on it 7 Key in the number of the smartphone to be enabled for remote control and confirm by pressing...

Page 14: ...led for remote control maximum 10 telephone numbers 9 Press Back to exit the list 10 Press Menu and select the Close Menu item The HUB is ready to be controlled via GSM SMS by smartphones whose number...

Page 15: ...it the blue LED starts flashing 1 second on and 1 second off Press and release The BLUE LED starts flashing Bluetooth Connection To ensure your privacy the HUB only communicates via Bluetooth with pa...

Page 16: ...he blue LED flashes rapidly for about 3 seconds then the HUB returns to standby ready to connect with one of the paired smartphones Note on the smartphone the HUB will be displayed with the name Telec...

Page 17: ...ts facing downwards To remove the Micro SIM card press it again Note the HUB can also be used without a Micro SIM this limits usage to Bluetooth connection in the immediate vicinity range about 10 met...

Page 18: ...ne number of the Micro SIM card installed in the HUB and confirm by pressing Send Where requested by the App enter the PIN of the Micro SIM installed in the HUB If a PIN is entered incorrectly 3 times...

Page 19: ...TelecoHUB App SMS menu accordingly No signal OK Poor Quality OK Normal Quality OK Good Quality OK Excellent Quality NO SIM Sim Card not inserted Sim Card locked SMS not available OK SMS NO SIM Sim Ca...

Page 20: ...om numbers contained in a list of 10 enabled telephone numbers To add a phone number to the list use a smartphone that has been Bluetooth paired with the HUB 1 Remain close to the HUB and open the Tel...

Page 21: ...Key in the number of the smartphone to be enabled for remote control and confirm by pressing Save 6 Repeat steps 4 and 5 to enter all the phone numbers to be enabled for remote control maximum 10 tele...

Page 22: ...e HUB is ready to be controlled via GSM SMS by smartphones whose numbers have been entered on the Authorised phones list list steps 4 5 and 6 Note use the same section of the Authorised phones list SM...

Page 23: ...when the camper door is opened see Alarms and Notifications section of this manual The HUB places 2 inputs and 2 outputs at the user s disposal to control camper equipment devices On the basis of how...

Page 24: ...be used as an alarm on opening or closing of the contact To configure the inputs use a smartphone that has been Bluetooth paired with the HUB 1 Remain close to the HUB and open the TelecoHUB App on th...

Page 25: ...ng Area Light as can the status On and Off and function Switch On and Switch Off labels To configure the outputs use a smartphone that has been Bluetooth paired with the HUB 1 Remain close to the HUB...

Page 26: ...Notifications bar otherwise the alarm is sent via SMS text message to all the phone numbers configured in the Alarm phones list The number inside the circle indicates there are notifications Press on...

Page 27: ...ctivate alarms remotely via SMS message but it is not possible to modify the list of phones to be warned Configuration of the telephone numbers to which SMS alarm messages are to be sent The HUB sends...

Page 28: ...oll down and select Modify in the Alarm phones list section 4 Identify a free slot and click on it 5 Key in the number of the smartphone to which SMS alarm messages are to be sent and confirm by press...

Page 29: ...9 6 Repeat steps 4 and 5 to enter all the phone numbers to which SMS alarm messages are to be sent maximum 4 telephone numbers 7 Press Back to exit the list 8 Press Menu and select the Close Menu item...

Page 30: ...systems signal coverage is normally ensured inside buildings too shelters garages etc Tracking precision depends on GSM cell density where the vehicle is currently located consequently it varies from...

Page 31: ...se the Teleco HUB App and reopen it I can t pair a smartphone It is possible to connect just one smartphone at a time So if the blue LED is on steady not flashing to indicate that a connection is alre...

Page 32: ...my smartphone Check the Micro SIM installed in the HUB is working properly and that it has sufficient credit The HUB does not send SMS alarm messages to my smartphone Check the Micro SIM installed in...

Page 33: ...e and Komfort models Connection with the HUB occurs via the IFS interface Note the antenna control units must be programmed with firmware in version 70 or later U70 C70 T70 etc Can I control my air co...

Page 34: ...heck GPRS network coverage in your current location Off No GSM connection Check that the Micro SIM card is inserted properly in the TelecoHUB control unit SIM CARD slot Check that the Micro SIM card i...

Page 35: ...55013 2001 A1 2003 EN 61000 3 2 2000 A2 2005 EN 61000 3 3 1995 A1 2001 A2 2005 EN 55020 2002 A2 2005 according to the terms of the European directive 2006 95 EC Low Voltage modified by 93 68 CEE and 2...

Page 36: ...36...

Reviews: