background image


Page 44 sur 72 


www.technomark-marking.com 

TECHNOMARK 

1 Allée du développement 
42350 LA TALAUDIÈRE (France) 
Tel : +33 (0) 4 77 22 25 91 
Fax : + 33 (0) 4 77 22 38 93 
E-mail : [email protected] 
 

User Guide GRAPHIX_v1.4_UK 

TRAÇABILITÉ CRÉATIVE


CREATIVE TRACEABILITY


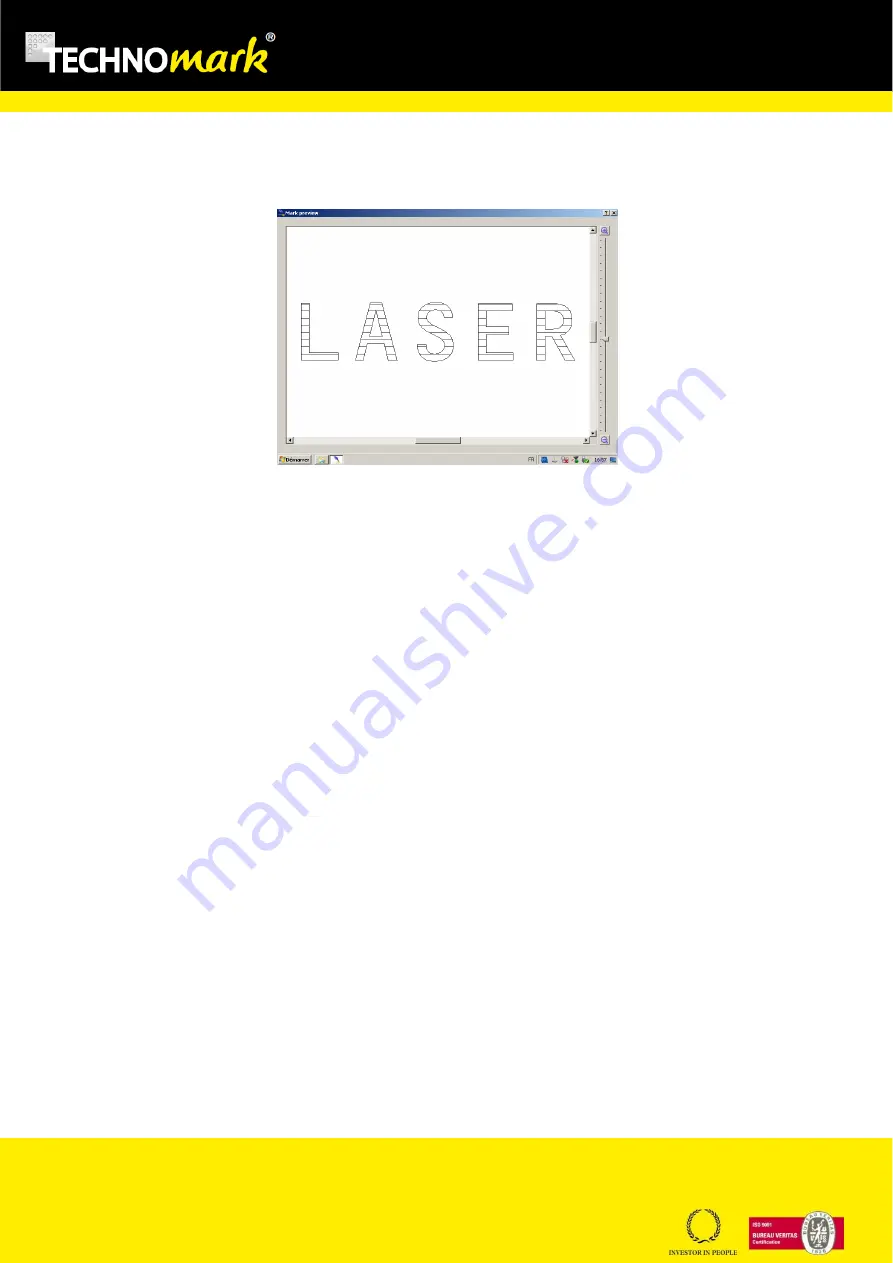
1)


Filling: single line 

2)


Inter-line: 0.5mm 

3)


Angle: 0° 


Summary of Contents for GraphiX

Page 1: ...Tel 33 0 4 77 22 25 91 Fax 33 0 4 77 22 38 93 E mail contact technomark marking fr User guide Version Translated from Original version of 12 05 2016 Revision 1 4 Revision date 09 01 2020 Produced by JM Validated by SJ 1 Allée du développement 42350 LA TALAUDIÈRE www technomark marking com Tél 33 0 4 77 22 25 91 Fax 33 0 4 77 22 38 91 ...

Page 2: ...requirements Our customer service is at your disposal for any further information And so now enjoy your marking CONTENTS 1 Introduction 5 2 Precautions of use 6 2 1 Designated use 6 2 2 Disposal remarks 6 3 Declaration of conformity 7 4 Safety 8 4 1 Safe operation of the machine 8 4 2 Laser safety 9 4 2 1 Laser risks 9 4 2 2 Fire risks 9 4 2 3 Electrical risks 10 4 2 4 Residuals hazards 10 4 3 Mac...

Page 3: ...opening for bar passage accessory 28 8 Identification of the components 29 9 Before operation 36 9 1 Points to watch before using the equipment 36 10 Operation 36 10 1 Quick start 36 10 1 1 Starting the machine 36 10 1 1 Starting the laser source 36 10 2 Creating your first flat marking file 39 10 2 1 Preparing the marking file 39 10 3 Creating your first ring marking file revolving part 46 10 3 1...

Page 4: ...e Tel 33 0 4 77 22 25 91 Fax 33 0 4 77 22 38 93 E mail contact technomark marking fr User Guide GRAPHIX_v1 4_UK TRAÇABILITÉ CRÉATIVE CREATIVE TRACEABILITY 12 Maintenance and routine care 69 12 1 General information 69 12 2 First level machine servicing 69 12 3 Troubleshooting tips 70 12 4 Spare parts 71 ...

Page 5: ... the use of the equipment The TECHNOMARK guarantee of the equipment it manufactures is defined in its terms and conditions Unless specifically stated otherwise on our acknowledgement of order receipt our equipment is guaranteed for 1 ONE year from the equipment s delivery date This guarantee consists of our free replacement of defective parts except with regards to externally supplied sub assembli...

Page 6: ...ich are highly polished cold show no reaction to the laser beam This is due to too high reflectivity from the material for the kind of laser beam used Furthermore the reflectivity can cause damages on the elements inside the marking head Consequently the marking on too brilliant or polished parts is to be banned The machine also allows the marking of some plastic parts You can contact Technomark f...

Page 7: ...TECHNOMARK 1 Allée du développement 42350 LA TALAUDIÈRE France Tel 33 0 4 77 22 25 91 Fax 33 0 4 77 22 38 93 E mail contact technomark marking fr User Guide GRAPHIX_v1 4_UK TRAÇABILITÉ CRÉATIVE CREATIVE TRACEABILITY 3 Declaration of conformity ...

Page 8: ... the installation use setting care and maintenance of the machine Before operating the machine you should read the entire manual carefully this will ensure that you can use the machine safely and get the best performance from it If the machine is used in a way other than that intended by Technomark or without the user having understood this manual he she alone will be entirely responsible for any ...

Page 9: ...laser system is a hazard to the eye or skin from the direct beam may pose a fire hazard or diffuse reflection hazard and may also produce laser generated air contaminants LGAC and hazardous plasma radiation The GRAPHIX LMG0 E10 GRAPHIX LMG0 E20 GRAPHIX LMG0 E30 and GRAPHIX LMG0 E50 shall not be modified in any way or operated with any portions of the laser protective housing open and or removed as...

Page 10: ...and the beam causes a heating of the material For long markings and according to the material the marked part can be hot Use safety gloves to treat parts after marking if necessary Properly speaking the machine does not produce any gases or hazardous vapours However depending on the material being marked the process can produce micro particles dust fumes and vapour which can be irritating or toxic...

Page 11: ...d power the extraction system can get hot during continuous use When required to work on these motors maintenance personnel should allow them to cool sufficiently before intervening 4 3 3 Noise risks The sound pressure level at the workstation does not exceed 70 dB A 4 3 4 Moving parts Never approach moving parts when the machine is in automatic mode Never remove protective guards Switch the machi...

Page 12: ...ow it works 4 3 5 3 Enclosures The particular use of enclosures on the machine contributes to it being a class 1 laser Never remove panels 4 3 5 4 Isolating switches The machine has a main electrical isolator that cuts the power to the machine as a whole An indicator lamp shows that the machine is receiving power Never remove protective guards Never bypass damage remove or re position protective g...

Page 13: ...E TRACEABILITY 4 3 6 Warning labels Before using the machine the operator should be familiar with all the warning labels on it Risque électrique Electric shock Rayonnement laser Laser radiation Produit laser classe 1 Class 1 laser product Do not remove or bypass the door safety device Laser radiation Do not remove guards Laser radiation Where warning labels have become damaged during normal use co...

Page 14: ...ou have received your GraphiX machine packed in a wood case to protect it during transport Accessories are packed in accompanying cartons Please follow the steps below very carefully to ensure that the machine is unpacked correctly Packaging and fasteners should be retained for later use Unscrew the screws and remove the upper lid Remove the foam protection Unscrew the screws and remove the side p...

Page 15: ...mail contact technomark marking fr User Guide GRAPHIX_v1 4_UK TRAÇABILITÉ CRÉATIVE CREATIVE TRACEABILITY 6 2 Contents of the package Main power supply cable User manual Software user manual Test plate F254 lens Option Rotary spindle Accessory Fume extraction system Accessory 19 screen Accessory Wireless keyboard mouse Accessory Screen support Accessory ...

Page 16: ...onents Vibration and impacts may damage sensitive components and diminish their accuracy The machine weighs 90 kg without accessories Check that the capacity of the lifting equipment used is sufficient for the weight of the machine We recommend the use of soft slings slid under the machine to handle it Only qualified personnel should be allowed to operate lifting equipment Under all circumstances ...

Page 17: ..._UK TRAÇABILITÉ CRÉATIVE CREATIVE TRACEABILITY 6 4 Positioning the machine The machine should be positioned on a stable support able to take the weight of the machine and any accessories We recommend a bench 1500 x 750 x 840 mm in size L x W x H 6 5 Installing accessories The machine may be equipped with several accessories These accessories must be installed in accordance with the manufacturer s ...

Page 18: ...ture 10 C to 60 C Environment for use Temperature for use 5 C to 40 C Humidity 90 non condensing Altitude 2000 m To ensure a long service life and high level of marking accuracy from the machine we recommend that the machine is installed in an air conditioned environment at 20 C The controller and laser marking head are sensitive to vibration Consequently sources of vibration close to the machine ...

Page 19: ...ed to the laser and the other end to the 220V or 110V socket External circuits to be connected to the product shall be SELV type as stated by the standards IEC60950 1 2005 and EN60950 1 2006 A11 7 2 Connecting the screen Connect the screen supplied as an option or provided by you to the VGA connector on the right hand side of the machine Connect the screen s main power supply to a 220V mains socke...

Page 20: ...es Ø100 mm chuck Max workpiece volume 330 mm x Ø100mm excluding volume clamps in jaws 2 marking areas Able to mark parts up to 5 kg for more please contact us Include storage for the chuck key Can clamp the part From inside from Ø30 to Ø90 mm From outside from Ø2 to Ø30 mm or from Ø30 to Ø80 mm depending on the chuck jaws type Axis D high capacity Capacities Ø 130 mm chuck Max workpiece volume 140...

Page 21: ...uide GRAPHIX_v1 4_UK TRAÇABILITÉ CRÉATIVE CREATIVE TRACEABILITY 7 4 1 Location Position the rotary spindle low or high capacity on the machine bed using the fasteners supplied and according to the positioning below Figure 1 Low capacity Figure 2 High capacity Secure the rotary spindle using M8 inserts position 1 for the LC and HC spindle position 2 for the LC spindle only Position 1 Position 2 ...

Page 22: ...nce Tel 33 0 4 77 22 25 91 Fax 33 0 4 77 22 38 93 E mail contact technomark marking fr User Guide GRAPHIX_v1 4_UK TRAÇABILITÉ CRÉATIVE CREATIVE TRACEABILITY 7 4 2 Connections All connections should be made with the power off Connect the communication cable to the D spindle connector inside the machine ...

Page 23: ...RK 1 Allée du développement 42350 LA TALAUDIÈRE France Tel 33 0 4 77 22 25 91 Fax 33 0 4 77 22 38 93 E mail contact technomark marking fr User Guide GRAPHIX_v1 4_UK TRAÇABILITÉ CRÉATIVE CREATIVE TRACEABILITY Figure 3 Low capacity spindle in position 2 ...

Page 24: ...l contact technomark marking fr User Guide GRAPHIX_v1 4_UK TRAÇABILITÉ CRÉATIVE CREATIVE TRACEABILITY 7 4 1 Setting up the D spindle Refer to the Quick start paragraph to start the machine In the R Spindle tab check that the settings are consistent with the settings below according to the spindle installed low capacity D spindle or high capacity D spindle ...

Page 25: ...ARK 1 Allée du développement 42350 LA TALAUDIÈRE France Tel 33 0 4 77 22 25 91 Fax 33 0 4 77 22 38 93 E mail contact technomark marking fr User Guide GRAPHIX_v1 4_UK TRAÇABILITÉ CRÉATIVE CREATIVE TRACEABILITY Figure 4 Low Capacity D spindle parameters ...

Page 26: ...RK 1 Allée du développement 42350 LA TALAUDIÈRE France Tel 33 0 4 77 22 25 91 Fax 33 0 4 77 22 38 93 E mail contact technomark marking fr User Guide GRAPHIX_v1 4_UK TRAÇABILITÉ CRÉATIVE CREATIVE TRACEABILITY Figure 5 High Capacity D spindle parameters ...

Page 27: ...pin connector 4 on the top of the machine s main switch and connect the other end to the 8 pin connector behind the extraction system The cable is reversible For continuous operation of the extraction system set the switch at the back of the system to the 0 position To operate the extraction system controlled by marking set the switch at the back to position 1 In this mode extraction is triggered ...

Page 28: ...accessory allows to introduce lengthy workpiece bar type inside the machine to mark them at extremity safely Before marking operation make sure of the good state of brushes by following the stages below Fix a lamp inside the machine towards the brushes Visually inspect the absence of light outside of the machine Check that all brushes return ready naturally after introducing a bar Change the syste...

Page 29: ...1 Allée du développement 42350 LA TALAUDIÈRE France Tel 33 0 4 77 22 25 91 Fax 33 0 4 77 22 38 93 E mail contact technomark marking fr User Guide GRAPHIX_v1 4_UK TRAÇABILITÉ CRÉATIVE CREATIVE TRACEABILITY 8 Identification of the components 3 1 2 7 4 8 5 6 ...

Page 30: ...ark marking fr User Guide GRAPHIX_v1 4_UK TRAÇABILITÉ CRÉATIVE CREATIVE TRACEABILITY 1 Marking head 7 Door safety switch 2 Control unit 8 Connection panel main switch USB port VGA connector extraction connector accessory 3 Electric column 9 Door 4 Bar opening accessory 10 Viewing window 5 PC Laser source 11 Screen support and screen accessory 6 Identification plate 9 11 10 ...

Page 31: ...trated by an F Theta focussing lens before being aimed at the part to be marked Below is a table of currently available F Theta focussing lenses F Theta scanning lenses ƒ 160S M39 ƒ 254S M39 Option Lens fixing mm 39 39 Working distance mm 183 5 280 4 Fixing distance mm 197 6 300 5 Marking area mm2 100 x 100 140 x 140 The working distance is defined as the distance between the centre of the marking...

Page 32: ... light is on during marking Emergency Stop mushroom button Pressing this button switches off the laser source in the event of an emergency Light selector This selector switches the light inside the machine on and off Z axis selector if manual triggering option available This selector moves the marking head to set the working distance Stop push button indicator light This button stops any marking i...

Page 33: ...d to move the head and consequently for setting the working distance It is equipped with an upper limit switch sensor Manually triggered electric column The focus distance is set using the Z axis selector on the control desk Electric column controlled by the marking file The focussing distance is set using the Up and Down keys on the Graph Pro Laser engine interface or by entering the thickness of...

Page 34: ...ance between the part and the PVC brush is too great 5 PC Laser source The GraphiX marking system uses an optical fibre laser source It guarantees a high degree of stability low sensitivity to the optical offset and a longer product life The GraphiX system includes a computer with Windows 7 embedded The PC is equipped with the GraphPro marking software 6 Identification plate 7 Door safety switch T...

Page 35: ...or The door provides access to the marking area for loading unloading parts and for maintenance operations Opening the door immediately blocks the emission of the laser source if marking is in progress The system changes to marking simulation mode 10 Viewing window You can watch marking safely through the protective window polycarbonate according NF EN 207 11 Screen support screen The screen suppo...

Page 36: ... could cause serious personal injury or damage to the machine Ensure that only trained personnel operate the machine Ensure that only trained and qualified personnel set up service and maintain the machine assisted by documentation from the supplier 10 Operation 10 1 Quick start 10 1 1 Starting the machine Press the main switch button to switch on the laser See 5 Connections paragraphe The button ...

Page 37: ...0 seconds laser status Laser WARM UP Wait for the end of the laser source warm up phase The indicator lamp turns a steady orange and the Ready light is on steady The machine and laser source are running Machine status indicator lamps Main switch indicator lamp On The machine is powered on Off The machine is switched off Machine on indicator lamp On Correct laser source starting procedure Off Sourc...

Page 38: ...Indicator light Flashes slow green 1 sec Computer starts and connects to the laser source System booting Up Steady green Laser source connected to the computer Wait for start Steady orange Laser source powered up Stand by shutter closed Flashes slow orange 2 sec Laser source warming up Warming UP Flashes fast orange 1 sec Start up procedure error Laser Warning Steady red Laser source ready Laser R...

Page 39: ... TRACEABILITY 10 2 Creating your first flat marking file 10 2 1 Preparing the marking file Double click the GraphPro Laser Editor icon to start the marking application Select manual mode See Auto semi automatic manual mode paragraph Create a new flat document by clicking on the drop down menu on the Main tool bar and select Layer A new document opens The graphical work area is displayed This area ...

Page 40: ... depend on the material and the desired rendering The values below are given for information purposes and will allow you to get started Material Power of 10W Frequency Hz Scanning speed mm per sec Steel 95 25 000 150 Stainless steel 95 25 000 150 Anodised aluminium 95 25 000 400 Polycarbonate 60 45 000 500 The Properties tab available for documents or objects allows you to modify properties in ord...

Page 41: ...22 38 93 E mail contact technomark marking fr User Guide GRAPHIX_v1 4_UK TRAÇABILITÉ CRÉATIVE CREATIVE TRACEABILITY 2 Click on the Text string icon on the Insert objects tool bar to add a text string to the graphic area It is possible to add other objects to the document 1D code 2D code logos images shapes etc from the insert objects tool bar ...

Page 42: ...ÈRE France Tel 33 0 4 77 22 25 91 Fax 33 0 4 77 22 38 93 E mail contact technomark marking fr User Guide GRAPHIX_v1 4_UK TRAÇABILITÉ CRÉATIVE CREATIVE TRACEABILITY 3 With the object selected edit the properties of the character string such as value font style etc using the Properties String tab ...

Page 43: ...rk marking fr User Guide GRAPHIX_v1 4_UK TRAÇABILITÉ CRÉATIVE CREATIVE TRACEABILITY 4 Edit the fill properties such as the type of fill the inter line distance etc via the Properties Filling tab You can press the F8 button to view the laser beam s trajectory and see the rendering of the marking See the example fills below 1 Filling single line 2 Inter line 0 1mm 3 Angle 45 ...

Page 44: ...1 Allée du développement 42350 LA TALAUDIÈRE France Tel 33 0 4 77 22 25 91 Fax 33 0 4 77 22 38 93 E mail contact technomark marking fr User Guide GRAPHIX_v1 4_UK TRAÇABILITÉ CRÉATIVE CREATIVE TRACEABILITY 1 Filling single line 2 Inter line 0 5mm 3 Angle 0 ...

Page 45: ...have a different rendering between several objects in a single marking file you can customise the laser parameters for each object 1 Tick the Custom laser parameters box in the object properties tab You can enter different parameters from the general parameters The object in the graphics area turns blue to tell you that its laser parameters are different from the general laser parameters Your file...

Page 46: ...eating your first ring marking file revolving part The D spindle accessory is essential for marking a ring document 10 3 1 Preparing the marking file 1 Double click the GraphPro Laser Editor icon to start the marking application 2 Click on the drop down menu on the Main tool bar and select Ring document 3 Edit the general laser parameters for the document such as power frequency and scanning speed...

Page 47: ... given for information purposes and will allow you to get started Material Power of 10W Frequency Hz Scanning speed mm per sec Steel 95 25 000 150 Stainless steel 95 25 000 150 Anodised aluminium 95 25 000 400 Polycarbonate 60 45 000 500 4 We are going to define the parameters necessary for marking a ring document as below Height of the ring o Height 100 mm for an F160 focal length o Height 140mm ...

Page 48: ...arking fr User Guide GRAPHIX_v1 4_UK TRAÇABILITÉ CRÉATIVE CREATIVE TRACEABILITY 5 If you have our electric column option controlled by the marking file the parameters below are also necessary for automated control of the working distance o Activate Use ring radius as Z axis position o Z axis Height 112 mm for a Low capacity D spindle Height 144 mm for a high capacity D spindle ...

Page 49: ... 4_UK TRAÇABILITÉ CRÉATIVE CREATIVE TRACEABILITY The graphical work area is displayed The graphical work area is an expanded drawing of a circular area defined by the Diameter and Height parameters modifiable in the document s Property Geometry tab 6 Re define the graphical working area according to o The diameter of the part to be marked o Marking on the inside or outside The new graphics zone is...

Page 50: ...2 38 93 E mail contact technomark marking fr User Guide GRAPHIX_v1 4_UK TRAÇABILITÉ CRÉATIVE CREATIVE TRACEABILITY 7 Click on the Text string icon in the Insert objects tool bar to add a text string to the graphics zone It is possible to add other objects to the document 1D code 2D code logos images shapes etc from the insert objects tool bar ...

Page 51: ... 4_UK TRAÇABILITÉ CRÉATIVE CREATIVE TRACEABILITY 8 Edit the character string s properties such as value font style etc using the Properties String tab The Properties tab available for documents and objects allows you to modify properties in order to achieve your marking needs You can customise the parameters which define how the objects will be engraved particularly the size origins fill laser par...

Page 52: ...0 LA TALAUDIÈRE France Tel 33 0 4 77 22 25 91 Fax 33 0 4 77 22 38 93 E mail contact technomark marking fr User Guide GRAPHIX_v1 4_UK TRAÇABILITÉ CRÉATIVE CREATIVE TRACEABILITY 9 Edit the fill properties such as the type of fill the inter line distance etc via the Properties Fill tab ...

Page 53: ...to have a different rendering between several objects in a single marking file you can customise the laser parameters for each object Tick the Custom laser parameters box in the object properties tab You can enter different parameters from the general parameters The object in the graphics area turns blue to tell you that its laser parameters are different from the general laser parameters Your fil...

Page 54: ... spindle It is necessary to indicate the position of the D spindle in relation to the marking head to define the position of the graphics area On the GraphiX machine the D spindle is positioned on the left of the head Consequently it is necessary to switch the X and Y axes and to reverse the X axis In the GraphPro Laser editor software click on Laser configuration in the Laser tool bar In the Fiel...

Page 55: ...22 38 93 E mail contact technomark marking fr User Guide GRAPHIX_v1 4_UK TRAÇABILITÉ CRÉATIVE CREATIVE TRACEABILITY 2 Marking mode with D spindle Click on Apply OK If you don t want to use the D spindle to mark revolving parts you can still leave the D spindle connected However you must control the parameters mode on the field orientation tab ...

Page 56: ...tance is set to obtain a realistic projection See 6 Identification of the components paragraph Remove the protective cap from the lens 1 Position the part to be marked inside the machine 2 Manually triggered electric column option Using the Z axis selector move the marking head so as to direct the two beams at a single point with an F160 lens 3 Option with electric column controlled by the marking...

Page 57: ... TRACEABILITY For a part with different thicknesses see the 7 5 3D Mark Option paragraph o Press enter The marking head moves automatically to set the focussing distance You can verify the setting by ensuring that the two beams merge at a single point with an F160 lens 4 In the GraphPro Laser editor software press the Overall limits button in the Laser tool bar to project the overall marking file ...

Page 58: ...TRAÇABILITÉ CRÉATIVE CREATIVE TRACEABILITY You can project objects individually by clicking the Limits on selection button in the Laser tool bar Lock them if a single object is active in the file 1 Move the part or objects in the graphics area if necessary 2 Press the overall limits or limits on selection button again to stop the projection 3 Close the machine door The indicator light on the marki...

Page 59: ...4 77 22 25 91 Fax 33 0 4 77 22 38 93 E mail contact technomark marking fr User Guide GRAPHIX_v1 4_UK TRAÇABILITÉ CRÉATIVE CREATIVE TRACEABILITY 4 Press the Send marking button in the Laser tool bar to start the marking process You can stop marking using the stop buttons on the laser tool bar or on the control desk ...

Page 60: ...cussing distance is set to obtain a realistic projection Remove the protective cap from the lens 1 Set the part to be marked on the D spindle 2 Manually triggered electric column option Using the Z axis selector move the marking head so as to direct the two beams at a single point with an F160 lens 3 Option with electric column controlled by the marking file o Press the Show laser engine button on...

Page 61: ...TRAÇABILITÉ CRÉATIVE CREATIVE TRACEABILITY For example for a part with a diameter of 100 mm the height of the part to be marked will be the distance between the base and the part s axis plus the part s radius Distance between the base and the part s axis on LC spindle D 112 mm see data sheet Distance between the base and the part s axis on HC spindle D 144 mm see data sheet Generative of the cylin...

Page 62: ..._v1 4_UK TRAÇABILITÉ CRÉATIVE CREATIVE TRACEABILITY o Press enter The marking head moves automatically to set the focussing distance You can verify the setting by ensuring that the two beams merge at a single point with an F160 lens 4 In the GraphPro Laser editor software press the Overall limits button in the Laser tool bar to project the overall marking file and position objects within the marki...

Page 63: ... be done letter by letter Press the Next sector limits or previous sector limits button to move from one projection to another You can project objects individually by clicking the Limits on selection button in the Laser tool bar Lock them if a single object is active in the file 6 Move the part or objects in the graphics area if necessary 7 Press the overall limits or limits on selection button ag...

Page 64: ...4 77 22 25 91 Fax 33 0 4 77 22 38 93 E mail contact technomark marking fr User Guide GRAPHIX_v1 4_UK TRAÇABILITÉ CRÉATIVE CREATIVE TRACEABILITY 9 Press the Send marking button in the Laser tool bar to start the marking process You can stop marking using the stop buttons on the laser tool bar or on the control desk ...

Page 65: ...Mark option This option allows a part to be marked on faces with different thicknesses You can enter a different thickness in the custom parameters for each object within your marking file When you start marking the marking head moves to adjust the working distance between each object When projecting objects you should use only the limits on selection function and manually set the working distance...

Page 66: ...ing files on the computer record D or Device or on an outside device Voir 8 4 Advanced operation Paragraphe Do not save your marking files on the record C of the computer These will be lost during the next restart 10 7 Switching off the laser 1 Save your work and close all open applications 2 Click the start button and then Stop on the computer The message Shutting down appears on the screen Once ...

Page 67: ...xample a programme may be used to automate operations such as updating the counter Note that in order to use all the features of GraphPro Laser Editor laser configuration parameters you must change to Manual mode Auto mode is very useful in working environments where the operator assigned to the marking is not authorised to edit the marking file or where complex drafts have to be run 11 2 Semi aut...

Page 68: ...mail contact technomark marking fr User Guide GRAPHIX_v1 4_UK TRAÇABILITÉ CRÉATIVE CREATIVE TRACEABILITY 11 4 Advanced operation For more information on the GraphPro software s possibilities please refer to the software user manual supplied This describes all the functions available for configuring the software and carrying out the most complex marking ...

Page 69: ...hould be followed at regular intervals Periodic servicing of the machine will also result in less frequent breakdowns leading to improved availability and greater accuracy Never use air at a pressure of more than 4 bar when cleaning the machine s components When doing any work on the machine to prevent anyone switching it on or inadvertently operating the control unit it is essential that it is ma...

Page 70: ...r Engine icon on the desktop The icon appears and the indicator light changes to a steady green 3 The send to marking command does not start marking but a simulation cycle Check that the door is correctly closed red indicator light on the marking head and no red pointer on the part 4 The part is not marked Check that the protective cap has been removed from the lens Check the focus distance accord...

Page 71: ...Door sealing profile 1 GX M 0087 Laser safety window 1 GX M 0029 Door balancing pin pusher spring 2 GX C 0014 Contact for push button Start and Stop 2 GX C 0015 LED bulb 24V 4 GX C 0021 Selector manual column 1 GX C 0023 Selector light 1 GX C 0025 Emergency push button Emergency stop 1 GX C 0028 Contact for light 1 GX C 0035 Key selector On 1 GX E 0005 Electronic card 1 V3 E 2017 Card for drive ax...

Page 72: ...38 93 E mail contact technomark marking fr User Guide GRAPHIX_v1 4_UK TRAÇABILITÉ CRÉATIVE CREATIVE TRACEABILITY GX E 0003 Screen 19 1 GX E 0004 Pack keyboard wireless mouse 1 Pad pre filter Fume Cube 200225 Pack of 4 1 HEPA Filter Fume Cube 110536 1 LABYRINTH pre filter F8 F9 Alpha 200 202274 Pack of 2 1 HEPA CHEMICAL filter Alpha 200 113505 1 ...

Reviews: