background image

En

gl

is

h

09

 IMPORTANT SAFETY INSTRUCTIONS

  IMPORTANT SAFETY INSTRUCTIONS

 Read these operating instructions carefully before 
using the unit. Follow the safety instructions on the 
unit and the applicable safety instructions listed below. 
Keep these operating instructions handy for future 
reference.


 1   Read these instructions.
 2   Keep these instructions.
 3   Heed all warnings.
 4   Follow all instructions.
 5   Do not use this apparatus near water.
 6   Clean only with dry cloth.
 7   Do not block any ventilation openings. Install in 

accordance with the manufacturer’s instructions.

 8   Do not install near any heat sources such as 

radiators, heat registers, stoves, or other apparatus 
(including amplifiers) that produce heat.

 9   Do not defeat the safety purpose of the polarized 

or grounding-type plug. A polarized plug has two 
blades with one wider than the other. A grounding-
type plug has two blades and a third grounding 
prong. The wide blade or the third prong are 
provided for your safety. If the provided plug does 
not fit into your outlet, consult an electrician for 
replacement of the obsolete outlet.

 10   Protect the power cord from being walked on 

or pinched particularly at plugs, convenience 
receptacles, and the point where they exit from the 
apparatus.

 11   Only use attachments/accessories specified by the 

manufacturer.

 12   Use only with the cart, stand, 

tripod, bracket, or table specified 
by the manufacturer, or sold with 
the apparatus. When a cart is used, 
use caution when moving the cart/
apparatus combination to avoid injury 
from tip-over.


 13   Unplug this apparatus during lightning storms or 

when unused for long periods of time.

 14   Refer all servicing to qualified service personnel. 

Servicing is required when the apparatus has been 
damaged in any way, such as power-supply cord or 
plug is damaged, liquid has been spilled or objects 
have fallen into the apparatus, the apparatus has 
been exposed to rain or moisture, does not operate 
normally, or has been dropped.


 Warning

 Unit


 To reduce the risk of fire, electric shock or product 

damage, 


-

 Do not expose this unit to rain, moisture, dripping 
or splashing.


-

 Do not place objects filled with liquids, such as 
vases, on this unit.


-

 Use only the recommended accessories.


-

 Do not remove covers.


-

 Do not repair this unit by yourself. Refer servicing 
to qualified service personnel.


-

 Do not let metal objects fall inside this unit.


-

 Do not place heavy items on this unit.


 AC power supply cord


 The power plug is the disconnecting device.
 Install this unit so that the power plug can be 
unplugged from the socket outlet immediately.


 Ensure the earth pin on the power plug is securely 

connected to prevent electrical shock.


-

 An apparatus with CLASS I construction shall 
be connected to a power socket outlet with a 
protective earthing connection.


 Caution

 Unit


 Do not place sources of naked flames, such as lighted 

candles, on this unit.


 This unit may receive radio interference caused by 

mobile telephones during use. If such interference 
occurs, please increase separation between this unit 
and the mobile telephone.


 Do not touch the top surface of this unit. This unit 

becomes hot while it is on.


 Placement


 Place this unit on an even surface.


 To reduce the risk of fire, electric shock or product 

damage,


-

 Do not install or place this unit in a bookcase, built-
in cabinet or in another confined space. Ensure this 
unit is well ventilated.


-

 Do not obstruct this unit’s ventilation openings 
with newspapers, tablecloths, curtains, and similar 
items.


-

 Do not expose this unit to direct sunlight, high 
temperatures, high humidity, and excessive 
vibration.


 Ensure that the placement location is sturdy enough 

to accommodate the weight of this unit (

 49).


 Keep your speakers at least 10 mm (

13

/

32

”) away from 

the system for proper ventilation.


 Do not lift or carry this unit by holding the knobs 

or antenna. Doing so may cause this unit to fall, 
resulting in personal injury or malfunction of this 
unit.


 Battery


 Danger of explosion if battery is incorrectly replaced. 

Replace only with the type recommended by the 
manufacturer.


 Mishandling of batteries can cause electrolyte 

leakage and may cause a fire.


-

 Remove the battery if you do not intend to use the 
remote control for a long period of time. Store in a 
cool, dark place.


-

 Do not heat or expose to flame.


-

 Do not leave the battery(ies) in a car exposed to 
direct sunlight for a long period of time with doors 
and windows closed.


-

 Do not take apart or short circuit.


-

 Do not recharge alkaline or manganese batteries.


-

 Do not use batteries if the covering has been 
peeled off.


-

 Do not mix old and new batteries or different types 
at the same time.


 When disposing of the batteries, please contact your 

local authorities or dealer and ask for the correct 
method of disposal.


 (09)

Summary of Contents for SU-G30

Page 1: ...SU G30 Network Audio Amplifier Owner s Manual Amplificateur réseau audio Manuel d utilisation ...

Page 2: ......

Page 3: ...nd awaits Let us take you on your journey to rediscover music Sans frontières la musique est aussi intemporelle touchant le coeur des gens en traversant les cultures et les générations Tous les jours nous attendons la révélation d une expérience émotionnelle authentique à partir d un son venu de nulle part Permettez nous de vous emmener en voyage pour redécouvrir la musique ...

Page 4: ...04 04 ...

Page 5: ...otive musical experience by music lovers for music lovers Apportez à tous l expérience musicale empreinte d émotions Chez Technics nous savons que l expérience de l écoute n est pas purement et simplement une question de technologie mais de relation magique entre les personnes et la musique Nous voulons que tout un chacun puisse ressentir la musique telle qu elle a été conçue à l origine et lui pe...

Page 6: ...l gain and phase characteristics for any type of speaker Also the low distortion switching power supply specifically designed for the SU G30 which stabilizes the output voltage realizes accurate signal amplification Technics regards as ideal High Quality Processing of All Types of Signal Sources Ranging from High Res Audio Sources to Analog Audio Sources Supporting a diversity of input sources suc...

Page 7: ...ttings 38 Other settings Using output correction function LAPC Troubleshooting 42 Before requesting service read the troubleshooting Others 47 Playable media Specifications etc Accessories AC power supply cord 1 K2CG3YY00191 Remote control 1 N2QAYA000115 Batteries for remote control 2 ONLY FOR CANADA The enclosed Canadian French label sheet corresponds to the English display on the unit Product nu...

Page 8: ...n Windows Media and the Windows logo are trademarks or registered trademarks of Microsoft Corporation in the United States and or other countries This product is protected by certain intellectual property rights of Microsoft Corporation and third parties Use or distribution of such technology outside of this product is prohibited without a license from Microsoft or an authorized Microsoft subsidia...

Page 9: ...self Refer servicing to qualified service personnel Do not let metal objects fall inside this unit Do not place heavy items on this unit AC power supply cord The power plug is the disconnecting device Install this unit so that the power plug can be unplugged from the socket outlet immediately Ensure the earth pin on the power plug is securely connected to prevent electrical shock An apparatus with...

Page 10: ...is restricted to indoor use due to its operation in the 5 15 to 5 25 GHz frequency range The WLAN feature of this product shall exclusively be used inside buildings THE FOLLOWING APPLIES ONLY IN THE U S A FCC Note This equipment has been tested and found to comply with the limits for a Class B digital device pursuant to Part 15 of the FCC Rules These limits are designed to provide reasonable prote...

Page 11: ...loth tightly to wipe the dirt and then wipe it with a soft cloth Do not use solvents including benzine thinner alcohol kitchen detergent a chemical wiper etc This might cause the exterior case to be deformed or the coating to come off To dispose or transfer this unit This unit may contain private information Before disposing of or transferring this unit perform the following to delete the data inc...

Page 12: ... Control reference guide Main unit 5V 2 1A PHONES VOLUME INPUT SELECTOR LAN DIGITAL IN 10BASE T 100BASE TX SPEAKERS HAUT PARLEURS 4 16Ω Class 2 Wiring AC IN OPT COAX1 COAX2 PC PHONO PHONO EARTH LINE IN 12 ...

Page 13: ...e for long periods may damage the user s ears 05 USB A terminal DC 5 V 2 1 A Port for iPhone iPad iPod and USB devices 30 31 06 Volume knob dB min 99 0 dB to 0 dB max When this unit is muted if you turn the knob the muting will be cancelled 07 Display Input source playback status etc are displayed For details visit www technics com support 08 Input selector knob Turn this knob clockwise or anticlo...

Page 14: ...he remote control 2 1 R03 LR03 AAA Alkaline or manganese batteries Note Insert the battery so the terminals and match those in the remote control Point it at the remote control signal sensor on this unit 12 Keep the batteries out of reach of children to prevent swallowing 14 ...

Page 15: ...2 NET DIGITAL ANALOG Select the device to be operated 24 30 31 32 33 34 35 36 03 INPUT Switch the input source 04 MENU Enter menu 24 25 28 30 32 33 05 SETUP Enter setup menu 38 06 LAPC Measure the output signal of the amplifier and correct its output 41 07 VOL Adjust the volume dB min 99 0 dB to 0 dB max 08 MUTE Mute the sound Press MUTE again to cancel MUTE is also cancelled when you adjust the v...

Page 16: ...e the audio output you can measure the amplifier output signal and correct its output when it is connected to the speakers 41 16 Speaker cable not supplied Speaker connection 1 Turn the knobs to loosen them and insert the core wires into the holes 2 Tighten the knobs Note When the connections are completed pull the speaker cables lightly to check that they are connected firmly Be careful not to cr...

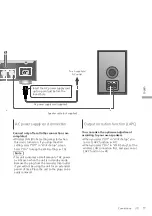
Page 17: ...ndby mode Remove the plug from the main electrical outlet if you will not be using the unit for an extended period of time Place the unit so the plug can be easily removed Speaker cable not supplied AC power supply cord supplied To a household AC outlet Insert the AC power supply cord up to a point just before the round hole Output correction function LAPC You can make the optimum adjustment accor...

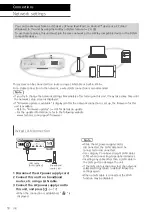
Page 18: ...or details on update For the update information refer to the following website www technics com support firmware Wired LAN connection LAN DIGITAL IN 10BASE T 100BASE TX AC IN OPT COAX1 COAX2 PC SPEAKERS HAUT PARLEURS 4 16Ω Class 2 Wiring Broadband router etc LAN cable not supplied 1 Disconnect the AC power supply cord 2 Connect this unit to a broadband router etc using a LAN cable 3 Connect the AC...

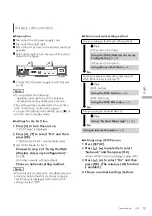
Page 19: ...for iOS automatically starts 3 For WAC Mode for iOS Proceed to step 2 of Using the WAC Wireless Accessory Configuration 20 For other network setting method Choose a network setting method Note When this unit is switched to standby mode and turned on before the Wi Fi setting is complete Wi Fi Setup is displayed Perform the Wi Fi setting or select Off Choose a network setting method Are you using an...

Page 20: ... You can set a password for this system under SPEAKER PASSWORD You will need this password if you make network settings by internet browser next time 5 Select Next to apply the settings Linking is displayed When the connection is established Success is displayed Fail may be displayed if the connection was not complete Try this method again from SETUP menu If Fail is still displayed try other metho...

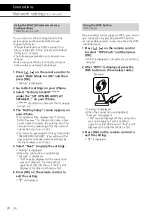
Page 21: ...mplete Try this method again from SETUP menu If Fail is still displayed try other methods 19 4 Press OK on the remote control to exit the setting is displayed Using the WPS PIN code WPS PIN If your wireless router supports WPS you can set up a connection by entering the WPS PIN code For details on how to enter the PIN code refer to the operating instructions of the wireless router 1 Press on the r...

Page 22: ...connection complete screen may not be displayed 7 Make sure to connect your compatible device back to your home wireless network 8 Press OK on the remote control to exit the setting is displayed Note Enable JavaScript and Cookies in your browser settings Using Technics Music App Setup from Browser If you install the dedicated app Technics Music App free of charge on your Android device you can set...

Page 23: ...unique to each set 5 Press OK to apply the settings 6 Press RETURN repeatedly to exit the settings To check the MAC address of this unit MAC Address 1 Press SETUP 2 Press repeatedly to select Network and then press OK 3 Press repeatedly to select MAC Address and then press OK The MAC address of this unit is displayed To make network related settings You can set specific IP address subnet mask defa...

Page 24: ...lso select the input source by turning the input selector knob on the unit 2 Press to select a DLNA server on the network and then press OK The folder content selection screen will be displayed Repeat this step to make further selections Folders content may be displayed in different order from the order on the server depending on its specifications 3 Press to select an item and then press OK Note ...

Page 25: ... playback may not be possible This unit does not guarantee connection with all DMC applications Use the dedicated app Technics Music App 1 stands for a digit that is unique to each set 2 The device name can be changed from This unit s name on the network 23 Random repeat playback Random 1 Press MENU 2 Press repeatedly to select Random and then press OK 3 Press to select On and then press OK All tr...

Page 26: ...the previous screen The Internet Radio stations genre region etc on this unit are edited and managed by vTuner The podcasts on the list of vTuner can also be played back The station that does not broadcast cannot be played back It will be skipped or return to the list Note The Internet Radio service may be suspended or be otherwise unavailable without notice Internet Radio may not be played back p...

Page 27: ... with the vTuner function Download and install the app from the website below www technics com support Creating the Internet Radio station list with PC 1 Press INPUT repeatedly to select Internet Radio You can also select the input source by turning the input selector knob on the unit 2 Check the MAC address of this unit 23 3 Use your PC to access the vTuner website www technics com radio You can ...

Page 28: ... play Skip Note Playback of other audio sources will stop and AirPlay output will have priority Volume changes on the iOS device or iTunes will apply to this unit Refer to the iTunes Help for the required settings in iTunes With some iOS and iTunes versions it may not be possible to restart the AirPlay playback if the selector is changed or the unit is turned to standby mode during the AirPlay pla...

Page 29: ... network as this unit 1 Start the Spotify app on your device and select a song to play back 2 Select the square image of the song s cover art in the bottom left of the playback screen 3 Select the icon 4 Select this unit as the output speakers Note The device name of this unit will be displayed as Technics SU G30 1 2 Registration subscription is required Fees may apply Services icons and specifica...

Page 30: ... to select Repeat and then press OK 3 Press to select an item and then press OK 1 Track Only plays the selected track 1 is displayed All All tracks in the folder are repeated is displayed Setting is available even when the input source is switched to DMP 24 Random repeat playback Random 1 Press MENU 2 Press repeatedly to select Random and then press OK 3 Press to select On and then press OK All tr...

Page 31: ...n iPhone iPad iPod is connected to this unit To continue charging from the USB cable connection during standby mode make sure the iPhone iPad iPod has started charging before turning the unit to standby mode Check the iPhone iPad iPod to see if the battery is fully charged Once fully charged remove the iPhone iPad iPod Note When this unit is in standby mode iPod Charging is displayed and the power...

Page 32: ...ng is displayed and this unit waits for registering 5 Select SU G30 from the Bluetooth device s menu The name of the connected device is indicated on the display MAC address may be displayed before SU G30 appears e g 6C 5A B5 B3 1D 0F Note If prompted for the passkey input 0000 You can register up to 8 devices with this unit If a 9th device is paired the device that has not been used the longest w...

Page 33: ...en press OK 3 Press to select Yes and then press OK Note The Bluetooth device will be disconnected if a different audio source is selected Bluetooth transmission mode You can change the transmission mode to prioritize transmission quality or sound quality 1 Press DIGITAL repeatedly to select Bluetooth You can also select the input source by turning the input selector knob on the unit If a Bluetoot...

Page 34: ... source by turning the input selector knob on the unit 6 Start playback on the connected device Note The digital audio input terminals of this unit can only detect linear PCM signals For details refer to the operating instructions of the device Sampling frequency Coaxial digital input 32 44 1 48 88 2 96 176 4 192 kHz Optical digital input 32 44 1 48 88 2 96 kHz Number of quantization bits 16 24 bi...

Page 35: ... dedicated app Technics Audio Player free of charge on your PC Download and install the app from the website below www technics com support 1 Disconnect the AC power supply cord 2 Connect this unit and a PC etc 3 Connect the AC power supply cord to this unit 17 4 Press to turn this unit on 5 Press DIGITAL repeatedly to select PC You can also select the input source by turning the input selector kn...

Page 36: ...dly to select LINE or PHONO You can also select the input source by turning the input selector knob on the unit 6 Start playback on the connected device You can input analog audio signals to this unit and play back music Audio cable not supplied Ground wire 2 not supplied e g Record player 1 1 When connecting to a record player with a built in PHONO equalizer connect its cable to the analog audio ...

Page 37: ... ray Disc player etc Minimizing audio distortion If audio distortion occurs when using the analog audio input terminals setting the attenuator to On may be improved The factory default is Off 1 Press SETUP 2 Press repeatedly to select Attenuator LINE or Attenuator PHONO and then press OK 3 Press to select On and then press OK ...

Page 38: ...ach level can be adjusted between 10 and 10 TONE is displayed after setting Sleep timer SLEEP The sleep timer can turn the unit to standby mode after a set time 30 minutes 60 minutes 90 minutes 120 minutes Off Auto off function AUTO OFF This unit is designed to conserve its power consumption and save energy The unit has been left unused for about 20 minutes and will enter standby mode within a min...

Page 39: ...unction can be enabled or disabled The factory default is Off Wi Fi signal strength Signal Level To check the Wi Fi signal strength where this system is located It is recommended to have a signal strength of 3 Change the position or angle of your wireless router or this system if the indicator is 2 or 1 and see if the connection improves If 0 is displayed this system cannot establish a link with t...

Page 40: ... displayed 5 Disconnect the AC power supply cord and reconnect it after 3 minutes Note Downloading may take longer or may not work properly depending on the connection environment Update via USB flash memory Preparation Download the latest firmware on the USB flash memory For details refer to the following website www technics com support firmware 1 Connect the USB flash memory with new firmware 2...

Page 41: ...he amplifier Check that a test tone is output from both the left and right speakers When the measurement is complete amplifier output correction will be automatically turned on If you press LAPC while the measurement is in progress it will be cancelled If you connect headphones during amplifier signal measurement or amplifier output correction it will be cancelled Turning on off the output correct...

Page 42: ... still cannot be operated consult the dealer A humming sound can be heard during playback An AC power supply cord or fluorescent light is near the cables Keep other appliances and cords away from the cables of this unit A strong magnetic field near a TV or other device may adversely affect the audio quality Keep this unit away from such devices The speakers may output noise when a device nearby is...

Page 43: ...ry of the iPhone iPad iPod is depleted Charge the iPhone iPad iPod and then operate again 31 Connect the iPhone iPad iPod again or try to restart the iPhone iPad iPod iPhone iPad iPod does not charge Only when unit is ON will charging begin from USB cable connection Make sure the unit is turned on when you start charging When charging an iPhone iPad iPod whose battery is depleted do not turn this ...

Page 44: ...rdless telephones etc may result in connection interruptions Increase the distance between this unit and these devices If your wireless router supports 5 GHz band try using the 5 GHz band To change to the 5 GHz band redo the network settings using an internet browser 22 On the step 5 make sure to select your network name SSID for the 5 GHz band Do not place this system inside a metal cabinet for i...

Page 45: ...rnet 40 Connect USB Device Download the latest firmware on the USB flash memory and connect it 40 Download Fail The firmware download has failed Press any button to exit Please try again later The server cannot be found Press any button to exit Make sure that the network is connected to the internet Empty The selected folder is empty Move tracks into the folder and retry the operation The server i...

Page 46: ...control Searching The unit is checking the DLNA server on the network Signal Overflow The audio from the analog audio input terminals in use is distorted Select Attenuator LINE or Attenuator PHONO according to the selected analogue audio input and change the setting of the attenuator to On 37 Unlocked PC COAX1 COAX2 or OPT is selected but no device is connected Check the connection with the device...

Page 47: ...f there are some files not supported About supported format refer to File format 51 iPhone iPad iPod Please be aware that Panasonic accepts no responsibility for the loss of data and or information Compatible iPhone iPad iPod as of June 2015 iPhone 6 Plus iPhone 6 iPhone 5s iPhone 5c iPhone 5 iPhone 4s iPad Air 2 iPad Air iPad 3rd and 4th generation iPad 2 iPad mini 3 iPad mini 2 iPad mini iPod to...

Page 48: ... different This system supports Bluetooth security features But depending on the operating environment and or settings this security is possibly not sufficient Transmit data wirelessly to this system with caution This system cannot transmit data to a Bluetooth device Range of use Use this device at a maximum range of 10 m 33 ft The range can decrease depending on the environment obstacles or inter...

Page 49: ... W 1 kHz T H D 0 5 8 20 kHz LPF 100 W 100 W 1 kHz T H D 0 5 4 20 kHz LPF Load impedance 4 16 Frequency response PHONO MM 20 Hz to 20 kHz RIAA DEVIATION 1 dB 8 LINE 5 Hz to 80 kHz 3 dB 8 DIGITAL 5 Hz to 90 kHz 3 dB 8 Input sensitivity Input impedance LINE 200 mV 22 k PHONO MM 2 5 mV 47 k Bluetooth SECTION Bluetooth system specification Bluetooth Ver 3 0 Wireless equipment classification Class 2 2 5...

Page 50: ...in jack PHONO MM Pin jack Digital input Optical digital input Optical terminal Coaxial digital input 2 Pin jack Format support LPCM FORMAT SECTION USB A USB Standard USB 2 0 high speed USB Mass Storage class USB B USB Standard USB 2 0 high speed USB Audio Class 2 0 Asynchronous mode DSD control mode ASIO Native mode DoP mode Wi Fi SECTION WLAN Standard IEEE802 11a b g n Frequency Band 2 4 GHz 1 11...

Page 51: ...32 44 1 48 88 2 96 176 4 192 kHz 16 24 bit DSD dff dsf 2 8224 MHz 5 6448 MHz PC USB B 1 File format Extension Sampling frequency Bit rate Number of quantization bits LPCM 32 44 1 48 88 2 96 176 4 192 352 8 384 kHz 16 24 32 bit DSD dff dsf 2 8224 MHz 5 6448 MHz 11 2896 MHz LAN DLNA 2 File format Extension Sampling frequency Bit rate Number of quantization bits MP3 mp3 32 44 1 48 kHz 16 to 320 kbps ...

Page 52: ...n shipment or failures which are caused by products not supplied by the warrantor or failures which result from accidents misuse abuse neglect mishandling misapplication alteration faulty installation set up adjustments misadjustment of consumer controls improper maintenance power line surge lightning damage modification introduction of sand humidity or liquids commercial use such as hotel office ...

Page 53: ...dents misuse abuse neglect mishandling misapplication alteration faulty installation set up adjustments misadjustment of consumer controls improper maintenance power line surge lightning damage modification introduction of sand humidity or liquids commercial use such as hotel office restaurant or other business or rental use of the product or service by anyone other than an Authorized Servicer or ...

Page 54: ...ge de l enceinte afin d obtenir un gain et des spécifications de phase idéaux pour tout type d enceinte Par ailleurs l alimentation dotée d une commutation à distorsion réduite spécialement conçue pour le SU G30 et qui stabilise la tension de sortie permet d amplifier le signal avec une précision que Technics considère comme idéale Traitement haute qualité de tous les types de sources de signal qu...

Page 55: ...e la fonction de correction de sortie LAPC Guide de dépannage 42 Avant de faire appel à l assistance lisez la section Dépannage Autres 47 Supports lisibles Spécifications etc Accessoires Cordon d alimentation 1 K2CG3YY00191 Télécommande 1 N2QAYA000115 Piles pour la télécommande 2 SEULEMENT POUR LE CANADA La feuille d autocollants en français ci incluse correspond aux noms des touches prises et voy...

Page 56: ...hnologie de codage audio MPEG Layer 3 est sous licence de Fraunhofer IIS et Thomson Windows Media et le logo Windows sont soit des marques déposées soit des marques de commerce de Microsoft Corporation aux États Unis et ou dans d autres pays Ce produit est protégé par des droits sur la propriété intellectuelle de Microsoft Corporation et de tiers L utilisation ou la distribution d une telle techno...

Page 57: ...tilisez exclusivement les accessoires recommandés Ne retirez pas les couvercles Toute réparation doit être faite par un personnel qualifié et non par l usager Ne laissez aucun objet en métal tomber à l intérieur de cet appareil Ne posez pas d objets lourds sur cet appareil Cordon d alimentation c a La fiche d alimentation permet de déconnecter l appareil L appareil doit être installé à proximité d...

Page 58: ...tion IC Son utilisation est soumise aux deux conditions suivantes 1 cet appareil ne doit pas provoquer d interférence et 2 cet appareil doit tolérer les différentes interférences reçues y compris les interférences susceptibles de provoquer un dysfonctionnement FCC ID ACJ SU G30 IC 216A SUG30 Cet émetteur ne doit pas être placé à proximité d une autre antenne ou d un autre émetteur ni être utilisé ...

Page 59: ...r essuyer la saleté puis essuyer l appareil avec un chiffon doux Ne pas utiliser de solvants tels que la benzine du diluant de l alcool des détergents de cuisine etc Cela pourrait modifier l apparence du boîtier externe ou décoller son revêtement Pour mettre cette unité au rebut ou la donner Cette unité peut contenir des informations privées Avant de mettre au rebut ou de donner cette unité réalis...

Page 60: ...Guide de référence Unité principale 5V 2 1A PHONES VOLUME INPUT SELECTOR LAN DIGITAL IN 10BASE T 100BASE TX SPEAKERS HAUT PARLEURS 4 16Ω Class 2 Wiring AC IN OPT COAX1 COAX2 PC PHONO PHONO EARTH LINE IN 60 ...

Page 61: ... écoute prolongée à volume élevé peut endommager l audition de l utilisateur 05 Borne USB A c c 5 V 2 1 A Port pour iPhone iPad iPod et les appareils USB 30 31 06 Molette du volume dB min 99 0 dB à 0 dB max Si le son de cette unité est coupé il vous suffit de tourner la molette pour le rétablir 07 Afficheur Source d entrée état de la lecture etc sont affichés Pour plus de détails accédez à www tec...

Page 62: ...ande 2 1 R03 LR03 AAA Utiliser des piles alcalines ou au manganèse Remarque Placer les piles de manière à respecter la polarité et Pointer en direction du capteur de signal de la télécommande de cet appareil 12 Conserver les piles hors de portée des enfants pour éviter qu ils les avalent 62 ...

Page 63: ... au menu 24 25 28 30 32 33 05 Touche de configuration SETUP Pour accéder au menu de configuration 38 06 Touche de calibration de phase à adaptation de charge LAPC Pour mesurer le signal de sortie de l amplificateur et corriger sa puissance 41 07 Touche de volume VOL Pour régler le volume dB min 99 0 dB à 0 dB max 08 Touche de mise en sourdine MUTE Pour mettre le son en sourdine Appuyez de nouveau ...

Page 64: ... pouvez mesurer le signal de sortie de l amplificateur et corriger sa puissance lorsqu il est connecté aux enceintes 41 64 Câble d enceinte non fourni Connexion des enceintes 1 Tournez les molettes pour les desserrer et insérez les fils centraux dans les orifices 2 Serrez les molettes Remarque Lorsque les raccordements sont terminés tirez légèrement sur les câbles d enceinte pour vérifier qu ils s...

Page 65: ...rsqu elle est en veille Retirez la prise du secteur lorsque vous n utilisez pas l unité pendant une longue période Positionnez l unité pour pouvoir facilement débrancher la prise Câble d enceinte non fourni Cordon d alimentation secteur fourni À une prise secteur murale Insérez le cordon d alimentation secteur au point situé juste avant le trou rond Fonction de correction de la sortie LAPC Vous po...

Page 66: ...ur obtenir des informations sur la mise à jour référez vous au site Internet suivant www technics com support firmware Connexion au réseau local branché LAN DIGITAL IN 10BASE T 100BASE TX AC IN OPT COAX1 COAX2 PC SPEAKERS HAUT PARLEURS 4 16Ω Class 2 Wiring Routeur à large bande etc Câble réseau local non fourni 1 Débranchez le cordon d alimentation secteur 2 Connectez cet appareil à un routeur à l...

Page 67: ...2 de Utilisation de la configuration WAC Wireless Accessory Configuration 20 Pour les autres méthodes de paramétrage réseau Choisissez une méthode de paramétrage réseau Remarque Lorsque cette unité est mise en veille et en marche avant que le paramétrage Wi Fi ne soit terminé Conf Wi Fi s affiche Effectuez le paramétrage Wi Fi ou choisissez Désactivé Sélection d une méthode de paramétrage réseau U...

Page 68: ...ns SPEAKER PASSWORD Vous aurez besoin de ce mot de passe la prochaine fois que vous paramétrerez le réseau en utilisant un navigateur Internet 5 Choisissez Next pour appliquer les paramètres Liaison s affiche Une fois la connexion établie Réussite est affiché à l écran Échec peut s afficher si la connexion n a pas été effectuée Essayez à nouveau cette méthode depuis le menu SETUP Si Échec s affich...

Page 69: ... depuis le menu SETUP Si Échec s affiche à nouveau essayez d autres méthodes 19 4 Appuyez sur OK sur la télécommande pour quitter le paramétrage s affiche Utilisation du code PIN NIP WPS PIN WPS Si votre routeur sans fil prend en charge le WPS vous pouvez configurer une connexion en saisissant le code PIN NIP WPS Pour plus de détails sur la manière dont saisir le code PIN NIP référez vous au mode ...

Page 70: ...rez vous de bien reconnecter votre périphérique compatible à votre réseau domestique sans fil 8 Appuyez sur OK sur la télécommande pour quitter le paramétrage s affiche Remarque Activez JavaScript et les cookies dans les paramètres de votre navigateur Utilisation de l application Technics Music App Conf dep navig Si vous installez l application dédiée Technics Music App gratuite sur votre appareil...

Page 71: ...res 6 Appuyez sur RETURN à plusieurs reprises afin de quitter l écran des paramètres Pour vérifier l adresse MAC de cette unité Adresse MAC 1 Appuyez sur SETUP 2 Appuyez à répétition sur pour sélectionner Réseau puis appuyez sur OK 3 Appuyez à répétition sur pour sélectionner Adresse MAC puis appuyez sur OK L adresse MAC de cette unité est affichée Pour effectuer des réglages de réseau Vous pouvez...

Page 72: ...urce d entrée en tournant la molette de sélection d entrée sur l unité 2 Appuyer sur pour sélectionner un serveur DLNA sur le réseau puis appuyer sur OK L écran de sélection du fichier contenu s affichera Répéter cette étape pour effectuer plus de choix Les fichiers le contenu peuvent s afficher dans un ordre différent de celui du serveur en fonction de leurs caractéristiques 3 Appuyer sur pour sé...

Page 73: ...ossibles à effectuer Cette unité ne garantit pas la connexion avec toutes les applications DMC Utilisez l application dédiée Technics Music App 1 représente un chiffre unique à chaque appareil 2 Le nom du périphérique peut être modifié à partir de Nom de cette unité sur le réseau 23 Lecture en reprise aléatoire Aléatoire 1 Appuyer sur MENU 2 Appuyer à répétition sur pour sélectionner Aléatoire pui...

Page 74: ... cette unité les stations radio Internet leur genre leur région etc sont modifiés et gérés par vTuner Des balados sur la liste de vTuner peuvent également être lus Une station qui n émet pas ne peut pas être lue Elle sera sautée ou l affichage reviendra à la liste Remarque Le service de radio Internet peut être interrompu ou indisponible sans préavis La radio Internet risque de ne pas être lue cor...

Page 75: ...a fonction vTuner Téléchargez et installez l application à partir du site Internet ci dessous www technics com support Création de la liste de stations de radio Internet avec un PC 1 Appuyez plusieurs fois sur INPUT pour choisir Radio Internet Vous pouvez aussi sélectionner la source d entrée en tournant la molette de sélection d entrée sur l unité 2 Vérifiez l adresse MAC de cette unité 23 3 Util...

Page 76: ...AirPlay a la préséance Le volume est changé sur le périphérique iOS ou iTunes et est appliqué à cette unité Référez vous à l aide de iTunes pour connaître les paramètres nécessaires dans iTunes Avec certaines versions de iOS et de iTunes il se peut qu il ne soit pas possible de redémarrer la lecture AirPlay si le sélecteur est changé ou si l unité est mise en veille pendant la lecture AirPlay Dans...

Page 77: ...n Spotify sur votre dispositif et sélectionnez une chanson à lire 2 Sélectionnez l image carrée représentant la pochette de la chanson en bas à gauche de l écran de lecture 3 Sélectionnez l icône 4 Sélectionnez cette unité comme enceintes de sortie Remarque Le nom de dispositif de cet appareil s affichera en tant que Technics SU G30 1 2 L enregistrement inscription est obligatoire Des frais peuven...

Page 78: ...yer sur OK 3 Appuyer sur pour sélectionner une rubrique puis appuyer sur OK Piste1 Lecture de la piste sélectionnée seulement 1 s affiche Tous Toutes les pistes du dossier sont répétées s affiche Le paramétrage est disponible même lorsque la source d entrée est commutée sur DMP 24 Lecture en reprise aléatoire Aléatoire 1 Appuyer sur MENU 2 Appuyer à répétition sur pour sélectionner Aléatoire puis ...

Page 79: ...lorsqu un iPhone iPad iPod est branché à cet appareil Pour poursuivre la charge depuis une connexion par câble USB en mode veille assurez vous que l iPhone iPad iPod a démarré la charge avant que l unité ne soit mise en veille Vérifiez sur l iPhone iPad iPod que la batterie est entièrement rechargée Une fois qu il est entièrement rechargé retirez l iPhone iPad iPod Remarque Lorsque cette unité est...

Page 80: ...uis appuyer sur OK Pairage s affiche à l écran et l unité attend l enregistrement 5 Sélectionner SU G30 à partir du menu de l appareil Bluetooth Le nom de l appareil connecté s affiche à l écran L adresse MAC s affiche avant que SU G30 n apparaisse par exemple 6C 5A B5 B3 1D 0F Remarque Sur demande du mot de passe entrer 0000 Il est possible d enregistrer jusqu à 8 dispositifs auprès de cet appare...

Page 81: ...connect puis appuyer sur OK 3 Appuyer sur pour sélectionner Oui puis appuyer sur OK Remarque Si une source audio différente est sélectionnée le dispositif Bluetooth se déconnecte Mode de transmission Bluetooth Vous pouvez changer le mode de transmission afin de donner la priorité à la qualité de transmission ou à la qualité sonore 1 Appuyer sur DIGITAL plusieurs fois pour sélectionner Bluetooth Vo...

Page 82: ...t la molette de sélection d entrée sur l unité 6 Démarrez la lecture sur l appareil connecté Remarque Les bornes d entrée audio numérique de cette unité ne peuvent détecter que les signaux PCM linéaires Pour plus de détails référez vous au mode d emploi du périphérique Fréquence d échantillonnage Entrée numérique coaxiale 32 44 1 48 88 2 96 176 4 192 kHz Entrée numérique optique 32 44 1 48 88 2 96...

Page 83: ...s frais sur votre PC Télécharger et installer l appli dédiée à partir du site Internet ci dessous www technics com support 1 Débrancher le cordon d alimentation secteur 2 Brancher un PC etc à cet appareil 3 Brancher le cordon d alimentation secteur de cette unité 17 4 Appuyer sur pour mettre cette unité en marche 5 Appuyez sur DIGITAL plusieurs fois pour sélectionner PC Vous pouvez aussi sélection...

Page 84: ...usieurs fois pour sélectionner LIGNE ou PHONO Vous pouvez aussi sélectionner la source d entrée en tournant la molette de sélection d entrée sur l unité 6 Démarrez la lecture sur l appareil connecté Vous pouvez envoyer des signaux audio analogiques à cette unité et écouter de la musique Câble audio non fourni Fil de terre 2 non fourni Par exemple Tourne disque 1 1 Lors de la connexion à un tourne ...

Page 85: ... audio Si une distorsion audio se produit lors de l utilisation des bornes d entrée audio analogique régler l atténuateur sur Activé peut apporter une amélioration Le mode d usine par défaut est Désactivé 1 Appuyez sur SETUP 2 Appuyez à répétition sur pour sélectionner Atténua LIGNE ou Atténua PHONO puis appuyez sur OK 3 Appuyez sur pour sélectionner Activé puis appuyez sur OK ...

Page 86: ...être réglé entre 10 et 10 TON est affiché après les réglages Minuterie sommeil SOMMEIL La minuterie de sommeil peut mettre l unité en veille après un délai défini 30 minutes 60 minutes 90 minutes 120 minutes Désactivé Fonction de mise hors marche automatique H M AUTO Cet appareil est conçu pour minimiser sa consommation en électricité et ainsi économiser de l énergie Lorsque l appareil n est pas u...

Page 87: ...activée Par défaut cette fonction est réglée sur Désactivé Puissance du signal Wi Fi Niveau du signal Pour contrôler la puissance du signal Wi Fi là où ce système se trouve Une puissance de signal à 3 est recommandée Modifiez la position ou l angle de votre routeur sans fil ou de ce système si le voyant indique 2 ou 1 et voyez si la connexion est meilleure Si 0 est affiché cela indique que le syst...

Page 88: ...Success s affiche 5 Débrancher le cordon d alimentation secteur et le rebrancher après 3 minutes Remarque Le téléchargement peut prendre plus de temps ou ne pas fonctionner correctement en fonction de l état de la connexion Mise à jour via mémoire flash USB Préparatifs Téléchargez le micrologiciel le plus récent sur une mémoire USB Pour plus de détails référez vous au site Internet suivant www tec...

Page 89: ...alité de test est émise à la fois depuis les enceintes gauche et droite Lorsque la mesure est terminée la correction de sortie de l amplificateur est automatiquement activée Si vous appuyez sur LAPC alors que la mesure est en cours cela l annule Si vous branchez des écouteurs casque d écoute pendant la mesure du signal de l amplificateur ou la correction de la sortie de l amplificateur cela l annu...

Page 90: ... d alimentation secteur attendez au moins 3 minutes puis rebranchez le Appuyez sur sur l unité pour la mettre en marche Si l unité ne fonctionne toujours pas consultez votre détaillant Un bourdonnement se fait entendre à la lecture Un cordon d alimentation secteur ou une lampe fluorescente se trouve près des câbles Éloignez les autres appareils et les autres cordons des câbles de ce système Un for...

Page 91: ... dossiers dessus iPhone iPad iPod Utilisation impossible Choisir USB comme source d entrée 31 Vérifier que l iPhone iPad iPod est bien connecté 31 La batterie de l iPhone iPad iPod est à plat Recharger la batterie 31 Connecter de nouveau l iPhone iPad iPod ou essayer de le redémarrer L iPhone iPad iPod ne se recharge pas Le chargement commence à partir de la connexion avec le câble USB uniquement ...

Page 92: ... des interruptions de connexion se produisent Augmentez la distance entre cette unité et les appareils en question Si votre routeur sans fil prend en charge la bande 5 GHz essayez d utiliser la bande 5 GHz Pour passer à la bande 5 GHz paramétrez à nouveau le réseau en utilisant un navigateur Internet 22 Lors de l étape 5 assurez vous de sélectionner le nom de votre réseau SSID pour la bande 5 GHz ...

Page 93: ...ent sur la mémoire USB et connectez le 40 Échec téléch Le téléchargement du logiciel a échoué Appuyer sur n importe quelle touche pour sortir Réessayer à un autre moment Le serveur est introuvable Appuyer sur n importe quelle touche pour quitter S assurer que le réseau sans fil est relié à Internet Vide Le dossier sélectionné est vide Déplacez des pistes dans le dossier et retentez l opération Le ...

Page 94: ...nal débordmt L audio venant des bornes d entrée audio analogique en cours d utilisation présente une distorsion Sélectionnez Atténua LIGNE ou Atténua PHONO en fonction des bornes d entrée audio analogique sélectionnées et changez le réglage de l atténuateur à Activé 37 Déverr PC COAX1 COAX2 ou OPT est sélectionné mais aucun appareil n est connecté Vérifiez la connexion de l appareil 34 35 Les comp...

Page 95: ...certifié en vertu des lois sur l utilisation des bandes de fréquences Par conséquent l obtention d un permis de transmission sans fil n est pas requise Les actions décrites ci dessous sont punissables en vertu de la loi Démontage ou modification du système Retrait des indications relatives aux spécifications Restrictions à l utilisation La liaison sans fil et ou l utilisation avec tous les disposi...

Page 96: ...kHz D H T 0 5 8 20 kHz filtre LPF 100 W 100 W 1 kHz D H T 0 5 4 20 kHz filtre LPF Impédance de charge 4 16 Réponse de fréquence PHONO MM 20 Hz à 20 kHz DÉVIATION RIAA 1 dB 8 LIGNE 5 Hz à 80 kHz 3 dB 8 NUMÉRIQUE 5 Hz à 90 kHz 3 dB 8 Sensibilité d entrée impédance d entrée LIGNE 200 mV 22 k PHONO MM 2 5 mV 47 k SECTION BLUETOOTH Spécifications du système Bluetooth Bluetooth Ver 3 0 Classification de...

Page 97: ...e à broche PHONO MM Prise à broche Entrée numérique Entrée numérique optique Borne optique Entrée numérique coaxiale 2 Prise à broche Support de format LPCM SECTION FORMAT USB A Norme USB USB 2 0 grande vitesse USB à forte capacité de stockage USB B Norme USB USB 2 0 grande vitesse USD classe audio 2 0 mode asynchrone Mode de contrôle DSD Mode natif ASIO mode DoP SECTION Wi Fi Norme WLAN IEEE802 1...

Page 98: ... AIFF aiff 32 44 1 48 88 2 96 176 4 192 kHz 16 24 bits ALAC m4a 32 44 1 48 88 2 96 176 4 192 kHz 16 24 bits DSD dff dsf 2 8224 MHz 5 6448 MHz PC USB B 1 Format du fichier Extension Fréquence d échantillonnage Débit binaire Nombre de bits de quantification LPCM 32 44 1 48 88 2 96 176 4 192 352 8 384 kHz 16 24 32 bits DSD dff dsf 2 8224 MHz 5 6448 MHz 11 2896 MHz LAN DLNA 2 Format du fichier Extensi...

Page 99: ...isateur d un mauvais entretien d une surtension temporaire de la foudre d une modification de la pénétration de sable de liquides ou d humidité d une utilisation commerciale dans un hôtel un bureau un restaurant ou tout autre usage par affaires ou en location d une réparation effectuée par une entité autre qu un centre de service Panasonic agréé ou encore d une catastrophe naturelle Les piles sèch...

Page 100: ...nasonic Canada Inc Two Riverfront Plaza Newark NJ 07102 5490 http www panasonic com 5770 Ambler Drive Mississauga Ontario L4W 2T3 www panasonic com Panasonic Corporation 2015 2016 Printed in Malaysia Imprimé en Malaisie En Cf TQBA2016 M0516KZ0 ...

Reviews: