background image

7-2

7. ON LINE OPERATION

EO18-33006

(Revision Date: Apr. 25, 2002)

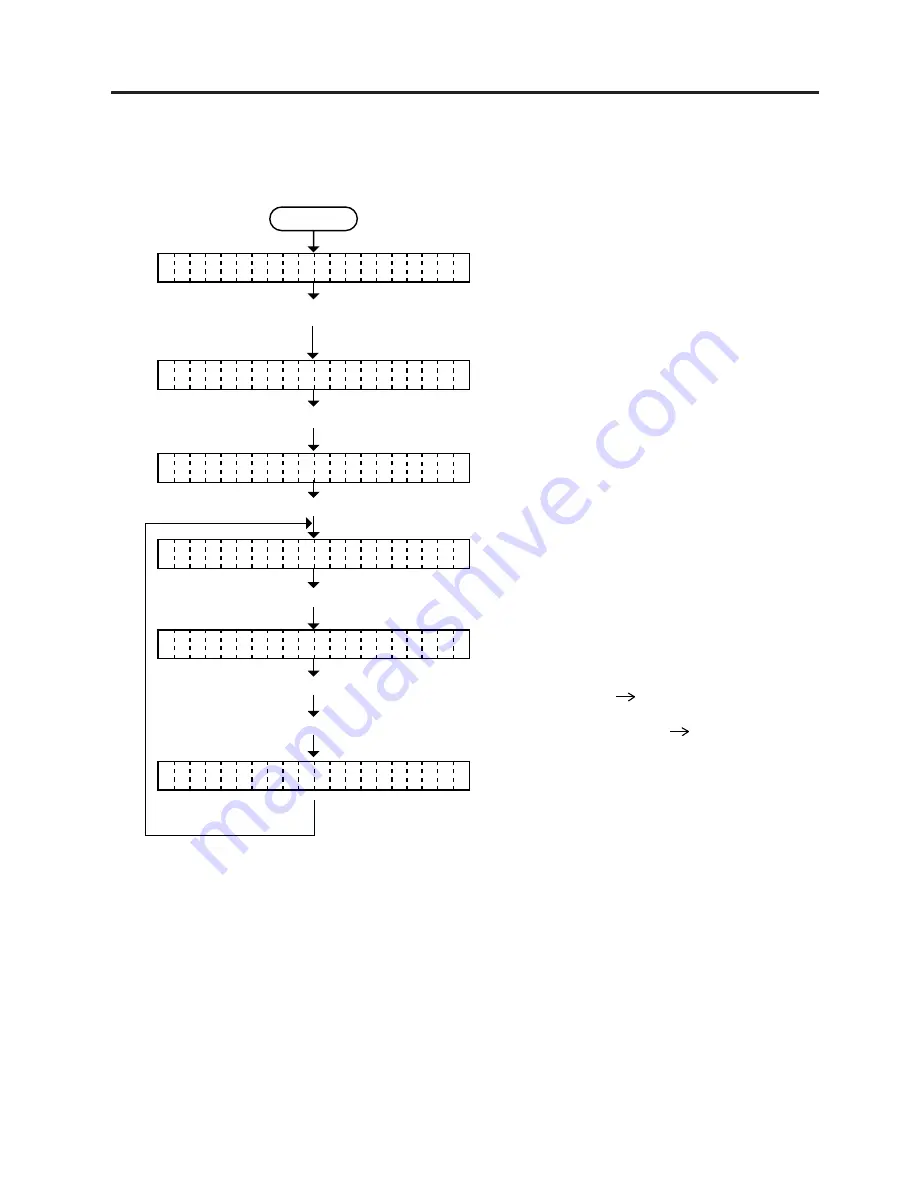
7.2 Dump Mode

Power On

The printer is in stand-by or printing.

The printer enters the pause state.

A reset menu is displayed.

A dump mode menu is displayed.

Press and hold the [RESTART] key for at least 3 seconds.

Press the [RESTART] key twice.

RS-232C:

RS-232C receive buffer

NETWORK:

Network I/F receive buffer

CENTRO:

Centronics I/F receive buffer

BASIC 1:

BASIC Interpreter
(I/F     Interpreter buffer)

BASIC 2:

BASIC Interpreter
(Interpreter     Printer buffer)

Press the [PAUSE] key.

Select receive buffer with the [FEED] key or [RESTART] key.

Receive buffer data is printed.  After that, 
the display restores the dump mode menu.

Press the [PAUSE] key.

< 1

R E S E T                

>


< 3

D U M P   M O D E        

>


B U

F E R               R S -

F

2 3 2 C

N O

  P R I N T I N G . . .  

W


Press the [PAUSE] key.

O N

L I N E                  


P A

S E                      

U


7.2 Dump Mode

Receive buffer data of RS-232C I/F, Centronics I/F, Network I/F,  and BASIC Interpreter are dumped
in this mode.  Communication data and Network connection can be checked.

Summary of Contents for B-680 Series

Page 1: ...PRINTED IN JAPAN TEC Thermal Printer B 680 SERIES Original Apr 2000 Revised Document No EO18 33006 Maintenance Manual...

Page 2: ...s and to insure proper performance and operation 2 Failure to follow manual instructions or any unauthorized modification substitution or change to this product will void the limited product warranty...

Page 3: ...E STEPPING MOTORS AND BELTS 2 4 2 4 REPLACING THE RIBBON MOTORS 2 5 2 5 REPLACING THE PRINT HEAD 2 5 2 6 REPLACING THE PLATEN 2 6 2 7 REPLACING THE ROLLER BELT AND FEED ROLLER 2 7 2 8 REPLACING THE ME...

Page 4: ...port Carton Thermal printer Side Pad L Accessory Board Left Right Side Holders Holder Shaft Owner s Manual Unpacking Procedure Holder Base Media Holder Thumbscrew M 4x6 Power Cord Print Head Cleaner S...

Page 5: ...parts 1 Turn the power off 2 Open the right side and top covers 3 Remove the six screws FL 4x6 B 4x6 and B 3x8 to detach the left side cover 4 Remove the B 3x8 screw to remove the bottom plate NOTE In...

Page 6: ...on the CPU PC Board Fig 2 2 CAUTION Be careful when replacing the CPU PC board since a non resettable counter IC15 is installed on this board Refer to section 6 2 1 Maintenance Counter Printing If th...

Page 7: ...ION Replace only with the same type and rated of fuse for continued protection against risk of fire 1 Disconnect the PS cable from CN2 on the I O PC board 2 Remove the two screws FL 4 x 6 to detach th...

Page 8: ...ler belt have no slack are engaged and evenly tense 5 Reassemble in the reverse order of removal Screw FL 4x6 Front Plate Screw FL 4x6 Platen Belt Feed Roller Belt Screw FL 4x6 Fig 2 5 I O PC Board Sc...

Page 9: ...Connector Black Dowels Fig 2 7 2 4 REPLACING THE RIBBON MOTORS 1 Detach the connector and remove the two SM 3x5B screws to detach the ribbon motors NOTE This procedure can be done without removing the...

Page 10: ...e the platen from the left end Connector Print Head Head Fixing Screw Head Lever Connecter Fig 2 9 3 Turn the head lever counterclockwise to lift the print head 4 Remove the head fixing screw and pull...

Page 11: ...nsor 5 Removal the pinch roller block NOTE Fit both sides of the studs into the notches when installing the ribbon end sensor plate 6 Remove the four E rings E 5 pinch roller holder bush pinch roller...

Page 12: ...slack are engaged and evenly tense 15 Reassemble the remaining parts in the reverse order of removal Feed Roller Positioning Plate Feed Roller Feed Roller Pulley Feed Roller Belt Stud Notch Media Gui...

Page 13: ...at the center of the effective print area and the feed gap sensor is located 10 mm left of center as viewed from the front 1 Detach the 4 connectors from the fixed movable media sensors 2 Remove the...

Page 14: ...screws and one SM 4x8 screws from the I O PC board Remove the I O PC board from the printer by releasing it from the locking supports See Fig 2 17 3 Replace the I O PC board with a new one and reasse...

Page 15: ...0 2V by turning VR1 on the I O PC board 3 Set the ribbon end portion not ink portion so that the ribbon end sensor can detect it Measure the voltage again If it is over 0 4V re adjust the voltage fro...

Page 16: ...11 REPLACING THE CENTRO PC BOARD 1 Refer to Section 2 10 to detach the EXP I O PC board 2 Remove the two SM 3x6C screws to detach the CENTRO PC board from the rear cover 3 Disconnect the harness from...

Page 17: ...eriodic servicing NOTE Beforestartingtheperiodicmaintenance besuretoreadcarefullyandunderstandtheService Manuals especially warnings cautions and adjustment 1 Ask and operator or a manager about any m...

Page 18: ...osition Vertical Sensor adjustment Adjustment by issuing commands 4 Communication test 5 Abnorma noise 6 Confirm that there are not any other errors 10 Mount the printer cover 11 Clean the outside of...

Page 19: ...ODULE B 4208 QM 3 INSTALLATION PROCEDURE FOR OPTIONAL EQUIPMENT 1 Open the right side cover and the top cover See Fig 2 1 2 Remove the left side cover See Fig 2 1 3 Remove the front plate See Fig 2 5...

Page 20: ...board through the opening of the cutter unit Cutter Unit Screw SM 4x6C Cutter Unit Connector CN1 Opening Cutter Harness Cutter I F PC Board Cutter Attaching Screw Screw FL 4x6 Fig 3 2 3 1 CUTTER MODUL...

Page 21: ...procedure in diag mode NOTE Retain the parts that are removed during installation of the cutter unit They will be required when the printer is modified to a standard type Adjusting the Cutter Guide Pl...

Page 22: ...r c s e D t i n U y t Q t i n U p i r t S 1 s s e n r a H p i r t S 1 3 2 STRIP MODULE B 4908 H QM 3 2 STRIP MODULE B 4908 H QM NOTE This module cannot be used together with the B 4208 QM cutter modul...

Page 23: ...de and top covers See Fig 2 1 3 Remove the six screws FL 4x6 B 4x6 and B 3x8 to detach the left side cover See Fig 2 1 4 Remove the two FL 3x5 screws to detach the blind plate Fig 3 7 Description Inst...

Page 24: ...e three SM 3x8 screws on the CPU PC board and the PCB holder plate 9 Return the three harnesses to CN2 CN5 CN7 on the CPU PC board 10 Attach the ferrite core to any cable attached to a PCMCIA PC board...

Page 25: ...utter Cutting one cycle Open 27 MOTOR CHOME Micro Switch Close Open Micro Switch Slide Cutter Cutter Motor Arm Clutch Slide Cutter Fig 4 1 Slide Cutter Cutter Motor Clutch Arm Cutter Motor Clutch Slid...

Page 26: ...etach the clutch Refer to Fig 4 2 NOTE When removing the S 3x4 screw use a straight hex wrench 3 Secure the new clutch with the S 3x4 screw so that the screw is perpendicular to the section of the D c...

Page 27: ...LED board LCD 2 Failure of the LCD LED harness 3 Failure of the CPU PC board 1 The print paper is of poor quality 2 Dirty print head 3 The head lever fastens the print head incompletely 1 Print head...

Page 28: ...Failure of the stepping motor 1 Failure of the communication cable 2 Failure of the RS 232C connecter 3 Failureofthecommunicationconnec tor 4 Failure of the PC or application software 5 Failure of the...

Page 29: ...n 6 32 6 3 12 Transmission Control Mode Selection 6 33 6 3 13 Language Selection for LCD Message 6 34 6 3 14 Auto Forward Wait in Cut Mode 6 35 6 3 15 Head up ON OFF Setting in Cut Mode 6 36 6 3 16 Ri...

Page 30: ...Thermistor Check Read only 6 62 6 5 2 Black Mark Sensor Adjustment 6 63 6 5 3 Feed Gap Sensor Adjustment 6 64 6 5 4 Paper End Setting for Black Mark Sensor 6 65 6 5 5 Paper End Setting for Feed Gap S...

Page 31: ...diagnosis are printed on the media Parameter Setting Mode See page 6 15 Fine adjustment of the feed length cut strip position back feed length X axis print tone thresholds of the black mark sensor and...

Page 32: ...is provided for this procedure to cancel the steps which follow the PAUSE key without turning the power off NOTES 1 Pressing the PAUSE key during printing causes the printer to pause printing and sho...

Page 33: ...resumed after the error is cleared 2 Both label and tag paper can be used for printing Power off Turn on the power while holding down the FEED key and PAUSE key The result of the self test is printed...

Page 34: ...10 RBN BK 0 232C ERR 255 KEY SYS ERR 0 FEED 0 0 mm PW FAIL 0 CUT 1 0 mm BACK 0 0 mm THRESHOLD R 1 0 V TONE T 0 step THRESHOLD T 0 7 V TONE D 0 step RBN FW 8 FONT PC 850 0 RBN BK 0 CODE AUTO X ADJ 0 0...

Page 35: ...driving time is not counted during ribbon saving operation but is during back feed See NOTE 4 Counted during ribbon saving operation See NOTE 4 Counted when a parity overrun or framing error occurs S...

Page 36: ...cut mode ON Available OFF Unavailable 24 Head up in cut mode ON Available OFF Unavailable 25 Ribbon saving module ON Available OFF Unavailable 26 Sensor Position CENTER Fixed Type Sensor EDGE Movable...

Page 37: ...50 0 mm to 50 0 mm 50 PC KEY 44 Cut Strip position fine adjustment 50 0 mm to 50 0 mm 51 PC KEY 45 Back feed length fine adjustment 9 5 mm to 9 5 mm 52 PC KEY 46 Print tone fine adjustment 10 step to...

Page 38: ...an be used for printing Power off Press the PAUSE key Press the PAUSE key Press the PAUSE key Select the ribbon type from those at the right by pressing the FEED key or RESTART key Turn on the power w...

Page 39: ...600 KANJI 8900 EEPROM OK DRAM 16MB CARD SLOT 1 ATA SLOT 2 LAN SENSOR1 00000000 00000000 SENSOR2 H 20 C A 22 C S 25 C R 4 2V T 2 5V RANK 7 EXP I O NG PROGRAM B 880 01APR2000 V1 0 A FMRM0058201 1A00 Che...

Page 40: ...estores the display to the system mode menu 7 PC card Check 6 DRAM Check 4 Kanji Check 6 2 SELF TEST MODE DRAM 16MB Capacity of DRAM System Painting memory KANJI 9D00 Checksum of BITMAP Kanji ROM Kanj...

Page 41: ...side the slit Fixed to 0 Strip sensor status 0 Without label 1 With label Fixed to 0 Fixed to 0 Print status content description Indicates whether the cutter is at the home position or not Indicates w...

Page 42: ...1099 Feed gap sensor status 0 0 5 0V Print head resistance rank 0 15 9 SENSOR 2 Check 6 2 SELF TEST MODE SENSOR2 H 20 C A 22 C S 25 C Heat sink temperature sensor status 25 C 80 C 90 C Environmental t...

Page 43: ...nect a jig as shown below and check HIGH output HIGH input and LOW output LOW input 10 EXP I O Check EXP I O OK Expansion I O PC board Loopback test OK The circuit has no problem NG The circuit has a...

Page 44: ...n Section 6 4 TEST PRINT MODE 6 2 SELF TEST MODE 6 2 3 Head Broken Element Check The printer automatically performs the head broken element check The result of the head broken element check is indicat...

Page 45: ...D E 0 B H R T Y P E C A T Press the PAUSE key F O W A R D L W I 0 F O F R R I B O N O S A V E T Y O P N B Press the PAUSE key F O C U H E D I U T A Press the PAUSE key T Y O F P Press the PAUSE key S...

Page 46: ...parameter is ON it is done while the print head is up Available only when the ribbon saving module is installed and the ribbon save mode is ON The ribbon saving module is selected Be sure to set this...

Page 47: ...T key to adjust the feed length See NOTE 1 Continued on Section 6 3 2 Cut strip position fine adjustment Press the FEED key and RESTART key at the same time FEED key Pressing the FEED key one time is...

Page 48: ...See NOTE 2 RESTART key Pressing the RESTART key one time is a 0 5 mm change up to 50 0 mm See NOTE 2 1 D I A G N O S T I C V 1 0 A F E D A D J U S T 1 2 E 0 m m 2 P A R A M E T E R S E T NOTES 1 Hold...

Page 49: ...ssing the FEED key one time is a 0 5 mm change up to 9 5 mm See NOTE 2 RESTART key Pressing the RESTART key one time is a 0 5 mm change up to 9 5 mm See NOTE 2 1 D I A G N O S T I C V 1 0 A B A K F E...

Page 50: ...RAMETER SETTING MODE Feed Length Fine Adjustment Example A A A A A A A A A A A A 0 0 mm Feed Direction 10 0 mm 10 0 mm 10 mm 10 mm Fig 6 4 Fig 6 5 Fig 6 6 0 0 mm Feed Direction 12 0 mm 12 0 mm Black M...

Page 51: ...he cut position fine adjustment value after calculating the value using the following formula so that the unprinted label returns to the correct print start position However use of this method will le...

Page 52: ...nt stop position when printing the label in strip mode varies according to label length for the strip mode printing stops so that the edge of the strip shaft is 4 mm from the middle of the gap This is...

Page 53: ...ST OPERATION EO18 33006 6 3 PARAMETER SETTING MODE Back Feed Length Fine Adjustment Example A A A A A A A A A A A A 0 0 mm Feed Direction 3 0 mm 3 0 mm 3 0 mm 3 0 mm Print start position Fig 6 15 Fig...

Page 54: ...RESTART key at the same time FEED key Pressing the FEED key one time is a 0 5 mm change up to 99 5 mm See NOTE 2 RESTART key Pressing the RESTART key one time is a 0 5 mm change up to 99 5 mm See NOTE...

Page 55: ...nting X Feed direction NOTES 4 The X axis fine adjustment is performed to fine adjust the X axis of the drawing in the left or right direction 5 Adjust the X axis in the effective print range After th...

Page 56: ...s Press the PAUSE key Continued on Section 6 3 6 Character code selection Press the FEED or RESTART key to adjust the feed length See NOTE 1 Press the PAUSE key See NOTE 3 Press the FEED or RESTART ke...

Page 57: ...PAUSE key 7 times Select either chracter code with the FEED key or RESTART Key See NOTE1 Press the FEED key and RESTART key at the same time Press the PAUSE key Continued on Section 6 3 7 Font zero se...

Page 58: ...pressing the PAUSE key Power off Turn on the power while holding down the FEED key and PAUSE key Press the FEED key Press the PAUSE key 8 times Select either zero font with the FEED key or RESTART key...

Page 59: ...key or RESTART key See NOTE 1 Press the FEED key and RESTART key at the same time Press the PAUSE key Continued on Section 6 3 9 Data Length Selection 38400 BPS 19200 BPS 9600 BPS 4800 BPS 2400 BPS 1...

Page 60: ...ngth with the FEED key or RESTART key See NOTE 1 Press the FEED key and RESTART key at the same time Press the PAUSE key Continued on Section 6 3 10 Stop Bit Selection 8 bits 7 bits 1 D I A G N O S T...

Page 61: ...ction 6 3 PARAMETER SETTING MODE Power off Turn on the power while holding down the FEED key and PAUSE key Press the FEED key Press the PAUSE key 11 times Select data length with the FEED key or RESTA...

Page 62: ...PARAMETER SETTING MODE Power off Turn on the power while holding down the FEED key and PAUSE key Press the FEED key Press the PAUSE key 12 times Select parity with the FEED key or RESTART key See NOTE...

Page 63: ...TO XON XOFF mode XON at power on XOFF at power off XON READY AUTO XON XOFF READY BUSY DTR mode XON at power on XOFF at power off READY BUSY READY BUSY DTR mode No XON at power on nor XOFF at power off...

Page 64: ...3 PARAMETER SETTING MODE Power off Turn on the power while holding down the FEED key and PAUSE key Press the PAUSE key Press the PAUSE key 14 times Slect a language to display the LCD maessage with th...

Page 65: ...urn on the power while holding down the FEED key and PAUSE key Press the FEED key Press the PAUSE key 15 times Select auto forward wait with the FEED key or RESTART key See NOTE 1 Press the FEED key a...

Page 66: ...ER SETTING MODE Power off Turn on the power while holding down the FEED key and PAUSE key Press the FEED key Press the PAUSE key 16 times Select head up ON OFF setting with the FEED key or RESTART key...

Page 67: ...r RESTART key See NOTE 1 Press the FEED key and RESTART key at the same time Press the PAUSE key Continued on Section 6 3 17 Control Code Selection OFF The ribbon saving module is not used ON The ribb...

Page 68: ...ify all the control codes 1 to 3 Failure to do this disables selection of MANUAL Power off Turn on the power while holding down the FEED key and PAUSE key Press the FEED key Press the PAUSE key 18 tim...

Page 69: ...he PAUSE key C O T R O L C O D E 1 1 B N Press the PAUSE key Go to B on the previous page C O T R O L C O D E 1 O 2 N RESTART FEED C O T R O L C O D E 1 0 1 N RESTART FEED C O T R O L C O D E 1 0 0 N...

Page 70: ...AUSE key Power off Turn on the power while holding down the FEED key and PAUSE key Press the FEED key Press the PAUSE key 19 times Select either ribbon type with the FEED key or RESTART key See NOTE 1...

Page 71: ...ss the PAUSE key 20 times Press the FEED or RESTART key to fine adjust the rewind motor voltage See NOTE 1 Press the FEED or RESTART key to fine adjust the feed motor voltage See NOTE 1 Press the FEED...

Page 72: ...rom the PC while a label stays at the strip sensor when idling after feeding or all printing finished If the status request command is sent during printing the printer will always send 05H regardless...

Page 73: ...piece of paper PRINT prints image buffer on a piece of paper Select Feed key Function with the FEED key or RESTART key See NOTE 1 Press the PAUSE key Continued on Section 6 3 22 Threshold Manual Fine...

Page 74: ...down the FEED key and PAUSE key Press the FEED key Press the PAUSE key 24 times Press the FEED key or RESTART key to fine adjust the threshold for the black mark sensor manually Press the FEED key an...

Page 75: ...wer while holding down the FEED key and PAUSE key Press the FEED key Press the PAUSE key 25 times Press the FEED key or RESTART key to fine adjust the threshold for the black mark sensor manually Pres...

Page 76: ...of backing paper is low In such case more than 5mm long gap is regarded as the no paper And trying to print or feed the label when the sensor stops at the gap results in a NO PAPER error This problem...

Page 77: ...king paper 2 Min voltage at the backing paper 2 A A B C Min voltage at the print area Min voltage at the black mark 2 2 8V 1 5V 4 4V 0 7V Label gap Black Mark Label Backing Paper Perforation Backing P...

Page 78: ...Press the FEED key and RESTART key at the same time Press the PAUSE key Continued on Section 6 3 25 Euro Font Code Selection TYPE 1 Windows code TYPE 2 Original code 1 D I A G N O S T I C V 1 0 A K A...

Page 79: ...f Turn on the power while holding down the FEED key and PAUSE key Press the FEED key Press the PAUSE key 27 times Press the FEED key or RESTART key to select the Euro font code RESTART FEED FFH 20H Pr...

Page 80: ...element check is not performed ON Auto print head broken element check is performed Select auto print head broken element check with the FEED key or RESTART key See NOTE 1 Press the PAUSE key Continu...

Page 81: ...e1 when using ECP DMA mode Power off Turn on the power while holding down the FEED key and PAUSE key Press the FEED key Press the PAUSE key 29 times Press the FEED key and RESTART key at the same time...

Page 82: ...on the power while holding down the FEED key and PAUSE key Press the FEED key Press the PAUSE key 30 times Press the FEED key and RESTART key at the same time OFF Unavailable ON Available Select web p...

Page 83: ...ower while holding down the FEED key and PAUSE key Press the FEED key Press the PAUSE key 31 times Press the FEED key and RESTART key at the same time CENTER Fixed Type Sensor EDGE Removable Type Sens...

Page 84: ...6 mm PAPER FEED Feed Operating procedure for the test mode is provided below ISSUE COUNT Select Print Condicton by pressing the PAUSE key To be continued on B of the next page Press the FEED key or RE...

Page 85: ...TE 3 Press the PAUSE key See NOTE 3 1000 Print count 1000 500 Print count 500 100 Print count 100 50 Print count 50 10 Print count 10 5 Print count 5 3 Print count 3 1 Print count 1 8 inch sec NONE co...

Page 86: ...Set the media feed From B of the preceding page S Standard mode Batch printing without cut 999 Label length 999 mm FEED Paper feed No FEED Paper no Feed 998 Label length 998 mm 997 Label length 997 m...

Page 87: ...ng is stopped The error is cleared by pressing the PAUSE key and the display shows 3 TEST PRINT Printing is not automatically resumed after the error is cleared 8 When the space area is 20mm at the pr...

Page 88: ...available at a test print 10 The print speed of 4 sec is applied to the thermal direct print only Even if the print speed of 4 sec is selected for the thermal transfer print the printer performs at 3...

Page 89: ...6 59 6 DIAG TEST OPERATION EO18 33006 Fig 6 25 Fig 6 24 Bar code AUTO PRINT...

Page 90: ...ABEL LENGTH 76 mm PRINT TONE FINE ADJUSTMENT VALUE 0 Operating procedure for the test mode is provided below Power off Turn on the power while holding down the FEED key and PAUSE key Press the FEED ke...

Page 91: ...acters are printed on 5 labels Press the FEED key and RESTART key at the same time Characters are printed on 5 labels From B of the next page From A of the preceding page To C of the preceding page Af...

Page 92: ...int head temperature after the excess headtemp erroroccursorbatchprintingisperformedforalongtime NOTE 1 Since the thermistor is supervised every 200 ms while displaying the status the display could va...

Page 93: ...n the power while holding down the FEED key and PAUSE key Press the FEED key three times Set the tag paper so that the black mark sensor can detect the white part of the tag paper See NOTE 1 The forme...

Page 94: ...off Turn on the power while holding down the FEED key and PAUSE key Press the FEED key three times Set the label so that the feed gap sensor can detect the backing paper no label See NOTE 1 The former...

Page 95: ...n on the power while holding down the FEED key and PAUSE key Press the FEED key three times Remove any paper from the sensor detecting area The former value is displayed Holding the FEED key or RESTAR...

Page 96: ...ed up to 5 0 V Power off Turn on the power while holding down the FEED key and PAUSE key Press the FEED key three times Remove any paper from the sensor detecting area The former value is displayed Ho...

Page 97: ...rameters to the settings before shipment Confirmation can be made through the automatic diagnostic procedure in self test mode See NOTE 1 and 2 MAINTE COUNTER CLEAR PARAMETER CLEAR Item Media distance...

Page 98: ...JA Type QP Type Stop bit Parity QP Type QQ JAType Transmission control mode QP JA Type QQ Type Language Selection for LCD QP Type Message QQ Type Auto forward wait in cut mode Head up ON OFF setting i...

Page 99: ...nt Interface Specification 3 For data to be cleared in the RAM clear mode refer to the RAM clear mode table 4 After RAM clear is performed the threshold setting value will turn to the default 0 When u...

Page 100: ...ile holding down the FEED key and PAUSE key Press the FEED key four times Press the PAUSE key Press the PAUSE key Press the FEED key or press the RESTART key twice Press the PAUSE key Turn off the pow...

Page 101: ...ey Press the PAUSE key Select type with the FFED key or RESTART key Press the FEED key twice or press the RESTART key Press the PAUSE key Turn off the power See NOTE 1 Press the FEED key and RESTART k...

Page 102: ...g the RESTART key one time is a 1 change up to 255 See NOTE Press the PAUSE key Enter each value with the FEED key and RESTART key Pressing the PAUSE key after setting all values selects other item Pr...

Page 103: ...essing the FEED key on time causes a 1 change up to 0 RESTART key Pressing the RESTART key one time causes a 1 change up to 9 Pressing the PAUSE key allows the 4th digit setting P O T O N 0 8 0 0 0 0...

Page 104: ...e FEED key 6 times 7 B A M I C S S B A I A E N A B L E C O S Press the PAUSE key B A I C O F F O S Continued from C on the next page A To browse the BASIC files or to select the trace specification go...

Page 105: ...N Continued from A on the previous page Program File is displayed N C E Press the PAUSE key 0 O T A S T C B A S O E BASIC File Browser T R C A S C T T I O E Press the PAUSE key T R C O F A O E Press...

Page 106: ...he printer is restored to the initial state Press and hold the RESTART key for at least 3 seconds Press the PAUSE key P A S E U 1 R E S E T O N L I N E O N L I N E NOTES 1 If the RESTART key is releas...

Page 107: ...eive buffer BASIC 1 BASIC Interpreter I F Interpreter buffer BASIC 2 BASIC Interpreter Interpreter Printer buffer Press the PAUSE key Select receive buffer with the FEED key or RESTART key Receive buf...

Page 108: ...0 12 33 34 35 36 2C 43 44 45 2C 67 90 90 2C 34 35 36 37 2D 63 57 52 3B 79 97 70 12 2C 34 53 76 5F D4 CC A3 26 78 35 70 7B Feed direction 30 5E FF 01 0B 3C 2C 12 40 45 89 00 30 30 30 31 2C 34 30 2E 9F...

Page 109: ...682 thermal printer will be via the RS 232C interface and the centronics interface Firmware Download The Boot Program Application Program and Character Generator are installed into the B 682 printer...

Page 110: ...le running Windows 95 or Windows 98 insert Setup Disk 1 2 into the PC floppy drive 2 Click on the START button then highlight RUN and click on RUN 3 When the RUN display appears as in Fig 8 2 type in...

Page 111: ...8 2 SOFTWARE INSTALLATION Fig 8 6 Fig 8 5 Fig 8 7 6 AfterclickOKinthepreviousscreen thefollowingmessagescreenappears Clickonthebutton to accept the directory or change the directory if desired 8 When...

Page 112: ...f the file installed into the FDK is EXE click it twice to decompress into ROM file 1 Turn on the printer power by the following procedure Power Off Turn on the power while holding down the FEED key a...

Page 113: ...rogram Loader as shown in Fig 8 10 below Revision Date May 11 2001 8 3 FIRMWARE DOWNLOAD Fig 8 10 2 Turn on the PC power and start up Windows 3 Click on the START button to access the program menu 4 H...

Page 114: ...creen the B NX series Download Program setting display screen will appear Revision Date May 11 2001 8 3 FIRMWARE DOWNLOAD Fig 8 12 6 Select the drive directory file name extension and applicable PC po...

Page 115: ...ameters for COM1 and COM2 are fixed as follows Baud Rate 9600 bps Parity None Stop Bit 1 bit 2 A device selection is possible on the main screen display of Fig 8 11 however that setting will be cleare...

Page 116: ...begin the download At this time the LCD on the B 680 printer changes from DOWN LOAD MODE to NOW LOADING NOTES 1 If NOW LOADING does not appear finish the download program turn the printer power off th...

Page 117: ...isdownloadedwillapper NOTES 1 If an error occurs on the PC or printer in the middle of downloading retry from connection of the printer to the PC 2 If the PC hangs up or a power failure occurs retry f...

Page 118: ...ing perform the following Turn the pritner power ON while pressing and holding the FEED and PAUSE keys to enter the System Mode Confirm that the correct version of the software is displayed on the LCD...

Reviews: