


57
FRANÇAIS
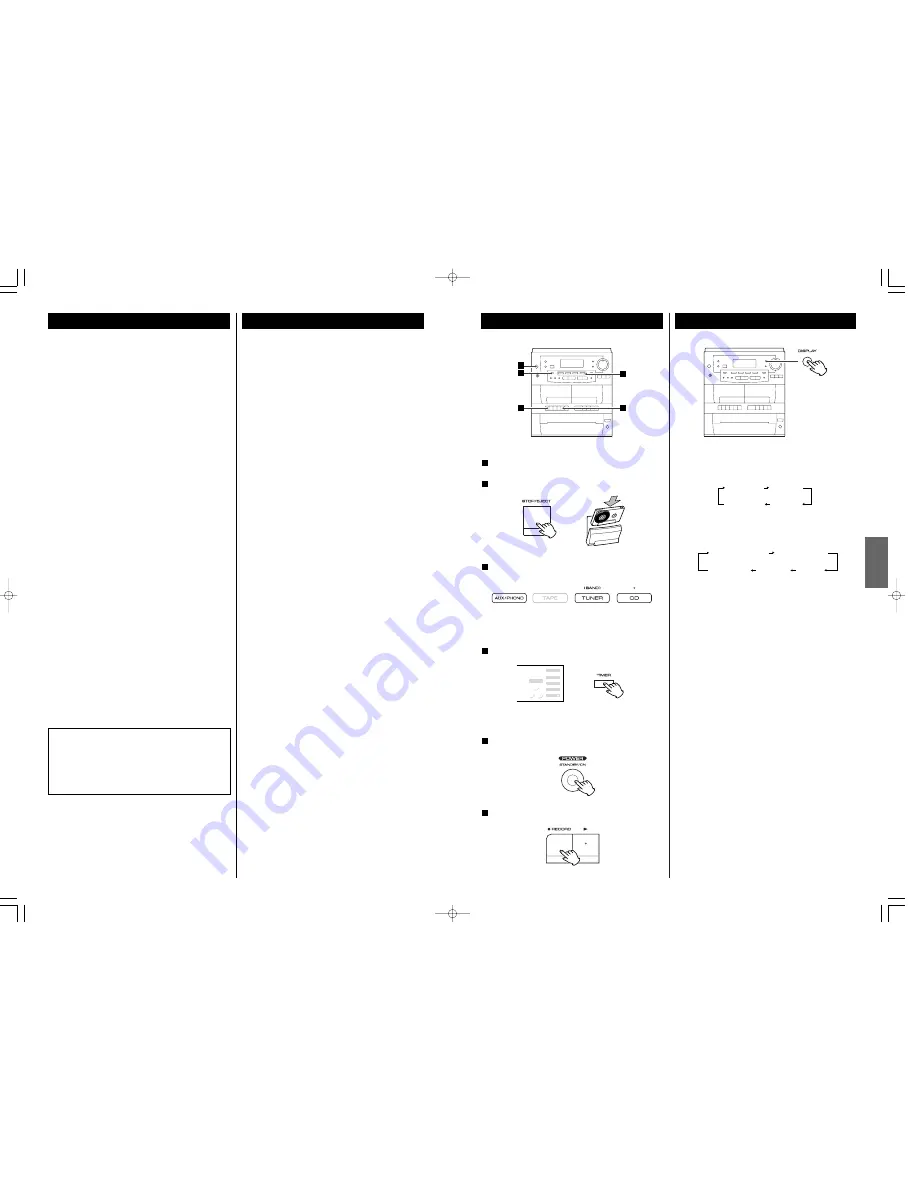
Enregistrement minuté
Réglez l’heure de départ et d’arrêt (voir page 55)
Chargez une bande enregistrable dans TAPE
@
.
2
1
Choisir une source d’enregistrement en appuyant sur la
touche correspondante.
3
<
Ne pas choisir “TAPE”
<
Quand vous choisissez “TUNER”, syntonisez un poste
Appuyez sur la touche TIMER
4
Le témoin “TIMER” est affiché.
Appuyez sur la touche POWER pour allumer l’appareil
5
Appuyez sur la touche RECORD de TAPE
@
.
6
Afficheur
Chaque fois que la touche DISPLAY est appuyée, l’afficheur
change comme suit:
Durant la lecture d’un CD:
Quand l’appareil est allumé:
“clock”, “timer on” ou “timer off” est affiché pour 5
secondes et ensuite retourne à “source”.
Quand l’appareil est éteint:
“timer on” ou “timer off” est affiché pour 5 secondes et
ensuite retourne à “clock”
temps écoulé de
la piste courante
temps qui reste
sur le disque
horloge
minuterie
désengendrée
minuterie
en marche
(source)
horloge
minuterie
désengendrée
minuterie
en marche
5
4
6
3
2
TIMER
ON
OFF
STEREO
CLASSIC
ROCK
POPS
FLAT
PLAY
MHz
kHz
2
1
3
4
Contents
Thank you for choosing TEAC. Read this manual carefully
to get the best performance from this unit.
Before Use
Read this before operation
<
As the unit may become warm during operation, always leave
sufficient space around the unit for ventilation.
<
The voltage supplied to the unit should match the voltage as
printed on the rear panel. If you are in any doubt regarding
this matter, consult an electrician.
<
Choose the installation location of your unit carefully. Avoid
placing it in direct sunlight or close to a source of heat. Also
avoid locations subject to vibrations and excessive dust, heat,
cold or moisture.
<
Do not place the unit on an amplifier/receiver or any other
electronic device that generates heat.
<
Do not open the sealed cabinet as this might result in damage
to the circuitry or electrical shock. If a foreign object should
get into the set, contact your dealer or service agency.
<
When removing the power plug from the wall outlet, always
pull directly on the plug, never yank the cord.
<
To keep the laser pickup clean, do not touch it, and always
close the disc tray.
<
Do not attempt to clean the unit with chemical solvents as
this might damage the finish. Use a clean, dry cloth.
<
Keep this manual in a safe place for future reference.
DO NOT MOVE THE UNIT DURING PLAYBACK
During playback, the disc rotates at high speed. Do NOT lift or
move the unit during playback. Doing so may damage the
disc or the record.
WHEN MOVING THIS UNIT
When changing places of installation or packing the unit for
moving, be sure to remove the disc and the record. Moving
this unit with the disc or the record loaded may result in
damage to this unit. If the unit is to be packed and moved a
large distance, it is also advisable to tighten the turntable
transport locking screw. See page 12 for instructions.
Beware of condensation
When the unit (or a disc) is moved from a cold to a warm
place, or used after a sudden temperature change, there is a
danger of condensation; vapor in the air could condense on
the internal mechanism, making correct operation erratic or
impossible. To prevent this, or if this occurs, leave the unit for
one or two hours with the power turned on. The unit will
stabilize at the temperature of its surroundings.
Maintenance
Always keep the turntable clean.
If the surface of the unit gets dirty, wipe with a soft cloth or
use diluted mild liquid soap. Be sure to remove any excess
completely. Do not use thinner, benzine or alcohol as they
may damage the surface of the unit. Allow the surface of the
unit to dry completely before using
CAUTION
Do not expose this unit to liquids of any kind. Keep any
objects containing liquids such as vases, water glasses, potted
plants, et cetera off the top of this unit.
Do not install this equipment in a confined space such as a
book-case or similar unit.
Important Safety Instructions . . . . . . . . . . . . . . . . . . . . . . . . . . 2
Contents . . . . . . . . . . . . . . . . . . . . . . . . . . . . . . . . . . . . . . . . . 4
Before Use . . . . . . . . . . . . . . . . . . . . . . . . . . . . . . . . . . . . . . . . 4
Discs . . . . . . . . . . . . . . . . . . . . . . . . . . . . . . . . . . . . . . . . . . . . . 5
Cassette Tape . . . . . . . . . . . . . . . . . . . . . . . . . . . . . . . . . . . . . . 6
Handling Records . . . . . . . . . . . . . . . . . . . . . . . . . . . . . . . . . . . 7
How to Replace the Stylus. . . . . . . . . . . . . . . . . . . . . . . . . . . . . 7
Connection. . . . . . . . . . . . . . . . . . . . . . . . . . . . . . . . . . . . . . . . 8
Remote Control Unit. . . . . . . . . . . . . . . . . . . . . . . . . . . . . . . . . 9
Names of Each Control (Front Panel/Remote Control Unit) . . . 10
Names of Each Control (Turntable) . . . . . . . . . . . . . . . . . . . . . 12
Basic Operation. . . . . . . . . . . . . . . . . . . . . . . . . . . . . . . . . . . . 13
Listening to a Record . . . . . . . . . . . . . . . . . . . . . . . . . . . . . . . 14
Listening to CDs . . . . . . . . . . . . . . . . . . . . . . . . . . . . . . . . . . . 16
Programmed Playback. . . . . . . . . . . . . . . . . . . . . . . . . . . . . . . 18
Intro Check. . . . . . . . . . . . . . . . . . . . . . . . . . . . . . . . . . . . . . . 19
Shuffle Playback . . . . . . . . . . . . . . . . . . . . . . . . . . . . . . . . . . . 20
Repeat Playback . . . . . . . . . . . . . . . . . . . . . . . . . . . . . . . . . . . 20
Listening to the Radio . . . . . . . . . . . . . . . . . . . . . . . . . . . . . . . 21
Preset Tuning . . . . . . . . . . . . . . . . . . . . . . . . . . . . . . . . . . . . . 22
Listening to Tapes . . . . . . . . . . . . . . . . . . . . . . . . . . . . . . . . . . 23
Extended Playback . . . . . . . . . . . . . . . . . . . . . . . . . . . . . . . . . 24
Recording . . . . . . . . . . . . . . . . . . . . . . . . . . . . . . . . . . . . . . . 24
Dubbing (Copy from TAPE
!
to TAPE
@
) . . . . . . . . . . . . . . . . . . 25
Setting the Clock . . . . . . . . . . . . . . . . . . . . . . . . . . . . . . . . . . 26
Setting the Timer . . . . . . . . . . . . . . . . . . . . . . . . . . . . . . . . . . 27
Timer Playback . . . . . . . . . . . . . . . . . . . . . . . . . . . . . . . . . . . . 28
Timer Recording . . . . . . . . . . . . . . . . . . . . . . . . . . . . . . . . . . . 29
Display . . . . . . . . . . . . . . . . . . . . . . . . . . . . . . . . . . . . . . . . . . 29
Troubleshooting . . . . . . . . . . . . . . . . . . . . . . . . . . . . . . . . . . . 30
Specifications . . . . . . . . . . . . . . . . . . . . . . . . . . . . . . . . . . . . . 31


