background image

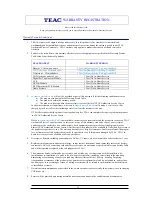
WARRANTY REGISTRATION

Please read this warranty card. 

Keep your purchase receipt to enable you to proceed quickly in the event of a Warranty Service. 

Warranty Terms & Conditions 

1. TEAC warrants to the original retail purchaser only, that this product is free from defects in material and 

workmanship under normal domestic use and authorises free service during the warranty period at any TEAC 

Authorised Service Centre only.  TEAC warranty only applies to products purchased, used and serviced in 

Australia. 

2. Subject to the terms herein, this warranty effectively covers the equipment as specified in the Warranty Periods 

Table below from the date of purchase. 

TEAC PRODUCT 

WARRANTY PERIOD 

Plasma TV 106 cm and above 

1 Year (In-Home Service/ Pick up Available)* 

LCD Televisions 80 cm and above 

1 Year (In-Home Service/Pick up Available)* 

Televisions – 59cm and above 

1 Year (In-Home Service/ Pick up Available)* 

All Televisions  under 59 cm 

1 Year (No In-Home Service) 

Digital Set Top Boxes & Module 

1 Year (No In-Home Service) 

VCR

1 Year (No In-Home Service) 

DVD & Module 

1 Year (No In-Home Service) 

DVD Recorder & PVR Module 

1 Year (No In-Home Service) 

Audio Systems 

1 Year (No In-Home Service) 

3.

In Home Service/Pick up*

 will only be provided as part of this warranty if all the following conditions are met; 

a) The product as indicated in the Warranty Period Table. 

b) The product is within the warranty period. 

c) The product is located within the normal service area of the local TEAC Authorised Service Centre. 

In any other situation or circumstance, where an 

In Home Service/Pick up*

 call is made, a service fee will be 

charged by the Service Provider including a travel fee if outside normal service area.  

If TEAC determines that the product is not repairable on site, TEAC can complete the repair by taking the product 

to a TEAC Authorised Service Centre. 

Where 

In-Home service/Pick up*

 is not available, the purchaser is required to send the product to the nearest TEAC 

Authorised Service Centre for repair. In this event, a copy of this warranty card and a copy of your receipt of 

purchase must be enclosed to be a valid warranty. Such equipment or part must be sent freight prepaid to your 

nearest TEAC Authorised Service Centre. After the repair, the product will be available for collection by or return to 

the purchaser at purchaser’s cost. The warranty does not cover freight or insurance. In all cases of transit damage or 

lost, a claim must be filed against the carrier by the purchaser, even if shipment is arranged by TEAC. TEAC in-

home service may also be available at a fee upon request. 

4. Accessories, Remote, including power adaptors, AV box, TV tuners, etc, are warranted to be defect free for 1 year. 

5. Replacement of spare parts under normal usage; except cabinet, front panel, knob, removable accessories, battery, 

consumable, AC cord, connecting cord and other accessories, are warranted as specified in Warranty Periods Table, 

and will be repaired or replaced at the sole judgement of TEAC. 

6. The warranties hereby conferred do not extend to, and exclude, any cost associated with the installation, de-

installation or re-installation of a product (be it in-home or otherwise), including costs related to the mounting, 

demounting or remounting of any screen, (and any other ancillary activities), delivery, handling, freighting, 

transportation or insurance of the product or any part thereof or replacement of and do not extend to, and exclude, 

any damage or  loss occurring by reason of, during, associated with, or related to such installation, de-installation, 

re-installation or transit. 

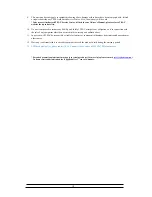
7. Normal customer maintenance as described in the owner’s manual is not covered by this warranty (such as cleaning 

VCR heads etc.) 

8. Service will be provided only during normal business hours and under safety conditions and circumstances. 

ii

Summary of Contents for DAB400

Page 1: ...DAB400 DAB RDS FM Radio...

Page 2: ...o a TEAC Authorised Service Centre Where In Home service Pick up is not available the purchaser is required to send the product to the nearest TEAC Authorised Service Centre for repair In this event a...

Page 3: ...connection with the sale of any equipment other than as stated in this warranty and outlined above 11 In no event will TEAC be responsible or liable for indirect or consequential damages from interru...

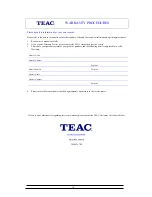
Page 4: ...ervice Centre 3 Please have your purchase receipt as your proof of purchase and the following details completed for a valid Warranty Owner s Name Owner s Address Postcode Model Name No Serial No Deale...

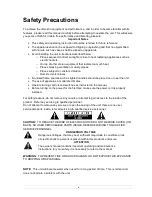
Page 5: ...e climates Operate turning controls and switches as instructed in the manual Before turning on the power for the first time make sure the power cord is properly installed For safety reasons do not rem...

Page 6: ...quids such as vases to be placed on the equipment DON T place hot objects or naked flame sources such as lighted candles or nightlights on or close to equipment High temperatures can melt plastic and...

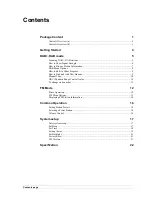
Page 7: ...er Program 9 How to Find and Add New Stations 9 Manual Tune 10 DRC Dynamic Range Control value 10 To change station order 11 FM Mode 12 Prime Operation 12 FM Menu Options 13 Displaying FM Station Info...

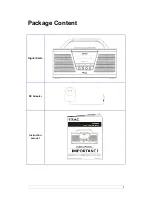
Page 8: ...1 Package Content Digital Radio DC Adapter Instruction manual...

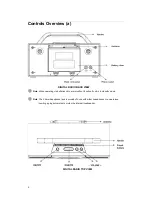
Page 9: ...le operating via batteries only alarm will not function if unit is in standby mode Note The 3 5mm headphone jack is provided to use with either headphones or an earpiece Inserting a plug automatically...

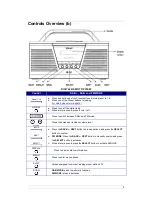
Page 10: ...and FM mode VOLUME Press to decrease or increase volume level BACK NEXT SELECT a Press the BACK or NEXT button to browse options and press the SELECT button to confirm b FM MODE Press the BACK or NEXT...

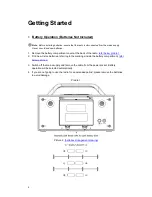
Page 11: ...e back of the radio refer below picture 1 2 Fit 6 new C size batteries referring to the markings inside the battery compartment refer below picture 2 3 Switch off the mains supply and remove the cable...

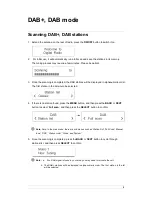
Page 12: ...e selected 4 If there is no station found press the MENU button and then press the BACK or NEXT button to select Full scan and then press the SELECT button to confirm Note Note In the main menu there...

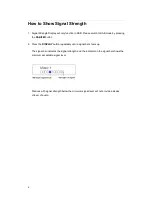
Page 13: ...sing the DAB FM button 2 Press the DISPLAY button repeatedly until a signal bar shows up The signal bar indicates the signal strength and the indicator on the signal bar shows the minimum acceptable s...

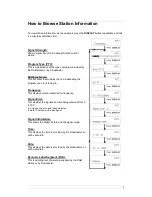
Page 14: ...broadcasting the program you are listening to Frequency This displays station transmission frequency Signal Error This displays the signal error rate being received from 0 to 100 a 0 means no error si...

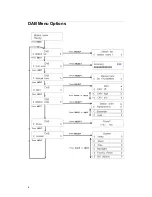
Page 15: ...8 DAB Menu Options...

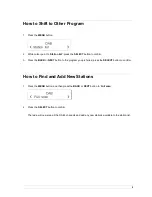
Page 16: ...the BACK or NEXT button to the program you preferred press the SELECT button to confirm How to Find and Add New Stations 1 Press the MENU button and then press the BACK or NEXT button to Full scan 2...

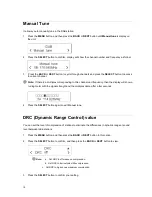
Page 17: ...display will show a tuning meter with the signal strength and the multiplex name after a few seconds 4 Press the SELECT button again to exit Manual tune DRC Dynamic Range Control value You can set th...

Page 18: ...n Alphanumeric Display all stations in alphanumeric order Ensemble List both active stations and inactive ones Valid Only list active stations 4 While the ideal one is shows up press the SELECT button...

Page 19: ...3 To manually change FM frequency press the BACK or NEXT button to change it by 0 05MHz 4 To Auto scan press the SELECT button or press the SCAN button directly 5 To automatically SEEK the next active...

Page 20: ...13 FM Menu Options...

Page 21: ...ided by the broadcaster Station name This displays the transmission station name of current listening to Audio type There are Stereo allowed and Forced mono two options Time It displays the time provi...

Page 22: ...tations will be shown 3 Press the BACK or NEXT button to select your preferred setting method 4 Press the SELECT button to confirm Audio Setting 1 Press the MENU button and then press the BACK or NEXT...

Page 23: ...te station press the SHIFT button and then press and hold one of the PRESET buttons and it will say Preset stored Selecting a Preset Station To select a stored station 1 Press the DAB FM button to shi...

Page 24: ...provide you more details Set Sleep 1 While cursor point to sleep press the SELECT button to confirm 2 Press the BACK or NEXT button to adjust the sleep period between 0 90 minutes 3 Press the SELECT...

Page 25: ...s the SELECT button to confirm 3 Press the BACK or NEXT button to change the hour press the SELECT button to confirm 4 Press the BACK or NEXT button to change the minutes press the SELECT button to co...

Page 26: ...ss the BACK or NEXT button to adjust the hours press SELECT button to confirm Note Adjust the minute using the same method as adjusting the hour Then you are required to set the duration of the alarm...

Page 27: ...ess the SELECT button repeatedly to postpone it by which the interval time is 5 10 15 30 minutes in turn Note a You cannot set the duration of the Snooze time more or equal to the duration of the Alar...

Page 28: ...y condition 1 Continue above step4 press the BACK or NEXT button to Dim level and then press the SELECT button to confirm 2 Press the BACK or NEXT button to select your required setting High Medium or...

Page 29: ...267 x 123 x 168mm Net Weight 1 2 kg Note Specifications are subject to change without prior notice Weight and Dimension are approximate This symbol on the product or in the instructions means that you...

Page 30: ...TEAC CUSTOMER CARE CENTRE TCCC Free call 1800 656 700 Between Monday to Friday EST 9AM to 5PM...

Reviews: