background image

3

CAUTION

<

Read all of these Instructions.

<

Save these Instructions for later use.

<

Follow all Warnings and Instructions marked on the audio equipment.

1) Read Instructions

— All the safety and operating instructions should

be read before the product is operated.

2) Retain Instructions

— The safety and operating instructions should

be retained for future reference.

3) Heed Warnings

— All warnings on the product and in the operating

instructions should be adhered to.

4) Follow Instructions

— All operating and use instructions should be

followed.

5) Cleaning 

— Unplug this product from the wall outlet before cleaning.

Do not use liquid cleaners or aerosol cleaners. Use a damp cloth for
cleaning.

6) Attachments

— Do not use attachments not recommended by the

product manufacturer as they may cause hazards.

7) Water and Moisture

— Do not use this product near water — for

example, near a bath tub, wash bowl, kitchen sink, or laundry tub; in a
wet basement; or near a swimming pool; and the like.

8) Accessories 

— Do not place this product on an unstable cart, stand,

tripod, bracket, or table. The product may fall, causing serious injury to
a child or adult, and serious damage to the product. Use only with a
cart, stand, tripod, bracket, or table recommended by the manufacturer,
or sold with the product. Any mounting of the product should follow the
manufacturer’s instructions, and should use a mounting accessory
recommended by the manufacturer.

9)

A product and cart combination should be moved

with care. Quick stops, excessive force, and uneven
surfaces may cause the product and cart combination
to overturn.

10) Ventilation

— Slots and openings in the cabinet

are provided for ventilation and to ensure reliable operation of the
product and to protect it from overheating, and these openings must not
be blocked or covered. The openings should never be blocked by
placing the product on a bed, sofa, rug, or other similar surface. This
product should not be placed in a built-in installation such as a
bookcase or rack unless proper ventilation is provided or the
manufacturer’s instructions have been adhered to.

11) Power Sources

— This product should be operated only from the

type of power source indicated on the marking label. If you are not sure
of the type of power supply to your home, consult your product dealer
or local power company. For products intended to operate from battery
power, or other sources, refer to the operating instructions.

12) Grounding or Polarization

— This product may be equipped with a

polarized alternating-current line plug (a plug having one blade wider
than the other). This plug will fit into the power outlet only one way. This
is a safety feature. If you are unable to insert the plug fully into the
outlet, try reversing the plug. If the plug should still fail to fit, contact
your electrician to replace your obsolete outlet. Do not defeat the safety
purpose of the polarized plug.

13) Power-Cord Protection

— Power-supply cords should be routed so

that they are not likely to be walked on or pinched by items placed upon
or against them, paying particular attention to cords at plugs,
convenience receptacles, and the point where they exit from the
product.

14) Outdoor Antenna Grounding

— If an outside antenna or    cable

system is connected to the product, be  sure the antenna or cable
system is grounded so as to provide some protection against  voltage
surges and built-up static charges. Article 810 of the  National Electrical
Code, ANSI/NFPA 70, provides information with  regard to proper
grounding of the mast and supporting structure, grounding of the lead-
in wire to an antenna discharge unit, size of grounding conductors,
location of antenna-discharge unit, connection to grounding electrodes,
and requirements for the grounding electrode.

Note to CATV system installer:

This reminder is provided to call the CATV system installer’s attention to
Section 820-40 of the NEC which provides guidelines for proper
grounding and, in particular, specifies that the cable ground shall be
connected to the grounding system of the building, as close to the point
of cable entry as practical."

15) Lightning

— For added protection for this product during a lightning

storm, or when it is left unattended and unused for long periods of time,
unplug it from the wall outlet and disconnect the antenna or cable
system. This will prevent damage to the product due to lightning and
power-line surges.

16) Power Lines

— An outside antenna system should not be located in

the vicinity of overhead power lines or other electric light or power
circuits, or where it can fall into such power lines or circuits. When
installing an outside antenna system, extreme care should be taken to
keep from touching such power lines or circuits as contact with them
might be fatal.

17) Overloading

— Do not overload wall outlets, extension cords, or

integral convenience receptacles as this can result in risk of fire or
electric shock.

18) Object and Liquid Entry

— Never push objects of any kind into this

product through openings as they may touch dangerous voltage points
or short-out parts that could result in a fire or electric shock. Never spill
liquid of any kind on the product.

19) Servicing

— Do not attempt to service this product yourself as

opening or removing covers may expose you to dangerous voltage or
other hazards. Refer all servicing to qualified service personnel.

20) Damage Requiring Service

— Unplug this product from the wall

outlet and refer servicing to qualified service personnel under the
following conditions:

a )

when the power-supply cord or plug is damaged.

b )

if liquid has been spilled, or objects have fallen into the product.

c )

if the product has been exposed to rain or water.

d )

if the product does not operate normally by following the operating

instructions. Adjust only those controls that are covered by the
operating instructions as an improper adjustment of other controls may
result in damage and will often require extensive work by a qualified
technician to restore the product to its normal operation.

e ) 

if the product has been dropped or damaged in any way.

f )

when the product exhibits a distinct change in performance _ this

indicates a need for service.

21) Replacement Parts

— When replacement  parts are required, be

sure the service technician has used replacement parts specified by
the manufacturer or have the same characteristics as the original part.
Unauthorized substitutions may result in fire, electric shock, or other
hazards.

22) Safety Check

— Upon completion of any service or repairs to this

product, ask the service technician to perform safety checks to
determine that the product is in proper operating condition.

23) Wall or Ceiling Mounting

— The product should be mounted to a

wall or ceiling only  as recommended by the manufacturer.

24) Heat

— The product should be situated away from heat sources

such as radiators, heat registers, stoves, or other products  (including
amplifiers) that produce heat.

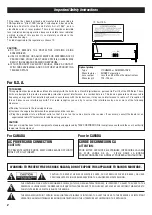
ANTENNA
LEAD IN
WIRE

ANTENNA
DISCHARGE UNIT
(NEC SECTION 810-20)

GROUNDING CONDUCTORS
(NEC SECTION 810-21)

GROUND CLAMPS

POWER SERVICE GROUNDING
ELECTRODE SYSTEM
(NEC ART 250. PART H)

NEC - NATIONAL ELECTRICAL CODE

ELECTRIC
SERVICE
EQUIPMENT

Example of Antenna Grounding
as per National Electrical
Code, ANSI/NFPA 70

GROUND
CLAMP

Important Safety Instructions

Summary of Contents for AD-600

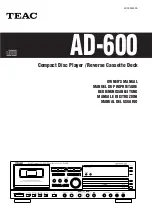
Page 1: ...OWNER S MANUAL MANUEL DU PROPRIETAIRE BEDIENUNGSANLEITUNG MANUALE DI ISTRUZIONI MANUAL DEL USUARIO 3D0039500A AD 600 Compact Disc Player Reverse Cassette Deck...

Page 2: ...MAKE A CONTACT WITH OUR SERVICEMAN AND DO NOT USE THE PRODUCT IN A TROUBLED STATE TO THE USER This equipment has been tested and found to comply with the limits for a Class B digital device pursuant t...

Page 3: ...ure grounding of the lead in wire to an antenna discharge unit size of grounding conductors location of antenna discharge unit connection to grounding electrodes and requirements for the grounding ele...

Page 4: ...d brancher le cordon d alimentation de la prise secteur avant de repositionner le s lecteur de changement de tension 1 Localiser le s lecteur de tension par le arri le du appareil 2 En utilisant un to...

Page 5: ...oles 28 CD Reproducci n 31 Comprobaci n de preludio 37 Reproducci n repetida 39 Reproducci n aleatoria 43 Reproducci n simple 45 Reproducci n programada 47 Reproducci n por el temporizador 51 Visualiz...

Page 6: ...keep the laser pickup clean do not touch it and do not forget to close the disc tray Do not attempt to clean the unit with chemical solvents as this might damage the finish Use a clean dry cloth Keep...

Page 7: ...tare di toccarlo e chiudere sempre il vano CD Evitare di pulire l apparecchio con solventi chimici poich ci potrebbe danneggiare la rifinitura esterna Fare semplicemente uso di un panno pulito ed asci...

Page 8: ...qui ont t convenablement finalis s Note Les disques CD R et CD RW peuvent tre jou s par l appareil sous r serve qu ils aient t convenablement finalis s Les disques qui portent des enregistrements r a...

Page 9: ...ssono essere riprodotti su questa unit a patto che siano stati correttamente completati in conformit con IEC 958 audio Discos que pueden utilizarse con esta unidad Discos compactos de audio convencion...

Page 10: ...duits chimiques risquent de provoquer des d g ts irr parables sur la surface en plastique du disque Ranger les disques dans leur tui apr s utilisation afin d viter de les rayer ou que de la poussi re...

Page 11: ...i ultraviolette Importante perci non conservarli in luoghi esposti alle luce solare diretta e tenerli lontano da sorgenti di calore come radiatori o apparecchiature elettriche in grado di generare cal...

Page 12: ...ns des endroits o l humidit est lev e ou poussi reux et sales Eviter d chapper ou soumettre les cassettes des chocs excessifs Comme les bandes des cassettes C120 sont physiquement faibles et peuvent f...

Page 13: ...tte Recuperare qualsiasi eventuale allentamento del nastro ruotando il foro della cassetta con un dito o una matita Evitare di toccare con le mani la superficie del nastro perch le impronte digitali a...

Page 14: ...uted neutral cleaning liquid Be sure to remove any fluid completely Do not use thinner benzine or alcohol as they may damage the surface of the unit C B A A B C C B Basic description of Dolby NR Durin...

Page 15: ...l mpiela con un trozo de tela suave o use un l quido de limpieza diluido y neutro L mpiela por completo No se debe usar diluente bencina o alcohol pues podr an da ar la superficie de la unidad C B A D...

Page 16: ...ez vous de connecter Fiche blanche w connecteur blanc L gauche Fiche rouge w connecteur rouge R droit Assurez vous que chaque fiche est enfonc e bien fond Pour viter le ronflement loignez les c bles d...

Page 17: ...ante A Salidas LINE IN OUT Conecte estas salidas a las entradas TAPE REC PLAY y CD IN del amplificador con el cable de conexi n para se ales de audio LINE IN TAPE w TAPE REC LINE OUT TAPE w TAPE PLAY...

Page 18: ...y Mise en place des piles Retirer le couvercle du compartiment des piles Introduire deux piles AA R6 SUM 3 S assurer que les piles sont correctement mises en respectant les polarit s plus et moins _ F...

Page 19: ...anddo si prevede di non utilizzare il telecomando per un lungo periodo pi di un mese rimuovere le batterie per prevenire perdite Se si verificassero delle perdite pulire il vano batterie e sostituire...

Page 20: ...Display CD PAUSE button Use this button to pause playback STOP button Use this button to stop playback or synchronized recording SHUFFLE button Use this button for shuffle playback PLAY button Use thi...

Page 21: ...buttons to search for a part of a track TAPE Cassette holder SEARCH button Use these buttons to fast forward or rewind the tape STOP button Use this button to stop playback or recording PAUSE button...

Page 22: ...Utilisez ces touches pour choisir un disque E D C B A D C B A Interrupteur CD TIMER La lecture d un CD command e par programmateur est possible si vous disposez d un programmateur audio Bouton PITCH...

Page 23: ...r cette touche pour remettre z ro 0000 le compteur de bande Touche RTZ Appuyez sur cette touche pour revenir au point 0000 de la bande Interrupteur DOLBY NR Placez cet interrupteur sur la position ON...

Page 24: ...ioniert diese Taste nicht Disc Nummerntasten DISC NO 1 2 3 Diese Tasten dienen zur Wahl einer Disc E D C B A D C B A CD TIMER Schalter Bei Anschlu eines optionalen Audio Timers ist timergesteuerte CD...

Page 25: ...CD Wiedergabe ge ndert werden Anspieltaste INTRO CHECK Mit dieser Taste kann die Anspielfunktion ausgel st werden Der Anfang jedes Titels wird jeweils 10 Sekunden lang gespielt Programm Pr f L schtast...

Page 26: ...per mettere in pausa la riproduzione Tasto STOP Usarlo per fermare la riproduzione o per la registrazione sincronizzata Tasto di riproduzione casuale SHUFFLE Usarlo per la riproduzione in ordine casua...

Page 27: ...sti di ricerca SEARCH Usarli per far avanzare velocemente il nastro o per riavvolgerlo Tasto STOP Usarlo per arrestare la riproduzione o la registrazione Tasto PAUSE Usarlo per mettere in pausa la rip...

Page 28: ...disco Use estos botones para seleccionar un disco E D C B A D C B A Interruptor CD TIMER Temporizador de DC Cuando se conecta un temporizador de audio opcional es posible la reproducci n de discos com...

Page 29: ...Bot n COUNTER CLEAR Reposici n del contador Presione este bot n para reponer el contador de cinta a 0000 Bot n RTZ Presione este bot n para localizar el punto 0000 de la cinta Interruptor DOLBY NR Re...

Page 30: ...l appareil Si l appareil ne contient aucun disque la mention no disc s affiche apr s initialisation Appuyez sur la touche OPEN CLOSE L correspondant DISC 1 2 ou 3 D posez un disque dans le tiroir fac...

Page 31: ...ualizar no disc despu s de la inicializaci n Presione el bot n OPEN CLOSE L de DISC 1 2 o 3 Coloque un disco sobre la bandeja con la cara impresa hacia arriba Nunca coloque m s de un disco sobre una b...

Page 32: ...m me si un autre disque est en cours de lecture D Even when a disc is set on a tray no disc is displayed untill a disc is selected by pressing the corresponding DISC NO button Pour commander la lectur...

Page 33: ...producidos aun cuando est tocando un otro disco D Starten der Wiedergabe Wenn bereits eine Disc gew hlt worden ist dr cken Sie die Taste PLAY y um die Wiedergabe zu starten Die Taste DISC NO kann nich...

Page 34: ...programm e c est la plage musicale suivante ou pr c dente qui est lue La plage musicale choisie est signal e par le damier musical E Recherche d un passage musical Pendant la lecture maintenez la pre...

Page 35: ...pista seleccionada ser reproducida desde el comienzo Al presionar una vez el bot n MUSIC SKIP durante la reproducci n la pista que est siendo reproducida comenzar a reproducirse desde el principio Par...

Page 36: ...dant la lecture l examen du disque commence au d but de la plage musicale suivante Si vous appuyez sur la touche INTRO CHECK pendant la lecture des 10 premi res secondes d une plage musicale l examen...

Page 37: ...si trovato un brano che si desidera ascoltare premere un altra volta il tasto INTRO CHECK La riproduzione normale inizia dal brano Durante la riproduzione programmata i brani programmati vengono ripro...

Page 38: ...son num ro en utilisant la touche MUSIC SKIP A REPEAT SINGLE REPEAT 1 REPEAT ALL OFF All the tracks of DISC 1 All the tracks of DISC 2 All the tracks of DISC 3 Every time the REPEAT MODE button of th...

Page 39: ...a Presione el bot n REPEAT y luego seleccione el n mero de pista presionando el bot n MUSIC SKIP Mit jedem Druck auf die Taste REPEAT MODE an der Fernbedienung ndert sich die Betriebsart folgenderma e...

Page 40: ...EPEAT 1 REPEAT ALL PROGRAM SHUFFLE INTRO CHECK CD TAPE CONT PLAY 2 1 Pour r p ter l intervalle A B A B REPEAT Commandez la lecture et pr cisez le d but de l intervalle A B le point A en appuyant sur l...

Page 41: ...punto B premere un altra volta il tasto A B La sezione specificata viene riprodotta ripetutamente Dopo aver specificato il punto A si pu usare il tasto MUSIC SKIP per saltare o avanzare velocemente a...

Page 42: ...lecture au hasard appuyez sur la touche SHUFFLE ou sur la touche STOP H alors que l appareil est l arr t ou encore appuyez sur l interrupteur POWER 2 1 2 2 If a disc has already been selected press t...

Page 43: ...uzione in ordine casuale non possibile ripetere la riproduzione di un brano Per arrestare la riproduzione in ordine casuale premere il tasto STOP H o il tasto OPEN CLOSE L del disco selezionato Per an...

Page 44: ...on is pressed during playback the unit stops after the playback of the track If you press the MUSIC SKIP button during single playback another track can be selected After the playback of that track th...

Page 45: ...mit der Taste MUSIC SKIP Nach Wiedergabe des Titels schaltet das Ger t auf Stopp und die Einzelwiedergabe wird aufgehoben Wird die Taste SINGLE w hrend Wiedergabe gedr ckt schaltet das Ger t nach der...

Page 46: ...programme de lecture peut comporter 20 num ros de plage musicale pris sur les 3 disques La lecture au hasard des plages musicales programm es n est pas possible Si la mention no disc est affich e choi...

Page 47: ...isplay e il numero di disco e il numero di brano 01 lampeggiano Quando il numero di disco e il numero di brano lampeggiano il tasto OPEN CLOSE L non operativo Selezionare un brano Selezionare un disco...

Page 48: ...Pour conna tre le contenu du programme L appareil tant l arr t appuyez de mani re r p t e sur la touche CHECK du bo tier de t l commande Le num ro de la plage musicale et sa position dans le programme...

Page 49: ...asto CHECK del telecomando Il numero di brano e il numero di programma appaiono sul display Durante il controllo P e un numero di disco lampeggia B Per cancellare un brano Premere il tasto CLEAR in mo...

Page 50: ...ous utilisez un programmateur audio Reliez l appareil et le programmateur audio de la mani re illustr e Placez l interrupteur POWER de chaque appareil sur la position ON D posez un disque Placez l int...

Page 51: ...dio come mostrato Impostare su ON attivazione l interruttore POWER di tutti i componenti Caricare un disco Impostare su ON attivazione l interruttore CD TIMER Impostare il timer audio Per i dettagli l...

Page 52: ...track being played Total remaining play time of all remaining tracks C B A En mode Lecture Pause chaque pression sur bouton TIME le mode change selon la s quence suivante Temps coul sur la piste coura...

Page 53: ...anscurrido A Bei Wiedergabe Pause Bei jedem Dr cken der Taste TIME ndert sich die Betriebsart folgenderma en Verstrichene Zeit des wiedergegebenen Titels A Bei Stop Gesamtzahl der Titel a Nel modo Sto...

Page 54: ...ext rieur puis refermez le compartiment cassette Cet appareil permet d utiliser des cassettes normales de type CrO2 de type ou M tal de type 2 u Lecture d une face j FaceA q FaceB q Arr t p qFaceA q F...

Page 55: ...q LatoB q Arresto p q LatoA q LatoB u Reproducci n de un s lo lado j LadoA q LadoB q parada p q LadoA q LadoB Inserte una cinta de casete Pulse el bot n EJECT L para abrir el campartimento inserte un...

Page 56: ...d 0004 D Pitch Control You can change the tape speed during playback allowing you to change the pitch of the reproduced sound By turning the PITCH CONTROL to the right the tape speed becomes faster re...

Page 57: ...contador de cinta indica un n mero entre 9996 y 0004 D Geschwindigkeitsfeineinstellung Bei Wiedergabe kann die Bandgeschwin digkeit feineingestellt werden um Klangabweichungen zu kompensieren oder bew...

Page 58: ...ecting LINE the external signal from LINE IN is selected as a source 5 S lectionnez le mode d inversion souhait 4 S lectionnez ON ou OFF de DOLBY NR 3 Load a recordable cassette tape You can use norma...

Page 59: ...hlie en Sie diese erneut mittels Klebeband 2 Das Ger t einschalten 1 Scegliere il modo Reverse desiderato 4 Selezionare ON o OFF di DOLBY NR 3 Agire sull interruttore SOURCE per selezionare la sorgent...

Page 60: ...Sens Inverse h l enregistrement ne se fera que sur la seconde face de la cassette Pour interrompre l enregistrement ap puyer sur la touche PAUSE Appuyer une deuxi me fois pour relancer la bande Pour...

Page 61: ...nte se grabar la cara B Para parar la grabaci n temporalmente presione el bot n PAUSE Para reiniciar el transporte de cinta presione el bot n PAUSE o el bot n PLAY hoy Para parar la grabaci n presione...

Page 62: ...g hold the REC MUTE button depressed for longer than 4 seconds A blank space will be left as long as the button is pressed Release the button to enter the Record Pause mode To restart recording press...

Page 63: ...e il tasto REC MUTE Il movimento del nastro continua e viene registrato uno spazio in bianco di circa 4 secondi mentre l indicazione lampeggia Il deck passa poi automaticamente alla posizione di pausa...

Page 64: ...disc and then press the STOP button to stop the playback Load a recordable cassette Select ON OFF of the DOLBY NR system Select the desired reverse mode 5 4 3 2 1 Pour enregistrer d s le d but de la c...

Page 65: ...dr ckung aktivieren ON oder deaktivieren OFF Stellen Sie die gew nschte Reverse Betriebsart ein 5 4 3 2 1 Registrazione dall inizio del nastro Inserire il compact disc che si vuole copiare Selezionare...

Page 66: ...yer sur la touche STOP H Choisissez le sens de l enregistrement l aide de la touche PLAY houy 6 5 6 7 8 5 8 7 6 Press the CD DUBBING button CD to tape copying starts from the current tape position To...

Page 67: ...qLato BqArresto u Grabaci n de un s lo lado j p Lado AqLadoBqparada Die Taste CD DUBBING dr cken Die CD Kopieraufnahme wird an der vorgesehenen Bandstelle ausgel st Zum Aufnahmestopp die STOP Taste H...

Page 68: ...re encha n e des CDs et d une cassette Lorsque la fin du CD ou de la cassette est atteinte la lecture se poursuit automatiquement avec l autre support L appareil tant l arr t appuyez sur la touche CD...

Page 69: ...NT PLAY o POWER Durante la riproduzione di CD CD lampeggia sul display Durante la riproduzione di TAPE TAPE lampeggia sul display Il disco o la cassetta pu essere cambiata intanto che non viene riprod...

Page 70: ...older cannot be closed The buttons don t work eInsert a cassette tape securely Sound is distorted or noisy eClean and demagnetize the heads eSelect the correct DOLBY NR type according to how the tape...

Page 71: ...s de type normal ou chrome Si vous ne parvenez pas r tablir un fonctionnement normal d brancher le cordon d alimentation et le rebrancher Risque de condensation En cas de d placement de l appareil ou...

Page 72: ...die richtige Dolby NR Rauschunterdr ckung ein Aufnahmen sind nicht m glich eFalls die Kopierschutzlaschen einer Compact Kassette fehlen schlie en Sie die ffnungen mit einem St ck Klebeband eReinigen...

Page 73: ...ette di protezione alla ri registrazione della cassetta sono staccate coprire i fori con nastro adesivo ePulire e smagnetizzare le testine Il suono registrato non chiaro ePer registrare usare un nastr...

Page 74: ...No se puede cerrar el compartimento de cinta No funcionan los botones eInserte correctamente la cinta de casete No hay sonido Sonido distorsionado o de poca calidad eLimpie y desmagnetice los cabezal...

Page 75: ...75...

Page 76: ...0 Mexico Phone 525 581 5500 TEAC UK LIMITED 5 Marlin House Croxley Business Park Watford Hertfordshire WD18 8TE U K Phone 01923 819699 TEAC DEUTSCHLAND GmbH Bahnstrasse 12 65205 Wiesbaden Erbenheim Ge...

Reviews: