24
CONNECTING TO A COMPUTER
If you want to watch, play, share, edit, … the videos and photos you made you can do so by
connecting the Guardo Action Cam One to your computer!
•
Connect the micro USB cable to the Micro USB Port of the Guardo Action Cam One.
•
Connect the other end of the micro USB cable to the USB port of your computer.
•
The Guardo Action Cam One will turn ON automatically. If not, turn it on manually.
‘MSDC’ will now appear on the display.
•
On your PC a pop-up “removable disk window” (e.g. ‘D:’,‘E:’, …) will appear or you will
find an “extra disk” (e.g. ‘D:’,‘E:’, …) under ‘My Computer’ or ‘Explorer’ in case you have
a Windows PC or in ‘Finder’ in case you have a Mac
•
C
lick on the ‘DCIM’ folder to open it
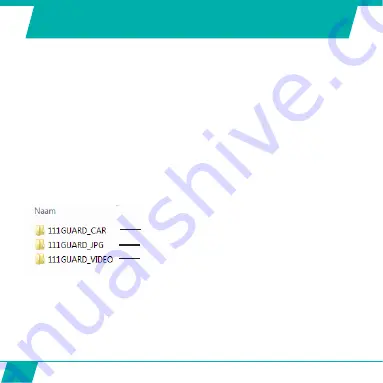
The following folders will be shown:
Copy/move the files to your hard disk or external disk to open, play, share or edit them!
Format Micro SD card:
you can use your computer to format your Micro SD card inside
the camera! On a Windows computer: Right-click the removable disk and choose ‘format’.
Format Micro SD card on Mac
: Open the ‘Disk Utility’ program: you can now format your
Micro SD card by clicking it in the left-hand pane and then clicking the ‘Erase’ tab.
Contains videos/photos made in dashcam mode
contains your photos
contains your videos
Summary of Contents for Guardo Action Cam One
Page 1: ...1 USER S MANUAL GB NL D FR ...
Page 5: ...5 2 3 4 5 6 7 13 9 14 15 16 25 20 1 12 11 10 8 ILLUSTRATIONS Illustration I ...
Page 6: ...6 17 19 21 18 22 23 24 2X 2X ...
Page 7: ...7 Illustration II Illustration III A Photo Mode B Video Mode C Playback mode 1 2 3 6 7 ...
Page 27: ...27 ...
Page 28: ...28 ...
Page 31: ...31 2 3 4 5 6 7 13 9 14 15 16 25 20 1 12 11 10 8 ILLUSTRATIES Illustratie I ...
Page 32: ...32 17 19 21 18 22 23 24 2X 2X ...
Page 33: ...33 Illustratie II Illustratie III A Foto modus B Video modus C Afspeelmodus 1 2 3 6 7 ...
Page 53: ...53 ...
Page 54: ...54 ...
Page 57: ...57 2 3 4 5 6 7 13 9 14 15 16 25 20 1 12 11 10 8 ABBILDUNGEN Abbildung I ...
Page 58: ...58 17 19 21 18 22 23 24 2X 2X ...
Page 59: ...59 Abbildung II Abbildung III A Fotomodus B Videomodus C Playback modus 1 2 3 6 7 ...
Page 79: ...79 ...
Page 80: ...80 ...
Page 83: ...83 2 3 4 5 6 7 13 9 14 15 16 25 20 1 12 11 10 8 ILLUSTRATIONS Illustration I ...
Page 84: ...84 17 19 21 18 22 23 24 2X 2X ...
Page 85: ...85 Illustration II Illustration III A Mode Photo B Mode Vidéo C Mode de Lecture 1 2 3 6 7 ...
Page 105: ...105 ...
Page 106: ...106 ...


