23
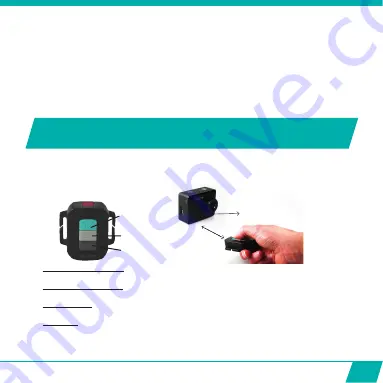
Power OFF Button
Photo Button
Video Button
Max distance
= 10 meters
Infrared signal reception eye
Note:
Only when you have heard the beep and the red LED Indicator (12) has flashed the
photo was really taken.
•
Picture in Video (PIV)
The Guardo Action Cam allows you to make photos while making a video recording!
o
Start recording a video as described above
o
Press the MENU Button (5) when you want to make the photo
o
‘Capture done’ will appear on the display to confirm your photo was taken!
•
Digital Zoom
The action cam allows you to zoom in and out with the up/down buttons (9) while
making a video recording.
BASIC OPERATION FROM REMOTE
CONTROL
USE REMOTE CONTROL WITH CAMERA
The remote control can be used for video recording, for taking pictures and for turning the
Guardo Action Cam One OFF.
•
Start video recording
: Aim the remote control to the camera’s infrared eye (7) and
press the Video Button once to start recording.
•
Stop video recording
: Aim the remote control to the camera’s infrared eye (7) and
press the Video Button once again to stop recording.
•
Take a photo
: Aim the remote control to the camera’s infrared eye (7) and press the
Photo Button once to make a photo.
•
Turn OFF
: Aim the remote control to the camera’s infrared eye (7) and press the
Power Button once to turn the camera off.
Note:
When using the remote control, the camera will shoot according to the last (manually) set settings.
Summary of Contents for Guardo Action Cam One
Page 1: ...1 USER S MANUAL GB NL D FR ...
Page 5: ...5 2 3 4 5 6 7 13 9 14 15 16 25 20 1 12 11 10 8 ILLUSTRATIONS Illustration I ...
Page 6: ...6 17 19 21 18 22 23 24 2X 2X ...
Page 7: ...7 Illustration II Illustration III A Photo Mode B Video Mode C Playback mode 1 2 3 6 7 ...
Page 27: ...27 ...
Page 28: ...28 ...
Page 31: ...31 2 3 4 5 6 7 13 9 14 15 16 25 20 1 12 11 10 8 ILLUSTRATIES Illustratie I ...
Page 32: ...32 17 19 21 18 22 23 24 2X 2X ...
Page 33: ...33 Illustratie II Illustratie III A Foto modus B Video modus C Afspeelmodus 1 2 3 6 7 ...
Page 53: ...53 ...
Page 54: ...54 ...
Page 57: ...57 2 3 4 5 6 7 13 9 14 15 16 25 20 1 12 11 10 8 ABBILDUNGEN Abbildung I ...
Page 58: ...58 17 19 21 18 22 23 24 2X 2X ...
Page 59: ...59 Abbildung II Abbildung III A Fotomodus B Videomodus C Playback modus 1 2 3 6 7 ...
Page 79: ...79 ...
Page 80: ...80 ...
Page 83: ...83 2 3 4 5 6 7 13 9 14 15 16 25 20 1 12 11 10 8 ILLUSTRATIONS Illustration I ...
Page 84: ...84 17 19 21 18 22 23 24 2X 2X ...
Page 85: ...85 Illustration II Illustration III A Mode Photo B Mode Vidéo C Mode de Lecture 1 2 3 6 7 ...
Page 105: ...105 ...
Page 106: ...106 ...


