17/ 42
Tensioner
Assembly
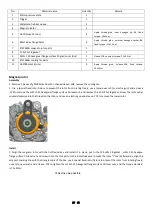
1. As shown in the picture, use a cross batch to remove the cross bolts and O-rings on the top of the tensioner, then use the
T-bar -8# to evenly loosen the tensioner fixing bolts diagonally, and remove the tensioner and the tensioner pad piece.
Inspection
1. When the top rod of the tensioner is normally extended, press the fixed rod of the tensioner by hand, if the top rod cannot
rebound, it is qualified;
2. Check that the O-ring is not scratched or damaged. If it is scratched or damaged, it needs to be replaced.
Tensioner installation
1. Tighten the tensioner ejector rod with a one-word batch
(rotate the one-word batch clockwise while holding the tensioner
ejector rod with your hands),
and tighten it when it reaches the highest point, and the ejector rod can be locked automatically.
Put the tensioner gasket into the tensioner and place it in the corresponding position of the cylinder, and tighten it with m6×22
bolts at a fixed torque with a torque of 1 2 ± 1.5N.m.
(tensioner spacers cannot be reused)
2. Rotate the ejector bolt counterclockwise with a flat batch, and after confirming that the ejector rod of the tensioner pops up,
put in the O-ring and the cross bolt to tighten.


