28/ 42
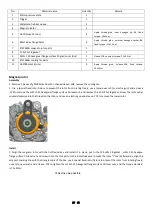
No.
Material name
Quantity
Remark
1
Stator pressure plate
1
2
Trigger
1
3
Waterproof rubber sleeve
1
4
Magneto stator
1
5
Gb70.1m6×25 (zinc
)
3
Apply thread glue, inner hexagon tip -5#, fixed
torque: 10±1n m
6
M6×16 hex flange bolts
3
Apply thread glue, external hexagon socket-8#,
fixed torque: 12±1.5n m
7
ZT1P58MJ magneto rotor parts
1
8
12.5×23×1.8 gasket
1
9
M12×1.25 hexagonal flange surface 10 grade nuts (zinc
)
1
Sleeve-17#, constant torque: 75± 5N·m
10
ZT1P58MJ cooling fan parts
1
11
Gb5789m6×16 (zinc
)
3
Apply thread glue, t-sleeve-10#, fixed torque:
10±1N.m
Magneto rotor
Assembly
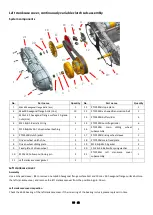
1. Remove 3 pieces of gb5789m6×16 with t-shaped sleeve -10#, remove the cooling fan,
2.
Use a special fixed rotor fixture to prevent the rotor from rotating freely, use a torque wrench (or electric gun) and a slee
ve
-17# to remove the m12×1.25 hexagonal flange surface 10-level nut, and remove the 12.5×23×1.8 gasket; screw the rotor puller
counterclockwise into the thread on the rotor, and use an electric gun and sleeve -17# to remove the lower rotor.
Install
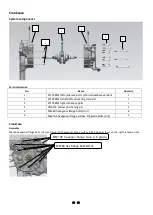
1. Align the magneto rotor with the half-round key and install it in place, put in the 12.5×23×1.8 gasket , m12×1.25 hexagon
flange surface 10-level nut and screw it into the thread, turn the rotor clockwise to make the rotor "t" mark afterwards, align the
adjacent marking line with the triangle mark of the box, use a special fixed rotor fixture to prevent the rotor from rotating freely,
use a torque wrench and a sleeve -17# to tighten the m12×1.25 hexagonal flange surface 10-level nuts, and the torque standard
is 75± 5N·m.
fit as close as possible


