background image

Illustrated Parts

Parts


Page 22

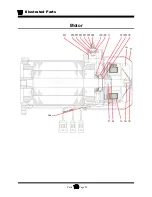
Motor

Summary of Contents for B0-248-48AC

Page 1: ...i n e s s Serial number Starting 171000 MANUAL MB 248 11 Operation Troubleshooting and Replacement Parts Manual Models Inlcuded B0 248 48AC B 2 48 B0 254 48AC B 2 54 Published 11 14 2006 Revision D E...

Page 2: ......

Page 3: ...parts or service should be obtained through your local dealer A dealer locator can be found on the Taylor Dunn website at www taylor dunn com If you do not have access to the internet you can call th...

Page 4: ...B2 48 With Dump Bed Option B2 10 Ambulance B2 48 with Steel Cab Foldaway 4 Passenger Seat and Stake Sides ET 3000 ET1 50 Full Size Truck P2 50 30 000 Pound Tow Tractor...

Page 5: ...ystem Troubleshooting 12 Chargers Illustrated Parts 13 Appendix A Special Tools 14 Appendix B Suggested Torque Values 15 Appendix C Brake Lining Handling Precautions 16 Taylor Dunn Model B0 248 48AC B...

Page 6: ...B2 48 With Stake Side Dump Bed Option SC1 00 Stock Chaser E4 55 Sit Down Tow Tractor C4 25 Sit Down Tow Tractor...

Page 7: ...t this manual 2 Who Should Read This Manual 3 Responsibilities 3 How To Use This Manual 4 Conventions 5 How to Identify Your Vehicle 6 B 2 48 and B 2 54 6 BT 2 48 7 BT 2 80 7 Taking Delivery of Your V...

Page 8: ...de Taylor Dunn has made every effort to include as much information as possible about the operation and maintenance of this vehicle Included in this manual are Vehicle Description Safety Rules and Gui...

Page 9: ...of the vehicle preoperational and operational checks on the vehicle and the reporting of any problems to service and repair personnel Of the Service Personnel The service personnel are responsible fo...

Page 10: ...to be performed on this vehicle It also includes various subjects that should be included in the operator and service training program Maintenance Service and Repair This section gives specific inform...

Page 11: ...treme care while performing the task or The symbol at the left and the bold text contained within a box denotes a Caution and is used to inform the reader that property damage may occur Be sure to exe...

Page 12: ...es as described in O S H A Standard Section 1910 178 Powered Industrial Trucks and with all applicable portions of the American National Standard for Personnel and Burden Carriers ANSI B56 8 Theese ve...

Page 13: ...result of shipping note the damage or problem on the bill of lading and file a claim with the freight carrier The claim must be filed within 48 hours of receiving the vehicle and its accessories Also...

Page 14: ...B2 48 With Stake Side Dump Bed Option SC1 00 Stock Chaser E4 55 Sit Down Tow Tractor C4 25 Sit Down Tow Tractor...

Page 15: ...5002 6 Combination Display 7 Seat Interlock Switch 8 Electrolyte Alarm Optional 8 Accelerator Pedal 9 Foot Brake Pedal 9 Steering 9 Directional Signals Optional 9 Hazard Light Switch Optional 9 Charge...

Page 16: ...d Batteries B 2 48 350 Amp Solid State Self Diagnostic AC Speed Control B 2 54 450 Amp Solid State Self Diagnostic AC Speed Control Dimensions 307 L X 114 W X 114 H Centimeters 121 L X 45 X 45 H Inche...

Page 17: ...s Do not tow this vehicle at more than 5 mph SAFETY RULES AND GUIDELINES It is the responsibility of the owner of this vehicle to assure that the operator understands the various controls and operatin...

Page 18: ...ual Proper operation of all vehicle controls A vehicle operation and driving test Driver Qualifications Only those who have successfully completed the Operator Training program are authorized to drive...

Page 19: ...tch to engage the reverse direction DO NOT SWITCH from forward to reverse or vice versa while the vehicle is in motion Make sure the vehicle is completely stopped before shifting The forward off rever...

Page 20: ...e horn switch is located on the right side of the instrument panel Depress the switch to sound the horn release it to turn it off 1 Headlight Switch The headlight switch is located on the top left of...

Page 21: ...travel in miles per hour Hour Meter Displays total time whole hours vehicle has been in operation Time is accumulated only while the vehicle is moving The example to the right indicates that the vehi...

Page 22: ...ases the braking action Steering The steering wheel and steering system are similar to an automobile To turn right turn the steering wheel clockwise To turn left turn the steering wheel counter clockw...

Page 23: ...the alarm and light will reset Charger Interlock The charger interlock is designed to disable the vehicle from being driven while the AC charger cord is plugged into a functioning power source The sea...

Page 24: ...ey switch while the vehicle is in motion unless the vehicle must be stopped in an emergency Turning the key switch off will immediately apply the park brake stopping the vehicle The abrupt stopping of...

Page 25: ...applied when the vehicle is stopped There is a parking brake bypass switch located on the right side of the control box see illustration Place this switch in the UP position to tow the vehicle see no...

Page 26: ...pd 15 Low battery warning is ON when battery is discharged below this level BDI Reset 80 Battery must be discharged below this value before the BDI will be allowed to reset Reset Volts 2 10 V Battery...

Page 27: ...speed Tow Decl LS 8 0 S Time to decelerate when below 20 of full speed Maintenance Meter Function Service Timer 0 H Refer to Maintenance Meter supplementary manual Speed Limits Max see warning 6 250...

Page 28: ...to turn the key switch OFF may result in damage to the vehicles electrical system New Battery Break in New batteries require a break in period of up to 40 cycles The batteries will not have their ful...

Page 29: ...arger There is a series of LED s on the faceplate of the charger that serve two functions 1 Status of charge The LED s will display an approximate percent of charge during the charging cycle Refer to...

Page 30: ...to Section Maintenance Service and Repair for battery maintenance information Do not interrupt the charging cycle When the charger is plugged in allow it to turn off before disconnecting Interrupting...

Page 31: ...Rules Page 17 SAFETY RULES AND OPERATING INSTRUCTIONS PERIODIC MAINTENANCE CHECKLIST NOTE A full page copy of the Periodic Maintenance Checklist is on the Vehicle Documentation CD under the Misc sub...

Page 32: ...Use on multiple shifts 2 Any deficiencies found during an inspection should corrected before the vehicle is returned to service 3 Battery water level should be inspected on a weekly schedule Daily Vi...

Page 33: ...TABLE OF CONTENTS General Maintenance Maintenance Guidelines 2 Troubleshooting Guide 3 Lubrication Chart 4...

Page 34: ...Do not use an open flame to check level or leakage of battery electrolyte Do not use open pans of fuel or flammable fluids for cleaning parts Only properly trained and authorized technicians should p...

Page 35: ...trol System Fault Speed Control System Overheated High Low Speed Switch in Low or wiring to the Switch is Faulty Low Speed Cutback Due to Maintenance Meter Trip optional Abnormal Noise Worn Drive Gear...

Page 36: ...2 Pedal Linkages 3 General Purpose Grease 3 Front Wheel Bearings 2 High Temperature Wheel Bearing Grease 4 King Pin 2 General Purpose Grease 7 Drive Drain Plug 1 8 Drive Level Plug 1 9 Drive Fill Plug...

Page 37: ...and King Pin 2 Adjust Front Wheel Bearings 3 Front Axle Removal and Installation 4 Removal 4 Installation 5 Front Axle Disassembly 6 Replace Front Wheel Bearings 7 Replace the King Pins and Bushings 9...

Page 38: ...rinding noise Any grinding noise may be an indication of worn or damaged wheel bearings NOTE Refer to the Replace Front Wheel Bearings section for information regarding the replacement of the wheel be...

Page 39: ...RINGS 6 Raise the front of the vehicle and support with jack stands 7 Remove the hub dust cap and cotter pin 8 While rotating the hub tighten the spindle nut to 30 ft lbs This seats the bearings 9 Bac...

Page 40: ...vehicle and support with jack stands 7 Remove both front wheels Refer to Tires and Wheels section for information regarding removing the front wheels 8 Tie up or support the front axle so it can not f...

Page 41: ...upport with jack stands 7 Install the front axle in reverse order of removal NOTE Use all new cotter pins NOTE Refer to the Replacing the Ball Joints section for information regarding the installing t...

Page 42: ...d king pin bushings Refer to the following sections for information regarding these procedures Replace the Steering Knuckle Replace the King Pins and Bushings NOTE The front axle does not have to be r...

Page 43: ...assembly from the hub Refer to Replace the Steering Knuckle for information regarding removing the steering knuckle 8 Remove the hub dust cap cotter pin and spindle nut 9 Remove the hub from the stee...

Page 44: ...to the Brakes section for information regarding the installation of the brake body 15 Lower the vehicle 16 Reconnect the main positive and negative cables at the batteries 17 Remove the blocks from b...

Page 45: ...ehicle Failure to use lifting and support devices of rated load capacity may result in severe bodily injury Failure to correctly broach or ream bronze bushings may result in steering difficulty and lo...

Page 46: ...teering knuckle or suspension arm Ream or broach bronze bushings to 1 25 0 001 10 Inspect the king pin for damage or wear If any damage or wear is noted then the king pin must be replaced 11 Reassembl...

Page 47: ...to the Brakes section for information regarding the removal of the brake body Do not remove the hydraulic brake line from the brake body If the brake line is removed then it will be necessary to bleed...

Page 48: ...y The rubber washer must compress slightly to create a seal for the grease NOTE Refer to Replace Front Wheel Bearings for information regarding proper tightening of the spindle nut 16 Install new cott...

Page 49: ...eering Gear 8 Replace the Steering Shaft 10 Replace the Steering Wheel 12 Replace the Steering Gear 13 Replace the Ball Joints Tie Rods and Drag Link 14 Replacing the Drag Link 16 Replacing the Tie Ro...

Page 50: ...heels so that they cannot turn from the straight ahead position 8 Disconnect the drag link from the pitman arm NOTE Refer to Replace the Ball Joints section for information regarding removing the ball...

Page 51: ...on the drag link 16 Untie the steering wheel and the front wheels 17 Reconnect the main positive and negative cables at the batteries 18 Rotate the steering wheel from a full left turn to a full right...

Page 52: ...g wheel or front wheels tied in the position may cause loss of control of the vehicle resulting in severe bodily injury and or property damage Front wheel alignment NOTE It is recommended to center th...

Page 53: ...between the lines at the front of the tires 12 Measure the distance between the lines at the rear of the tires 13 Adjust the tie rod so that the distance at the front and rear of the tires is the same...

Page 54: ...hicle resulting in severe bodily injury and or property damage Typical Ball Joint INSPECT BALL JOINTS NOTE A set of ball joints and or rod ends will wear at the same rate If a ball joint and or rod en...

Page 55: ...he blocks from behind the wheels 10 Release the parking brake and test drive the vehicle 1 Make sure the key switch is in the OFF position then remove the key 2 Place the forward reverse switch in the...

Page 56: ...ar for information regarding removing the steering gear 6 Raise the front of the vehicle and support with jack stands 7 Disconnect the drag link from the pitman arm NOTE Refer to Replace the Ball Join...

Page 57: ...ng gear is rotated through its centered position 14 While holding the gear lash adjusting screw so that it cannot turn tighten the gear lash adjusting screw jam nut 15 Reconnect the main positive and...

Page 58: ...rminals off of the wires 7 Remove the steering wheel NOTE Refer to Replace the Steering Wheel section for information regarding removing the steering wheel 8 Remove the upper steering shaft bushing or...

Page 59: ...d to property damage and or severe bodily injury 11 Remove the steering shaft from the vehicle 12 Lightly grease the input shaft splines steering wheel splines and the upper steering shaft bushing 13...

Page 60: ...itch and disconnect the wires from the switch 7 Remove the steering wheel nut 8 Using a steering wheel puller remove the steering wheel 9 Position the front wheels in the straight ahead position 10 Li...

Page 61: ...e the steering shaft Refer to Replace the Steering Shaft section for information regarding removing the steering shaft 8 Remove the pitman arm using a pickle fork NOTE On some vehicle configurations i...

Page 62: ...ront of the vehicle and support with jack stands 7 Loosen the rod end jam nut or clamp on the steering sleeve 8 Remove the rod end nut 9 Remove the rod end from the steering arm HINT Count the number...

Page 63: ...pickle fork remove the ball joint from the steering arm 10 Remove the ball joint from the steering sleeve HINT Count the number of turns required to remove the ball joint from the sleeve This will ma...

Page 64: ...ends from the steering knuckle and pitman arm NOTE Refer to the Replacing the Ball Joints section for information regarding the removal of the ball joints or rod ends 8 Remove the drag link as an asse...

Page 65: ...ign the front wheels NOTE Refer to the Steering section for information regarding realignment of the front wheels 11 Lower the vehicle 12 Reconnect the main positive and negative cables at the batteri...

Page 66: ...and jack stands of adequate capacity to lift and support the vehicle Failure to use lifting and support devices of rated load capacity may result in severe bodily injury 6 Raise the front of the vehi...

Page 67: ...fer to the illustration at the end of this section for a blown up view of the steering gear assembly 1 Center the steering gear A Turn the steering shaft all of the way in one direction B While counti...

Page 68: ...10 Remove the ball nut from the worm shaft 11 Thoroughly clean and inspect all parts for signs of corrosion damage or wear and replace as required Reassembly 1 Lightly lubricate all parts before reass...

Page 69: ...Rotate the worm shaft to center the ball nut in the housing 13 Place a new gasket onto the housing and install the assembled pitman shaft side cover onto the housing using two of the three mounting bo...

Page 70: ...Maintenance Service and Repair Steering Page 22 Exploded View of Steering Gear...

Page 71: ...he Service Brakes 4 Two or Four Wheel Hydraulic Disc Brakes 4 Check Master Cylinder Fluid 5 Bleed the Brake System 6 Flush the Brake System 8 Replace Front Disc Brake Pads 9 Replace Rear Brake Pads 11...

Page 72: ...pad If the brake pad lining is 1 16 inch or less then the brake pad must be replaced It is recommended to replace the left and right side brake pads as a set Current Taylor Dunn brakes are asbestos f...

Page 73: ...d its service limits then the front hub must be replaced Refer to Front Axle Servicefor information on replacing the front hub NOTE Depending on the rear axle configuration the rear brake rotor may be...

Page 74: ...lack of braking power the entire brake system should be inspected INSPECT THE AUTOMATIC PARKING BRAKE The parking brake is located inside of the motor and is electromagnetically operated To inspect o...

Page 75: ...shield when working with or around brake fluid SKIN CONTACT Flush area immediately with water for several minutes If a rash or skin irritation develops get medical attention immediately EYE CONTACT I...

Page 76: ...area immediately with water for several minutes If a rash or skin irritation develops get medical attention immediately EYE CONTACT Immediately flush the eye with water for 15 minutes and call physic...

Page 77: ...low enough to allow air to enter the brake lines If air enters the brake lines during the bleeding process then you will have to start again from the beginning 14 Repeat the above steps until you are...

Page 78: ...regarding removing the wheels 10 Remove the wheel cylinders from each axle Refer to Replace the Wheel Cylinder section for information regarding removing the wheel cylinder 11 Attach a clear hose to...

Page 79: ...ining asbestos Since this possibility exists all brake parts should be handled as if they contain asbestos Refer to appendix C for recommended handling precautions NOTE Installing new brake pads will...

Page 80: ...s found 14 Install new spacer bushings in the mounting bracket 15 Install new brake pads in reverse order Torque the mounting bolts to 11 ft lbs 16 Repeat this procedure for the other wheel 17 Install...

Page 81: ...arts should be handled as if they contain asbestos Refer to appendix C for recommended handling precautions Always use a lifting strap hoist and jack stands of adequate capacity to lift and support th...

Page 82: ...ound 15 Install new spacer bushings in the mounting bracket 16 Back off the parking brake adjustment wheel park brake only 17 Install new brake pads in reverse order Torque the mounting bolts to 11 ft...

Page 83: ...t or rear Current Taylor Dunn brakes are asbestos free However there is the possibility that the original brakes were replaced with aftermarket parts containing asbestos Since this possibility exists...

Page 84: ...12 Disconnect the brake hose from the brake body 13 Install the new brake body assembly in reverse order Use teflon tape thread sealant on the brake hose fitting Torque the brake body bolts to 11 ft...

Page 85: ...shield when working with or around brake fluid SKIN CONTACT Flush area immediately with water for several minutes If a rash or skin irritation develops get medical attention immediately EYE CONTACT I...

Page 86: ...Bleed the brakes refer to Bleed the Brakes section for information regarding bleeding the brakes 16 Reconnect the main positive and negative cables at the batteries 17 Remove the blocks from behind t...

Page 87: ...scard Remove the rubber boot Depress the plunger and remove the plunger spring clip retainer Pull the plunger and all seals out of the master cylinder bore Thoroughly clean inspect and replace parts a...

Page 88: ...TAYLOR DUNN...

Page 89: ...ear Hub or Rotor 5 Removing and Installing the Rear Axles Disc Brakes 6 Transmission Assembly 8 Remove and Install 8 Disassembly and Reassembly of the Primary Reduction Gear Case 9 Disassembling the 3...

Page 90: ...rt the vehicle Failure to use lifting and support devices of rated load capacity may result in severe bodily injury 6 Place a level on top of the motor Raise the rear of the vehicle until the level in...

Page 91: ...of the level plug opening Refer to the Lube Chart section for information regarding type of oil 11 Replace the fill plug 12 Reconnect the main positive and negative cables at the batteries 13 Remove t...

Page 92: ...hand operated park brake set the brake 4 Place blocks under the front wheels to prevent vehicle movement 5 Disconnect the main positive and negative cables at the batteries 6 Remove the wires from the...

Page 93: ...the tire wheel assembly 8 Remove the axle hub bolt and washer and remove the hub from the axle 9 Remove the outer brake pad Refer to section Brake Service for information regarding removing the brake...

Page 94: ...e batteries Always use a lifting strap hoist and jack stands of adequate capacity to lift and support the vehicle Failure to use lifting and support devices of rated load capacity may result in severe...

Page 95: ...They are intended for one time use only If removed they must be replaced Reusing the original bolts could cause loss of brakes resulting in severe bodily injury and or property damage Refer to sectio...

Page 96: ...ables from the spring axle mounting brackets and brake arms 7 Disconnect the wiring from the motor 8 Disconnect the hydraulic brake lines from the left and right brake bodies 12 Reinstall the drive in...

Page 97: ...5 Disconnect the main positive and negative cables at the batteries 7 Place a drain pan under the gear case that is capable of holding four quarts of oil and drain the oil from the front gear case 8...

Page 98: ...the output gear from the pinion shaft NOTE If necessary remove the seal from the input shaft bore at this time 15 Mark the gear case position in relation to the 3rd member housing so that it will be r...

Page 99: ...the front flange on the 3rd member and gear case cover NOTE Pack the motor seal with non acetic based grease 20 Fill the differential with oil NOTE Refer to Changing the Differential Oil for informati...

Page 100: ...on on removing the drive from the vehicle 8 Place a drain pan under the gear case that is capable of holding four quarts of oil and drain the oil from the front gear case and 3rd member 9 Place the 3r...

Page 101: ...adjusting nut from the side plate 14 Turn the side plate over and remove the carrier bearing race from the side plate 15 Remove the differential assembly from the 3rd member housing 16 Remove the carr...

Page 102: ...front bearing from the input shaft NOTE The input shaft may have to be driven out to perform this procedure 19 Remove the input shaft s shims and spacer 20 Remove the pinion shaft from the 3rd member...

Page 103: ...carrier bearing race ring nut so that the ring gear is not in binding against the pinion gear 6 Remove the differential assembly NOTE Do not allow the ring nut to rotate 7 Remove the pinion gear and...

Page 104: ...ions 15 Check the gear lash between the ring and pinion gears The gear lash should be 0 005 to 0 007 inches 16 Adjust the gear lash if needed by tightening or loosening the carrier bearing race ring n...

Page 105: ...gear case axles and housings motor and install the complete drive onto the vehicle 20 Fill the drive with oil Refer to the Lube Chart section for information regarding type of oil Refer to Change Oil...

Page 106: ...inion bearing 3 Install the main gear onto the pinion shaft and torque the pinion nut to 154 169 ft lbs 4 Measure the torque required to rotate the pinion shaft in the housing 5 The torque required to...

Page 107: ...him mm where DV The number on the face of the pinion gear A The distance in millimeters from the face of the pinion gear to the top of the inner pinion bearing race see below B 54 C The number on the...

Page 108: ...Maintenance Service and Repair Transmission Page 20 NOTE Values shown are for reference only C D...

Page 109: ...TABLE OF CONTENTS Suspension Replace the Rear Springs 2 Replace the Front Springs 3 Replace the Spring Bushings 4 Replace the Shocks 5...

Page 110: ...d as a set HINT In most vehicles it will be easier if the springs are replaced one at a time 6 Raise the rear of the vehicle and support with jack stands 7 Tie up or support the rear axle so it cannot...

Page 111: ...replaced one at a time 6 Raise the front of the vehicle and support with jack stands 7 Tie up or support the front axle so it cannot fall out of the vehicle 8 Unbolt the spring from the front axle bea...

Page 112: ...he Front Springs section for information regarding removing the front springs 8 If the vehicle is equipped with spring hangers remove the spring hanger bolt from the vehicles frame 9 Remove the spring...

Page 113: ...e is seen then the shock must be replaced B Inspect the upper and lower shock bushings If any signs of damage or wear are seen then the shock must be replaced 9 Install the shock in reverse order 10 L...

Page 114: ...TAYLOR DUNN...

Page 115: ...TABLE OF CONTENTS Tire Inflation 2 Tire Inspection 2 Replace the Tire Wheel 3 Repair the Tire pneumatic 4 Replace the Tire pneumatic 5 Tires and Wheels...

Page 116: ...tions available with varying tire pressures Refer to the side wall of your tire for information regarding the tire pressure for your tires The illustration to the right is an example of the side wall...

Page 117: ...em 11 Inspect the tread and side walls for debris in the rubber that could lead to a puncture If any debris is found it should be removed and the tire inspected for a leak 1 Make sure the key switch i...

Page 118: ...severe bodily injury and or property damage REPAIR THE TIRE PNEUMATIC NOTE To properly repair a puncture the tire must be removed from the wheel Refer to Replace the Tire section for information on r...

Page 119: ...eplacement should only be performed by personnel trained in tire replacement The tire replacement procedure will be unique to the type of replacement equipment being used Refer to the instructions pro...

Page 120: ...TAYLOR DUNN...

Page 121: ...LE OF CONTENTS Cleaning 2 Testing 3 Watering 5 Charging 6 Replacing 6 volt batteries only 7 Moist Charge Batteries 9 Storage and Returning to Service 10 Storage 10 Returning to Service 11 Battery Serv...

Page 122: ...rinse thoroughly with clear water DO NOT get any of the solution into the battery cells 8 Reconnect the batteries remove the blocks from the wheels and test drive Explosive mixtures of Hydrogen gas ar...

Page 123: ...h or charge battery in an area where open flames including gas furnace or water heater pilots sparks cigarettes or any other sources of combustion are present Always provide ample ventilation in rooms...

Page 124: ...mber77 200 00 hydrometer check and record the specific gravity of each cell in the battery pack If after charging none of the cells exceed a hydrometer reading of 1250 then there may be a fault in the...

Page 125: ...ject onto the battery A conductive object that comes in contact with the battery terminals will initiate a short circuit of the battery This could cause the battery to explode resulting in severe bodi...

Page 126: ...ative cables at the batteries CHARGING Refer to Charging Your Vehicle in section Safety Rules and Operating Instructions 6 Clean the batteries Refer to Cleaning the Batteries section for information o...

Page 127: ...tion are present Always provide ample ventilation in rooms where batteries are being charged Failure to do so may result in severe property damage and or serious A battery is a live electrical source...

Page 128: ...icle 11 Inspect the battery compartment for signs of corrosion 12 If minimal signs of corrosion are seen then the damaged paint should be stripped off and the entire battery compartment prepped and re...

Page 129: ...n rooms where batteries are being charged Failure to do so may result in severe property damage and or serious A battery is a live electrical source It cannot be disconnected or neutralized Do not dro...

Page 130: ...E AND RETURNING TO SERVICE Storage Thoroughly clean the batteries and battery compartment Refer toCleaning in this section for information regarding cleaning the batteries Check the electrolyte level...

Page 131: ...that comes in contact with the battery terminals will initiate a short circuit of the battery This could cause the battery to explode resulting in property damage and or bodily injury Battery electro...

Page 132: ...TAYLOR DUNN...

Page 133: ...le when printed at this size A full size diagram 22 x 16 is included on the CD in PDF format You can access the diagram from a button on the CD menu The diagram is SCH 00007 for vehicles with 12 volt...

Page 134: ...TAYLOR DUNN...

Page 135: ...Control System Diagnostics TABLE OF CONTENTS Test Equipment Required 2 Important Notes and Instructions 2 Status LED Code Table 3 Throttle Module Test 6 Rev C...

Page 136: ...vehicle exhibits intermittent problems it must be in the failed mode for troubleshooting If it is running normally when the testing is done then the problem will not be identified DURING ALL TESTS or...

Page 137: ...Failed Shutdown of main contactor Shutdown of motor Shutdown of EM brake 1 External load attached to controller B terminal Possible non factory installed device 15 Controller Severe Undertemp Shutdow...

Page 138: ...ng 32 EM Brake Open Short Shutdown Driver 2 Shutdown Throttle Full brake 3 Faulty motor brake 4 Faulty wiring 33 Coil3 Driver Open Short Shutdown driver 3 1 See note Not used If fault occurs then chec...

Page 139: ...down EM bake 1 May occur when adjusting parameters Cycle key switch to clear fault 68 VCL Runtime Error Shutdown main contactor Shutdown motor Shutdown EM bake Shutdown Throttle Shutdown interlock Shu...

Page 140: ...y lamp is ON then the analyzer battery should be replaced Additional information regarding the analyzer can be found in the instructions provided with the analyzer D0 110 53 Disconnect both of the bat...

Page 141: ...4 Important Notes and Instructions 4 Troubleshooting for Built in Charger 5 Troubleshooting for Portable Charger 8 Testing The Timer Relay 9 Testing the Interlock Relay 10 Turn the Key switch OFF BEF...

Page 142: ...urrent state of charge when it is plugged in it assumes that the batteries require charging when it is connected For this reason it is recommended to discharge the batteries approximately 50 1175 1200...

Page 143: ...efore connecting the charger The electrolyte in the batteries is too high boil over The electrolyte in the batteries is too low excessive gassing or sulfur smell To test the charger to see if it is tu...

Page 144: ...than 80 discharged as per hydrometer reading The battery voltage must be above approximately 65 of the chargers rated DC voltage If the batteries are below approximately 65 of the chargers rated DC vo...

Page 145: ...r has a bad connection Stop here and repair the problem Slide the insulators back onto the connectors on the two 10 gauge wires Slide the insulators off the connectors on the two 14 gauge wires Re Con...

Page 146: ...re continuing Connect a 2k ohm resistor across the capacitor terminals for 10 seconds Do not touch the capacitor terminals with your hands The resistor should be held with a pair of insulated pliers F...

Page 147: ...mer Relay Test Stop here and repair the problem Test the AC voltage across the transformer primary circuit The transformer primary consists of the two solid wires with the brown fiber insulator that a...

Page 148: ...blem Remove the charger cover and perform the following tests 1 Inspect the internal wiring of the charger and repair as required 2 Check the continuity of both fuse links and replace if bad 3 Disconn...

Page 149: ...f the charger If it is less than the rated AC voltage of the charger then the timer relay is bad Stop here and repair the problem Test the AC voltage across the transformer secondary circuit The volta...

Page 150: ...here and repair the problem 9 Connect the charger to a working AC power source The charger should turn on If the charger does not turn on then their may be a problem with the AC power source or the A...

Page 151: ...st Equipment Required for Troubleshooting 4 Important Notes and Instructions 4 Status LED Error Code Table 5 Troubleshooting 6 Turn the Key switch OFF BEFORE disconnecting the batteries Disconnecting...

Page 152: ...ses the charger current while holding the batteries at the terminal voltage until the charging cycle is complete The charger faceplate has three status LED s that monitor the charging status Refer to...

Page 153: ...eter and clamp on DC ammeter monitor the battery voltage and current during the charging cycle The charging current should remain within 10 of the DC output current see previous page until the battery...

Page 154: ...od working condition Make sure that the AC voltage at the electrical socket is the same as the AC voltage on the charger nameplate Make sure the batteries are in good condition If the charger exhibits...

Page 155: ...arger cooling fins and clean as required 4 Input or Output over current Charger will automaticaly correct for this condition and restart Note If only the 100 LED is flashing and all others are OFF the...

Page 156: ...g current will be reduced and will taper off until the batteries are fully charged Perform the following if the charger does not turn on 5 Disconnect the charger from the AC source 6 Remove the charge...

Page 157: ...ing Cycle 4 Status Light Error Code Table 5 Troubleshooting 6 Rev C Turn the Key switch OFF BEFORE disconnecting the batteries Disconnecting the batteries with the key switch ON may corrupt the contro...

Page 158: ...here are no internally serviceable components in the charger If the charger has failed then it must be replaced DEFINITIONS Volts Per Cell Voltage for each cell in a battery pack for example one 6 vol...

Page 159: ...ge the charger decreases the charger current while holding the batteries at the terminal voltage until the charging cycle is complete The charging cycle is complete when the current is down to A1 On t...

Page 160: ...ng off due to that the charger has restarted Fully test the battery pack before assuming that the charger is not turning off or running too long A charger could turn off in less than 12 hours but stil...

Page 161: ...charger Battery voltage must be less than 33 7v 36v charger Battery voltage must be less than 43 2v 48v charger Battery voltage must be less than 57 6v 4 Overheated Inspect for dirt or debris on the c...

Page 162: ...e reduced and will taper off until the batteries are fully charged The batteries are fully charged when the charging current is down to A1 If the charger does not turn on there are no faults and the P...

Page 163: ...trument Panel Starting Serial 179502 28 Speed Control Panel 30 Wire Harnesses 30 Resetting the Maintenance Meter Function 31 Miscellaneous Electrical 32 Lighting 34 Lestronic Charger page 1 36 Lestron...

Page 164: ...Illustrated Parts Parts Page 2 Front Axle...

Page 165: ...Illustrated Parts Parts Page 3 Front Axle ITEM PART DESCRIPTION QTY 15 049 71 Axle Beam B 2 48 BT 2 48 B 2 54 1 15 050 76 Complete axle assembly 1 See following pages for component breakdowns...

Page 166: ...Illustrated Parts Parts Page 4 Steering Knuckle...

Page 167: ...43 Bushing 2 10 80 309 12 Thrust Bearing 2 11 45 338 00 Grease Seal 2 12 80 017 00 Tapered Bearing 4 13 80 103 00 Tapered Bearing Race 4 14 12 158 10 Wheel Hub W Rotor incl 1 12 1 11 1 13 2 15 88 228...

Page 168: ...Illustrated Parts Parts Page 6 Steering Linkage...

Page 169: ...SCRIPTION QTY 1 18 041 05 Tie rod B 2 48 B 2 54 BT 2 48 1 2 86 510 00 Ball joing clamp 4 3 86 501 98 Ball joing left 2 4 86 501 99 Ball joint right 2 5 88 527 11 1 8 x 1 Cotter pin 4 6 18 057 11 Drag...

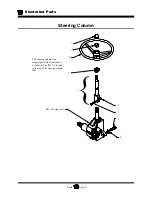
Page 170: ...rated Parts Parts Page 8 Steering Column Ref Steering Gear 8 9 The steering column is an integral part of the frame and is not shown Part ID 5 is located in the top of the steering column tube 7 4 3 6...

Page 171: ...2 Hex bolt grade 8 1 4 88 089 84 5 16NF Hex lock nut grade C 1 5 32 248 10 Upper bushing 1 6 20 031 65 Steering shaft assembly incl 3 and 4 1 7 19 011 25 Steering wheel cap 1 8 88 128 62 7 16 Split l...

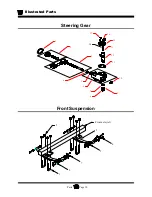
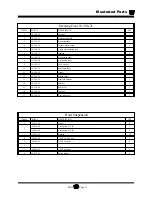
Page 172: ...Illustrated Parts Parts Page 10 Steering Gear 1 2 3 4 7 8 Front axle ref 5 9 1 0 1 5 1 3 1 7 1 2 1 1 2 3 1 4 1 6 4 1 6 8 7 5 Front Suspension...

Page 173: ...9 18 308 81 Lock washer 1 10 18 308 79 Seal input shaft 1 11 18 308 82 Gasket 1 12 18 308 76 Pitman shaft 1 13 18 308 75 Gear lash adjuster 1 14 18 308 85 Shim kit 1 15 18 308 84 Side cover 1 16 18 3...

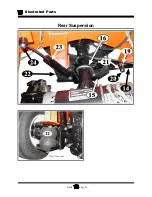
Page 174: ...Illustrated Parts Parts Page 12 Rear Suspension View from rear...

Page 175: ...5 510 17 Leaf spring 2 15 16 861 46 Spring mounting plate left 1 16 861 47 Spring mounting plate right 1 16 96 114 00 U bolt 4 88 159 84 1 2NC Nylon lock nut 8 18 19 96 103 00 U bolt 2 20 88 149 81 1...

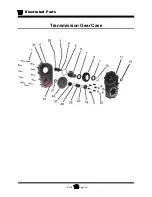
Page 176: ...Illustrated Parts Parts Page 14 Transmission Gear Case...

Page 177: ...1 12 GT 72019 Seal 1 18 GT 71979 Bearing 1 21 GT 3273633 Pinion nut 1 23 See Note 1 previous page Spacer 1 24 GT 3287453 Output gear 30 1 0 or 1 GT 3287463 Output gear 24 1 0 or 1 GT 3287473 Output ge...

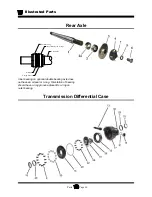
Page 178: ...al Case Rear Axle Inner bearing on optional double bearing axle does not have an oil seal or o ring Orientation of bearing should have o ring groove adjacent to o ring on outer bearing Axle Shaft Inne...

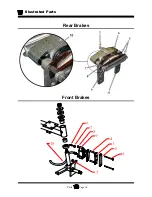
Page 179: ...ART DESCRIPTION QTY 1 41 154 20 Axle shaft single bearing 2 41 154 25 Axle shaft double bearing 2 2 80 505 20 Bearing 2 2a 80 505 30 Bearing for double bearing axle 2 3 41 490 11 Disc brake rotor 2 4...

Page 180: ...Illustrated Parts Parts Page 18 Rear Brakes Front Brakes...

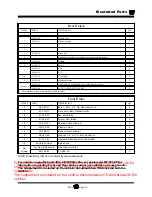
Page 181: ...Brake 4 4 41 348 52 Spacer Disc Brake 4 5 32 240 41 Bearing TeflonR Coated 4 6 99 588 00 Bleeder screw 2 7 99 588 01 Bleeder screw adapter 2 8 88 069 82 Locknut 1 4 NC Gr 8 Do Not Reuse 4 9 41 351 30...

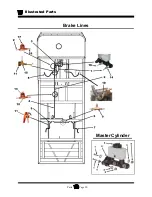
Page 182: ...Illustrated Parts Parts Page 20 Brake Lines Master Cylinder...

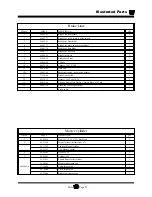
Page 183: ...e light switch regen switch adaptor 2 13 71 110 00 Brake Light Switch 1 14 99 575 32 Adaptor 3 16T x M10 1 0 2 15 99 559 00 T Fitting Single Male Flare to 2 Female Flare 3 16 Tube 1 16 99 603 74 Brake...

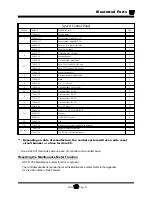
Page 184: ...Illustrated Parts Parts Page 22 Motor...

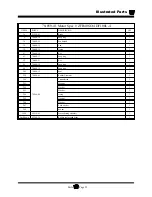
Page 185: ...ring 1 41 70 400 16 Key 1 42 70 400 17 Snap ring 1 52 70 400 21 Key 1 96 70 400 18 Snap ring 1 98 70 400 19 Snap ring 1 203 70 400 13 Seal 1 224 70 400 09 Rubber Grommet 2 206 70 260 00 Terminal stud...

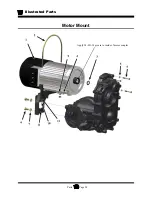
Page 186: ...Illustrated Parts Parts Page 24 Motor Mount Apply 94 421 34 grease to inside of motor coupler...

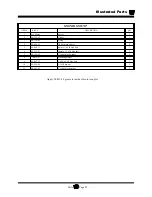
Page 187: ...88 068 62 1 4 Split lock wahser 4 5 89 060 11 6mm x 1 0 x 50 Hex bolt 3 6 89 111 27 10mm x 1 5 x 20 Hex bolt 2 7 88 128 62 7 16 Split lock washer 2 8 70 456 03 Mounting bracket 1 9 88 067 17 1 4NC x 1...

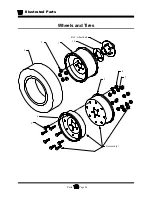
Page 188: ...Illustrated Parts Parts Page 26 Wheels and Tires Ref wheel hub 1 2 5 assembly 4 3 6 7 8 9 10...

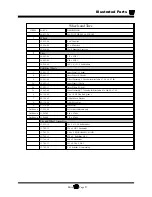
Page 189: ...8 3a 12 042 12 Inner Wheel 12 bolt 4a 12 042 13 Outer Wheel 12 bolt 5a 12 042 00 Wheel Assembly 3 75 bead width includes 3a 4a 6 7 8 6 88 110 09 3 8 x 3 4 NF Hex Bolt grade 5 7 88 109 62 3 8 Split Lo...

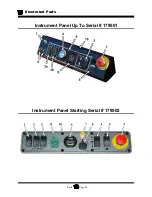
Page 190: ...Illustrated Parts Parts Page 28 Instrument Panel Up To Serial 179501 Instrument Panel Starting Serial 179502...

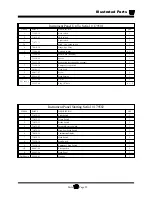
Page 191: ...mergency stop switch 1 8 94 304 11 Dash panel 1 9 88 817 07 Screw 6 10 02 546 02 Dash housing 1 Not shown 97 211 20 U Nut 2 95 313 00 Plug 1 2 hole 0 1 2 Instrument Panel Starting Serial 179502 ITEM P...

Page 192: ...s Parts Page 30 Speed Control Panel B 2 48 shown Wire Harnesses PART DESCRIPTION QTY 75 153 08 Dash harness 1 75 153 04 Cable Spy Glass 75 153 07 Main control h1arness 1 75 153 05 60 Control panel 1 7...

Page 193: ...Circuit breaker B 10A 1 11 72 501 42 Line contactor B 2 48 1 71 210 13 Line contactor B 2 54 1 12 79 840 20 Circuit breaker B 20A 1 13 88 818 06 8 x 1 2 Screw 10 14 88 060 14 1 4 X 1 1 2 NC HEX HD SCR...

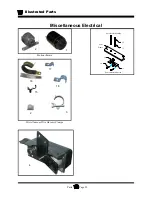
Page 194: ...Illustrated Parts Parts Page 32 Miscellaneous Electrical Seat Interlock Switch Accelerator Module 10 14 13 11 12 Seat Frame 1 2 Motion Alarms Miscellaneous Wire Harness Clamps 2 3 17 16 15 18 4...

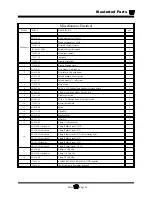
Page 195: ...itch 2 7 88 069 81 1 4 NC Hex Nylon Locknut Horn Switch 2 8 71 111 00 Brake Light Switch 1 9 88 045 06 10 32 x 1 2 Machine Screw brake light switch 2 10 71 102 10 Seat interlock Switch 1 11 85 030 00...

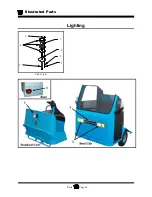
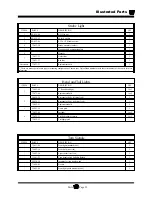
Page 196: ...Illustrated Parts Parts Page 34 Lighting Stobe Light 4 1 2 3 5 6 7...

Page 197: ...nformation Head and Tail Lights ITEM PART DESCRIPTION QTY 1 72 005 00 5 Round head light 1 or 2 72 072 00 Replacement bulb 1 or 2 2 94 050 10 Rectangular light left steel cab 1 94 050 11 Rectangular l...

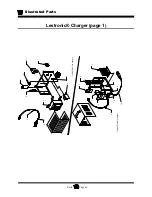
Page 198: ...Illustrated Parts Parts Page 36 Lestronic Charger page 1 6 8 5 4 3 7 11 1 2 8 3 4 5 10 7 6 2 1 8 9 Typical Built In charger Typical Portable charger...

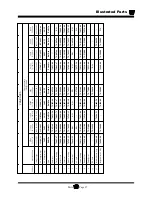
Page 199: ...79 730 00 79 566 10 76 200 00 22640 79 303 20 36LC40 8ET 150 60 16 36 40 Built In 79 852 00 79 805 67 79 808 00 79 902 00 79 749 10 S O 79 831 10 79 530 00 79 809 50 76 200 00 11860 79 304 65E 36LC25...

Page 200: ...Illustrated Parts Parts Page 38 Lestronic Charger page 2 6 8 5 4 3 7 11 1 2 8 3 4 5 10 7 6 2 1 8 9 Typical Built In charger Typical Portable charger...

Page 201: ...31 10 79 531 00 79 530 00 S O 76 200 00 13110 79 301 10 24LC25 8ET 115 60 9 24 25 Portable 79 851 10 79 805 64 79 808 10 79 902 00 S O S O S O 79 831 00 79 532 00 79 530 00 79 566 10 76 200 00 12750 7...

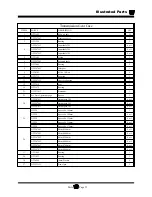
Page 202: ...al part of the charger When replacing the charger do not cut and splice the AC cord Cutting the AC cord will void the charger warranty NOTE The Signet model HBS series charger replaces all previous Si...

Page 203: ...41 Portable Charger Wiring PART DESCRIPTION QTY 75 107 10 HRNSS PORTABLE LESS CHRGER 1 JF3 86181 00 00 RECEPTACLE W INTERLOCK 1 90157 05M19 00 Mounting hardware for receptacle 2 92907 05100 00 4 92907...

Page 204: ...Illustrated Parts Parts Page 42 Batteries NEG POS NEG POS 3 4 5 6 7 8 1 NEG POS NEG POS NEG POS NEG POS NEG POS NEG POS 12 Volt Negative tap Main Positive Main Negative 1 2...

Page 205: ...te requires special charger 3 50 243 10 Battery rod 4 50 250 00 Battery hold down 5 88 088 66 Flat washer tin lead plated 6 88 069 81 1 4NC Nylon lock nut 7 88 081 12 5 16NC x 1 Square bolt stainless...

Page 206: ...Illustrated Parts Parts Page 44 Seat Cushions and Deck...

Page 207: ...kboard 55 x 41 fold away seat option 1 90 441 00 Deckboard 37 1 2 x 41 1 90 440 43 Diamond plate deck cover 32 3 4 x 41 1 90 440 50 Diamond plate deck cover 19 1 2 x 41 1 90 440 54 Diamond plate deck...

Page 208: ...Illustrated Parts Parts Page 46 Mirrors 92 202 00 Assembly Miscellaneous Frame Components...

Page 209: ...racket for 92 206 00 92 202 00 Mirror mountingr bracket assembly 1 92 202 21 Arm 1 2 92 202 23 Bracket 2 3 92 202 22 Joint 1 4 88 080 14 5 16NC x 1 1 2 Hex bolt 1 5 88 088 61 5 16 SAE flat washer 4 6...

Page 210: ...Illustrated Parts Parts Page 48 Decals...

Page 211: ...73 10 Vehicle identification 1 4 94 384 21 Brake warning 1 5 94 313 20 Safety warning 1 6 94 384 01 Not a motor vehicle 1 7 94 384 14 When leaving vehicle warning 1 8 94 301 41 Brake fluid 1 9 94 384...

Page 212: ...Illustrated Parts Parts Page 50 Cab Options Steel Cab Fiberglass cab...

Page 213: ...ield 1 90 850 00 Rear window 1 98 310 10 Rubber windshiel gasket by the foot 94 035 01 Plastic door trim by the foot 90 908 50 Filler panel 2 Fiberglass Windshield Frame illustration not available ITE...

Page 214: ...rts Parts Page 52 Door Options Steel Cab 1 2 4 5 6 7 8 9 10 11 12 14 15 16 16 17 18 19 20 21 22 23 25 26 27 28 Note Left Door Shown 24 3 13 Steel door detail Door Restraint 16 13 Door frame Cab Door f...

Page 215: ...011 66 Kit Cab Door Left Specify Color includes 10 11 12 1 91 011 68 Kit Cab Door Left Orange includes 10 11 12 1 91 011 67 Kit Cab Door Right Specify Color includes 10 11 12 1 91 011 69 Kit Cab Door...

Page 216: ...Illustrated Parts Parts Page 54 3 8 9 6 7 5 4 2 1 Typical door assembly Door Options Fiberglass Cab...

Page 217: ...08 98 Side Curtain Left 1 90 908 99 Side Curtain Right 1 3 97 315 53 Handle Assembly Outer 2 4 97 315 51 Door Latch 2 5 97 315 54 Handle Assembly Inside 2 6 97 304 50 Snap Fastner 12 7 88 737 08 Rivet...

Page 218: ...Illustrated Parts Parts Page 56 Hydraulic Dump Body Option...

Page 219: ...1 17 88 149 81 Locknut 1 2 NC Hex Head 1 18 19 20 21 72 022 51 Rubber Mounting Ring 1 22 71 102 15 Switch Dump Bed 1 23 91 285 01 Dump Bed 1 Not shown 90 442 00 Deckboard 1 AA 000 11 Fluid Hydraulic D...

Page 220: ...Illustrated Parts Parts Page 58 Rear Cargo Box 1 2 3 4 5 6 5 Top Covers...

Page 221: ...1 5 98 310 00 Ruber window gasket by the foor 6 90 851 00 Rear window 2 Not shown 94 320 10 Load line decal 1 00 210 23 Deck support angle 1 Top Covers ITEM PART DESCRIPTION QTY 91 151 00 Fiberglass t...

Page 222: ...Illustrated Parts Parts Page 60 Hitches...

Page 223: ...t lock washer 4 NOTE Replacement parts only Ladder rack cannot be added to an existing vehicle PART DESCRIPTION QTY 00 201 44 Ladder rack 1 00 201 49 Ladder rack with stake side pockets 1 88 102 11 3...

Page 224: ...TAYLOR DUNN...
Page 225: ...ed Torque Limits for Standard Hardware 3 Hardware Identification 3 Standard Head Markings 3 Hex Bolts 3 Other Bolts 3 Hex Nuts 4 Hex Lock Nuts stover 4 Other Nuts 4 Suggested Torque Values non critica...

Page 226: ...of the AC motor speed control system 62 027 64 Dealer level maintenance handset Used for diagnostics and adjusting of the AC motor speed control system Start switch standard Disc Brake Boot Installat...

Page 227: ...Carriage Bolt grade 2 unless marked as above Other Bolts NOTE Torque value used should be for lowest grade of hardware used If a grade 2 nut is used on a grade 8 bolt use grade 2 torque value NOTE Toq...

Page 228: ...as S A E Grade 2 Lock nuts use a letter to indicate the grade of the nut Grade A locknuts would be the equivelent of Grade 2 hex nuts Grade B as Grade 5 and Grade C as Grade 8 NOTE Nuts with no marki...

Page 229: ...2 13 39 59 60 90 85 128 95 1 2 20 44 66 68 102 96 144 110 9 16 12 56 84 87 131 123 184 140 9 16 18 63 94 97 146 137 206 160 5 8 11 78 117 120 180 170 254 195 5 8 18 88 132 136 204 192 288 225 3 4 10 1...

Page 230: ...center section Dana F N R 25 35 300 420 34 47 6 Carrier cap bolts Dana 100 120 1200 1440 136 163 2 Differential Cover plate Dana H12 18 25 216 300 24 5 34 Drain plug Dana H12 25 40 300 480 34 54 4 Dra...

Page 231: ...um cleaner or any alternate method approved by OSHA to minimize the hazard caused by airborne asbestos fibers and brake dust Do not grind sand break or chisel the brake pads shoes as this will cause u...

Page 232: ...Taylor Dunn Mfg 2114 W Ball Rd Anaheim CA 92804 800 688 8680 714 956 4040 FAX 714 956 0504 Mailing Address P O Box 4240 Anaheim California 92803 Visit our Website www taylor dunn com...

Reviews: