


Electrical Troubleshooting
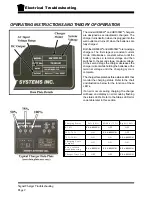
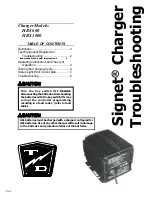
Charger Troubleshooting
Page 6
• Disconnect the charger from the AC source.
• Disconnect the batteries.
• Disconnect the charger from the vehicle’s harness.
• Remove the charger from the vehicle.
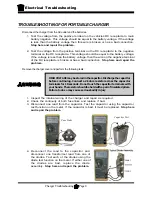
Remove the charger cover and perform the following tests:
1. Inspect the internal wiring of the charger and repair as required.
2. Check the continuity of both fuse links and replace if bad.
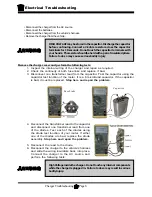
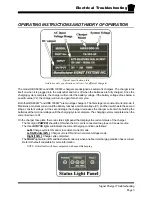
3. Disconnect one transformer lead from the capacitor. Test the capacitor using the
capacitor test function of the meter. It is a 6 microfarad capacitor. If the capacitor
is bad, it must be replaced.
Stop here and repair the problem.
HIGH VOLTAGE may be stored in the capacitor. Discharge the capacitor
before continuing. Connect a 2k ohm resistor across the capacitor
terminals for 10 seconds. Do not touch the capacitor terminals with
your hands. The resistor should be held with a pair of insulated pliers.
Failure to do so may cause serious bodily injury
High Voltage inside the charger. Do not touch any internal components
while the charger is plugged in. Failure to do so may result in serious
bodily injury.
Fuse Links
Capacitor
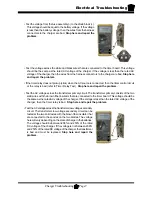
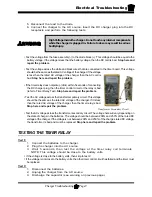
4. Reconnect the transformer lead to the capacitor
and disconnect one transformer lead from one
of the diodes. Test each of the diodes using
the diode test function of your meter. If either
one of the diodes are bad, replace the diode
assembly.
Stop here and repair the problem.
5. Reconnect the lead to the diode.
6. Reconnect the charger to the vehicle’s harness
and slide the wiring insulators back into place.
Connect the charger to the AC source and
perform the following tests:
Summary of Contents for B0-248-48AC
Page 2: ......
Page 70: ...Maintenance Service and Repair Steering Page 22 Exploded View of Steering Gear...
Page 88: ...TAYLOR DUNN...
Page 114: ...TAYLOR DUNN...
Page 120: ...TAYLOR DUNN...
Page 132: ...TAYLOR DUNN...
Page 134: ...TAYLOR DUNN...
Page 164: ...Illustrated Parts Parts Page 2 Front Axle...
Page 166: ...Illustrated Parts Parts Page 4 Steering Knuckle...
Page 168: ...Illustrated Parts Parts Page 6 Steering Linkage...
Page 174: ...Illustrated Parts Parts Page 12 Rear Suspension View from rear...
Page 176: ...Illustrated Parts Parts Page 14 Transmission Gear Case...
Page 180: ...Illustrated Parts Parts Page 18 Rear Brakes Front Brakes...
Page 182: ...Illustrated Parts Parts Page 20 Brake Lines Master Cylinder...
Page 184: ...Illustrated Parts Parts Page 22 Motor...
Page 186: ...Illustrated Parts Parts Page 24 Motor Mount Apply 94 421 34 grease to inside of motor coupler...
Page 188: ...Illustrated Parts Parts Page 26 Wheels and Tires Ref wheel hub 1 2 5 assembly 4 3 6 7 8 9 10...
Page 196: ...Illustrated Parts Parts Page 34 Lighting Stobe Light 4 1 2 3 5 6 7...
Page 206: ...Illustrated Parts Parts Page 44 Seat Cushions and Deck...
Page 208: ...Illustrated Parts Parts Page 46 Mirrors 92 202 00 Assembly Miscellaneous Frame Components...
Page 210: ...Illustrated Parts Parts Page 48 Decals...
Page 212: ...Illustrated Parts Parts Page 50 Cab Options Steel Cab Fiberglass cab...
Page 218: ...Illustrated Parts Parts Page 56 Hydraulic Dump Body Option...
Page 220: ...Illustrated Parts Parts Page 58 Rear Cargo Box 1 2 3 4 5 6 5 Top Covers...
Page 222: ...Illustrated Parts Parts Page 60 Hitches...
Page 224: ...TAYLOR DUNN...


