background image

EN

5

Model for USA

This product has been designed and manufactured 
according to FDA regulations “title 21, CFR, chapter 1, 
subchapter J, based on the Radiation Control for Health and 
Safety Act of 1968”, and is classified as class 

I

 laser product. 

There is not hazardous invisible laser radiation during 
operation because invisible laser radiation emitted inside 
of the product is completely confined in the protective 
housings.

The label required for this regulation is located in between 
the HDMI OUTPUT and the RS-232C ports on the rear panel.

For European Customers

Disposal of electrical and electronic equipment and 
batteries and/or accumulators

(a)   All electrical/electronic equipment and waste batteries/

accumulators should be disposed of separately from 
the municipal waste stream via collection facilities 
designated by the government or local authorities.

(b)   By disposing of electrical/electronic equipment and 

waste batteries/accumulators correctly, you will help 
save valuable resources and prevent any potential 
negative effects on human health and the environment.

(c)   Improper disposal of waste electrical/electronic 

equipment and batteries/accumulators can have serious 
effects on the environment and human health because 
of the presence of hazardous substances in the 
equipment.

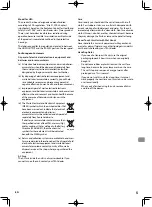
(d)   The Waste Electrical and Electronic Equipment 

(WEEE) symbols, which show wheeled bins that 
have been crossed out, indicate that electrical/
electronic equipment and batteries/
accumulators must be collected and disposed of 
separately from household waste.
If a battery or accumulator contains more than 
the specified values of lead (Pb), mercury (Hg), 
and/or cadmium (Cd) as defined in the Battery 
Directive (2006/66/EC), then the chemical 
symbols for those elements will be indicated 
beneath the WEEE symbol.

(e)   Return and collection systems are available to end users. 

For more detailed information about the disposal of old 
electrical/ electronic equipment and waste batteries/
accumulators, please contact your city office, waste 
disposal service or the shop where you purchased the 
equipment.

AC Fuse

The AC fuse inside the unit is not userserviceable. If you 
cannot turn on the unit, contact your TEAC dealer.

Care

Occasionally you should dust the unit all over with a soft 
cloth. For stubborn stains, use a soft cloth dampened with 
a weak solution of mild detergent and water. Dry the unit 
immediately afterward with a clean cloth. Don’t use abrasive 
cloths, thinners, alcohol, or other chemical solvents, because 
they may damage the finish or remove the panel lettering.

Never Touch this Unit with Wet Hands

Never handle this unit or its power cord while your hands 
are wet or damp. If water or any other liquid gets inside this 
unit, have it checked by your TEAC dealer.

Handling Notes

• 

If you need to transport this unit, use the original 
packaging to pack it how it was when you originally 
bought it.

• 

Do not leave rubber or plastic items on this unit for a 
long time, because they may leave marks on the case.

• 

This unit’s top and rear panels may get warm after 
prolonged use. This is normal.

• 

If you do not use this unit for a long time, it may not 
work properly the next time you turn it on, so be sure to 
use it occasionally.

• 

When you’ve finished using this unit, remove all discs 
and turn off the power.

Pb, Hg, Cd

Summary of Contents for BD-01U

Page 1: ...BD 01U Blu ray Disc Player ENGLISH OWNER S MANUAL FRAN AIS MODE D EMPLOI ESPA OL MANUAL DEL USUARIO DEUTSCH BEDIENUNGSANLEITUNG ITALIANO MANUALE DI ISTRUZIONI...

Page 2: ...CE OF PROCEDURES OTHER THAN THOSE SPECIFIED HEREIN MAY RESULT IN HAZARDOUS RADIATION EXPOSURE 1 Read these instructions 2 Keep these instructions 3 Heed all warnings 4 Follow all instructions 5 Do not...

Page 3: ...of the shelf or board above the apparatus shall be set 10 cm 4 away from the rear panel or wall creating a fluelike gap for warm air to escape 19 Slots and openings in the cabinet at the sides and und...

Page 4: ...uction Manual carefully In case of any trouble please contact the store where you purchased the unit To prevent being exposed to the laser beam do not try to open the enclosure CAUTIONS ABOUT BATTERIE...

Page 5: ...te If a battery or accumulator contains more than the specified values of lead Pb mercury Hg and or cadmium Cd as defined in the Battery Directive 2006 66 EC then the chemical symbols for those elemen...

Page 6: ...tenance cleaning or worn part replacement every 1 000 hours of use depending on the operating environment Contact your TEAC dealer for details Moisture Condensation Moisture condensation may damage th...

Page 7: ...ding out an infrared signal With a digital camera including built in cell phone cameras Point a digital camera towards the remote control Push any button on the remote control and look through the dig...

Page 8: ...or other countries This product is protected by certain intellectual property rights of Microsoft Use or distribution of such technology outside of this product is prohibited without a license from M...

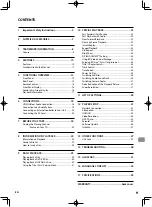
Page 9: ...sc 30 Playing Back a USB Flash Drive 30 Using the Title Disc Pop up Menu 31 10 SPECIAL PLAYBACK 32 Fast Forward Fast Reverse 32 Fast Playback with Audio 32 Slow Forward Playback 32 Frame by Frame Play...

Page 10: ...condary video in the primary video You can call up the secondary video whenever the scene contains the secondary video BD Live BD Live BD ROM version 2 Profile 2 0 that allows interactive functions to...

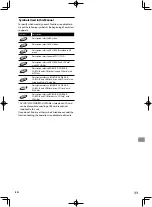
Page 11: ...rs to BD RE R DVD RW R CD RW R and USB flash drive and SD Card with MP3 files Description refers to BD RE R DVD RW R CD RW R and USB flash drive and SD Card with Windows Media Audio files Description...

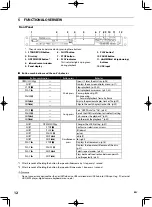
Page 12: ...to the next chapter track or file p 29 STOP C Long press Sets HDCP Auto to On p 45 PAUSE F Resets the HDMI resolution to its default setting SKIP H Fast reverses the playback 1 p 32 SKIP G Fast forwa...

Page 13: ...ernal controller using an RS 232C D Sub 9 pins cable p 23 5 DIGITAL OUTPUTS OPTICAL COAXIAL jacks Used to connect a digital audio device using a digital optical audio cable ditital coaxial audio cable...

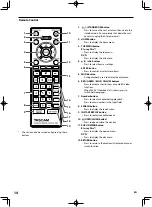
Page 14: ...rm or select menu items 5 MODE button During playback press to display the play menu 6 RED GREEN BLUE YELLOW buttons Press to activate shortcut keys on some BD video functions When file list thumbnail...

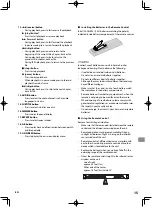
Page 15: ...remote control Caution Incorrect use of batteries can result in hazards such as leakage and bursting Please observe the following Use alkaline or standard carbon zinc batteries Do not mix new and old...

Page 16: ...anel Display Every time DIMMER is pressed the brightness of the panel display will change as follows Auto Only dims during playback Otherwise it is bright Bright The display panel is always bright Dim...

Page 17: ...epeat mode 4 Media File type During Music Playback while displaying the file list Track File number 5 30 0 04 09 1 4 2 3 1 Track number File number Elapsed time Current track file number Total number...

Page 18: ...rate of 25 30 frames per second 2 1080p For USA Canada Outputs video data with a frame rate of 60 frames per second For Europe Outputs video data with a frame rate of 50 60 frames per second 3 1080p...

Page 19: ...nput jacks Digital audio coaxial cable not supplied AV receiver amplifier with a digital audio optical coaxial input jack Digital audio optical cable not supplied BALANCED INPUT AUDIO INPUT DIGITALAUD...

Page 20: ...MPEG DownMix 2ch LPCM DVD VR Dolby Digital Dolby Digital DownMix 2ch LPCM LPCM 2ch LPCM 2ch LPCM MPEG 6 MPEG DownMix 2ch LPCM DTS CD DTS DTS DownMix 2ch LPCM AVCHD Dolby Digital Dolby Digital DownMix...

Page 21: ...Digital Multi LPCM Mute LPCM 2ch LPCM 2ch LPCM Mute MPEG 6 MPEG Multi LPCM Mute DTS CD DTS DTS Multi LPCM Mute AVCHD Dolby Digital Dolby Digital Multi LPCM Mute LPCM Multi LPCM Multi LPCM Mute Audio C...

Page 22: ...insert any cable other than a LAN cable to the LAN terminal to avoid damaging the unit Note After connecting a LAN cable set up necessary network settings For the network setup refer to Network Conne...

Page 23: ...r make sure that you with the controller are close enough to the unit so that you can visually confirm the unit s behavior status RS 232C cable not supplied LAN cable not supplied External controller...

Page 24: ...he initialization screen will appear for the first time you turn on the unit Perform initialization Initialization Welcome This unit is ready for initialization Please follow the on screen instruction...

Page 25: ...d MP3 WMA WAV JPEG AVCHD Recommended Specifications AVCHD This unit cannot play back stand alone AVCHD files m2ts mts or m2t written to a DVD or copied to an SD card The DVD or SD card containing AVCH...

Page 26: ...SB hub connected card or device may not be recognized Unplayable Discs and Files The following discs will not be played back in this unit CD ROM CD I compact disc interactive DVD RAM VSD video single...

Page 27: ...d on the audio CD Files refers to the contents on a disc which are recorded in MP3 WMA WAV JPEG file format Note Unrecognizable characters will be replaced with Guide to File List Music File List e g...

Page 28: ...List Use K L to move the highlight up and down in the list To access the files in a group folder select the desired group folder then press ENTER Press 0 or RETURN to go back to the previous hierarchy...

Page 29: ...B play next time the playback will start from the point where it has been stopped Audio CD Playback will start from the point where it is stopped next time you press B play If you press ENTER instead...

Page 30: ...playback Press B play To stop playback Press C stop Playback will be in Resume On Stop mode and the title list will appear Resume On Stop Mode When you press B play next time the playback will start...

Page 31: ...o not delete the folders or files in the USB flash drive with your computer This unit may not read USB flash drives formatted on a computer If a folder or file name includes one of the following unrec...

Page 32: ...ress k pause Then press g forward Every time you press g forward the playback speed changes in 3 different levels 2 Press B play to return to normal playback Note Only slow forward is available Set St...

Page 33: ...y 1 During playback press A B at the desired starting point A 2 During playback press A B at the desired ending point B As soon as you set the point B the part between point A and point B will start p...

Page 34: ...o use interactive features when the unit is connected to the Internet Examples of BD Live features Online access to additional content such as movie trailers subtitles BD Java applications etc While d...

Page 35: ...go to the previous track file The track file will move backward one at a time Time Search 1 During playback press SEARCH 2 Use K L to select then press ENTER e g Blu ray Disc Search 00 00 50 0 01 00 3...

Page 36: ...ray Disc available audio varies depending on BD Audio Mode setting 1 During playback press AUDIO 2 Use K L to select Primary or Secondary then press ENTER Primary Sets the audio for the primary video...

Page 37: ...ed setting On Activates noise reduction Off Deactivates noise reduction Note The Noise Reduction setting will remain even if this unit is turned off Super Resolution Super Resolution reduces image det...

Page 38: ...the types of settings you can customize The item highlighted in gray is the default setting Category Menus Options Video Out TV Aspect 16 9 Wide 16 9 Squeeze 4 3 Letter Box 4 3 Pan Scan Still Mode Aut...

Page 39: ...English Portuguese Finnish Romanian French Russian German Slovak Greek Spanish Hungarian Swedish Icelandic Turkish Irish Other Subtitle Off Bulgarian Italian Chinese Japanese Czech Korean Danish Norw...

Page 40: ...minutes On Screen Guide On Off Panel Display Auto Bright Dimmer Network Network Connection Start Connection Test Network Status BD Live Setting Allow Limited Allow Prohibit Others Power On Play On Off...

Page 41: ...l then press ENTER 6 Use K L to select IP Address then press ENTER 7 IP address setting screen will appear Enter IP address with cursor buttons and number buttons Cancel Return Next Network Settings I...

Page 42: ...r the connection test finishes 17 Select Finish to complete the settings Connection Test After you enable a network connection or change the network settings always perform the connection test to chec...

Page 43: ...C allows integrated system control over HDMI and is part of the HDMI standard This function may not work properly depending on the device connected to the unit When HDMI CEC setting is set to On funct...

Page 44: ...will be output instead of 1080p 24 Refer also to the manual of your display device Do not remove HDMI cable during playing the video in 1080p 24 Video signals will not be output if you replace the con...

Page 45: ...7 That number will be used as the recover password Record your password in case you might forget it If you forget the password enter 4 7 3 7 The password will be cleared and rating level will be set t...

Page 46: ...then execute Software Update Disc USB Update You can update the software by using a disc or USB flash drive Prepare a software update disc or USB flash drive Access the TEAC Global Site http teac glob...

Page 47: ...Erase Saved BD ROM Data It will damage the drive Note Format USB or USB Erase Saved BD ROM Data is not available when a Blu ray Disc is in the unit 13 OTHER FUNCTIONS Unit Lock This unit can be locke...

Page 48: ...an unauthorized display device with an HDMI cable the audio video signal may not be output Perform an HDMI cable hotplug wherein you disconnect the HDMI cable from the TV and this unit and then recon...

Page 49: ...not respond to some operating commands during playback Is Power On Play function enabled If so open the disc tray to temporarily disable the function then set Power On Play to Off p 35 Operations may...

Page 50: ...ackage is used and a USB flash drive is connected MPEG 2 video and audio on the USB flash drive cannot be played back MPEG 2 is noncompliant on this unit The contents of the USB flash drive cannot be...

Page 51: ...an unauthorized copy is detected a message will be displayed and playback or copying will be interrupted More information about Cinavia technology is provided at the Cinavia Online Consumer Informatio...

Page 52: ...ture files You can copy JPEG files on BD RE R DVD RW R CD RW R or USB flash drive SD Card from a computer and play back the files on this unit LAN Local Area Network A group of computer networks cover...

Page 53: ...of the playback varies depending on discs WAV WAV is the audio compressing technology developed by Microsoft and IBM You can copy WAV files on BD RE R DVD RW R CD RW R or USB flash drive SD Card from...

Page 54: ...piak 5557 Persian 5247 Tsonga 6665 Burmese 5971 Irish GLE 5347 Polish POL 6258 Turkish TUR 6664 Byelorussian 4851 Italian ITA 5566 Portuguese POR 6266 Turkmen 6657 C E Japanese JPN 5647 Quechua 6367 T...

Page 55: ...o 90 dB during playback JEITA Audio Dynamic Range 90 dB during playback JEITA THD Total Harmonic Distortion 0 01 1 kHz during playback JEITA Channel Separation 90 dB during playback JEITA Terminals US...

Page 56: ...434 8 mm 483 mm 465 mm 42 4 mm 44 mm 1 mm 1 mm 31 8 mm Note Illustrations in this Owner s Manual might differ in part from the actual product Specifications and external appearance could be changed wi...

Page 57: ...To locate an Authorized Service Center in Your Area CALL 1 800 447 8322 Europe This product is subject to the legal warranty regulations of the country of purchase In case of a defect or a problem ple...

Page 58: ...BD 01UT C G Printed in China 2VMN00252 2 V M N 0 0 2 5 2 TEAC CORPORATION http tascam jp Phone 81 42 356 9143 1 47 Ochiai Tama shi Tokyo 206 8530 Japan TEAC AMERICA INC http tascam com Phone 1 323 726...

Reviews: