background image


4.4 Connection                          

Several typical system connections  of  TES-5630M 

economical  digital infrared wireless system  combo  unit 

will be introduced in this section, including connection: 

 To loudspeaker 

 To other extension receiver (TES-5600R) 

 To other auxiliary devices 


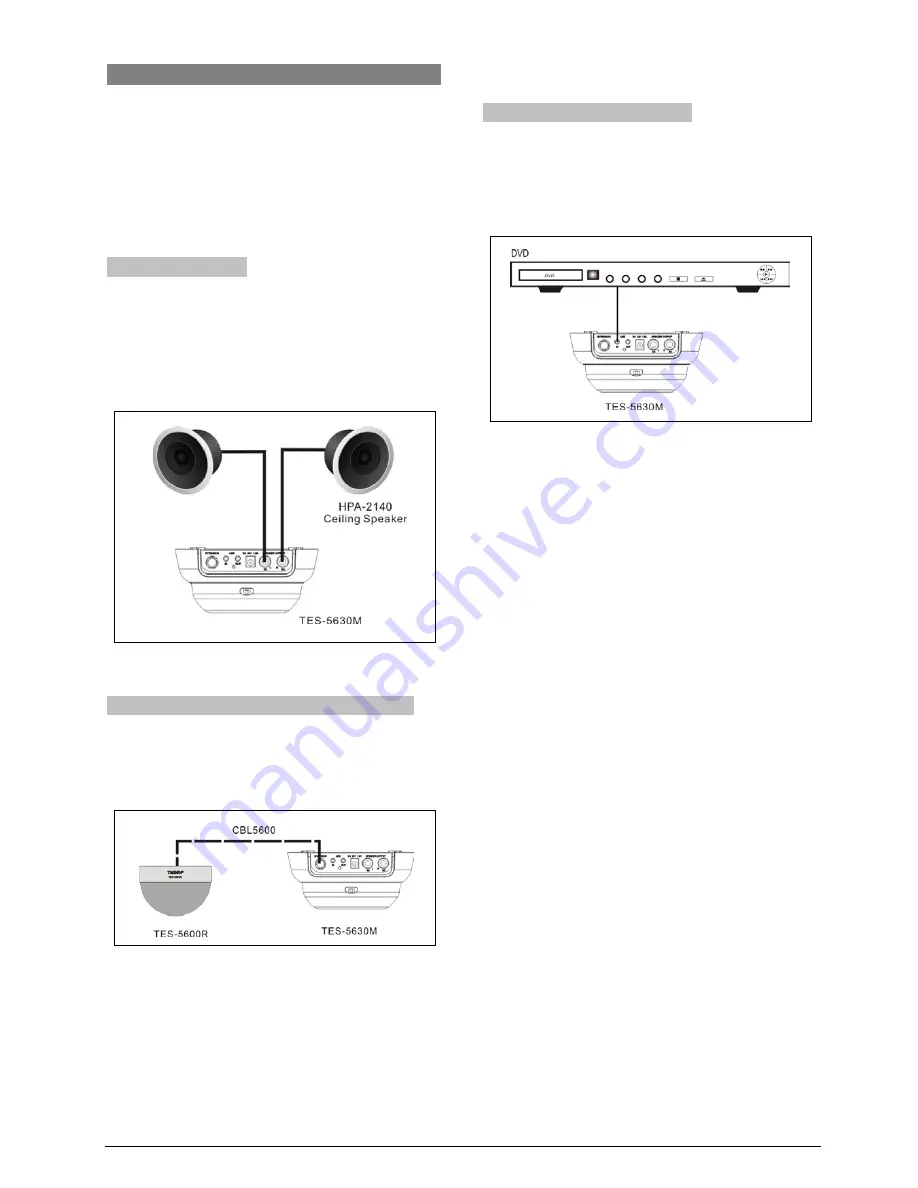
4.4.1 To loudspeaker 

TES-5630MA  has  two  speaker  interfaces  which can be 

connected to loudspeakers directly. Use an audio cable 

to connect “SPEAKER OUTPUT” port on TES-5630M to 

the input interface of speaker. 


Figure 4.8  TES-5630M connecting to loudspeakers 


4.4.2 To other extension receiver (TES-5600R) 

TES-5630M can be connected to an extension receiver 

(TES-5630M) through the “EXTENSION” interface. 


Figure 4.9  TES-5630M connecting to receiver 


4.4.3 To other auxiliary devices 

TES-5630M  can be connected to an external audio 

device through LINE IN interface. The external audio 

signal is now available at the LINE OUT and speakers. 


Figure 4.10  TES-5630M connecting to external audio 

device through “LINE IN” interface 


34 

Summary of Contents for TES-5600

Page 1: ...Digital Infrared Wireless Classroom Audio System Installation and Operating Manual V 1 9...

Page 2: ...gulations of the European directive 2014 30 EU To protect your hearing please avoid high pressure level on earphones Adjust to a lower and convenient level If any detailed information needed please co...

Page 3: ...ly cord or plug is damaged liquid has been spilled or objects have fallen into the apparatus the apparatus has been exposed to rain or moisture does not operate normally or has been dropped 17 Do not...

Page 4: ...tch have power supplied to the unit whenever the power cord is inserted into the power source however the unit is operational only when the ON OFF switch is in the ON position The power cord is the ma...

Page 5: ...rode the battery and cause fire explosion leakage or heat generation Be careful to put the battery into the charging case with correct electrode position otherwise it may cause fire explosion leakage...

Page 6: ...liary devices 10 2 4 2 To recording device 10 2 4 3 To speaker 10 2 4 4 To central control system 11 2 5 Configuration and operation 12 2 5 1 Mic Sens 12 2 5 2 Line In Vol 13 2 5 3 EQ Setting 13 2 5 4...

Page 7: ...nctions and indicators 37 5 3 Infrared service area 39 5 4 Operation 40 5 4 1 TES 5602A handheld type 40 5 4 2 TES 5603 B pendant type 41 Chapter 6 Accessories 44 6 1 Power Adapter 44 6 2 Dedicated Ca...

Page 8: ...8 6 Power adapter 58 8 7 Charging unit 58 8 8 Connection details 59 Appendix 60 Appendix Connect RG 59 Coaxial cable to TES 5600R 60 Appendix Soldering of BNC connector and RG 59 Coaxial cable 60 VII...

Page 9: ...s connection configuration and operation of digital infrared wireless system main unit Chapter 3 Digital infrared receiver Detailed description of functions installation and connection of digital infr...

Page 10: ...microphones built in amplifier supports 2 speakers Digital IR Wireless Microphone TES 5602A Digital IR Wireless Microphone handheld type rechargeable battery TES 5603 Digital IR Wireless Microphone p...

Page 11: ...nit one or more digital infrared receivers speakers and up to 4 digital infrared wireless microphones Figure 1 1 System overview The system is composed of one or more of the following Digital IR Wirel...

Page 12: ...hargeable battery or AA alkaline cell TES 5603B Digital IR Wireless Microphone pendant type rechargeable battery Power Adapter TES ADP5V Power Adapter DC 5 V 2 0 A TES ADP15V Power Adapter DC 15 V 2 4...

Page 13: ...to radio wave based wireless communications nor radio radiation The advanced digital infrared technology allows perfect resistance against HF driven lighting interference and good operation in sunligh...

Page 14: ...which is composed of visible light radio waves and other types of radiation Its wavelength is longer in comparison with the wavelength of visible light Infrared light cannot pass through opaque walls...

Page 15: ...ti receiver operation should be considered For outdoor using a site test will be required to determine the needed amount of receivers With sufficient receivers perfect signal transmission can be fulfi...

Page 16: ...half rack width and suitable for either tabletop or 19 inch rack mounting two main units abreast using Four bottom studs for tabletop and two brackets for rack mounting are supplied Types TES 5600MA...

Page 17: ...panel of TES 5600M main unit Rear panel of TES 5600MA P main unit Rear panel of TES 5600MAU P main unit Rear panel of TES 5600MB P main unit Rear panel of TES 5600MBU P main unit Figure 2 1 Digital i...

Page 18: ...ol 4 Receiver interfaces 1 4 BNC 5 Device USB interface For firmware upgrade 6 MIC LINE IN 6 4mm balance difference input LINE IN 1 can offer phantom power when being used for microphone input 7 LINE...

Page 19: ...s abreast First unscrew the screws on the lateral and bottom from the housing Then fasten the four brackets with these screws and put the main units in the cabinet Finally fix the four holes up with s...

Page 20: ...vice through LINE IN interface 2 4 2 To recording device Digital infrared wireless system main unit has LINE OUT interface which can be connected to recording devices Figure 2 6 Digital infrared wirel...

Page 21: ...rough wired Ethernet or wireless communication by wired wireless touch panel Features include power controlling system PA volume controlling and controlling of various electric devices such as DVD rec...

Page 22: ...the knob to confirm and turn back to the initial interface C Access main menu Pressing the knob under initial interface will go to main menu which includes ten menu items Mic Sens Line In Vol EQ Sett...

Page 23: ...IN volume will be reduced 18 dB after triggering 1 Press the knob to enter the setting interface 2 Rotate the knob to select a fade way among Off Low Voice High Voice and IR Signal Voice trigger LINE...

Page 24: ...it See the information of microphone in use In the About interface power on a microphone or press the MUTE button on the microphone its version and frequency will be displayed See the receivable frequ...

Page 25: ...ction activated when a high level being input to the phoenix interface or the controllable microphone or central control system send an alarm signal to the main unit the OLED displays Alarm On Note Pl...

Page 26: ...tion and operation of the USB Audio 2 6 1 Installation of USB LINK Once the TES 5600MU main unit connects to the computer the TES 5600M LINK will be detected automatically If it is connected for the f...

Page 27: ...llowing figure Figurer2 11 Adjusting microphone volume Note High volume may lead to distortion user can confirm a suitable volume by recording and playback when necessary When recording under compress...

Page 28: ...K and modify its setting in the Playback dialog box as shown in the following figure Figurer2 12 Adjusting playback volume Note Please select the TES 5600M USB LINK as the current device on playback U...

Page 29: ...2 6 4 PPT page switch The TES 5600M P main unit cooperates with the TES 5603 B microphone to realize remote PPT page switch control See 5 4 3 19...

Page 30: ...75 Horizontal 360 Reception range Optical range 25 m Actual reception range 12 m Types TES 5600R Digital Infrared Receiver TES 5600RN Digital Infrared Receiver enlargement type 3 2 Functions and indic...

Page 31: ...hting equipment 3 3 1 2 Avoid direct intense light Exposing the receiver to intense light source may cause system failure or noise Please do not mount the receiver in such a way the intense light sour...

Page 32: ...receiver can be mounted on the ceiling in the front middle part of the classroom and about 2 to 3 meters L away from the blackboard figure 3 5 Figure 3 5 Planning the receiver 1 15m 15m classroom In...

Page 33: ...n of the TES 5600R N and mark the positions of the drilling holes Drill four holes 5 mm diameter 30 mm depth into the ceiling Step 2 Put the rubber plugs into the mounting holes on the ceiling Step 3...

Page 34: ...0R and mark the positions of the drilling holes Drill four holes 5 mm diameter 30 mm depth and a vent 52 mm diameter for mounting and heat elimination during operation into the ceiling Step 2 Put the...

Page 35: ...e fixing bracket onto the TES 5600RZJ with M3 screws Step 2 Fix the tripod mounted stator onto the other end of the TES 5600RZJ with M3 screws Step 3 Aim the mounting hole at the bottom of the tripod...

Page 36: ...nto the fixing bracket and fix it with clockwise rotation Step 2 Position the wall mounted bracket on the wall according to the installation location of the TES 5600R N and mark the positions of the d...

Page 37: ...igital infrared wireless system main unit Note The correctness of the cable connection can be ensured when the transceiver indicator is lit up If the indicating light is off there might be failure in...

Page 38: ...for medium and small classroom applications Types TES 5630M Economical Digital Infrared Wireless System Combo Unit supports 2 wireless microphones built in amplifier supports 2 speakers TES 5630MA Eco...

Page 39: ...steps Step 1 Install the ceiling mounting kit at the top of the TES 5630M Step 2 Drill a hole with 98 mm diameter into the ceiling for mounting and heat elimination during operation Step 4 Hold the s...

Page 40: ...rk the positions of the drilling holes Drill two holes 5 mm diameter 30 mm depth into the ceiling Step 2 Put the included rubber plugs into the mounting holes on the ceiling Step 3 Fix the mounting br...

Page 41: ...600ZJ2 should be ordered separately Figure 4 5 TES 5630M tripod mounted 1 Mounting steps Step 1 Put the bracket on the bottom of the TES 5630M and fix it with rotation Step 2 Aim the mounting hole at...

Page 42: ...ately Figure 4 6 TES 5630M tripod mounted 2 Mounting steps Step 1 Fix the TES 5630M onto the TES 5600RZJ with M3 screws Step 2 Fix the tripod mounted stator onto the other end of the TES 5600RZJ with...

Page 43: ...RZJ on the wall according to the installation location of the TES 5630M and mark the positions of the drilling holes Drill four holes 5 mm diameter 30 mm depth on the wall Step 3 Put the included rubb...

Page 44: ...to connect SPEAKER OUTPUT port on TES 5630M to the input interface of speaker Figure 4 8 TES 5630M connecting to loudspeakers 4 4 2 To other extension receiver TES 5600R TES 5630M can be connected to...

Page 45: ...ice 10 High voice 11 IR signal 4 FB feedback suppress Setting a FB suppress level through different combinations of the two switches Switch combination Trigger signal sources 00 Off 01 10 Low 11 High...

Page 46: ...are available depending on the microphone type Functions include speak and mute frequency selection own sensitivity setting remote volume control etc Types TES 5602A Digital IR Wireless Microphone han...

Page 47: ...1 TES 5600 series digital infrared wireless microphone Figure 5 1 1 Microphone 2 Infrared transmitting glass 3 Battery charge indicator 4 Mute button 5 Power ON OFF button 6 Power indicator 7 Mute ind...

Page 48: ...the selected signal source Page up of the current PPT TES 5603 16 Power charge indicator 17 Power mute button 18 Clip 19 PPT mode Own microphone indicator Turns on when OWN microphone is selected for...

Page 49: ...ES 5600 series digital infrared wireless microphone is designed to be at its best position to guarantee maximum emission angle and to ensure the most effective infrared signal transmission The vertica...

Page 50: ...o devices such as CD player can be connected via the 3 5 mm AUDIO IN interface and the microphone will be muted automatically 3 OWN mute control Press the MUTE button to enable or disable the mute fun...

Page 51: ...attery status Indicator Full Green on Enough Yellow on Lack Red on Press and hold the power mute button for more than 2 seconds to close the microphone TES 5603 offers 4 frequency channels 1 0 MHz 1 6...

Page 52: ...ia the 3 5 mm AUDIO IN interface and the microphone will be muted automatically Keep on pressing the function button can switch the source type of audio input switch to the LINE indicator can indicate...

Page 53: ...y USB port or TES 5600CS when powered by a rechargeable Lithium battery When charging it switches to external power supply mode automatically and the PWR indicator indicates the charging status Chargi...

Page 54: ...rared wireless system combo unit Figure 6 2 TES ADP24VN power adapter TES ADP15V power adapter Connect the TES ADP15V to the power adapter interface at the rear panel of the TES 5600MB digital infrare...

Page 55: ...he loudspeaker and the main unit Length of per roll 305 meter Weight of per roll 14 1 kg Color pearl white Figure 6 7 CBL SPK CBL SPK2 speaker cable CBL SPK2 Speaker cable is used to connect the louds...

Page 56: ...m Power consumption 8 60 W Frequency response 65 Hz 20 kHz Sensitivity 89 dB Weight 5 kg Figure 6 12 HPA 2140 ceiling speaker HPA 2220 wall mounted speaker Wall mounted Dimensions 215 170 150 mm Power...

Page 57: ...2240 wall mounted speaker HPA 2280 wall mounted speaker Wall mounted Dimensions 345 215 210 mm Power consumption 8 80 W Frequency response 65 Hz 20 kHz Sensitivity 90 dB Weight 4 9 kg Figure 6 16 HPA...

Page 58: ...one time by using Micro USB Two charging indicators display the battery status The charging circuit will check if the battery is connected and control the charging process Figure 6 20 TES 5600CHG char...

Page 59: ...h TES ADP5V6A Figure 6 23 TES 5603CHG 09 charging station 6 8 Li ion Rechargeable battery TES 5600BAT Li ion rechargeable battery For TES 5602A TES 5603B digital infrared wireless microphone Voltage 3...

Page 60: ...6 9 TES 5600RZJ TES 5600RZJ is suitable for tripod or wall mounted of TES 5600R N Length 115 mm Weight 110 g Figure 6 26 TES 5600RZJ 50...

Page 61: ...ver is directly under sunshine or spotlight Reposition it and avoid direct sunshine or spotlight Is there any obstacle between the receiver and the microphone Is the receiver suitable for the height a...

Page 62: ...udio device Select TES 5600M USB LINK as current audio device manually Manifold USB devices in one HUB TES 5600MU connects to a single HUB channel DO NOT connect several devices in a USB HUB Driving e...

Page 63: ...dicated cable Maximum number of receivers 1 per output 4 in total Maximum cable length 100 m per output System environmental conditions Working conditions fixed stationary transportable Temperature ra...

Page 64: ...ximal number of microphone 2 Number of connectable receivers 4 Speaker interface Max 2 30 W 8 Virtual 2 23 W 8 External control terminal 8 pin Phoenix Audio input output USB interface only for TES 560...

Page 65: ...0M Current consumption Max 45 mA Mounting Ceiling tripod mounting Infrared detector Wavelength 870 nm Modulation method DQPSK Carrier frequency 1 8 MHz Communication area Horizontal 360 Vertical 150 C...

Page 66: ...rtual 2 23 W 8 Weighted signal to noise ratio 85 dB A Dynamic range 90 dB Audio frequency response 50 20000 Hz 3 dB Total harmonic distortion 0 06 1 kHz Crosstalk attenuation at 1 kHz 75 dB Mounting C...

Page 67: ...l 1 1 0 MHz Audio channel 2 1 6 MHz Audio channel 3 2 3 MHz Audio channel 4 3 0 MHz Emission angle Vertical 0 90 Horizontal 360 Vertical 0 90 Horizontal 120 Emission range Optical range 25 m actual ra...

Page 68: ...x h x d 95 x 45 x 28 115 x 50 x 32 95 x 45 x 28 121 x 52 x 33 39 x 27 x 43 Weight 0 3 kg 0 4 kg 0 3 kg 0 4 kg 50 g Color Black White 8 7 Charging unit Type TES 5600CHG TES 5600CS Mains voltage 100 24...

Page 69: ...hield NOTE The LINE IN of TES 5600M P must be balance signal If there is a unbalance signal please turn it to be balance signal before input the connecting means is shown in follow Emergency switch Te...

Page 70: ...the braided shield and the cable into the cable clip 3 Fix the screws At last fix the coaxial cable into the slot Appendix Soldering of BNC connector and RG 59 Coaxial cable 1 Strip 5mm insulation of...

Page 71: ...Copyright by TAIDEN Last Revision 08 2017 TAIDEN INDUSTRIAL CO LTD 6 F Block B Future Plaza 6060 Qiaoxiang Rd Nanshan District Shenzhen China P C 518053 Website http www taiden com...

Reviews: