background image

Accessing the telephone application

PTC-1800 Product Reference Guide

35

Accessing the 

telephone application

Press the Phone key to activate the telephone
application. The Home screen displays.

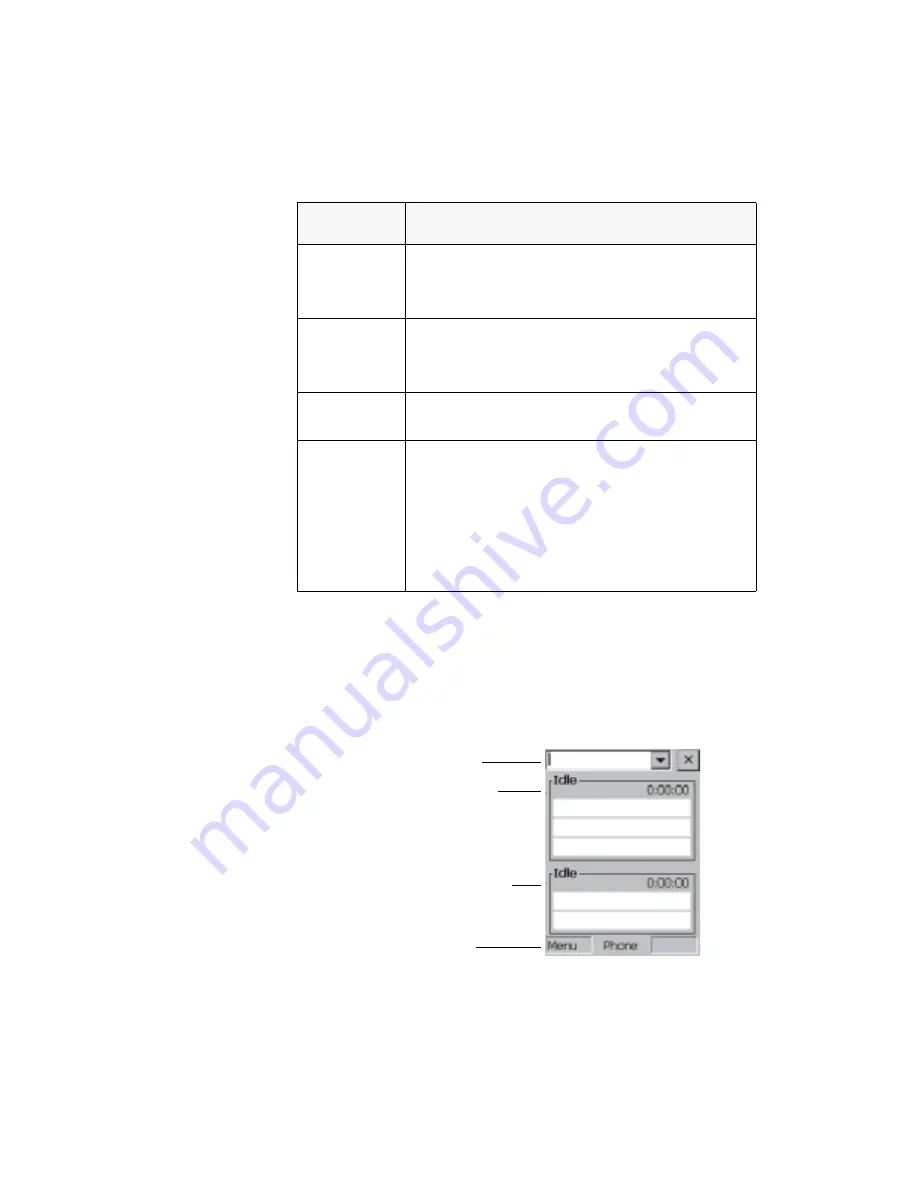
The Home screen is divided into four sections, as
shown in Figure 4:

Figure 4. The Home Screen

Down Arrow

Opens the telephone directory from the
Home screen.

Moves you down through menu options.

Up Arrow

Opens the dialed calls list from the Home
Screen.

Moves you up through menu options.

Soft Key 1
(SK1)

Opens the Main Menu from the Home
screen.

Soft Key 2
(SK2)

Mutes the call on Line 1.

Checks or unchecks a check box.

Allows you to enter data in lowercase
alphabetic (ab), uppercase alphabetic (AB),
or numeric (12) characters. The current
format is shown in the top left-hand corner
of the screen.

Key

Function

Combo box

Top group box

Bottom group box

Status bar

Summary of Contents for PTC-1800

Page 1: ...PTC 1800 Product Reference Guide Document Number 30635 000 002...

Page 2: ...Chapter 3 Configuring TN 3270 5250...

Page 3: ...PTC 1800 Product Reference Guide Document Number 30635 000 002 Release Date November 2000...

Page 4: ...this manual is subject to change without notice Symbol Technologies shall not be liable for technical or editorial omissions or mistakes in this manual Nor shall it be liable for incidental or consequ...

Page 5: ...3 Lithium ion battery pack 3 Guidelines for handling 3 Disposal 4 Getting help 4 Bridge battery 4 Disposal 4 Recycling 4 Spread spectrum radio 4 Safety compliance 4 Internal laser scanner 5 Safety com...

Page 6: ...mponents 13 Bridge battery 13 DOC Hard disk drive 13 Memory 13 Operating system 13 Processor 13 Radio optional 14 External components 14 AC adapter 14 Vehicle adapter optional 14 Chapter 7 Features 23...

Page 7: ...ne directory 39 Setting the telephone alert 46 Locking the keyboard 48 Turning on the Auto Answer feature 49 Initializing keypad tones 50 Editing Viewing user identification information 50 Operating t...

Page 8: ...ery pack 63 Removing the battery pack 63 Installing a new battery pack 64 Recharging the battery pack 64 Charging options 64 When to charge the battery pack 64 Charging time 64 Charging guidelines 65...

Page 9: ...1800 75 Equipment required 75 Cleaning the PTC 1800 75 Cleaning the contacts 75 Servicing the PTC 1800 75 Disposing of the PTC 1800 76 Chapter 15 Troubleshooting 77 Getting started 77 Common solution...

Page 10: ...ommunication and I O 85 Display 85 Electrical 85 Environmental 86 Laser scanner 86 Memory 86 Microprocessor 86 Operating system 86 Physical 87 Storage 87 Appendix B 89 Accessory part numbers 89 Append...

Page 11: ...n radiate radio frequency energy and if not installed and used in accordance with this instruction manual may cause harmful interference to radio communications Operation of this equipment in a reside...

Page 12: ...the back of the unit DOC statement The PTC 1800 s radio is also approved for use in Canada The PTC 1800 uses a spread spectrum radio transceiver that qualifies for unlicensed use The Canadian DOC ID i...

Page 13: ...er Operation of the PTC 1800 with voice applications may produce an audible noise noticeable to hearing aid users Thus it is recommended that a headset be used by hearing aid users Lithium ion battery...

Page 14: ...50 for assistance prior to disposing of your lithium ion batteries Bridge battery Disposal Never attempt to incinerate the bridge battery doing so could cause it to explode The PTC 1800 s bridge batte...

Page 15: ...ce with U S Department of Health and Human Services DHHS Regulation 21 CFR Subchapter J No controls are provided for operation or maintenance Laser light in excess of Class I limits is inside an inter...

Page 16: ...Chapter 3 Configuring TN 3270 5250 6 PTC 1800 Product Reference Guide...

Page 17: ...n For that information refer to the manual or instructions provided by your supervisor Related publications The following manuals may be useful as you operate the PTC 1800 PTC 1800 Quick Start Guide P...

Page 18: ...Chapter 3 Configuring TN 3270 5250 8 PTC 1800 Product Reference Guide...

Page 19: ...ive telephone calls and VoiceAlert messages Accessories Various accessories are available for use with the PTC 1800 Contact your Symbol sales representative or visit www symbol com for ordering inform...

Page 20: ...Chapter 3 Configuring TN 3270 5250 10 PTC 1800 Product Reference Guide...

Page 21: ...ure If anything is missing or damaged notify your Symbol sales representative Follow the instructions below to unpack your PTC 1800 1 Remove the PTC 1800 and other parts from the box 2 Remove all pack...

Page 22: ...ter s cord 2 Position the bead approximately 5 in 13 cm away from the connector that will plug into the PTC 1800 s charger jack 3 Snap the bead closed to secure it to the cord Installing the battery p...

Page 23: ...e PTC 1800 contains an 8 MB hard disk drive identified as HARDDISK Memory The PTC 1800 has two types of memory 256 KB of read only memory ROM 16 MB of random access memory RAM Operating system The PTC...

Page 24: ...he parts listed below are not shown in any of the figures AC adapter Use only the AC adapter supplied by Symbol with your PTC 1800 Using any other adapter could cause damage or change EMC emissions le...

Page 25: ...ts PTC 1800 Product Reference Guide 15 Figure 1 Parts of the PTC 1800 front view 1 Status LED 2 Speaker 3 Display 4 Keypad 5 Headset jack 6 Microphone 7 Push to talk 8 Antenna screen button for VoiceA...

Page 26: ...s 1 8 VGA transflective monochrome liquid crystal display LCD screen displays data entered into the PTC 1800 and may show prompts error messages and other information 4 Keypad Consists of 25 keys that...

Page 27: ...nd key 9 Scan key 10 Soft Key 2 SK2 one on each side 3 Application keys keys 7 Hold key Name Description 1 Compass key Moves the cursor on the PTC 1800 s display screen in one of four directions up do...

Page 28: ...anumeric data into the PTC 1800 or function like the keys on a standard telephone keypad when the telephone application is activated 6 On Off key Wakes up or suspends the PTC 1800 Press to boot after...

Page 29: ...erence Guide 19 Figure 3 Partsof the PTC 1800 left side top and back views 1 Charger jack 2 Battery pack 3 Battery pack 4 Charger contacts 5 Antenna release button 6 Buzzer port 1 Charger jack 7 Infra...

Page 30: ...r extended life lithium ion battery pack Caution Never leave the PTC 1800 without the battery pack installed Removal of the pack for extended periods will drain the bridge battery even with the unit s...

Page 31: ...ct Reference Guide 21 8 Laser scanner Scans bar codes See Chapter 9 for details 9 Reset button behind battery pack Press to place unit in ship mode Press the On Off key to perform a cold boot after re...

Page 32: ...Chapter 3 Configuring TN 3270 5250 22 PTC 1800 Product Reference Guide...

Page 33: ...ications Backlight The PTC 1800 s backlight lights up the screen to enhance readability in dim lighting conditions The backlight turns on automatically when the PTC 1800 boots up and turns off when th...

Page 34: ...rease the screen s contrast Incoming message alert The PTC 1800 can be programmed to alert the user when a telephone call or a VoiceAlert message is being received provided the PTC 1800 is configured...

Page 35: ...he unit s operation and configuration Run mode This is the PTC 1800 s normal operating mode All resources are functional Suspend mode Pressing the On Off key terminates any active telephone call s The...

Page 36: ...he Reset button located behind the PTC 1800 s battery pack In this mode most power to the unit is turned off Resume If the PTC 1800 is suspended pressing the On Off key or one of the Scan keys turns t...

Page 37: ...d boot it by pressing the On Off key Turning off the PTC 1800 Refer to the Power management section in Chapter 7 for more information Press the On Off key to suspend the PTC 1800 Suspending the PTC 18...

Page 38: ...Chapter 3 Configuring TN 3270 5250 28 PTC 1800 Product Reference Guide...

Page 39: ...to begin using the data application Consult the information provided by your supervisor for details on your organization s data application 1 Press the Data key to activate your organization s data a...

Page 40: ...tem in business today Data can also be entered with the PTC 1800 s laser scanner When you scan a 1D bar code the PTC 1800 is programmed to read while the PTC 1800 and scanner interpret the data and st...

Page 41: ...s scanning a bar code 2 Press one of the PTC 1800 s Scan keys to start scanning The PTC 1800 beeps if the scan is successful 3 Watch the line of light made by the scanner as it scans the bar code The...

Page 42: ...o communicate via pulses of light to and from other IrDA compliant devices such as printers and host systems Procedure Follow the instructions below to use the PTC 1800 s IrDA port 1 Line up the PTC 1...

Page 43: ...less LAN Any off link H 323 Gateway telephony device e g POTS H 321 H 324 via an AirTalk Gateway Features The telephone application provides the following features Initiates and receives telephone cal...

Page 44: ...numeric data into the PTC 1800 e g to create a telephone directory or function like the keys on a standard telephone keypad Hold Places a call on hold or reconnects a call Send Places a call to the nu...

Page 45: ...ctory from the Home screen Moves you down through menu options Up Arrow Opens the dialed calls list from the Home Screen Moves you up through menu options Soft Key 1 SK1 Opens the Main Menu from the H...

Page 46: ...place a call Component Description Number field blank box where cursor is located Allows you to enter the telephone number IP address E 164 address or host name of the person you want to call Telepho...

Page 47: ...g call Call Rejected Answering Active Hold Mute Terminating Call duration Indicates the length in hours minutes and seconds of the call on Line 1 e g 0 00 00 Call ID The first line of the top group bo...

Page 48: ...on hold e g 0 00 00 Call ID The first line of the bottom group box shows the name of the caller on Line 2 Telephone num ber address The second line of the bottom group box shows the telephone number...

Page 49: ...ructions for setting up the PTC 1800 s telephone Creating modifying the telephone directory You can create a telephone directory to access easily the telephone numbers of people you call frequently Ea...

Page 50: ...an entry to the PTC 1800 s existing telephone directory 1 At the Home screen press the SK1 key The Main Menu displays see Figure 6 Figure 6 The Main Menu 2 Press the Down arrow key to highlight Direc...

Page 51: ...case character Once you have entered the letter if you wait about 2 sec the cursor will automatically move to the next position or you can press another key to move it instantly Press the SK2 key to s...

Page 52: ...SK1 key twice to highlight the Next button 15 Press the SK2 key The third telephone directory screen displays see Figure 9 Figure 9 Telephone Directory Screen Leave the Noneoption selected if you do...

Page 53: ...y to highlight Directory 3 Press the Send key 4 Press the Down arrow key until Properties is highlighted 5 Press the Send key The Directory Properties screen displays see Figure 10 Figure 10 Directory...

Page 54: ...ough the fields in the telephone directory screens making the necessary changes as you go Deleting a telephone directory entry Follow the instructions below to delete a telephone directory entry 1 At...

Page 55: ...telephone directory 1 At the Home screen press the Down arrow key to display the telephone directory 2 Press the Up or Down arrow key until the entry that you want to obtain information about is high...

Page 56: ...ied 1 At the Home screen press the SK1 key The Main Menu displays see Figure 6 2 Press the Down arrow key until Settings is highlighted 3 Press the Send key Ring should be highlighted 4 Press the Send...

Page 57: ...desired level 6 Press the SK1 key to move to the Ring Tone field 7 Press the Down arrow key to select the desired ring tone 8 Press the SK1 key to move to the Speaker checkbox 9 Press the SK2 key to c...

Page 58: ...gure 6 2 Press the Down arrow key until Settings is highlighted 3 Press the Send key A new menu appears 4 Press the Down arrow key until Key Lock is highlighted 5 Press the Send key The keyboard is no...

Page 59: ...e PTC 1800 to answer incoming calls automatically without you having to press the Send key 1 At the Home screen press the SK1 key The Main Menu displays see Figure 6 2 Press the Down arrow key until S...

Page 60: ...tings Menu and the PTC 1800 will generate a tone when its keys are pressed Turning off keypad tones To prevent the PTC 1800 from generating keypad tones follow the instructions in the Initializing key...

Page 61: ...ser Identification screen 6 Press the End key to exit the User Identification screen and return to the Home screen Field Description Telephone Number The telephone number IP address E 164 address or h...

Page 62: ...pen the PTC 1800 s telephone directory then use the Up and Down arrow keys to highlight the desired number in the list Press the Up arrow key to open a list of your most recently dialed calls then use...

Page 63: ...ng call If a call is in progress pressing the Hold key swaps Lines 1 and 2 Only the call on Line 1 can be the active call capable of sending and receiving audio Calls on Line 2 are considered to be on...

Page 64: ...alls by pressing the Up arrow key at the Home screen The screen displays a list of the 20 most recently dialed starting with the most recent received or missed calls respectively Saving an entry in a...

Page 65: ...the SK1 key A small menu displays 4 Press the Down arrow key until Delete is highlighted 5 Press the Send key A message displays asking if you want to delete the entry 6 Press the Down arrow key to h...

Page 66: ...ll Information Screen Table 10 Description of the Call Information Screen Field Description To From The name of the person associated with this call Number The telephone number IP address E 164 addres...

Page 67: ...d key 4 Press the Down arrow key until Clear is highlighted 5 Press the SK1 key 6 Press the Down arrow key to highlight one of the options in Table 11 Table 11 Options for Clearing Calls 7 Press the S...

Page 68: ...PTC 1800 screen displays 4 Press the End key to exit the About PTC 1800 screen Exiting the telephone application Follow the instructions below to exit the PTC 1800 s telephone application 1 At the Ho...

Page 69: ...nd running the VoiceAlert application Only configured members of the group will be able to hear the transmitted message and be able to communicate with the originator of the message Setting up the Voi...

Page 70: ...ype of VoiceAlert notification This section allows you to select how the PTC 1800 will alert you to an incoming broadcast message Audible alert In the bottom left hand corner of the VoiceAlert screen...

Page 71: ...cation The Voice Alert screen displays See Figure 16 The available user groups have been set up by your system administrator 2 Press the Right arrow key to move to the Group field and open the list of...

Page 72: ...old down the Push to Talk button and speak into the microphone on the PTC 1800 or an attached headset 6 Release the Push to Talk button when you are finished talking Receiving a broadcast message The...

Page 73: ...See Chapter 2 for information on how to dispose of them properly Replacing the battery pack Removing the battery pack Follow these steps to remove the battery pack You must suspend the PTC 1800 befor...

Page 74: ...ery pack can be recharged via a 12 VDC 1 2 A AC adapter a 15 VDC 2 7 A cigarette lighter adapter or the Model 1822 charger When to charge the battery pack If you need to continue using the PTC 1800 us...

Page 75: ...gher capacity battery packs may be used Charging guidelines Follow these basic guidelines when charging your PTC 1800 s battery pack Recharge the battery pack in temperatures 32 113 F 0 45 C Recharge...

Page 76: ...apter into an electrical outlet or the cigarette lighter adapter into a vehicle s cigarette lighter socket 3 Charge standard battery packs for 3 5 hours 5 hours for first time use and extended life ba...

Page 77: ...charge and eventually become inoperable To prevent this charge the battery pack at least every six months Environment Avoid long term storage of your batteries in temperatures above 104 F 40 C or in e...

Page 78: ...Chapter 3 Configuring TN 3270 5250 68 PTC 1800 Product Reference Guide...

Page 79: ...battery Charge the PTC 1800 s bridge battery before you use the unit for the first time whenever the Low Bridge icon Appendix C displays on the PTC 1800 s screen and whenever the main battery pack ha...

Page 80: ...placed into suspend mode Memory effects are characteristic of nickel cadmium battery technology To reduce the risk of memory effects perform the following procedure once a month to condition the bridg...

Page 81: ...ecommends that the PTC 1800 s bridge battery be replaced every 3 5 years under normal operating conditions However the PTC 1800 s bridge battery is not user replaceable Replacement procedure If the br...

Page 82: ...Chapter 3 Configuring TN 3270 5250 72 PTC 1800 Product Reference Guide...

Page 83: ...een 32 and 122 F 0 50 C Handling the PTC 1800 The following information will help to ensure that you receive safe reliable and trouble free service from your PTC 1800 Suspend the PTC 1800 before you r...

Page 84: ...0 days Do not store the PTC 1800 in temperatures below 4 F 20 C or above 104 F 40 C Do not store the PTC 1800 in a damp or humid environment Procedure 1 Transfer any data stored in the PTC 1800 to a h...

Page 85: ...s directly onto the PTC 1800 To clean the PTC 1800 slightly moisten a soft clean lint free cloth with a mild nonabrasive liquid cleaner and wipe the outside surfaces Do not use a paper towel Cleaning...

Page 86: ...1800 Product Reference Guide Disposing of the PTC 1800 When your PTC 1800 has reached the end of its useful life do not throw it away Send it to an authorized Symbol service center for bridge battery...

Page 87: ...x C for an explanation of the PTC 1800 s Status LED codes Do any icons appear on the PTC 1800 s display screen See Appendix C for an explanation of the display icons Has the speaker sounded How many t...

Page 88: ...still does not operate follow your organization s procedure to have the PTC 1800 serviced The PTC 1800 s screen is slow to refresh Wait until the PTC 1800 warms up to room temperature if it has been...

Page 89: ...tery pack Make sure the receiving equipment is turned on and is properly connected to the host computer If the PTC still does not establish contact follow your organization s procedure to have the PTC...

Page 90: ...ears on the blank surface when the scanner is operating If no scanning line appears follow your organization s procedure to have the scanner serviced Make sure the bar code label you are trying to sca...

Page 91: ...following before contacting Symbol Review the other documentation available for the PTC 1800 Review the troubleshooting sections in your Microsoft manuals Review the documentation for your application...

Page 92: ...Chapter 3 Configuring TN 3270 5250 82 PTC 1800 Product Reference Guide...

Page 93: ...the PTC 1800 Overview Do not reboot the PTC 1800 unless absolutely necessary Rebooting the PTC 1800 erases all programs and data in RAM Rebooting stops the PTC 1800 resets the unit and then restarts b...

Page 94: ...et the PTC 1800 When the PTC 1800 reboots after a reset it returns you to the operating system Procedure 1 Remove the PTC 1800 s battery pack following the instructions in Chapter 12 2 Use a nonconduc...

Page 95: ...Software program AirBeam2 for radio file transfer Charging Contacts Connects to Model 1822 charger Infrared port Infrared lens for IrDA communications Speed 115 2 kbps maximum Headset jack 1 mm jack f...

Page 96: ...sing 104 F 40 C Shock 4 ft 1 2 m drop to concrete Note If the PTC 1800 s battery pack dislodges the connection to the LAN network will have to be re established Altitude Operating Up to 10 000 ft 3 04...

Page 97: ...e 87 Physical Length 7 7 in 19 6 cm Width 2 6 in 6 6 cm Thickness 1 2 in 3 cm Weight 12 to 13 oz 34 to 37 kg with standard battery pack 14 to 15 oz 4 to 43 kg with extended life battery pack Storage H...

Page 98: ...Chapter 3 Configuring TN 3270 5250 88 PTC 1800 Product Reference Guide...

Page 99: ...ve or visit www symbol com to order any of the following parts Table 13 Accessory part numbers Item Part number Hardware AC Adapter 12 VDC 1 2 A Lithium ion battery packs Standard Extended life Cigare...

Page 100: ...Chapter 3 Configuring TN 3270 5250 90 PTC 1800 Product Reference Guide...

Page 101: ...d LED codes Display icons Table 14 interprets the display screen s status icons Table 14 Display icons Icon Name Description Low Batt The battery pack is low recharge it Low Bridge The bridge battery...

Page 102: ...light emitting diode LED Table 15 LED codes Status LED Explanation Blinking green The PTC 1800 s battery pack is being charged Green The PTC 1800 s battery pack has been charged to a 90 or greater ca...

Page 103: ...harging time 64 Cleaning the contacts 75 Cleaning the PTC 1800 75 Clearing call lists 57 Clock 23 Common solutions 78 Communicating data 32 Communication and I O 85 Conditioning the bridge battery 70...

Page 104: ...nner 5 Introduction 9 32 83 K Key functions 34 L Laser scanner 86 LED codes 92 Length of time 67 Lithium ion batteries 63 Lithium ion battery pack 3 Locking the keyboard 48 Low battery warning 25 M Ma...

Page 105: ...ormation 3 Safety precautions 3 Saving an entry in a call list to the telephone directory 54 Scanning procedure 30 Scope of the manual 7 Selecting the type of VoiceAlert notification 60 Sending a broa...

Page 106: ...ehicle adapter optional 14 Via an optional internal radio 31 Via the AC or cigarette lighter adapter 65 Via the keyboard 30 Via the Model 1822 charger 66 Vibration alert 61 Viewing call lists 54 Voice...

Page 107: ......

Page 108: ...Chapter 3 Configuring TN 3270 5250 Symbol Technologies Inc One Symbol Plaza Holtsville NY 11742 1300 Document No 30635 000 002 Printed in the U S A 30635 000 002...

Reviews: