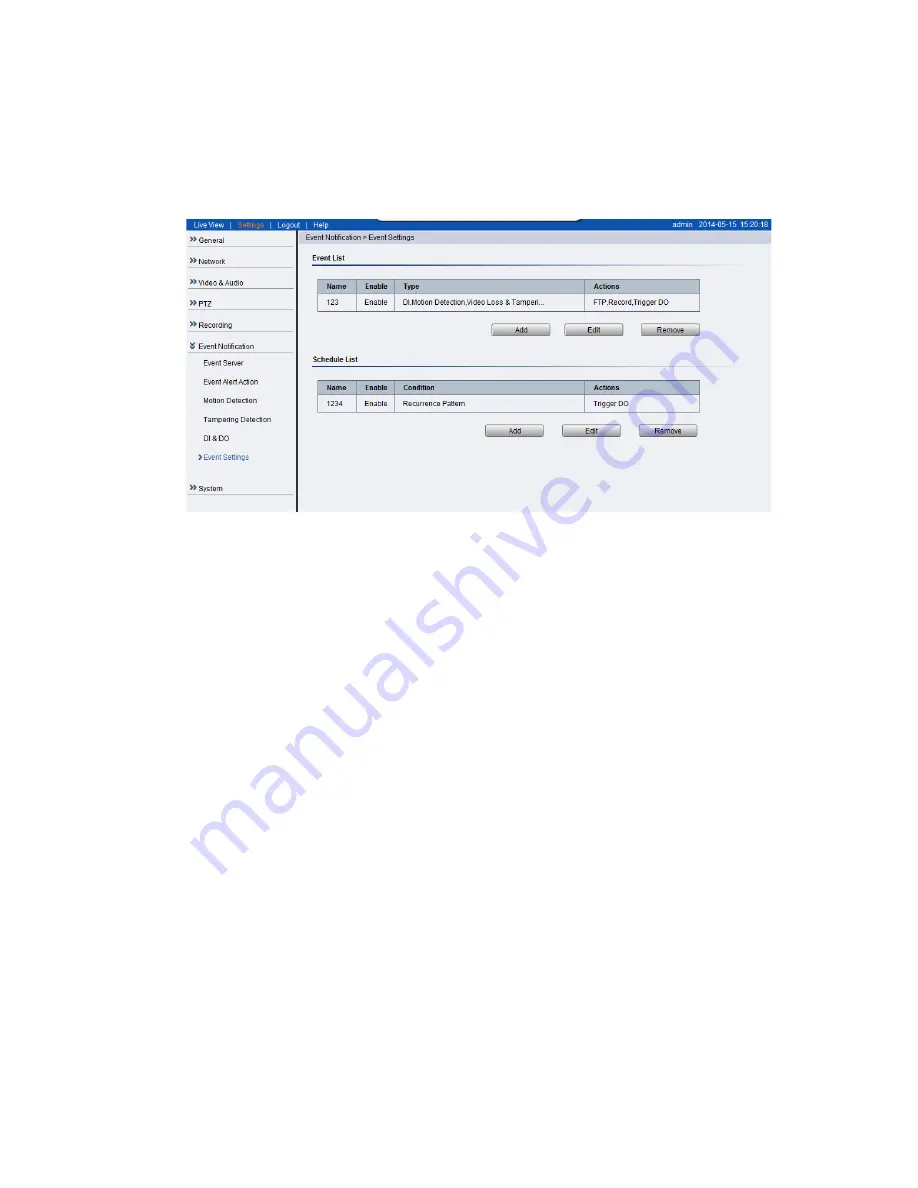
background image


127 

Event Settings 

Event settings deal with alarm handling and notification, as well as feature 
scheduling. These settings can be found under the 

Event Notification > 

Event Settings menu. 


The event handler is rule based. There are lists for both two types of rules: 


Event List – Contains rules based on triggered events such as motion 
detection or DI triggers.  


Schedule List – Contains time-based rules. 

Each rule has an action list. When the conditions for rule are met, the actions 
specified by the rule are carried out. Users may perform the following actions 
in both Event and Schedule lists: 


Add – Clicking on the Add button adds a new rule to a list. 


Edit – A selected rule may be edited by clicking on the Edit button.  


Remove – A selected rule may be deleted by clicking on the Remove 
button.


Summary of Contents for CAM3351R4

Page 1: ...CAM3xxx Series User Manual Release 2 3...

Page 2: ...fitness for any particular purpose Furthermore Surveon Technology reserves the right to revise this publication and to make changes from time to time in the content hereof without obligation to notif...

Page 3: ...ne 2012 1 2 New model CAM3351 added September 2012 1 3 New models added August 2013 1 4 New bracket added for CAM3351 and UI Modified October 2013 1 5 Add new controller icons December 2013 1 6 New mo...

Page 4: ...4 2 2 New model CAM3451R3 R6 added CAM3461LV HW upgraded CAM3471V 3471M 3471MP EOL Removed Jan 2016 2 3 Video Analytics Functions added Mar 2016...

Page 5: ...for CAM3361LV 3461LV 18 Specifications for CAM3371EM EV 20 Specifications for CAM3451R3 R6 22 Specifications for CAM3471HEM 3471HEV 24 Specifications for CAM3471HI 26 Specifications for CAM3571M MP VP...

Page 6: ...owser 48 Obtaining IP address through the IP Utility 48 Connecting to the Network Camera 49 Logging into the System 49 Installing Active X Components in Internet Explorer 50 Logging Out of the System...

Page 7: ...M VP CAM3371EV EM CAM3351R4 R6 CAM3361LV CAM3461LV CAM3451R3 R6 100 ROI Settings 102 Privacy Mask Setting 103 Audio Settings 104 PTZ 105 Recording 106 Recording Basic Settings 106 Video Analysis for C...

Page 8: ...creen 146 Exiting the IP Utility 147 5 4 Camera Actions 148 Search 148 Login 149 Properties 151 Delete from Tool 153 Select All 154 Rebooting Camera 155 Set IP 156 Link to Camera Web Interface 158 Lin...

Page 9: ...9 Update Firmware 172 5 8 Focus Tool 174...

Page 10: ...Grounding Particular attention should be given to prepare reliable grounding for the power supply connection It is suggested to use a direct connection to the branch circuit Check for proper grounding...

Page 11: ...regions where power sources are unstable apply surge suppression Available with sufficient space behind the device for cabling Never install or use unless waterproof or dust resistant is listed as a f...

Page 12: ...Ns they provide a complete budget conscious remote surveillance solution that are ultra clear and highly integrated CAM3xxx series combine a user friendly interface and simplified installation with a...

Page 13: ...H 264 MPEG 4 MJPEG Compression Motion JPEG MPEG 4 and H 264 also known as MPEG 4 Part 10 AVC each employ different techniques to reduce the amount of data transferred and stored in a network video sys...

Page 14: ...rs to consolidate power facilities for higher reliability With PoE a camera can still operate in the event of a power failure if it is connected to a centralized backup power with an Uninterruptible P...

Page 15: ...s D N Bullet IP Camera CAM3451R3 3M WDR D N Bullet IP Camera CAM3451R6 3M WDR D N Bullet IP Camera CAM3461LV 3 Megapixel D N Outdoor Bullet IP Camera CAM3471HEV 3MP P Iris Outdoor Bullet IP Camera CAM...

Page 16: ...er Time 1 1 1 1 000 000 s Video Compression H 264 MPEG 4 MJPEG Resolution Up to 1920 x 1080 Video FPS 30 fps at 1080P 1920 x 1080 30 fps at SXGA 1280 x 1024 30 fps at HD720 1280 x 720 30 fps at D1 720...

Page 17: ...SNMP FTP HTTP HTTPS CIFS PPPoE UPnP RTP RTSP RTCP 3GPP ONVIF iSCSI Ethernet 10 100 Base T RJ45 Local Storage microSD SDHC x 1 RS 485 N A USB N A SDK SDK 2 0 OS Microsoft Windows XP Vista 7 Browser IE...

Page 18: ...EG Resolution Up to 1920 x 1080 Up to 2048 x 1536 Video FPS 30 fps at 1080P 1920 x 1080 30 fps at SXGA 1280 x 1024 30 fps at HD720 1280 x 720 30 fps at D1 720 x 480 30 fps at VGA 640 x 480 30 fps at Q...

Page 19: ...ARP TCP UDP ICMP IGMP DHCP NTP DDNS SMTP SNMP FTP HTTP HTTPS CIFS PPPoE UPnP RTP RTSP RTCP 3GPP ONVIF iSCSI Ethernet 10 100 Base T RJ45 Local Storage microSD SDHC x 1 RS 485 N A USB N A SDK Surveon SD...

Page 20: ...r Time 1 1 1 000 000s Video Compression H 264 MPEG 4 MJPEG Resolution Up to 1920 x 1080 Video FPS 30 fps at 1080P 1920 x 1080 30 fps at SXGA 1280 x 1024 30 fps at HD720 1280 x 720 30 fps at D1 720 x 4...

Page 21: ...S CIFS PPPoE UPnP RTP RTSP RTCP 3GPP ONVIF iSCSI Ethernet 10 100 Base T RJ45 Local Storage microSD SDHC slot x 1 Class2 Class 4 Class 6 RS 485 N A USB N A SDK SDK 2 0 OS Microsoft Windows XP Vista 7 B...

Page 22: ...ter Time 1 1 1 10 000s Video Compression H 264 MPEG 4 MJPEG Resolution Up to 2048 x 1536 Video FPS 25 fps at QXGA 2048 x 1536 30 fps at 1080P 1920 x 1080 30 fps at SXGA 1280 x 1024 30 fps at HD720 128...

Page 23: ...MP FTP HTTP HTTPS CIFS PPPoE UPnP RTP RTSP RTCP 3GPP ONVIF iSCSI Ethernet 10 100 Base T RJ45 Local Storage microSD SDHC x 1 RS 485 N A USB N A SDK Surveon SDK 2 0 OS Microsoft Windows 7 8 Browser IE 8...

Page 24: ...me 1 1 1 10 000 s Video Compression H 264 MPEG 4 MJPEG Resolution Up to 2048 x 1536 Video FPS 30 fps at QXGA 2048 x 1536 60 fps at 1080P 1920 x 1080 60 fps at SXGA 1280 x 1024 60 fps at 720P 1280 x 72...

Page 25: ...3GPP ONVIF iSCSI Ethernet 10 100 Base T RJ45 Local Storage microSD SDHC x 1 Class 4 Class 6 RS 485 N A USB N A SDK SDK 2 0 OS Microsoft Windows 7 8 Browser IE8 x or above Safari Chrome via IE Tab Soft...

Page 26: ...ideo FPS 30 fps at QXGA 2048 x 1536 60 fps at 1080P 1920 x 1080 60 fps at SXGA 1280 x 1024 60 fps at 720P 1280 x 720 60 fps at D1 720 x 480 60 fps at VGA 640 x 480 60 fps at QVGA 320 x 240 Video Contr...

Page 27: ...PS CIFS PPPoE UPnP RTP RTSP RTCP 3GPP ONVIF iSCSI Ethernet 10 100 Base T RJ45 Local Storage microSD SDHC x 1 Class 4 Class 6 RS 485 N A USB N A SDK SDK 2 0 OS Microsoft Windows 7 8 Browser IE8 x or ab...

Page 28: ...3 Diagonal 126 40 Horizontal 98 32 Vertical 72 24 Camera Angle Adjustment N A Pan Tilt Zoom Functionalities N A Shutter Time 1 1 1 1 000 000 s Video Compression H 264 MPEG 4 MJPEG Resolution Up to 25...

Page 29: ...UDP ICMP DHCP NTP DDNS SMTP FTP HTTP CIFS PPPoE UPnP RTP RTSP RTCP 3GPP ONVIF iSCSI Ethernet 10 100 Base T RJ45 Local Storage microSD SDHC slot x 1 Class 4 Class 6 only RS 485 N A USB N A SDK Surveon...

Page 30: ...30 Chapter 2 Hardware Overview 2 1 Overview CAM3xxx Series except compact cameras CAM3351R4 R6 1 Sunshield 2 Lens 3 IR LED 4 Light Sensor 5 Camera Bracket...

Page 31: ...31 CAM3351R4 3351R6 3451R3 3451R6 3361LV 3461LV Rear View for CAM3xxx Series except compact cameras Please remove the cover Reset Button microSD SDHC Card Slot Status LED Indicator...

Page 32: ...32 2 2 Dimensions Dimensions for CAM3xxx Series except compact cameras Unit mm inches Dimensions for CAM3351R4 3351R6 3361LV 3451R3 3451R6 3461LV Unit mm inches...

Page 33: ...33 2 3 Functions Cable Functions for CAM3xxx Series except compact cameras 5 1 1 8 6 7 microSDHC RESET STATUS...

Page 34: ...2 Status LED Indicator The LED will light up after the camera has successfully completed the boot process The Status LED indicator in the rear of the camera can be set to light whenever the unit is a...

Page 35: ...The power connector is provided for solutions without PoE 8 I O Terminal Connector The I O terminal connector provides an RS 485 interface one transistor output two digital inputs and connection point...

Page 36: ...to voltages greater than 30V DC DI2 Digital Input Pin 4 Connect to GND to activate or leave floating or unconnected to deactivate Must not be exposed to voltages greater than 30V DC DO Digital Output...

Page 37: ...37...

Page 38: ...61LV 1 Network Connector The camera connects to the network via a standard RJ 45 network connector The camera detects the speed of the local network 10 100BaseT The camera also supports PoE Power over...

Page 39: ...hole and four screw holes on a flat surface with the electric drill 2 Fix the camera bracket on the surface with screws and screw anchors 3 Run the cable through the bracket 4 Join the camera with the...

Page 40: ...tighten the zoom puller Unscrew the focus puller on the lens and adjust the focus as required Re tighten the focus puller and install the front cover back on the camera Zoom puller Focus puller Note...

Page 41: ...R3 3451R6 3461LV 1 Use the camera bracket to mark the desired camera position on a flat interface Make one cable entry hole and three screw holes on the surface with the electric drill 2 Fix the camer...

Page 42: ...42 3 Join the camera with the bracket Loose the connecting screw to adjust the camera s viewing point to upward downward left and right...

Page 43: ...ined 4 Connect the camera to the network with the network connector 5 PoE 802 3af is supported You can also connect the power connector to the power adapter and then connect the adapter to a power out...

Page 44: ...44 2 5 Camera Deployment Camera Deployment for CAM3xxx Series except compact cameras...

Page 45: ...45 Camera Deployment for compact cameras CAM3351R4 3351R6 3361LV 3451R3 3451R6 3461LV...

Page 46: ...46 2 6 Before You Start Please prepare a PC with Windows XP or above and web browsers Internet Explorer 6 0 or above installed...

Page 47: ...interface Internet Explorer is the recommended web browser for use with network cameras and our examples will be from this browser Usage on other browsers will be similar RTSP Player These include com...

Page 48: ...tion 2 After the installation is complete click the Auto Search button or click Camera Search in the menus The camera search will begin and a status bar will display the search progress 3 The details...

Page 49: ...er and press enter You can also Click the Link to Camera button or click Camera Link to Camera in the IP Utility menu bar The camera s live view webpage will open in a browser window Logging into the...

Page 50: ...tor privileges If the dialog box suggests that you are not allowed to install ActiveX components try resolving the problem using the following steps 1 In Internet Explorer open Tools Internet Options...

Page 51: ...ng the browser window Users can also choose to click the Logout link located at the top of the screen Using the Help Interface While using the web interface you may click on the Help link located unde...

Page 52: ...a Mobile Device RTSP Player In order to access streaming video on 3GPP mobile devices please make sure the network camera is already online and connected to the Internet In the IP field under the IP A...

Page 53: ...uration V Set IP Only Port Settings V X UpnP V X Wifi Setting V X Video Audio Settings Basic Settings V X Image Appearance Settings V X Video Streams V X Audio Settings V X PTZ RS 485 Settings PTZ Set...

Page 54: ...54 Export Import V X Reboot V V Camera Search X V Login V V Properties X V Delete from Tool X V Clearing and Setting Status X V Camera Group Actions X V Configuration Settings X V Focus Tool X V...

Page 55: ...nd pull up the help menu 2 Live View Controls These controls allow users to configure the live view streams and camera live view functionality 3 Button Bar These controls allow the user to quickly acc...

Page 56: ...Camera Name can be changed under Settings General Basic Settings Manual Record When clicked records the current live video Stops recording when clicked again The location for storing the video can be...

Page 57: ...the resolution of the stream currently selected Options are available for each stream 1536P 2048 x 1536 1080P 1920 x 1080 SXGA 1280 x 1024 720P 1280 x 720 VGA 640 x 480 QVGA 320 x 240 for stream 1 and...

Page 58: ...58 Control Description AutoFocus can be achieved by pressing this button P IRIS level can be adjusted Manually or Automatically...

Page 59: ...default set to model name MAC address displays on the center of the main page Users may replace the default name with a new name consisting of alphanumeric characters spaces and the character Camera N...

Page 60: ...g during camera access o LED off during camera access LED default on off during camera access o LED always off LED always off Click OK to save or Cancel to abort the changes before you leave the page...

Page 61: ...ogin Checking the checkbox will allow users to view the camera stream without having to login Maximum number of simultaneous viewers limited to Enter a number from 1 to 10 in this field to limit the n...

Page 62: ...62...

Page 63: ...name used to login to the system User Group The system allows for 2 types of users o Administrator Administrators have full access privileges o Operator Operators can only access the live view page P...

Page 64: ...control user access The password must be a combination of alphanumeric characters _ between 4 and 20 characters in length and must begin with an alphabet letter This password should be retyped in the...

Page 65: ...Time Settings There are 3 ways to set the system time Synchronize with NTP server NTP is a protocol for synchronizing the system clock to an external server If this option is chosen enter the IP addre...

Page 66: ...ay Light Saving Time by ticking on Enable Day Light Saving Click OK to save or Cancel to abort the changes before you leave the page For the new interface the User could key in the Time offset hrs und...

Page 67: ...vity These settings are found under the Settings Network context Network Configuration These settings are used to configure basic network access for the camera They are found under Network Network Con...

Page 68: ...This only works if your network environment and hardware equipment support IPv6 Get IPv6 address automatically the network camera will listen to router advertisements and be assigned with a link loca...

Page 69: ...his feature is disabled by default Connecting using DDNS requires registration on third party websites for DDNS services Select desired DDNS service website check the Enable DDNS option and fill in va...

Page 70: ...ss where software listens for incoming information This section which can be accessed under Network Port Settings includes HTTP Port Settings RTSP Settings and RTP Multicast Settings Note The default...

Page 71: ...Note The RTP port number must be an even number After entering the RTP port number the RTCP port number will automatically be set to the RTP port number 1 RTP Multicast Settings Tick Enable RTP Multic...

Page 72: ...Name An identifier for the camera on the network Interval The time between camera sent UPnP updates Click OK to activate UPnP or Cancel to abort the changes before you leave the page Once activated th...

Page 73: ...73 Wifi Wifi functionality is not supported for CAM3xxx series...

Page 74: ...consists of the following three key components 1 Manager Network management station NMS a server which executes applications that monitor and control managed devices 2 Agent A network management softw...

Page 75: ...n password and the Encryption password Security name According to your NMS settings choose Read Write or Read Only and enter the community name Authentication type Select MD5 or SHA as the authenticat...

Page 76: ...er network with especially wide deployment on the internet Select Create Self Signed Certificate Automatically and click Create to have the certification authority automatically Once succeed you will...

Page 77: ...window will be prompted for creating certificate information Edit the information in the files if necessary and click OK to confirm the setting Once succeed you will see the Certificate Info in the n...

Page 78: ...video stream settings as well as audio parameters Basic Settings Basic settings pertain to simple live view tweaks These parameters can be found under Video Audio Basic Settings Video Orientation In c...

Page 79: ...solution is 160 x 120 Include Date Displays the current date Include Time Displays the current time Camera Name Displays the name of the camera Video Codec Setting H 264 profile can be further set to...

Page 80: ...Appearance Settings These settings found under Video Audio Image Appearance deal with the video output of the camera There are two tabs Image Attributes and Sensor Configuration as well as Advanced S...

Page 81: ...s color information to produce a clear image quality o Auto mode The camera will determine when to switch o Day mode Forces day mode Chroma Suppress Reduces the false color phenomena Suppress Level Th...

Page 82: ...82 o Schedule for day mode Allows users to set a day night transition time...

Page 83: ...tness Adjusts the perceived light intensity of the image Note In certain situations the sensor may experience banding issues In these cases please raise the brightness Contrast Adjusts the overall dif...

Page 84: ...amera captures images Longer shutter times allow more light into the sensor resulting in a cleaner picture however longer shutter times can result in motion blur o Fixed o Auto The camera will automat...

Page 85: ...of the image AGC Automatic gain control AGC adjusts the video gain level to a variety of inputs This setting provides a baseline value for the AGC Values higher than this will be darkened and values...

Page 86: ...olor balancing method used AWB Automatically chooses white level MWB The user must specify the red and blue gain levels to achieve the correct white level o R Gain The gain applied to the red video ch...

Page 87: ...o 2DNR Reduces noises o 3DNR Reduces noises in low light conditions and even with moving objects o BLEND Blends 2DNR and 3DNR to create clear images Normal Strength Ranges from 0 to 164 Motion Adapti...

Page 88: ...88 Edge Enhance Noise Sensitivity Senses the noise Edge Strength Clip Enhances the edges of the image...

Page 89: ...89 Lens Correction Correct the barrel distortions and pincushion distortions of images while using wide angle lenses...

Page 90: ...he camera will determine when to switch o Day mode Forces day mode Chroma Suppress Reduces the false color phenomena o Night mode Forces night mode o Schedule for day mode Allows users to set a day ni...

Page 91: ...es please raise the brightness Contrast Adjusts the overall difference in the light vs dark areas Saturation Adjusts the colorfulness of a color relative to its own brightness Sharpness Adjusts the ed...

Page 92: ...cally o True WDR the shutter speed by average HDR level Auto Low Middle High o BLC Backlight Compensation allows the camera to adjust the exposure of the entire image to properly expose the subject in...

Page 93: ...ue video channel Smart IR Adjusts the shutter time automatically to make the image clear without overexposures o Off o On Focus Panel The parameters deal with the focus The adjustments will be shown i...

Page 94: ...Smart Shutter This functionality is used for capturing precise images of fast moving objects by adjusting the shutter speed automatically to avoid captured images going blurry or dragging using the co...

Page 95: ...Enable On Off this functionality o Hide Show show hide the enabled smart shutter window o AE Region Window Move the window to the area where you d like to set as a target area Smart AF The Smart AF a...

Page 96: ...eams The configuration for video streams including resolution frame rate and image quality parameters can be found under Video Audio Video Streams The page is split into settings for 2 streams Common...

Page 97: ...option is only available in Stream 1 Video Resolution Sets the resolution of the video output The following options are available QSXGA 2560x1920 Stream 1 only QXGA 2048x1536 Stream 1 only 1080P 1920...

Page 98: ...nstant bit rate output regardless of video quality Bit rates available are dependent on the video resolution chosen and range from 256 kbps to 6 Mbps You can also choose to type in the values you want...

Page 99: ...99 Settings can be further defined when the network disconnection occur Enable this option to adjust the Video Frames Constant Bit Rate for Video Stream 1 and 2...

Page 100: ...streams including field of view resolution frame rate and image quality parameters can be found under Video Audio Video Streams FoV can be defined as the width and height of a scene to be monitored Di...

Page 101: ...ly Video Frames per Second Sets the number of frames per second 1 3 5 10 15 20 25 30 FPS are possible values You can also choose to type in the values you want the range is from 1 30 Key Frame Interva...

Page 102: ...functions in one image Window Settings o Window Name Specify a name for a different window o Delta Quality Can be selected from 10 to 10 o Encoding Frame interval Can be selected from 1 to 1000 Backg...

Page 103: ...103 Privacy Mask Setting Use New button to create privacy mask on the video up to 3 masks can be created The window name and the mask color can be further defined...

Page 104: ...incoming audio from the camera Audio In Selects the source for the camera audio feed Line In specifies an external source connected to the camera s line in port while Microphone is the camera s inter...

Page 105: ...RS 485 device Options are 2400 4800 9600 19200 11520 bd Enable PTZ This check box activates PTZ service allowing PTZ controls to be displayed o PTZ decoder address The address of the PTZ decoder whic...

Page 106: ...y be recorded onto the microSD card if the network connection is lost When a network connection is re established recording will switch back to the remote destination If this feature is turned off the...

Page 107: ...nt or scheduled recording o microSD Card o Remote Storage o ISCSI Storage Before selecting the ISCSI Storage as your recording destination settings of Event Server under the Event Notification should...

Page 108: ...108 Click OK to save or Cancel to abort the changes before you leave the page...

Page 109: ...f action triggered this recording eg if it was alarm recording or scheduled recording Locked The lock state of the alarm The video records located will be split into pages The information on these Cli...

Page 110: ...Locks Unlocks video files Locked files cannot be removed Select one or multiple video files and click Lock Unlock When a file is locked the Locked status will display yes Remove Manually deletes store...

Page 111: ...chosen For 2 5 could be used that combining with other functions Video Analysis The video analysis menu Settings Video Analysis deals with object counting object loitering detection object direction...

Page 112: ...s the direction name of Direction type or input by yourself English numbers only Vertex Number Pre set as 4 After inputting the numbers the polygon could be created choose Modify if you need to make a...

Page 113: ...ng Detection Enable Object Loitering Detection Tick this option to enable the function Define Region Define the monitoring type by Zone Full Scene If choosing Full Scene the pre setting polygon would...

Page 114: ...to click save for storing then press OK to apply VI s new setting Object Direction Detection Window Name Pre set the direction name of Direction type or input by yourself English numbers only Directi...

Page 115: ...h numbers only Vertex Number The setting range is from 3 8 at least the vertex should be set as 3 Direction Type Right Enter In Leave Out Note 1 The operation of this function is similar to Object Cou...

Page 116: ...ng pic Event Notification Event Notification settings found under Settings Event Notification deal with the event detection scheduled recording and notification abilities of the camera Event Server Th...

Page 117: ...Sender Email Address The return e mail address for notifications This should be your notification address Recipient email address The e mail address notification emails will be sent to Only one email...

Page 118: ...ote location via the file transfer protocol Server Address The address of the FTP server FTP Server Port The port number of the FTP server Default 21 User Name The user name of the FTP account Passwor...

Page 119: ...mputer System Interface s name Server Address Your server address Port o CHAP logon information User Name Your user name Target Secret Created to manage the connections between an iSCSI device and the...

Page 120: ...twork Resume surveon cgi param cgi action update USER admin PWD admin System LiveViewPor 6002 Network Resume Settings NVR Server IP Address The IP address of the NVR server The system will start to pi...

Page 121: ...h new window will be created with a default name Window N where N is the number of the window After creating the window clicking it will select the window You can drag and resize the window using your...

Page 122: ...crosses the Trigger Threshold denoted by the red line a motion event will be triggered Use Activity Status Display to check if the setting of threshold is reasonable For smaller motions below the set...

Page 123: ...the days of the week that Motion Detection is active by checking the corresponding boxes and fill in a start time and end time for motion detection in the From and To boxes Click OK to save or Cancel...

Page 124: ...pering alarm handling and notifications can be configured under Event Settings The tempering detection parameters include Tampering Detection Turns tampering detection on or off Tampering Sensitivity...

Page 125: ...Event Settings Digital Input The two inputs are listed as Input1 and Input2 and connect to external circuits such as window break detectors These inputs can be tested by clicking the Test button in th...

Page 126: ...to send signals through the digital output Each output has a Normal Status High DO outputs a high voltage when triggered and is connected to the output circuit in the following manner Low DO acts as a...

Page 127: ...sed on triggered events such as motion detection or DI triggers Schedule List Contains time based rules Each rule has an action list When the conditions for rule are met the actions specified by the r...

Page 128: ...contain the following triggering actions Note If editing a rule that has not been triggered the rule will not be triggered after until after editing is complete If the rule is triggered any changes w...

Page 129: ...he trigger is active by checking the corresponding boxes and fill in a start time and end time for motion detection in the From and To boxes Never The event is never triggered Triggered By After the f...

Page 130: ...on Contents of the notification e mail o Snapshot Video Clip Choose to send a snapshot or video attachment from 5s before to 30s after the trigger FTP uploads a snapshot or video clip to a FTP locatio...

Page 131: ...ion The length of time that the DO signal is sent Options are 1 2 5 10 20 or 30 seconds For more information please refer to the section on DI DO Click OK to save or Cancel to abort the changes before...

Page 132: ...the Event Set Time Interval When Activated The trigger time of the event 00 00 to 23 59 Enable Triggering By The next step is to specify the frequency of trigger response 3 options are available Alwa...

Page 133: ...shot or video clip to a FTP location specified in the Event Server settings o Snapshot Video Clip Choose to upload a snapshot or video file from 5 seconds before to 30 seconds after the trigger Files...

Page 134: ...ed under System Storage Management Storage Status The status of the current storage device can be obtained under Storage Status Storage Devices micro SD Card ISCSI NAS Status If a readable card is pre...

Page 135: ...Duration for Automatic Disc Save __ Hours If storage recycling is activated the card will save recordings continuously 99999 hours max Max Duration for Automatic Disc Cleanup __ Hours When The Disk Is...

Page 136: ...mation including IP Address MAC Address Subnet Mask Default Router address microSD Card Capacity Status Boot Loader Version Firmware Version Clicking on the Email button will send the system status in...

Page 137: ...a settings both successful and unsuccessful triggered events and error messages This information can be very useful in the event of a camera failure or unauthorized entry Clicking Email will send the...

Page 138: ...rk configuration Upgrade all configurations to clear all settings back to factory defaults Click Upgrade to start the upgrade Upon completion of firmware upgrade the camera will reboot you will be log...

Page 139: ...about 2 seconds The status LED will change to amber during startup 3 When the Status Indicator changes to back to Green which may take up to 1 minute the process is complete The default IP address is...

Page 140: ...lternately you may press the Reset button on the bottom of the camera to perform a complete reset of the camera no configurations retained To reset the camera by pressing the Reset button on the botto...

Page 141: ...well as import configuration details The following options are available Restart Camera Resets the camera when Apply is clicked Export Configuration Export the camera s settings and configurations by...

Page 142: ...ration V Set IP Only Port Settings V X UpnP V X Wifi Setting V X Video Audio Settings Basic Settings V X Image Appearance Settings V X Video Streams V X Audio Settings V X PTZ RS 485 Settings PTZ Sett...

Page 143: ...143 Export Import V V Reboot V V Camera Search X V Login V V Properties X V Delete from Tool X V Clearing and Setting Status X V Camera Group Actions X V Focus Tool X V...

Page 144: ...amera Utility also provides tools to perform simple connectivity configuration firmware upgrades and reboot operations The utility is intended to simplify the configuration and management of multiple...

Page 145: ...ish to install the application for the current user only Just me or all users on this computer Everyone 5 Click Next to continue The system will respond with a ready screen Click Next again The system...

Page 146: ...subnet as the computer In some cases this may result in longer wait times IP Utility Main Screen The IP Utility main screen is divided into 3 sections 1 Camera Group Display displays group details 2 C...

Page 147: ...147 Exiting the IP Utility To exit the IP utility click the X button on the top right corner of the screen or choose File Exit from the menu bar...

Page 148: ...as listed as well as locates any new cameras connected on the same subnet The search is performed every time the IP utility starts To perform search again 1 Click the Auto Search button or click Camer...

Page 149: ...equire that proper login credentials are supplied To login to a camera 1 Right click the camera you wish to set Select Login from the popup the system responds with the Login window Alternatively clic...

Page 150: ...ame and password 3 Click OK to set the username and password Note To perform further configuration please make sure that the User set here has administrator privileges The default Username Password fo...

Page 151: ...erties of a camera can be viewed by following these steps 1 Select a camera by checking the box in the first column of its listing 2 Right click the camera and select Properties or select Camera Prope...

Page 152: ...152 The Camera Information popup will display with camera details...

Page 153: ...Select one or more cameras by checking the box in the first column of their listing 2 Right click the camera s which you want to delete from the tool and select Delete from Tool The camera will be rem...

Page 154: ...154 Select All In a group context right clicking a camera and selecting Select All will select all the cameras in the group...

Page 155: ...o this 1 Select a camera by checking the box in the first column of its listing 2 Click the Reboot button or select Camera Configuration Reboot from the menu bar The camera will reboot If further conf...

Page 156: ...1 Click the Set IP button 2 You can choose to obtain an IP address from DHCP or assign a fixed IP 3 Select one or more cameras by checking the box in the first column of their listing Click Select All...

Page 157: ...157 Click OK to save or Cancel to abort the changes before you leave the page...

Page 158: ...Link to Camera 1 Select a camera by checking the box in the first column of its listing 2 Double click the selected camera or select Camera Link to Camera in the menu bar The camera s live view webpa...

Page 159: ...gement page of the selected camera 1 Select a camera by checking the box in the first column of its listing 2 Right click the camera and select User Manager or click Camera User Manager in the menu ba...

Page 160: ...ings There are two pre defined subsections All Devices contains all the cameras in the tool as well as predefined groups New Devices and Warnings Errors MyGroup contains only user defined groups Add G...

Page 161: ...2 In the New Group Name field type in a group name 3 Click OK to add the group The group will appear under MyGroup Note Camera group names can contain upper and lower case letters numerals and the _...

Page 162: ...wish to delete 2 Choose Delete Group to delete the group Alternatively click the group and choose Delete Group from the Group menu 3 The system will ask to confirm the deletion Click Yes to delete th...

Page 163: ...Rename Group 1 Expand MyGroup and right click the group you wish to rename 2 Choose Rename Group Alternatively click the group and choose Rename Group from the Group menu The Rename Group popup appea...

Page 164: ...164 3 Enter a new group name in the New Group Name field 4 Click OK to save your changes Note Camera group names can contain upper and lower case letters numerals and the _ symbol...

Page 165: ...From the Camera Group window select a group under MyGroup 2 Select one or more cameras from the existing group by checking the box in the first column of their listing 3 Right click the camera and sel...

Page 166: ...166 4 In the Select Group pop up box select the destination group 5 Click OK to move the selected camera s to the group Note Cameras can not be moved from groups under All Devices...

Page 167: ...oup 1 From the Device Group window select a group 2 Select one or more cameras from the existing group by checking the box in the first column of their listing 3 Right click the camera s and select De...

Page 168: ...168 4 In the Select Group pop up box select the destination group 5 Click OK to copy the selected camera s to the group...

Page 169: ...d and updated by selecting Camera Configuration or the process can be automated by downloading the configuration from one camera using the Download Configuration function and then using the Update Con...

Page 170: ...ck the camera which you want to download from and select Configuration Download Configuration or select Camera Configuration Download Configuration from the menu bar The Download Configuration popup w...

Page 171: ...s which you want to update to and select Configuration Update Configuration or select Camera Configuration Update Configuration from the menu bar The Update Configuration popup will display 3 Click t...

Page 172: ...irmware Actions Update Firmware Once a new version of the camera firmware is obtained the firmware can be updated using the following steps Note You must be logged into the camera to update the camera...

Page 173: ...ight click the camera s which you want to update to and select Maintenance Update Firmware or select Camera Maintenance Update Firmware from the menu bar The Update Firmware popup will display 3 Click...

Page 174: ...s Tool button to open it Information of Best Focus Value Current Focus Value and Focus Percent will be shown at the bottom of the Focus Tool Window You can click Refresh to get a new data after focus...

Reviews: