LUBRICATION AND MAINTENANCE
Super Products LLC Publication: 0004175
4
-
7
4
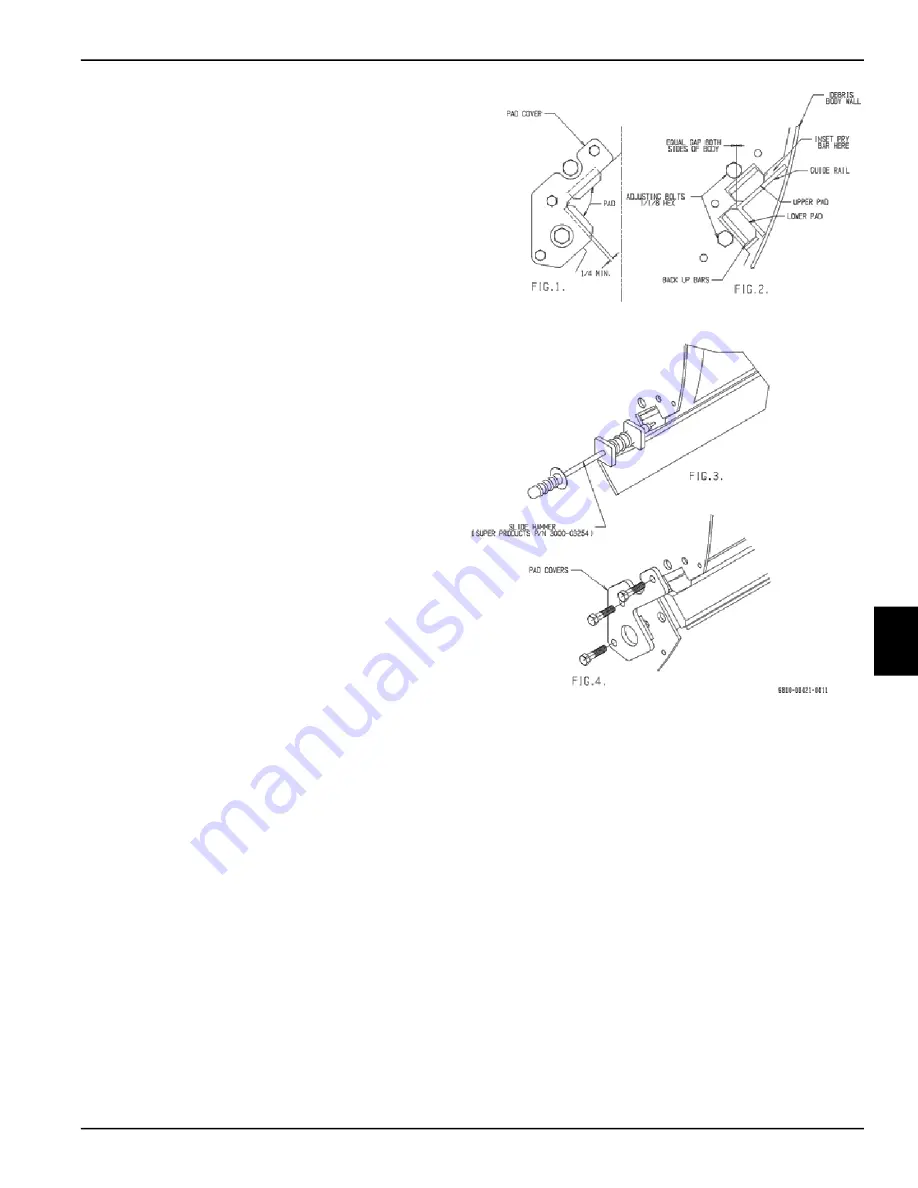
4. Thread self taping screw with slide hammer (Super
Products P/N 3000-03254) into lower pad and tap
out. See FIG. 3. Use pry bar to lift Ejector plate.
Follow same steps to remove upper pad.
5. Insert backup bars and slide pads, beveled edge
toward guide rail. Follow same steps for other side.
6. Reinstall pad covers. See FIG. 4.
7. Tighten upper pad adjusting screws so there is ¼" of
white pad showing on each side.
8. Position the ejector plate side-to-side with a pry bar
so there is an equal gap on both sides of the body.
See Fig. 2.
9. Tighten bottom pads to 40 ft-lbs. each side
10. Move the plate backward 2 feet & then back to
narrowest point.
11. Tighten to 75 ft-lbs. each side.
12. Move the plate backward 2 feet & then back to
narrowest point.
13. Loosen bottom pads 2 turns each, & tighten lock
nuts.
14. Restart engine and check for binding of the plate
throughout its full stroke. If it binds, evenly back off
lower adjusting screws ½ turn each.
Wiper Adjustment
Extend ejector plate to rear edge of body. Note
clearances between wiper and around perimeter inside of
body. Using a block of wood and a hammer, knock wiper
segments outward until they just contact the inside wall of
the body.
Summary of Contents for MUD DOG
Page 1: ......
Page 6: ......
Page 52: ...1 46 Super Products LLC Publication 0004175 SAFETY 1 Figure 1 55 Part no 0033284...
Page 60: ......
Page 62: ...2 2 Super Products LLC Publication 0004175 PRE OPERATION 2 Figure 2 1 Figure 2 2...
Page 70: ......
Page 82: ......
Page 90: ......
Page 108: ...5 18 Super Products LLC Publication 0004175 TROUBLESHOOTING 5 Hydraulic Schematic...
Page 109: ...TROUBLESHOOTING Super Products LLC Publication 0004175 5 19 5 Electrical Block Diagram...
Page 110: ......
Page 120: ......
Page 124: ......
Page 125: ......


