


SunFounder TS-10 10.1-inch Touch Screen
DEVICE_TOKEN
=
'__YOUR_DEVICE_TOKEN__'
Replace
__YOUR_DEVICE_TOKEN__
with the
Device token
copied from the Cloud4RPi. Press
Ctrl + X
to
complete the modification.
DEVICE_TOKEN
=
'556UfPaRw6r6rDKYfzx5Nd1jd'
Run the sample file
control.py
.
sudo python3 control.py
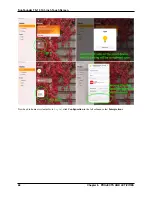
Browse back to the Cloud4RPi server page. If your Raspberry Pi is connected to Cloud4RPi, the device information
will turn green.
Using the Cloud4RPi Control Panels
The control panel on the Cloud4RPi server provides many useful widgets for IoT applications. These widgets can be
used to control the conponents or display sensor data.
After entering
Control Panels
, click the
New Control Panel
button.
Note:
Always run the
control.py
file before using the Control Panel.
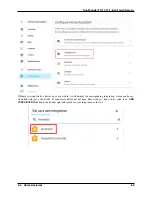
Enter a Control Panel name, and then click on the
Add Widget
button.
80
Chapter 5. PROJECTS AND ACTIVITIES
Summary of Contents for TS-10
Page 1: ...SunFounder TS 10 10 1 inch Touch Screen www sunfounder com Nov 19 2021 ...
Page 2: ......
Page 6: ...SunFounder TS 10 10 1 inch Touch Screen 2 CONTENTS ...
Page 9: ...SunFounder TS 10 10 1 inch Touch Screen 5 ...
Page 10: ...SunFounder TS 10 10 1 inch Touch Screen 6 Chapter 1 HARDWARE DESCRIPTION ...
Page 16: ...SunFounder TS 10 10 1 inch Touch Screen 12 Chapter 2 INSTALL THE RASPBERRY PI OS ...
Page 21: ...SunFounder TS 10 10 1 inch Touch Screen pi 3 Step 5 17 ...
Page 141: ...SunFounder TS 10 10 1 inch Touch Screen 5 7 Scratch Projects 137 ...
Page 165: ...SunFounder TS 10 10 1 inch Touch Screen 5 7 Scratch Projects 161 ...
Page 167: ...SunFounder TS 10 10 1 inch Touch Screen 5 7 Scratch Projects 163 ...
Page 181: ...SunFounder TS 10 10 1 inch Touch Screen 5 7 Scratch Projects 177 ...
Page 209: ...SunFounder TS 10 10 1 inch Touch Screen 205 ...
Page 210: ...SunFounder TS 10 10 1 inch Touch Screen 206 Chapter 7 3D PRINTED SUPPORT ...
Page 212: ...SunFounder TS 10 10 1 inch Touch Screen 208 Chapter 8 FAQ ...