SunFounder TS-10 10.1-inch Touch Screen
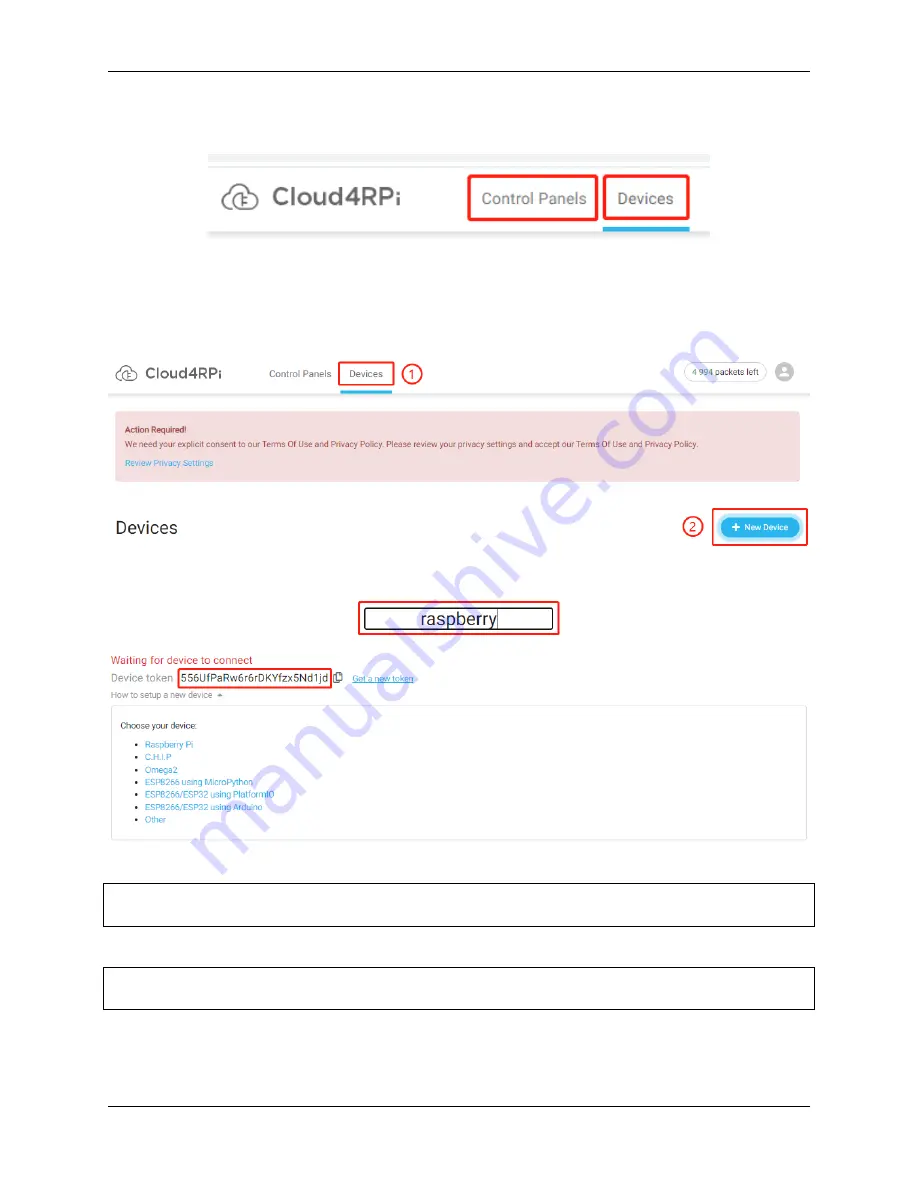
Once logged in, you should see two buttons at the top of Cloud4RPi,
Devices
to display the device connections and
Control Panels
to display the information received or sent from the Raspberry Pi on the webpage.
Connect Your Raspberry Pi to Cloud4RPi
After logging in, click the
Devices
option, and then click
New Device
.
Give the new device a name, and copy the current
Device token
to the clipboard.
Open the terminal of the Raspberry Pi and download the test examples provided by Cloud4RPi.
cd
/home/pi
git clone https://github.com/cloud4rpi/cloud4rpi-raspberrypi-python.git
Use a text editor such as Nano to modify the content of the
control.py
file.
cd
cloud4rpi-raspberrypi-python
sudo nano control.py
Find the following line of code.
5.5. Cloud4RPi
79
Summary of Contents for TS-10
Page 1: ...SunFounder TS 10 10 1 inch Touch Screen www sunfounder com Nov 19 2021 ...
Page 2: ......
Page 6: ...SunFounder TS 10 10 1 inch Touch Screen 2 CONTENTS ...
Page 9: ...SunFounder TS 10 10 1 inch Touch Screen 5 ...
Page 10: ...SunFounder TS 10 10 1 inch Touch Screen 6 Chapter 1 HARDWARE DESCRIPTION ...
Page 16: ...SunFounder TS 10 10 1 inch Touch Screen 12 Chapter 2 INSTALL THE RASPBERRY PI OS ...
Page 21: ...SunFounder TS 10 10 1 inch Touch Screen pi 3 Step 5 17 ...
Page 141: ...SunFounder TS 10 10 1 inch Touch Screen 5 7 Scratch Projects 137 ...
Page 165: ...SunFounder TS 10 10 1 inch Touch Screen 5 7 Scratch Projects 161 ...
Page 167: ...SunFounder TS 10 10 1 inch Touch Screen 5 7 Scratch Projects 163 ...
Page 181: ...SunFounder TS 10 10 1 inch Touch Screen 5 7 Scratch Projects 177 ...
Page 209: ...SunFounder TS 10 10 1 inch Touch Screen 205 ...
Page 210: ...SunFounder TS 10 10 1 inch Touch Screen 206 Chapter 7 3D PRINTED SUPPORT ...
Page 212: ...SunFounder TS 10 10 1 inch Touch Screen 208 Chapter 8 FAQ ...


