CHAPTER
SIX
APPENDIX
For new Raspberry Pi users, the following sections are essential operations that will need to be used for doing certain
projects. Please read these sections carefully.
6.1 Assemble the Camera Module
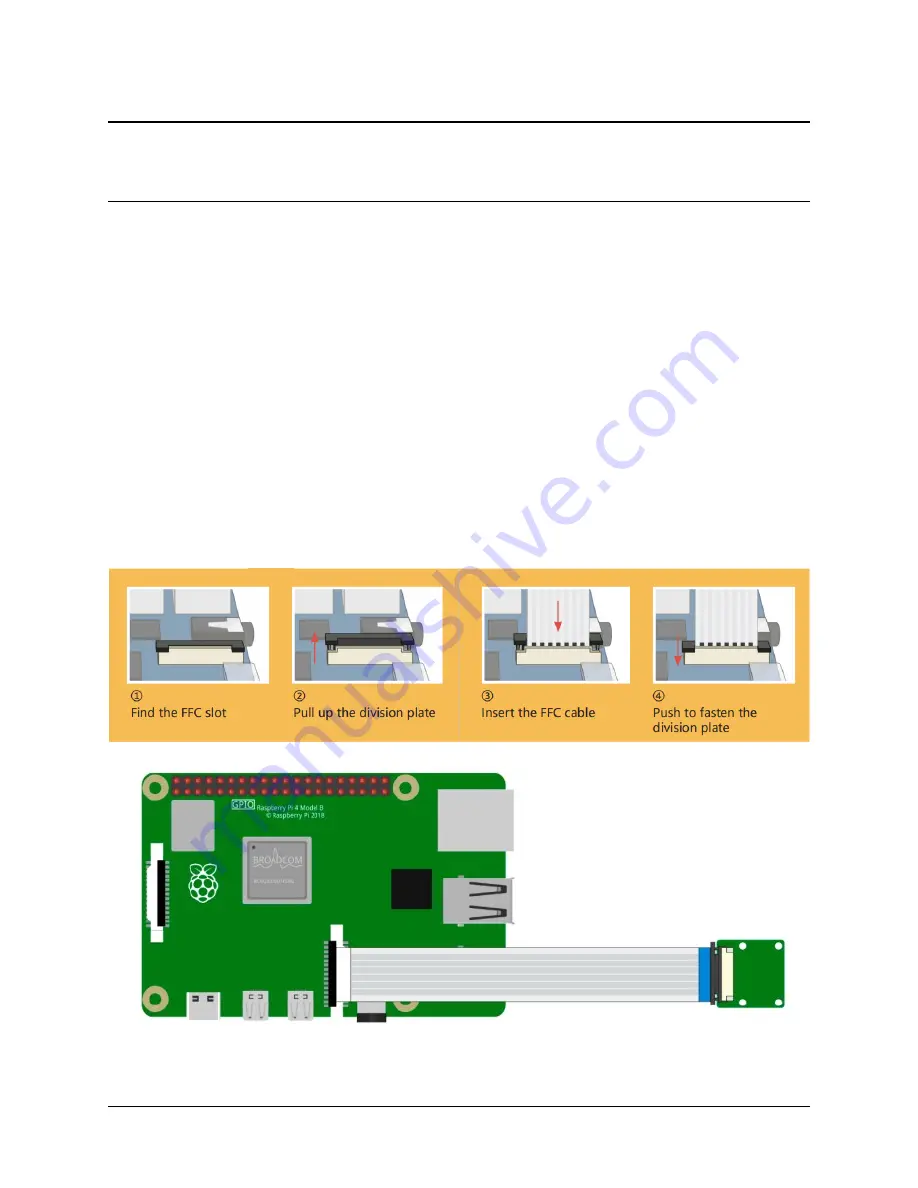
On the camera module or Raspberry Pi, you will find a flat plastic connector. Carefully pull out the black fixing switch
until the fixing switch is partially pulled out. Insert the FFC cable into the plastic connector in the direction shown and
push the fixing switch back into place.
If the FFC wire is installed correctly, it will be straight and will not pull out when you gently pull on it. If not, reinstall
it again.
193
Summary of Contents for TS-10
Page 1: ...SunFounder TS 10 10 1 inch Touch Screen www sunfounder com Nov 19 2021 ...
Page 2: ......
Page 6: ...SunFounder TS 10 10 1 inch Touch Screen 2 CONTENTS ...
Page 9: ...SunFounder TS 10 10 1 inch Touch Screen 5 ...
Page 10: ...SunFounder TS 10 10 1 inch Touch Screen 6 Chapter 1 HARDWARE DESCRIPTION ...
Page 16: ...SunFounder TS 10 10 1 inch Touch Screen 12 Chapter 2 INSTALL THE RASPBERRY PI OS ...
Page 21: ...SunFounder TS 10 10 1 inch Touch Screen pi 3 Step 5 17 ...
Page 141: ...SunFounder TS 10 10 1 inch Touch Screen 5 7 Scratch Projects 137 ...
Page 165: ...SunFounder TS 10 10 1 inch Touch Screen 5 7 Scratch Projects 161 ...
Page 167: ...SunFounder TS 10 10 1 inch Touch Screen 5 7 Scratch Projects 163 ...
Page 181: ...SunFounder TS 10 10 1 inch Touch Screen 5 7 Scratch Projects 177 ...
Page 209: ...SunFounder TS 10 10 1 inch Touch Screen 205 ...
Page 210: ...SunFounder TS 10 10 1 inch Touch Screen 206 Chapter 7 3D PRINTED SUPPORT ...
Page 212: ...SunFounder TS 10 10 1 inch Touch Screen 208 Chapter 8 FAQ ...


