43
User’s Manual
APPENdIx
Troubleshooting Guide
This section provides information to help solve common
problems you may encounter with your system.
display Help
Although the unit’s video settings will be configured
correctly when installed, it is possible that subsequent
changes in your hardware configuration (for example, the
installation of a new television) may affect the configuration
and, in extreme circumstances, may cause the User
Interface to be displayed incorrectly or not at all.
Display Help exists for this scenario; so that the unit’s video
settings can be re-configured using the remote control
without reference to the User Interface.
Accessing display Help
Access the
•
Admin UI
as described previously.
Press the following combination of six buttons on your
•
remote control handset:
J
menu
,
J
menu
,
4
,
3
,
5
,
7
This button combination can be easily remembered as the
alphanumeric buttons 4, 3, 5, 7 correspond to the letters H,
E, L, P, to spell the world
help
.
The screen may flicker for a few moments as some tests
are run, then depending on the nature of your configuration
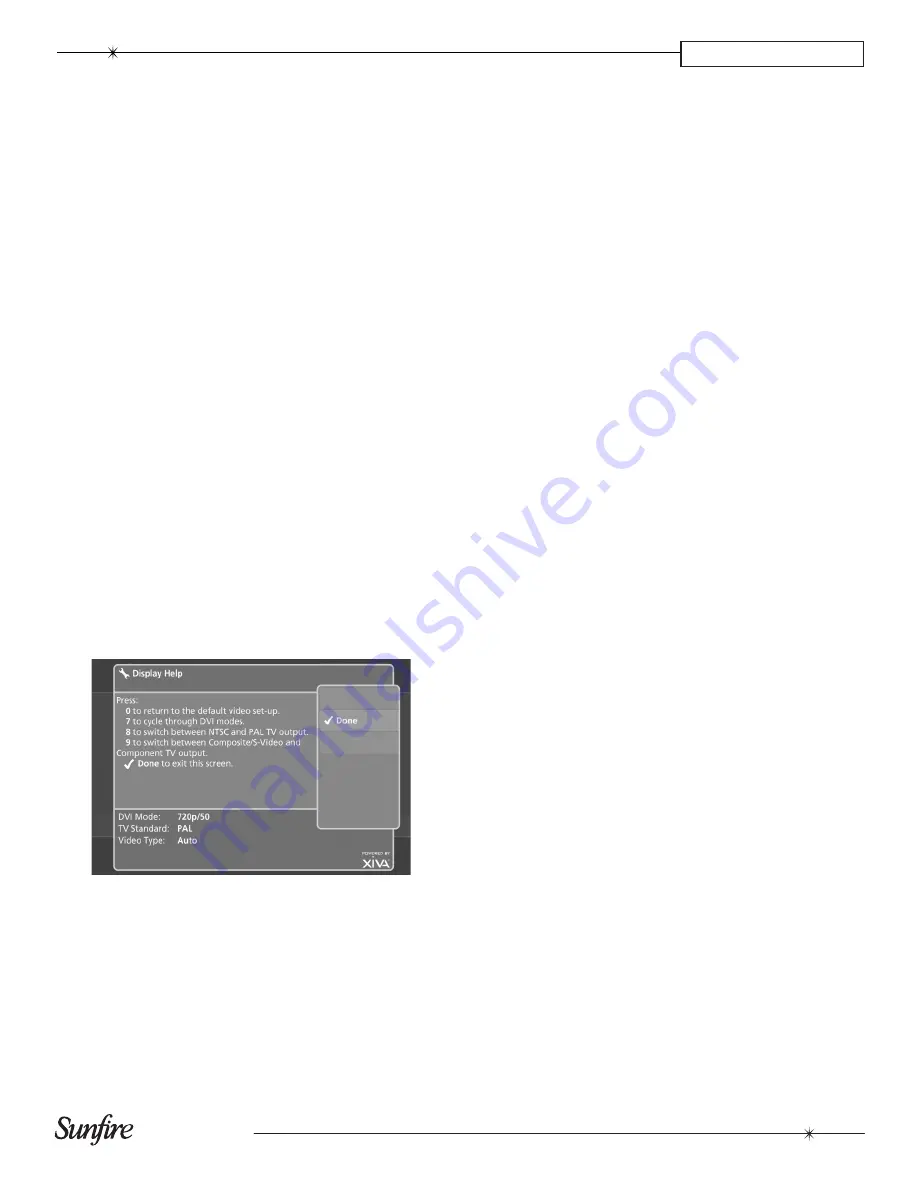
problems, the User Interface may display the
display Help
screen:
The options available via the
display Help
screen are as
follows:
Return to the default Video Set-Up
If you are experiencing problems with video display on
either output, try using this function to cure the problem.
Press the
•
0
button on your remote control to return to
the default video set-up.
This will cause the unit to restart with the video settings re-
set to their default values.
Cycle Through HdmI modes
If the User Interface is not displayed on the television
connected to Digital Video Out, it may be due to the wrong
HDMI mode being selected for your particular television.
Press the
•
7
button on your remote control to switch to
the next available HDMI mode.
The television connected to Digital Video Out will flicker
and then display the new mode. Repeatedly press the 7
button to cycle through all the available modes, before
deciding which is best for your particular television.
Press the
•
O
done
button to return to the User
Interface.
Switch Between NTSC and PAL TV Output
If the video fails to display, or is displayed incorrectly, on
televisions connected to Analogue Video Out, try using this
function to rectify the problem.
Press the
•
8
button on your remote control to switch
between NTSC and PAL TV output formats.
Choose the best option for your television.
Press the
•
O
done
button to return to the User
Interface.
Switch Between Composite, S-Video and Component
TV Output
If the video fails to display, or is displayed incorrectly, on
televisions connected to Analogue Video Out, try using this
function to rectify the problem.
Press the
•
9
button on your remote control to switch
between Composite, S-Video and Auto TV outputs.
Repeatedly press the
9
button for the unit to cycle through
the available options. Choose the best option for your
television.
Press the
•
O
done
button to return to the User
Interface.
Blank display
If you select an item from the media libraries for playback
and the display goes blank, it may be due to a missing
or invalid library item. In the event that this happens, try
pressing the
à
Library
button on the remote control to
return to the User Interface. If this does not resolve the
problem, contact your dealer or installer.
disc Eject
If your disc does not eject automatically, there is a hidden
button just inside the disc slot on the front of the TGM-100.
Press the button using the end of a paper clip until the disc
ejects.


