background image

28

User’s Manual

CHAPTER 4 – Admin User Interface

the Genres attribute, scroll to the end of the word Indie, 

then press the 

R

 Return button before entering Indie 

Rock. Press 

R

 Return again and enter Alt Country. 

Note that on the 

Edit Album details

 screen, multiple 

genres are separated by a semi-colon, but when entering 

them, you must use the 

Return button, otherwise a 

new genre consisting of all the words you entered will be 

created.

When you have finished making changes to the album’s 

details, press the 

M

Save 

button.

Editing Track Information in the Audio Library

Navigate to the 

• 

Admin UI

 and select

 Audio Library

.

Press the 

• 

U

 or 

V

 buttons to select

 Tracks

 and press 

the 

T

 button.

Use the 

• 

U

 or 

V

 buttons again to highlight the Track 

you wish to edit.
Press the 

• 

ä

Options 

button and choose

 Edit Track 

details

.

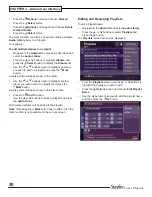
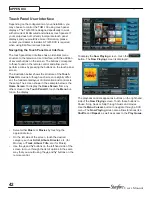
The following screen is displayed:

Use the 

• 

U

 or 

V

 buttons to highlight the attribute you 

want to change.
Press the

• 


O

Edit

 button.

Use the alphanumeric keypad to edit the title and press 

• 

the 

O

Ok 

button.

When you have finished making changes to a Track’s 

details, press the 

M

Save 

button.

Editing Genre, Year and Era names in the Audio Library

Navigate to the 

• 

Admin UI

 and select

 Audio Library

.

Press the 

• 

U

 or 

V

 buttons to select either 

Genres

Years

  or 

Eras

 and press the 

T

 button.

Use the 

• 

U

 or 

V

 buttons again to highlight the Genre, 

Year or Era you wish to edit.

Press the 

• 

ä

Options 

button and choose the

 Edit 

name

 option.

Use the alphanumeric keypad to enter a new name for 

• 

the Genre, Year or Era.

Press 

• 

O

Select

 to save your changes.

Selecting Album Artwork

For most albums, your TGM-100 should automatically 

retrieve the cover art from the Internet. If cover art is not 

found or you have recorded custom CDs, you may apply 

generic artwork to the album or import your own from a 

connected PC.

Highlight the album in your

• 

 Audio Library

 to which you 

would like to apply a cover art image.
Press the 

• 

ä

Options 

button.

Use the 

• 

U

 and 

V

 buttons to select 

Edit Album 

details

  and press the 

O

Select 

button.

Choose the

• 

 Artwork

 option and press the 

O

Edit


button.

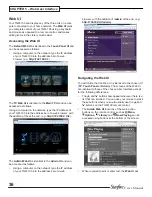
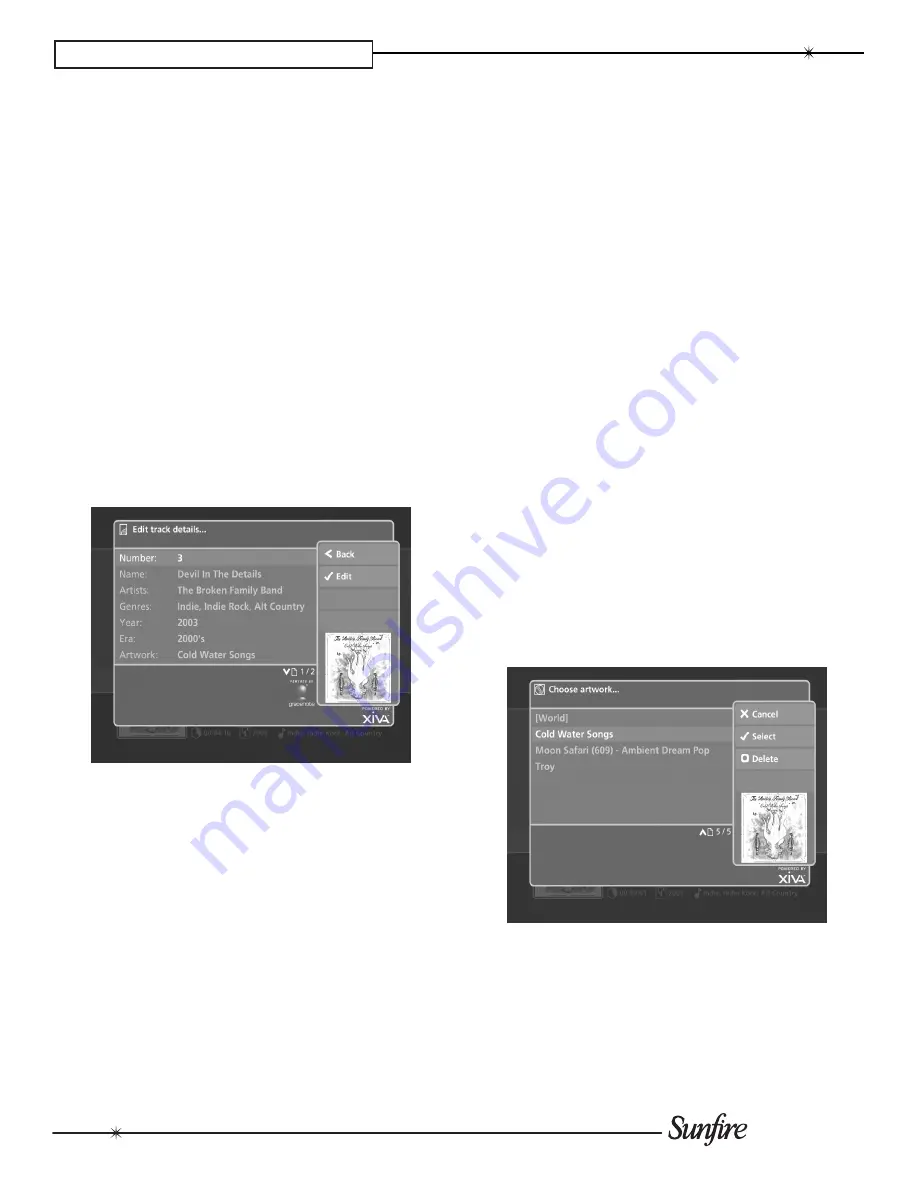
The following screen, listing all of the cover art images 

stored on your TGM-100, is displayed:

Use the 

• 

U

 or 

V

 buttons to scroll through the cover art 

images.
Press the 

• 

O

Select 

button to associate a piece of 

artwork with your chosen album.

It is also possible to upload images from your PC to your 

TGM-100 and apply these to items in the media libraries 

(see pg. 38).

Summary of Contents for TGM-100 Server

Page 1: ...TGM 100 Server TGM 100C Client Theater Grand Media Player User s Manual ...

Page 2: ......

Page 3: ... or similar surface that may block any ventilation openings or placed in a built in installation such as a bookcase cabinet or closed equipment rack that may impede the flow of air through ventilation openings 11 Power Sources The apparatus should be connected to a power supply only of the type described in these op eration instructions or as marked on the apparatus 12 Power Cord Protection Power ...

Page 4: ...ECTRIC SHOCK MATCH WIDE BLADE OF PLUG TO WIDE SLOT FULLY INSERT ATTENTION POUR ÉVITER LES CHOCS ÉLECTRIQUES INTRO DU IRE LA LAME LA PLUS LARGE DE LA FICHE DANS LA BORNE CORRE SPONDANTE DE LA PRISE ET POUSSER JUSQU AU FOND EXAMPLE OF ANTENNA GROUNDING ACCORDING TO NATIONAL ELECTRICAL CODE INSTRUCTIONS CONTAINED IN ARTICLE 810 RADIO AND TELEVISION EQUIPMENT GROUND CLAMP GROUNDING CONDUCTORS NEC SECT...

Page 5: ...rdware Specifications 50 51 Terms and Conditions 52 60 Limited Warranty 61 Service Assistance 61 Contents Read the Safety Instructions carefully before connecting and using your TGM 100 Digital Media Server Chapter 1 is a general introduction to the features details and control of your TGM 100 Chapter 2 shows many options for connecting your source equipment to the TGM 100 and also describes the b...

Page 6: ...e of a capacity to suit your requirements large libraries of DVDs and CDs can be stored and replayed at the touch of a button All movies and music are accessed via intuitive Graphical User Interfaces GUIs and can be displayed in a variety of ways to match your individual preferences Additional information about your movies and music is automatically downloaded from the Internet to make it a breeze...

Page 7: ...remain switched on continu ously However if you are not planning to use it for an extended period you may switch the unit off To turn the unit off press the button on the front panel After a brief period the unit will switch off and the Power LED will turn red Using the Remote Control Press the àLibrary button to display the Home Screen Use the S and T buttons to highlight different items on the d...

Page 8: ...n The Now Playing screen shows the length of the track being played and how long it has been playing Playing Music From the Library Press the àLibrary button to display the Home Screen Use the S and T buttons to highlight Music and press the OSelect button The JMenu button lets you choose how you want to browse your music collection for example by Tracks Albums Artists or Genres Select the groupin...

Page 9: ...rary button to display the Home Screen Use the S and T buttons to highlight Movies and press the OSelect button Press JMenu to display the movies in your library in various ways for example Titles Actors Directors or Ratings Highlight the grouping you prefer and press the OSelect button To play a movie select it from the list and use the OSelect button to select Play Title You may also start playb...

Page 10: ...I provides a method to control the TGM 100 from touch panels located throughout the home The TGM 100 is designed to work with all ELAN wired or wireless touch panels and provides full control over the system Admin UI pgs 27 35 The Admin UI allows full access to all setup and playback functions This UI allows for more complex actions than the TV UI and has more options but many of the options are n...

Page 11: ...n to turn the unit Off Blue ON Red OFF Flashing STARTUP 2 DISC PLAYER CDs and DVDs should be inserted with the label side facing up NOTE Push slowly then the motorized tray will pull in the disc 3 EJECT BUTTON Pressing the EJECT button ejects the disc 4 IR WINDOW The front panel IR Window allows remote control information to be transmitted to the TGM 100 ...

Page 12: ...lay the TV User Interface You may also need to switch the TV to the relevant input to display the picture 6 S VIDEO OUT Connect the S VIDEO output of the TGM 100 to the S VIDEO input of a suitable PAL or NTSC TV to display the TV User Inter face You may also need to switch the TV to the relevant input to display the picture 7 ANALOG AUDIO OUT This analog audio output may be connected to the input ...

Page 13: ...ng Your Remote to Control Other Devices 6 G PAGE SCROLL BUTTONS These buttons are used to scroll through menus by page When editing text these buttons are used to change the character set 7 s MUTE BUTTON If the current output volume setting is set to Variable this button will mute the current output If the TV or Amp device is selected this button mutes the volume of that device See the section cal...

Page 14: ... mode these buttons can be used as an alphanumeric keypad similar to a mobile phone 21 R REPEAT RETURN BUTTON The Repeat button has the following functions During music playback this button toggles the Repeat Play setting on the TGM 100 In text entry mode this button can be used to perform a Carriage Return 22 Q SHUFFLE DELETE BUTTON The Shuffle button performs the following functions During music...

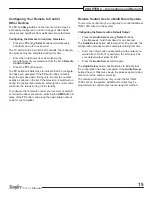
Page 15: ...chosen audio output Reassigning Volume Control The rVolume and sMute buttons on the remote control can be configured to control the volume on your amplifier while the Audio Server device is selected To reassign volume control Ensure the Amp button on your remote control is correctly configured to control your amplifier as described in Configuring Your Remote to Control Other Devices Press the Audi...

Page 16: ... Library button to display the Home Screen Use the U and V buttons to select the Set Up option Use the O Select button to display the Set Up menu Use the U and V buttons again to select Shutdown Restart Press the O Select button The TV will display the following screen To Shut down Highlight Yes and press the OSelect button on the remote control to switch the unit off Note To switch the unit on ag...

Page 17: ...evision to go into standby To configure the remote to control your receiver or amplifi er follow the above procedure pressing the AMP button in place of the TV button and using the appropriate numeric code for your amplifier Remote Control Use In a Multi Room System Your remote control may be configured to control additional TGM 100C clients in the system Configuring the Remote with a Default Outp...

Page 18: ...ntrolling the output Touch Panel Interface AV2 TGM 100C Clients TGM 100 Remote User Interface Digital TV User Interface AV1 Graphical User Interfaces The TGM 100 features an advanced Graphical User Inter face UI which can be displayed on televisions throughout your home and controlled using the supplied remote control or a properly programmed universal remote In addition to the television User Int...

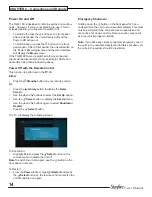
Page 19: ...d allows you to control it You can also view this screen by pressing the Now Playing button on the remote control Set Up Select this option to display the Set Up screen The following options are available on this screen Power The Power screen is used to Shutdown or Restart the TGM 100 Look Up Media Details Use the Look Up Media Details function to retrieve CD and DVD details from the Internet On l...

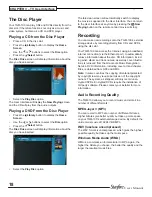
Page 20: ...torage device by recording directly from CDs and DVDs using the disc slot Your TGM 100 can access the Internet using a broadband internet connection via the Ethernet port to automatically retrieve information about the disc CD information includ ing artist album and track names as well as cover illustra tions is retrieved from the Gracenote Music Recognition Service DVD information including cover...

Page 21: ...ding Place a CD or DVD in the slot The unit will begin recording automatically When the recording is complete the disc will be ejected from the unit To record another disc simply place it in the slot The unit will automatically attempt to retrieve information about the disc from the Internet If you do not have an Internet connection or if information is not available for a particular disc the movi...

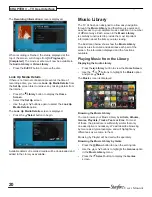
Page 22: ... and easy access to your complete music collection in a number of different ways Each screen in the Music Library is carefully constructed to provide the most important information about the items you are viewing The illustration below shows how the Music Library screens are structured and describes each part of the screen the information displayed and the functions available Playing Music from th...

Page 23: ...ou will only play or add the chosen track not any bigger grouping like Albums or Artists To play a Track in a selected Genre Select an individual Album choose Tracks to display a list of Tracks contained within the highlighted Album Highlight Tracks then press OSelect Choose a Track and select Play Track You may immediately play a selected Track or add the Track to the Play Queue see page 22 Brows...

Page 24: ...te control or select Play Playlist to begin playback Initiating playback of your entire Music Library in this way will automatically enable shuffle and repeat Choose from Selections adds all Tracks Play Playlist plays all selections and Add Playlist adds all selections to the Play Queue The Play Queue Many selections have an Add option to add the selection to the current Play Queue e g Add Track A...

Page 25: ...arty tracks from a number of different albums and include them in a Playlist called Party Music You can then play your selection simply by choosing the appropriate playlist from the Playlist screen Playing a Playlist Press the àLibrary button on your remote control to display the Home Screen Highlight Music and press OSelect to display the Music Library screen Press the JMenu button to display the...

Page 26: ... the d f or e c button on your remote control To seek within a track Hold down the d f or e c button on your remote control Play resumes from the new position when you release the button Shuffle and Repeat playback You can play selections from the Music Library in a shuffled order to add variety to your music You can also play selections repeatedly To Shuffle the playback order Press the Q button ...

Page 27: ...es from the Library Displaying the Movie Library Press the àLibrary button to view the Home Screen Use the S and T buttons to highlight Movies and press the OSelect button The Movie screen is displayed Browsing the Movie Library Press the JMenu button on your remote control to display your movies in various ways for example Titles Actors Directors Ratings or Years Select the grouping you prefer an...

Page 28: ... resume playback in full screen from the same position To skip to the next or previous chapter Press the d f or e c button on your remote control To seek forwards or backwards Hold down the d f or e c button on your remote control for a few seconds and release the button when the seek begins Seek will begin at 4 times normal speed and x4 will be displayed on the screen along with the chapter numbe...

Page 29: ...e Albums Artists and Tracks in your Music Library with names which identify the album you are listening to and these help you locate items when you are browsing through the Library If you have an Internet connection the unit looks up the CD information and cover art automatically from the Gracenote Music Recognition Service You can edit these names and images at any stage to suit your own preferen...

Page 30: ...e Year and Era names in the Audio Library Navigate to the Admin UI and select Audio Library Press the U or V buttons to select either Genres Years or Eras and press the T button Use the U or V buttons again to highlight the Genre Year or Era you wish to edit Press the äOptions button and choose the Edit name option Use the alphanumeric keypad to enter a new name for the Genre Year or Era Press OSe...

Page 31: ...ingle action on all the marked items rather than performing the same action on each item individually For example To delete multiple albums from the Audio Library Navigate to the Admin UI as previously described and select the Audio Library Press the U or V buttons to highlight Albums and press the OSelect button to display the Albums list Use the U or V buttons again to highlight an album you wis...

Page 32: ...e album Use the U or V buttons again to highlight another album you wish to add to a playlist and press the pMark button A mark symbol will appear next to this album also Press the MAdd To button Use the U or V buttons to select a playlist and press the äAdd button Both marked albums will be added to the playlist Note If pressing the pMark button has no effect then the mark function is not availab...

Page 33: ...Video Library Your TGM 100 labels the movies in your Video Library with names which identify the movie you are watching and these help you locate items when you are browsing If you have an Internet connection your TGM 100 reads the DVD information and cover art automatically from the Internet You can edit these names and images at any stage to suit your own preferences Editing Movie Information in...

Page 34: ... Editing Artist Director Genre and Year names in the Video Library Navigate to the Admin UI screen as described previously Select Video Library Press the U or V buttons to select either Artists Directors Genres or Years and press the T button Use the U or V buttons again to highlight the item you wish to edit Press the äOptions button and choose the Edit name option Use the alphanumeric keypad to ...

Page 35: ...e Note Any items you choose to delete will be permanently erased from your TGM 100 s hard disk Anything you de lete by accident will need to be re recorded Marking Items in the Video Library The mark function can be used to select multiple items within a list in the Video Library You can then perform a single action on all of the marked items rather than repeating the same action on each item indi...

Page 36: ...ings should only be changed by a qualified in staller Therefore only a few basic screens will be reviewed here User Interface Settings This screen allows changes to Language On Screen Hints and Color Language Allows plug ins for additional languages for the UI On Screen Hints Allows you to turn On Screen Hints on or off in order to provide additional operational help within the Admin UI Color Allo...

Page 37: ...nicians as well as end users You should only enter into this screen if instruct ed to do so by your installer or Sunfire Technical Support Output Configuration This screen allows you to make several changes to the way your TGM 100 interfaces with the rest of the system You should only change the Audio Format if needed Audio Format changes the audio outputs from Surround mode to Stereo mode When Su...

Page 38: ...of tv at the end e g http 192 168 0 1 tv The Admin Web UI is identical to the Admin UI and can be accessed as follows Using a computer on the network type the IP address of your TGM 100 into the address bar of a web browser with the addition of admin at the end e g http 192 168 0 1 admin Navigating the Web UI You will notice that the Web UI is identical to the chosen UI TV Touch Panel or Admin The...

Page 39: ...However instead of using the alphanumeric keypad on your TGM 100 remote control you can use your computer keyboard to enter text and numbers Note If you make any changes to the Connection Set tings via the Web UI such as changing the IP Address you may need to reconnect using the new connection details ...

Page 40: ...he username and password required are as follows Username tgm100 Password tgm100 Note The above username and password are case sensitive Transferring Media Using a Mac If you are using a Macintosh computer you can create a new network connection as follows Select Go from the Finder menu and click Connect to Server Click on the Browse button in the Connect to Server window Navigate to your TGM 100 ...

Page 41: ...ur portable player is compatible before using this application Note These instructions refer to Apple iTunes version 7 1 While most versions are supported the User Interfaces may vary and therefore these instructions may not always be accurate The Library source in iTunes shows all media files stored on the local hard disk as well as media which has been added from other networked drives You can a...

Page 42: ...using Windows Media Player on a PC It is also possible to use your PC and Windows Media Player to transfer music from your TGM 100 to your portable device Note These instructions refer to Windows Media Player version 11 While most versions are supported the User Interfaces may vary and therefore these instructions may not always be accurate Firstly make sure you can navigate to your TGM 100 and vi...

Page 43: ... unit Navigate to the TV UI Set Up screen as described previously Use the U and V buttons again to select the Settings option and press the OSelect button Choose System Information by using the U and V buttons and then pressing the OSelect button The software version is displayed on the System Information screen Checking for Software Updates Navigate to the TV UI Set Up screen as described previou...

Page 44: ...creens Although each screen is slightly differ ent the fundamental layout of information and controls is the same The screen shown in the example below is the Home Screen To display the Home Screen from any other screen in the Touch Panel UI touch the Menu but ton on the display Select either Music or Movies by touching the appropriate icon On the left side of the screen touch the desired category...

Page 45: ...due to the wrong HDMI mode being selected for your particular television Press the 7 button on your remote control to switch to the next available HDMI mode The television connected to Digital Video Out will flicker and then display the new mode Repeatedly press the 7 button to cycle through all the available modes before deciding which is best for your particular television Press the ODone button...

Page 46: ...perating temperature an automatic shutdown will be initiated to prevent component damage and subsequent data loss The User Interface will display the following warning message When the countdown is complete the unit will automatically shutdown When the unit is next switched on the following screen will be displayed If you see either of these screens displayed on the User Interface you should conta...

Page 47: ... 001 002 003 004 005 006 007 009 013 014 015 016 079 CIHAN 009 CLARIVOX 108 033 047 CLATRNIC 017 CLATRONIC 001 002 003 004 005 006 007 008 009 119 013 014 015 016 158 097 018 151 CONDOR 001 002 003 004 005 006 007 031 009 119 013 014 015 016 097 018 CONIC 111 CONTEC 055 102 018 CONTINENTAL EDISON 135 107 139 042 COSMOS 001 002 003 004 005 006 007 009 013 014 015 016 CROSLEY 138 146 024 081 010 CRO...

Page 48: ...4 031 007 081 118 119 HCM 001 002 003 004 005 006 007 008 009 013 014 015 016 018 HIFI VOX 112 135 107 139 042 059 HINARI 098 055 111 008 017 018 HIT 146 HITACHI 062 055 157 063 031 111 042 065 081 118 010 066 120 158 125 070 040 072 HYPER 031 151 ICE 001 002 003 004 005 006 007 008 009 017 013 014 015 016 018 151 IMPERIAL 001 002 003 004 034 138 143 005 006 007 146 008 024 081 009 154 119 010 013...

Page 49: ...1 123 124 125 126 036 079 132 084 114 NORDMENDE 034 035 106 112 135 139 037 042 147 040 NORMN 001 002 003 004 005 006 007 009 013 014 015 016 NOVA 095 OCEANIC 081 118 010 012 036 OKANO 001 002 003 004 005 006 007 009 013 014 015 016 097 ONCEAS 031 ONWA 008 017 151 ORAVA 001 002 003 004 005 006 007 009 013 014 015 016 ORBITER 086 ORION 098 001 002 003 004 005 036 006 007 111 008 009 010 017 012 013...

Page 50: ... 058 SICATEL 033 SIEMENS 101 001 002 003 004 085 063 138 143 141 005 006 087 090 091 007 111 142 009 119 096 013 014 015 016 102 SIERA 031 007 146 109 154 099 SIESTA 086 SILVER 008 017 086 SINGER 001 002 003 004 005 006 007 146 081 009 013 014 015 016 077 SINUDYNE 098 003 146 081 SMARAGD 130 SOLAVOX 010 SONOLOR 166 010 SONOKO 007 018 SONTEC 001 002 003 004 005 007 009 013 014 015 016 SONY 052 053 ...

Page 51: ...OM 001 002 003 AIWA 014 015 018 019 087 086 AKAI 033 AMC 016 080 081 083 ANGSTROM 066 ARCAM 058 AUDIO ALCHEMY 027 AUDIO TECHNICA 026 AUDIOFILE 038 B K 045 046 CARVER 053 011 037 038 052 031 032 010 054 CINEMA SOUND 084 026 CLARION 090 DENON 083 084 085 095 096 091 092 097 089 FISHER 022 031 FOSGATE 005 GE 036 GOLDSTAR 035 HAFLER 039 HARMAN KAR 005 125 127 103 104 098 HITACHI 021 INKEL 123 JVC 119 ...

Page 52: ...ating humidity 10 90 RH non condensing Video Outputs S Video Output Connector Output resolution S VIDEO jack NTSC or PAL HDMI Output Connector Output resolution HDMI 480i 1080p Component Video Output Y Pr Pb Connector Output resolution 3 x RCA jack 480i 1080i Audio Outputs Analogue Output Output level Output impedance Connector 2VRMS 600W RCAjack Digital Outputs Optical output connector Coaxial ou...

Page 53: ...weight better than 96dB 0 003 110dB Communications Ethernet Connector IR Input Maximum input leve Connector USB 1 1 2 0 2 connectors Connector RJ45 10BaseT 100BaseT 1000BT 5V 3 5mm jack S S Type A USB socket Accessories Power cord Remote control unit AAA R03P dry cell batteries Operating instructions 4 1 2 1 Note The specifications and design of this product are subject to change without notice ...

Page 54: ...be liable to you or any third party for any loss of profits loss of data loss of revenue loss of or loss of use of software loss of or loss of use of equipment to which the TGM 100 is connected business interruption or other indirect consequential special or incidental damages of any nature arising from or relating to your use of the Software even if Imerge has been advised of the possibility of s...

Page 55: ...ted services as described earlier However Imerge will not trade sell or rent your personal information such as name address phone number or email address to third parties world wide for targeted services or marketing purposes without your consent And we also protect your privacy by limiting employee access to the use of customer data We may provide aggregate statistics about our sales customers mu...

Page 56: ...ers The SOFTWARE is licensed with the DEVICE as a single integrated product and may only be used with the DEVICE If the SOFTWARE is not accompanied by a DEVICE you may not use the SOFTWARE You may permanently transfer all of your rights under this EULA only as part of a permanent sale or transfer of the DEVICE provided you retain no copies of the SOFTWARE If the SOFTWARE is an upgrade any transfer...

Page 57: ...gle computer and except for making one back up copy of the Software may not otherwise copy the SOFTWARE This LICENSE of SOFTWARE may not be shared or used concurrently on different computers 2 1 2 Limitations No Reverse Engineering Customer may not reverse engineer decompile or disassemble the SOFTWARE nor attempt in any other manner to obtain the source code No Separation of Components The SOFTWA...

Page 58: ...ware from one hardware system to another over a network so long as each hardware system which receives the Sonic Software is the subject of a license for the Sonic Software it receives Except as permitted by applicable law and this License you may not decompile reverse engineer disassemble modify rent lease loan distribute create derivative works from the Sonic Software or publish or transmit the ...

Page 59: ...nt Certain components of the software for the XiVA powered TGM 100s are subject to the GNU General Public License or other so called open source licenses Open Source Software Open Source Software is not subject to the restrictions in Section 6 Title to Software and Intellectual Property and is subject to the GNU General Public License GPL or other license terms as applicable In compliance with the...

Page 60: ...n the Program is not required to print an announcement These requirements apply to the modified work as a whole If identifiable sections of that work are not derived from the Program and can be reasonably considered independent and separate works in themselves then this License and its terms do not apply to those sections when you distribute them as separate works But when you distribute the same ...

Page 61: ...es the limitation as if written in the body of this License 9 The Free Software Foundation may publish revised and or new versions of the General Public License from time to time Such new versions will be similar in spirit to the present version but may differ in detail to address new problems or concerns Each version is given a distinguishing version number If the Program specifies a version numb...

Page 62: ...ide you with any new enhanced or additional data types or categories that AMG may choose to provide in the future and is free to discontinue its online services at any time without any obligation to you To the extent that you the End User provide any information or original works of authorship to be added to AMG Databases you represent and warrant that you are the sole author of such work s and fu...

Page 63: ...y other obligations or liabilities whatso ever with respect to equipment manufactured by Sunfire or services rendered by Sunfire THE FOREGOING WARRANTIES ARE EXCLUSIVE AND IN LIEU OF ALL OTHER EXPRESSED AND IMPLIED WARRANTIES EXCEPT WAR RANTIES OF TITLE INCLUDING BUT NOT LIMITED TO IMPLIED WAR RANTIES OF MERCHANTABILITY AND FITNESS FOR A PARTICULAR PURPOSE ATTENTION TO OUR VALUED CONSUMERS To insu...

Page 64: ...62 User s Manual APPENDIX ...

Page 65: ...63 User s Manual APPENDIX ...

Page 66: ...Theater Grand Media Player TGM 100 Server TGM 100C Client P N 9900980 REV A ...

Reviews: