background image


125

A P P E N D I X

C

System Configuration Card and 
OpenBoot Configuration 
Parameters

This appendix provides information on the system configuration card (SCC) and the 
OpenBoot PROM configuration parameters stored on it. For more on the SCC, see 

“System Configuration Card” on page


38

.

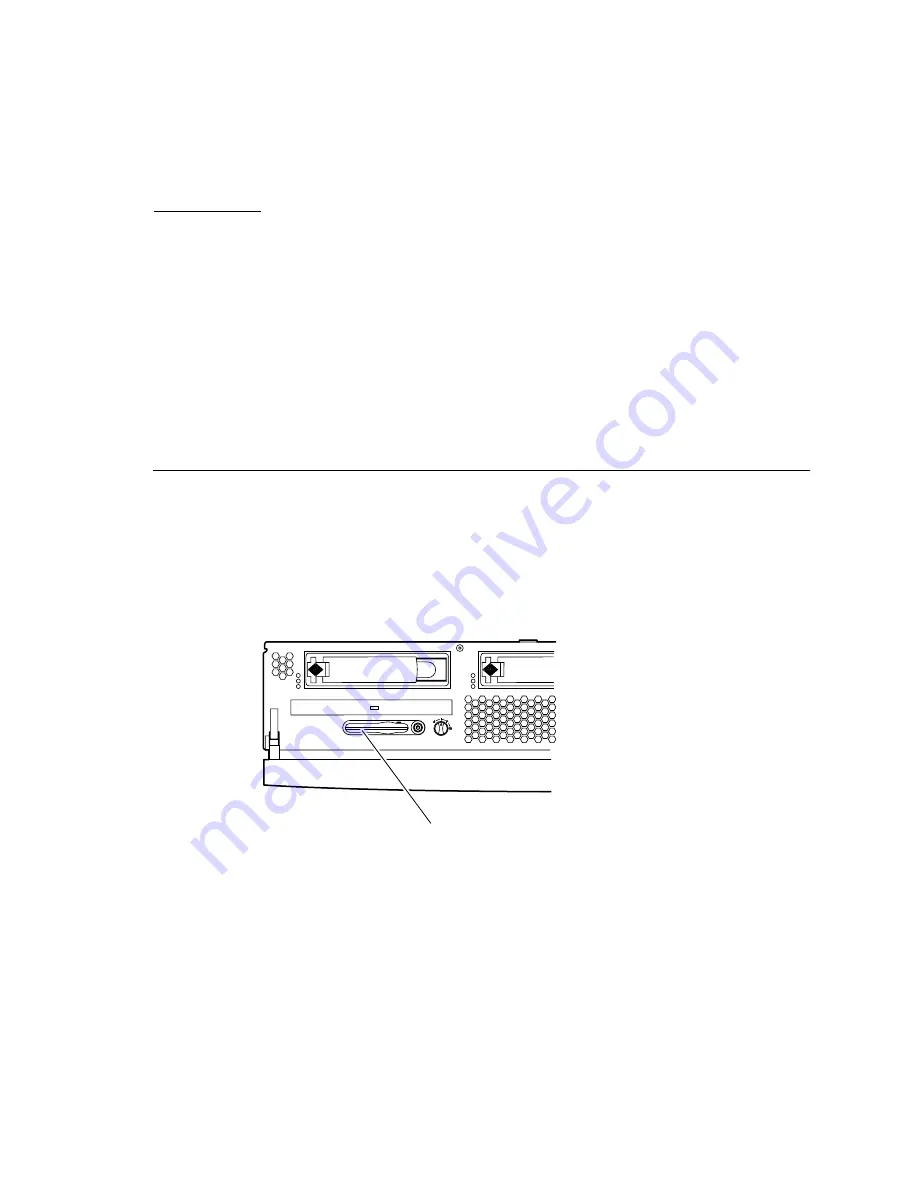
The system configuration card is housed in a slot behind the front bezel, next to the 
On/Standby button (see 

FIGURE


C-1

). The card contains unique network identity 

information, including the MAC address and hostid (stored in the IDPROM), and 
the OpenBoot PROM configuration (also known as NVRAM).

FIGURE


C-1 

Location of the System Configuration Card 

The server attempts to access the system configuration card while booting.

If a properly formatted card is not present in the reader, the system does not boot. 

If the content of the NVRAM section is invalid, the system is initialized with its 
default NVRAM configuration. The default values can be seen using the 

printenv

 command. 

System configuration card

Summary of Contents for Netra 240

Page 1: ...Sun Microsystems Inc www sun com Submit comments about this document at http www sun com hwdocs feedback Netra 240 Server Service Manual Part No 817 2699 12 June 2004 Revision A...

Page 2: ...opyright 2004 Sun Microsystems Inc 4150 Network Circle Santa Clara California 95054 Etats Unis Tous droits r serv s Sun Microsystems Inc a les droits de propri t intellectuels relatants la technologie...

Page 3: ...tors 8 Rear Panel Indicators 12 2 Preparing to Service the System 15 Tip Warning 15 Controlling Server Power 16 Powering On the Server 20 Powering On the Server Remotely 22 Powering Off the Server 22...

Page 4: ...34 Removing the Bezel Assembly 34 Installing the Bezel Assembly 35 Air Filter 36 Removing the Air Filter 36 Installing the Air Filter 37 System Configuration Card 38 Removing a System Configuration Ca...

Page 5: ...luster 65 5 Removing and Replacing Miscellaneous Internal Components 67 Air Duct and Rear Fan Assembly 68 Removing or Rotating the Air Duct and Rear Fan Assembly 68 Installing or Closing the Air Duct...

Page 6: ...B Connector Pinouts 115 Gigabit Ethernet Ports 116 Network Management Port 117 Serial Ports 118 Serial Management Port 118 RJ 45 to DB 9 Adapter Crossovers 119 RJ 45 to DB 25 Adapter Crossovers 120 Se...

Page 7: ...Contents vii Index 133...

Page 8: ...viii Netra 240 Server Service Manual June 2004...

Page 9: ...t Network Indicators 13 FIGURE 2 1 Netra 240 Server Tip Hazard 16 FIGURE 2 2 On Standby Button and Rotary Switch 17 FIGURE 2 3 Rotary Switch Positions 19 FIGURE 2 4 Finger Holds on the Bezel 21 FIGURE...

Page 10: ...n Screw 77 FIGURE 5 5 Location of the PCI Lockdown Bracket 78 FIGURE 5 6 Removing and Installing the Upper Half Length PCI Cards 79 FIGURE 5 7 Removing and Installing the Lower Full Length PCI Card 80...

Page 11: ...Breakdown Rotating Service Module Internal and Rear Panel Components 110 FIGURE A 3 Illustrated Parts Breakdown Miscellaneous Internal Components 112 FIGURE B 1 Gigabit Ethernet Port Pin Numbering 11...

Page 12: ...xii Netra 240 Server Service Manual June 2004...

Page 13: ...ndby Button Power States Actions and Results 18 TABLE 2 2 Rotary Switch Positions and Server Behaviors 19 TABLE 2 3 System Control Rotary Switch Functions and Positions 20 TABLE 5 1 DIMM Pair Installa...

Page 14: ...101 Connector Signals 120 TABLE B 9 Alarm Connector Signals 121 TABLE B 10 USB Connector Pin Signals 122 TABLE B 11 SCSI Port Pin Signals 123 TABLE C 1 OpenBoot PROM Configuration Parameters Stored on...

Page 15: ...tion Guide 817 2698 Before following any of the procedures described in this book ensure that you have read the Important Safety Information for Sun Hardware Systems Manual 816 7190 Using UNIX Command...

Page 16: ...en contrasted with on screen computer output su Password AaBbCc123 Book titles new words or terms words to be emphasized Replace command line variables with real names or values Read Chapter 6 in the...

Page 17: ...d by or in connection with the use of or reliance on any such content goods or services that are available on or through such sites or resources Application Title Part Number Installation overview Net...

Page 18: ...t go to http www sun com service contacting Sun Welcomes Your Comments Sun is interested in improving its documentation and welcomes your comments and suggestions You can submit your comments by going...

Page 19: ...t are not available on all standard configurations of the Netra 240 server Identifying the Netra 240 Server Components The components for the Netra 240 server can be broken down into three areas Front...

Page 20: ...Hard Drives on page 40 FIGURE 1 1 Hardware Cryptographic Module on page 85 FIGURE 1 3 Memory Modules on page 70 FIGURE 1 3 PCI Cards on page 76 FIGURE 1 2 Power Distribution Board on page 81 FIGURE 1...

Page 21: ...Chapter 1 Identifying the Netra 240 Server Components and LEDs 3 FIGURE 1 1 Front Panel Components Bezel assembly Air filter Hard drives System configuration card DVD drive...

Page 22: ...omponents and Rear Panel Components Power distribution board Front fan assembly SCSI interface board Rotating service module Power supply units Air duct and rear fan assembly Customer Alarm board behi...

Page 23: ...Chapter 1 Identifying the Netra 240 Server Components and LEDs 5 FIGURE 1 3 Hardware Cryptographic Module and Memory Memory Optional hardware cryptographic module...

Page 24: ...for system board FRU part numbers and Installing a System Board on page 95 for instructions on removing the processor fans during system board installation Optional Components TABLE 1 2 lists the ord...

Page 25: ...un Crypto Accelerator 500 card Sun Crypto Accelerator 500 X7405A Removable media Internal slim DVD ROM drive X7425A Internal slim DVD RW drive X7413A Rackmount kits 19 inch 2 post rackmount kit X7901A...

Page 26: ...provided Front Panel Indicators TABLE 1 4 to TABLE 1 6 provide details about the indicators on the front panel and a description of the dry contact alarm states of the Netra 240 server See FIGURE 1 5...

Page 27: ...p and running the Solaris Operating System Solaris OS Off Either power is not present or Solaris software is not running Service Required Yellow On The server has detected a problem and requires the a...

Page 28: ...fully loaded Off Offiii Closed Open Transient state Solaris OS successfully loaded On Off Open Closed Normal operating state Watchdog timeout Off On Closed Open Transient state reboot Solaris OS Sola...

Page 29: ...include the system power shutdown ii Based on a determination of the fault conditions the user can turn the alarm on using the Solaris platform alarm API or ALOM CLI For more information on the alarm...

Page 30: ...he Netra 240 server See FIGURE 1 7 and FIGURE 1 8 for the location of the rear panel indicators TABLE 1 6 Hard Drive Indicators Indicator LED Color LED State Component Status Activity Green Flashing A...

Page 31: ...work Indicators TABLE 1 7 Network Link Indicators LED Color LED State Network Link Status Green On Link is established Blinking Link is transferring data Off Link is not established Power supply indic...

Page 32: ...mum supported speed If the network activity indicator is off the network link is not established TABLE 1 9 Power Supply Unit Indicators LED Color LED State Component Status Green On Power is present a...

Page 33: ...ic Discharge on page 32 Note Illustrations might contain optional components that are not available on all standard configurations of the Netra 240 server Tip Warning Caution When the Netra 240 server...

Page 34: ...urning the power off does not disable the ALOM For information on controlling server power using software refer to the Sun Advanced Lights Out Manager Software User s Guide for the Netra 240 Server 81...

Page 35: ...Chapter 2 Preparing to Service the System 17 FIGURE 2 2 On Standby Button and Rotary Switch On Standby button Rotary switch...

Page 36: ...TABLE 2 3 provides the system control rotary switch functions and positions TABLE 2 1 On Standby Button Power States Actions and Results Server Power State Description Press and Release Press Down for...

Page 37: ...ed Disable On Standby button Write protect ALOM Flash PROM Write protect OpenBoot PROM POST Flash PROM Disable suspension to OpenBoot PROM kadbi i When the rotary switch is in the locked position you...

Page 38: ...erial management port For more information on establishing a connection refer to the Netra 240 Server Installation Guide 817 2698 2 Connect the server to a power source Once connected the server autom...

Page 39: ...ront bezel to access the rotary switch FIGURE 2 4 Finger Holds on the Bezel 5 Set the rotary switch to the Normal or Diagnostics position TABLE 2 2 and FIGURE 2 3 6 Press the On Standby button Verbose...

Page 40: ...tiate a reconfiguration boot For those instructions see Initiating a Reconfiguration Boot on page 24 Caution Never move the system when the system power is on Movement can cause catastrophic hard driv...

Page 41: ...ctrical power is present when the server is in Standby mode Caution As long as the power input cables are connected potentially hazardous energy is present inside the server 8 Close the bezel Powering...

Page 42: ...te forced shutdown refer to the Sun Advanced Lights Out Manager Software User s Guide for the Netra 240 Server 817 3174 Information on ALOM is also available in the Netra 240 Server System Administrat...

Page 43: ...device for specific instructions 2 Turn on power to the alphanumeric terminal or local graphics monitor or log in to the ALOM 3 Turn the rotary switch to the Diagnostics position Use the Diagnostics p...

Page 44: ...minutes to appear The time depends on the system configuration number of CPUs memory modules PCI cards and the level of POST and OpenBoot Diagnostics tests being performed For more information about...

Page 45: ...t both power input cables before carrying out this procedure As long as the power input cables are connected potentially hazardous energy is present inside the server Caution After servicing replace a...

Page 46: ...erver FIGURE 2 5 4 Hang the cover on the Netra 240 server if necessary FIGURE 2 6 You must open the rotating service module to hang the cover on the server Refer to Accessing Rotating Service Module C...

Page 47: ...onto the server once you have completed the service procedures for the internal components 1 Place the server cover back on top of the server and push it all the way forward Ensure that the rear corn...

Page 48: ...ponents The procedures for servicing the rotating service module components are provided in Chapter 4 Opening the Rotating Service Module 1 Power off the server See Powering Off the Server on page 22...

Page 49: ...module once you have completed the service procedures for the rotating service module components see Chapter 4 1 Close the rotating service module back into position 2 Tighten the two captive screws t...

Page 50: ...mage caused by static electricity You need the following items Antistatic wrist or foot strap Antistatic mat 1 Power off the system See Powering Off the Server on page 22 2 Remove the server cover See...

Page 51: ...xtremely sensitive to static electricity Ordinary amounts of static from your clothes or the work environment can destroy components Do not touch the components or any metal parts without taking prope...

Page 52: ...server See Powering Off the Server on page 22 2 Ensure that the server is properly grounded See Avoiding Electrostatic Discharge on page 32 3 Grip the bezel at the two finger holds and rotate it down...

Page 53: ...e bezel hinges 6 Lift and pull the bezel forward to remove it from the server Installing the Bezel Assembly 1 Mount the new bezel and hinges onto the server 2 Secure the bezel assembly to the server u...

Page 54: ...el Removing the Air Filter 1 Ensure that the server is properly grounded See Avoiding Electrostatic Discharge on page 32 2 Grip the bezel at the two finger holds and rotate it down to its open positio...

Page 55: ...ing Front and Rear Panel Components 37 FIGURE 3 3 Removing and Replacing the Air Filter From the Bezel Installing the Air Filter 1 Snap the new air filter into place in the bezel FIGURE 3 3 2 Close th...

Page 56: ...ion card is not programmed with any OpenBoot PROM and ALOM configurations Upon initial insertion in the Netra 240 server you are prompted for confirmation that you wish to use the new card It is then...

Page 57: ...ation card is inserted into the system configuration card reader secure a new tie wrap to discourage accidental or unintentional removal of the card FIGURE 3 4 Removing and Inserting a System Configur...

Page 58: ...fs Hard Drives The Netra 240 server has slots for up to two internal hard drives The slots accept any Sun Low Voltage Differential LVD SCSI hard drive conforming to the 1 inch SCA 2 form factor Note...

Page 59: ...nconfigure command and specify the device you intend to remove For example if it is Disk 1 type format Searching for disks done AVAILABLE DISK SELECTIONS 0 c1t0d0 SUN36G cyl 24620 alt 2 hd 27 sec 107...

Page 60: ...E 1 6 for the location of the LED indicators for the hard drive 9 Slide the catch at the front of the hard drive to the right FIGURE 3 5 cfgadm al Ap_Id Type Receptacle Occupant Condition c0 scsi bus...

Page 61: ...3 5 This releases the handle on the front of the hard drive The lever must be open before you insert the hard drive into the server If the lever is closed the hard drive will not engage with the serv...

Page 62: ...a system containing two hard drives 7 Determine the label of the new hard drive The label appears in the Ap_Id column of the sample output Type In the preceding sample output the new drive is Disk 1 f...

Page 63: ...ve contains a laser device Do not attempt to open the DVD drive enclosure or remove a DVD drive using any procedures other than those contained in this section If you do you risk being exposed to radi...

Page 64: ...er on page 22 2 Grip the bezel at the two finger holds and rotate it down to open FIGURE 3 1 3 Unclip the catches that fasten the DVD drive to the chassis FIGURE 3 6 FIGURE 3 6 Removing a DVD Drive 4...

Page 65: ...a DVD Drive 1 If the server is powered on power off the server See Powering Off the Server on page 22 2 If a filler panel is installed remove the filler panel from the DVD drive slot by pulling it tow...

Page 66: ...VD Drive Slot With a Filler Panel 3 Push the DVD drive firmly into the drive slot until the DVD connector is inserted into the system and the clips engage with the chassis FIGURE 3 6 4 Close the bezel...

Page 67: ...the ALOM prompt type Where n is the power supply unit identifier 1 or 2 For example to replace power supply unit 1 you would enter When the blue OK to Remove LED on the back of the power supply unit...

Page 68: ...supply unit into the server until you feel it engage with the power distribution board inside Ensure that the lever does not return to a vertical position until the power supply unit engages with the...

Page 69: ...r supply unit LED indicators to verify that the power supply unit is up and running The green LED on the back of the power supply unit should light up indicating that the power supply unit is function...

Page 70: ...52 Netra 240 Server Service Manual June 2004...

Page 71: ...hat are extremely sensitive to static electricity Ordinary amounts of static from your clothes or the work environment can destroy components Do not touch the components or any metal parts without tak...

Page 72: ...owering Off the Server on page 22 2 Remove the server cover See Removing the Server Cover on page 27 3 Open the rotating service module See Opening the Rotating Service Module on page 30 4 Ensure that...

Page 73: ...board into position in the rotating service module FIGURE 4 1 2 Tighten the captive screw to secure the alarm board to the rotating service module FIGURE 4 1 3 Connect the ribbon cable and the cable t...

Page 74: ...and F3 The entire front fan assembly tray should be replaced if one of these fans fail Removing the Front Fan Assembly Tray 1 Power off the server See Powering Off the Server on page 22 2 Remove the...

Page 75: ...otating service module FIGURE 4 2 7 Lift the front fan assembly tray straight up and remove it from the server FIGURE 4 2 Installing the Front Fan Assembly Tray 1 Place the front fan assembly tray int...

Page 76: ...SCSI Interface Board The SCSI interface board houses the two hard drives Removing the SCSI Interface Board 1 Power off the server See Powering Off the Server on page 22 2 Grip the bezel at the two fi...

Page 77: ...rew on the top of the SCSI interface board FIGURE 4 3 FIGURE 4 3 Removing the SCSI Interface Board 9 Detach the bezel cables the SCSI interface cable the DVD power I2C interface ribbon cable the alarm...

Page 78: ...rface cable the DVD power I2C interface ribbon cable the alarm board cable and the SCSI interface board power cable to the SCSI interface board FIGURE 4 3 4 Close the rotating service module See Closi...

Page 79: ...IGURE 2 4 3 Remove the system configuration card from the system configuration card reader See Removing a System Configuration Card on page 38 4 Remove the DVD ROM drive from the server See Removing a...

Page 80: ...June 2004 FIGURE 4 4 Lifting the SCSI IDE Cable Clamp 9 Unplug the cables in the sequence below FIGURE 4 5 and FIGURE 4 6 a Unplug the SCSI interface board cable from the system board and remove it o...

Page 81: ...rface board d Unplug the bezel cables from the SCSI interface board and move them out of the way 10 Using a No 2 Phillips screwdriver loosen the two green captive screws at the front of the system con...

Page 82: ...64 Netra 240 Server Service Manual June 2004 FIGURE 4 6 Removing the System Configuration Card Reader Cluster System configuration card reader cluster Captive screws Tabs...

Page 83: ...the SCSI interface board d Plug the SCSI interface cable 4 Press the SCSI IDE cable clamp back down to secure the SCSI interface and IDE cables The cable clamp is attached to the chassis and has a gre...

Page 84: ...66 Netra 240 Server Service Manual June 2004...

Page 85: ...static electricity Ordinary amounts of static from your clothes or the work environment can destroy components Do not touch the components or any metal parts without taking proper antistatic precauti...

Page 86: ...trostatic Discharge on page 32 5 Determine if you want to gain access to the components beneath the air duct and rear fan assembly or if you want to completely remove the assembly from the server refe...

Page 87: ...ter 5 Removing and Replacing Miscellaneous Internal Components 69 FIGURE 5 1 Removing Rotating the Air Duct and Rear Fan Assembly Rotating the Assembly Removing the Assembly Air duct and rear fan asse...

Page 88: ...ice Module on page 31 5 Install the server cover See Installing the Server Cover on page 29 6 Power on the server See Powering On the Server on page 20 Memory Modules There are eight DIMM slots on the...

Page 89: ...5 Removing and Replacing Miscellaneous Internal Components 71 FIGURE 5 2 System Board CPUs and Corresponding Memory Locations Bank0 CPU0 CPU1 Bank0 Bank1 CPU0 DIMM slots CPU1 DIMM slots Bank1 Rear of...

Page 90: ...4 to install the replacement memory module s Removing Memory Modules 1 Power off the server See Powering Off the Server on page 22 2 Remove the server cover See Removing the Server Cover on page 27 3...

Page 91: ...ter 5 Removing and Replacing Miscellaneous Internal Components 73 FIGURE 5 3 Removing and Inserting Memory 7 Remove the memory module from the socket Socket latch Socket latch Memory module Memory soc...

Page 92: ...CPU is installed in the CPU0 slot Therefore you must install the first DIMM pair in CPU0 DIMM Bank0 see FIGURE 5 2 A dual processor system board must have a minimum of one DIMM pair installed in CPU0...

Page 93: ...ssembly up See Removing or Rotating the Air Duct and Rear Fan Assembly on page 68 Note that you only have to rotate the assembly up not remove it from the server 2 Locate the correct memory socket FIG...

Page 94: ...PCI cards are not hot swappable Note Add PCI cards to the Netra 240 server in order from PCI 0 to PCI 2 This corresponds to populating the PCI slots from bottom to top The following procedures descri...

Page 95: ...module See Opening the Rotating Service Module on page 30 4 Ensure that the server is properly grounded See Avoiding Electrostatic Discharge on page 32 5 Completely remove the air duct and rear fan as...

Page 96: ...78 Netra 240 Server Service Manual June 2004 7 Remove the PCI lockdown bracket on the inside of the server FIGURE 5 5 FIGURE 5 5 Location of the PCI Lockdown Bracket PCI lockdown bracket...

Page 97: ...ing one of the two half length PCI cards installed in the upper positions PCI1 or PCI2 unseat the PCI card from the connector and lift it out of the server FIGURE 5 6 FIGURE 5 6 Removing and Installin...

Page 98: ...the PCI card from the connector and lift it out of the server FIGURE 5 7 Installing a PCI Card 1 Prepare the server for servicing if you have not done so already a Power off the server See Powering Of...

Page 99: ...rd support and slide the PCI card support completely against the PCI card FIGURE 5 7 4 Reattach the PCI lockdown bracket and tighten the PCI lockdown screw FIGURE 5 5 and FIGURE 5 4 5 Install the air...

Page 100: ...n page 30 5 Ensure that the server is properly grounded See Avoiding Electrostatic Discharge on page 32 6 Disconnect the power distribution board wiring harness from the three connectors on the system...

Page 101: ...e back of each power supply unit down FIGURE 5 9 This disconnects the power supply unit from the power distribution board FIGURE 5 9 Disengaging a Power Supply Unit 9 Slide each power supply unit part...

Page 102: ...For more information about these pinch points refer to the power supply labels 5 Insert the two power supply units in the power supply unit bays 6 Slide each power supply unit into the server until y...

Page 103: ...Module 1 Power off the server See Powering Off the Server on page 22 2 Remove the server cover See Removing the Server Cover on page 27 3 Open the rotating service module See Opening the Rotating Serv...

Page 104: ...10 Removing and Installing the Hardware Cryptographic Module 7 Squeeze the retaining standoff to compress it 8 Lift the hardware cryptographic module away from the chassis FIGURE 5 10 Optional hardwa...

Page 105: ...assembly See Installing or Closing the Air Duct and Rear Fan Assembly on page 70 6 Close the rotating service module See Closing the Rotating Service Module on page 31 7 Install the server cover See I...

Page 106: ...ely remove the air duct and rear fan assembly See Removing or Rotating the Air Duct and Rear Fan Assembly on page 68 6 Remove all PCI cards from the PCI riser card assembly See Removing a PCI Card on...

Page 107: ...onents 89 8 Pull the PCI riser card assembly straight up to detach it from the system board FIGURE 5 11 FIGURE 5 12 Disconnecting the PDB Wiring Harness From the System Board 9 Disconnect the PDB wiri...

Page 108: ...004 10 Lift the SCSI IDE cable clamp out of the way FIGURE 5 13 The clamp has a green cap that is attached to the chassis and holds the SCSI interface cable and the IDE cable FIGURE 5 13 Lifting the S...

Page 109: ...al Components 91 11 Disconnect the interface board SCSI and IDE cables from the system board FIGURE 5 14 FIGURE 5 14 Removing the SCSI Interface Board Cable and the IDE Cable From the System Board IDE...

Page 110: ...assembly cables from the system board connectors FIGURE 5 15 FIGURE 5 15 Detaching the Front Fan Assembly Cables From the System Board Connectors 13 Remove the Hardware Cryptographic Module See Remov...

Page 111: ...nents 93 14 Unscrew and remove the DB 9 and SCSI jackposts on the server back panel FIGURE 5 16 FIGURE 5 16 Removing the DB 9 and SCSI Jackposts From the Server 15 Unscrew the two screws and remove th...

Page 112: ...IGURE 5 17 FIGURE 5 17 Removing and Installing a System Board 17 Lift the front of the system board slightly and slide the system board toward the front of the chassis so that the SCSI Ethernet and se...

Page 113: ...Netra 240 server chassis you must first remove the fans from the CPU heat sink assemblies 1 Place the replacement system board on a clean static free worktable 2 Locate the CPU heat sink assemblies on...

Page 114: ...RE 5 19 Follow the fan power cables from the fans to the cable connectors on the system board FIGURE 5 19 Detaching the Fan Power Cables Note The connectors for the CPU0 heat sink fans are labeled P0...

Page 115: ...onents 97 4 Unlock the heat sink from the CPU socket by first pressing down on the fasteners securing the heat sink assembly and then lifting them up FIGURE 5 20 Repeat this step for both fasteners on...

Page 116: ...98 Netra 240 Server Service Manual June 2004 5 Carefully pull the heat sink up from the CPU socket FIGURE 5 21 FIGURE 5 21 Lifting the Heat Sink From the CPU Socket...

Page 117: ...nts 99 6 Using a No 1 Phillips screwdriver remove the screws securing the fans to the heat sink and remove the fans FIGURE 5 22 Two screws secure each fan Set the fans and screws aside after removing...

Page 118: ...firmly positioned in their slots at the rear of the chassis and insert the board into the chassis FIGURE 5 17 10 Install all ten of the system board screws Do not put any screws in the holes for the P...

Page 119: ...7 Connect the PDB wiring harness to the system board See FIGURE 5 12 to locate the wiring harness 18 Place the PCI riser card assembly in position in the server FIGURE 5 11 a Press down on the top of...

Page 120: ...102 Netra 240 Server Service Manual June 2004...

Page 121: ...jumper Only service personnel should modify the settings for this jumper Note Illustrations might contain optional components that are not available on all standard configurations of the Netra 240 se...

Page 122: ...ly service personnel should modify this setting JP11 1 2 Not fitted ROM write protect Only service personnel should modify this setting JP12 1 2 Not fitted ALOM console bypass Only service personnel s...

Page 123: ...Chapter 6 System Board Jumper Settings 105 FIGURE 6 1 Location of Jumpers on the Netra 240 System Board JP11 JP8 JP5 JP1 JP2 JP9 JP3 JP4 JP12 JP14 JP6 JP10 JP13...

Page 124: ...106 Netra 240 Server Service Manual June 2004...

Page 125: ...te but are subject to change without notice Consult your authorized Sun sales representative or service provider to confirm a part number prior to ordering a replacement part Note Illustrations might...

Page 126: ...GURE A 1 Illustrated Parts Breakdown Front Panel Components TABLE A 1 Part Numbers for Front Panel Components Reference Number Part Part Number 1 Bezel assembly F370 6129 2 Air filter pack containing...

Page 127: ...DVD drive internal slim DVD RW drive F370 6145 X7413A 4 DVD drive internal slim DVD ROM drive F370 6632 X7425A 5 Hard drive F540 5924 XRA SC1N2 73G15K TABLE A 1 Part Numbers for Front Panel Components...

Page 128: ...Parts Breakdown Rotating Service Module Internal and Rear Panel Components TABLE A 2 Part Numbers for Rotating Service Module Internal and Rear Panel Components Reference Number Part Part Number 1 Po...

Page 129: ...SCSI interface board F370 6128 6 PCI card optional varies 7 Air duct and rear fan assembly F370 6125 8 Power supply units DC F300 1567 8 Power supply units AC F300 1568 TABLE A 2 Part Numbers for Rota...

Page 130: ...112 Netra 240 Server Service Manual June 2004 Miscellaneous Internal Components FIGURE A 3 Illustrated Parts Breakdown Miscellaneous Internal Components 3 2 1...

Page 131: ...GHz 0 MB F375 3120 02 2 Hardware cryptographic module F370 5464 X7405A 3 Memory expansion SPD 0 0 DIMM 2 x 256 MB F370 5565 X7402A 3 Memory expansion SPD 0 0 DIMM 2 x 512 MB F370 4939 X7403A 3 Memory...

Page 132: ...114 Netra 240 Server Service Manual June 2004...

Page 133: ...appendix gives the pinouts for the following Netra 240 server rear ports Gigabit Ethernet Ports on page 116 Network Management Port on page 117 Serial Ports on page 118 Alarm Port on page 121 USB Por...

Page 134: ...s FIGURE B 1 Gigabit Ethernet Port Pin Numbering TABLE B 1 Ethernet Connection Transfer Rates Connection Type IEEE Terminology Transfer Rate Ethernet 10BASE T 10 Mbit s Fast Ethernet 100BASE TX 100 Mb...

Page 135: ...on If you are planning to use the network management NET MGT port you must use a shielded Ethernet cable to maintain your server s NEBS compliance The cable s shield must be grounded at both ends FIGU...

Page 136: ...from the back panel This port is the default connection to the system and you should use this port only for server management Caution You must use a shielded Ethernet cable to maintain your server s...

Page 137: ...B 6 and TABLE B 7 RJ 45 to DB 9 Adapter Crossovers TABLE B 5 Serial Management RJ 45 Connector Signals Pin Signal Description Pin Signal Description 1 Request to Send 5 Ground 2 Data Terminal Ready 6...

Page 138: ...Numbering TABLE B 7 RJ 45 to DB 25 Adapter Crossovers Serial Port RJ 45 Connector DB 25 Adapter Pin Signal Description Pin Signal Description 1 RTS 5 CTS 2 DTR 6 DSR 3 TXD 3 RXD 4 Signal Ground 7 Sign...

Page 139: ...alarming system FIGURE B 5 shows the pin numbering of the alarm port and TABLE B 9 describes the pin signals FIGURE B 5 Alarm Port Pin Numbering TABLE B 9 Alarm Connector Signals Pin Service Pin Serv...

Page 140: ...for attaching supported USB 1 1 compliant devices FIGURE B 6 shows the pin numbering of the USB ports and TABLE B 10 describes the pin signals FIGURE B 6 USB Ports Pin Numbering TABLE B 10 USB Connect...

Page 141: ...SCSI port and TABLE B 11 describes the pin signals FIGURE B 7 SCSI Port Pin Numbering TABLE B 11 SCSI Port Pin Signals Pin Signal Description Pin Signal Description 1 Data12 35 Data12 2 Data13 36 Data...

Page 142: ...22 Ground 56 Ground 23 BSY 57 BSY 24 ACK 58 ACK 25 RST 59 RST 26 MSG 60 MSG 27 SEL 61 SEL 28 CD 62 CD 29 REQ 63 REQ 30 I O 64 I O 31 Data8 65 Data8 32 Data9 66 Data9 33 Data10 67 Data10 34 Data11 68 D...

Page 143: ...GURE C 1 The card contains unique network identity information including the MAC address and hostid stored in the IDPROM and the OpenBoot PROM configuration also known as NVRAM FIGURE C 1 Location of...

Page 144: ...ckage local mac address true If true network drivers use their own MAC address not that of the server fcode debug false If true includes name fields for plug in device FCodes ttyb rts dtr off false If...

Page 145: ...ag device net Device from which to boot if diag switch is true boot file none File to boot if diag switch is false boot device disk net Device s from which to boot if diag switch is false use nvramrc...

Page 146: ...diag device If false Runs in nondiagnostic mode Following a boot request boots boot file from boot device obdiag trigger power on reset Class of reset events that causes OpenBoot diagnostics tests err...

Page 147: ...ifications TABLE D 1 Physical Specifications of the Netra 240 Server Netra 240 Server Dimensions Measurements Height 2 rack units RU 3 44 inches 87 4 mm Width without bezel 16 73 inches 425 mm Width w...

Page 148: ...ft 40 C 40 F to 70 C 158 F Relative humidity 5 to 85 relative humidity noncondensing Short termi 5 to 90 relative humidity noncondensing but not to exceed 0 024 kg water kg dry air 0 053 lbs water 2...

Page 149: ...server Note The figures for the maximum operating current are provided to help you specify the fusing and cabling you need to deliver power to your equipment However these figures represent worst cas...

Page 150: ...work Equipment Building System Requirements Physical Protection and GR 1089 CORE Electromagnetic Compatibility and Electrical Safety Generic Criteria for Network Telecommunications Equipment Caution T...

Page 151: ...itical 10 major 10 minor 11 user 11 alarm states dry contact 10 ALOM Advanced Lights Out Manager remote power off 23 25 remote power on 22 alphanumeric terminal remote power off 23 25 remote power on...

Page 152: ...32 H half length PCI card 76 handle hard drive 43 hard drive 40 bay 43 catch 42 43 filler 40 handle 43 installing 43 removing 40 SCSI interface board houses 58 Sun Low Voltage Differential LVD SCSI ha...

Page 153: ...g the server 27 operating noise acoustic specifications 131 optional components order numbers 7 P parts breakdown illustrated 107 front panel components 108 miscellaneous internal components 112 rotat...

Page 154: ...0 removing 58 server back panel jackposts 93 100 slot DVD drive 48 specifications 129 acoustic noise emissions 131 electrical 131 environmental 130 NEBS compliance 132 physical 129 power limits 131 st...

Reviews: