


-
48
-
© STULZ GmbH, Hamburg
-
48
-
10.2 Maintenance of the other plumbing components
IMPORTANT WARNINGS:
• When cleaning the plastic components do not use detergents or solvents;
• scale can removed using a solution of 20% acetic acid and then rinsing with water.
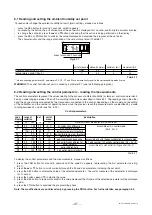
The steam humidifier has just one part that requires periodical replace ment: the steam production cylinder. This operation
is necessary when the lime scale deposits that form inside the cylinder prevent the sufficient passage of current. This situ-
ation is displayed on the controller by an alarm signal. The frequency of this operation depends on the supply water: The
higher the content of salts or impurities, the more frequently the cylinder will need replacing.
n.
description
1
S/D manifold (supply-drain) fill
2
electrovalve
3
drain electrovalve
4
tank fill pipe
5
cylinder supply
6
overflow pipe
7
tank
8
base
9
drain column
10
drain pipe
11
drain pump
12
conductivity meter
Fig. 10.2.1A
Tab. 10.2.1
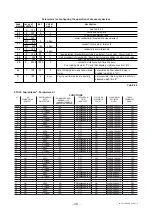
•
Fill electrovalve
(Fig. 10.2.1, part no. 2) After having disconnected the cables and the pipe, remove the electrovalve
and check the condition of the inlet filter; clean if necessary using water and a soft brush.
•
Supply and drain manifold
(Fig. 10.2.1, parts no. 1) Check that there are no solid residues in the cylinder attach-
ment, remove any impurities.
Check that the seal (o-ring) not is damaged or cracked; replace if necessary.
•
Drain electrovalve /drain pump
(Fig. 10.2.1, part no. 3/12) Disconnect electrical power, remove the coil and remove
the valve body after having unscrewed the two fastening screws from the manifold; remove any impurities and rinse.
•
Bottom collection tank
(Fig. 10.2.1, part no. 8)
Clean the tank from any deposits and check that the water flows freely from the tank to the drain at the drain valve.
•
Tank
(Fig. 10.2.1, part no. 7)
Check that there are no blockages or solid particles and that the conductivity measuring electrodes are clean, remove
any impurities and rinse.
•
Supply, fill, overflow pipes
(Fig. 10.2.1, parts no. 4,5 and 6/9) Check that these are free and do not contain impurities;
remove any impurities.
IMPORTANT WARNING:
After having replaced or checked the plumbing, check that the connections have been carried out correctly and the cor-
responding seals have been used. Re-start the machine and perform a number of supply and drain cycles (from 2 to 4),
then, applying the safety procedure, check for any water leaks.
1
2
3
4
5
6
7
8
9
10
11
12


