background image


Page 9 /59 

snengde_installation-product-SN-range v1.2 - Copyright Netasq 2015 

PRESENTATION AND INSTALLATION GUIDE – SN RANGE 

FOREWORD 

Assumptions on physical security measures 

NETASQ  Firewall-VPN  appliances  are  installed  and  stored  in  compliance  with  the  state  of  the  art 
regarding  sensitive  security  devices:  secured  access to  the  premises,  Shielded cables  with  twisted 
pairs, labeled cables, etc. 


Assumptions on organizational security measures 

The default password of the “admin” user (super administrator) must be changed the very first time 
the  product  is  used.  The  wizard  will  prompt  the  user  to  change  his  password  during  the  initial 
installation, in the 

Administration of the appliance

 window. In the web administration interface, this 

password  can  be  changed  in  the  Administrator  module  (System  menu),  under  the 

Administrator 

account 

tab.  

The  definition  of  this  password  must  observe  the  best  practices  described  in  the  UserGuide,  in  the 
chapter  Welcome,  under  the  section 

User  awareness

,  sub-section 

User  password  management

available at: 

http://documentation.stormshield.eu/ 


A particular administrative role – that of the super-administrator – has the following characteristics: 

-


Only the super-administrator is permitted to connect via the local console on NETASQ Firewall-
VPN appliances, and only when installing the Firewall or for maintenance operations, apart from 
actual use of the equipment.  

-


He is in charge of defining the profiles of other administrators, 

-


All access to the premises where the appliances are stored has to be under his supervision, 
regardless of whether the access is due to an intervention on the appliance or on other 
equipment. He is responsible for all interventions carried out on appliances. 


Assumptions on the IT security environment 

NETASQ firewall-VPN appliances are installed in accordance with the current network interconnection 
policy and are the only passageways between the different networks on which the control policy for 
traffic has to be applied. They are scaled according to the capacities of the adjacent devices or these 
devices restrict the number of packets per second, positioned slightly below the maximum treatment 
capacities of each firewall-VPN appliance installed in the network architecture. 

The  type  of  firewall-VPN  NETASQ  appliance  is  selected  according  to  packet  treatment  capacity 
determined by the  network architecture. Otherwise, adjacent appliances would impose  a restriction 
on the number of packets per second. This limit is set slightly below the maximum treatment capacity 
of each NETASQ firewall-VPN appliance installed. 


Summary of Contents for SN2000

Page 1: ...ield Network Firewalls PRODUCT PRESENTATION AND INSTALLATION SN Range Date Version Details August 2014 V1 0 Creation November 2014 V1 1 Update May 2015 V1 2 Update SN910 Reference snengde_installation...

Page 2: ...of use 30 Installation 31 Connecting to the mains 33 Connecting for the administration of the product 34 Connecting to the network 34 INITIAL CONNECTION TO THE PRODUCT 35 Requirements 35 Connection 36...

Page 3: ...the chapter Documentation Products concerned SN150 SN200 SN300 SN500 SN700 SN900 SN910 SN2000 SN3000 and SN6000 General conditions of use and user license version 2 1 October 2014 To view the current...

Page 4: ...act has been signed NETASQ only guarantees the software of the Product s hereinafter referred to as the Software for a period of ninety 90 days against serious defects and malfunctions compared to the...

Page 5: ...with the prerequisites and conditions of use described herein The same holds for all the consequences of an action inaction error omission or default attributed to the Customer or any service provide...

Page 6: ...s of any rights of third parties on the Product s allowing it to grant the Customer use of said Product s 4 Intellectual Property Copyright NETASQ 2014 All rights reserved Any copying adaptation or tr...

Page 7: ...esult in the payment of damages or late penalties 7 Exporting NETASQ informs that the Products may contain technology and Software subject to US and EU laws on the control of exports as well as subjec...

Page 8: ...te on an Evaluation Assurance Level or EAL scale of 1 to 7 a product s capacity to provide security functions for which it had been designed as well as the quality of its life cycle development produc...

Page 9: ...istrator is permitted to connect via the local console on NETASQ Firewall VPN appliances and only when installing the Firewall or for maintenance operations apart from actual use of the equipment He i...

Page 10: ...will be marked with the mandated crossed out wheeled bin symbol This symbol means that the product meets the requirements laid down by the WEEE directive with regards to the destruction and reuse of w...

Page 11: ...to the rules packet by packet The SN Firewall is based on a sophisticated packet filtering mechanism that provides a high level of security All Firewalls integrate the ASQ Active Security Qualificati...

Page 12: ...w of information relating to the Firewall s activity and its configuration Through SN Activity Reports available from a dedicated portal you can view how Internet access is used the various attacks th...

Page 13: ...ed in a cardboard box sealed by one or two warranty seals On this packaging there is a label indicating information identifying the product it contains and its version Check that this information corr...

Page 14: ...pasted on the back panel of the product on the underside for SN150 SN2000 SN3000 and SN6000 models displays the serial number and the password for registering your product Figure 5 Serial number label...

Page 15: ...SN2000 and SN3000 or an A to B USB cable SN150 For SN500 SN700 SN900 and SN910 models the packaging should also contain A set of brackets and screws for mounting the Firewall in a rack 4 non slip rub...

Page 16: ...ble to disconnect the product ensure that the connection to the power supply is always easily accessible Warranty and safety rules Under no circumstances should you take apart a Stormshield Network ap...

Page 17: ...s component In the event of hardware problem with your Firewall or if one of the elements does not match its description please contact your certified partner Installing an appliance outside a rack Yo...

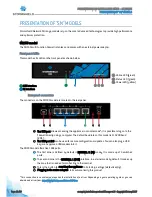
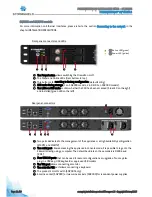
Page 18: ...n console mode it is possible to log on to the Firewall directly using a computer The default baud rate on this model is 115200 baud 8N1 2 The USB port 2 0 can be used for secure configuration or upda...

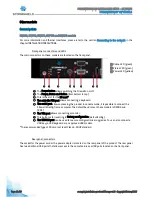
Page 19: ...ot for the SD card 4 The mini din PS2 port allows connecting a keyboard 5 The serial port allows accessing the product in console mode it is possible to connect the Firewall directly from a computer T...

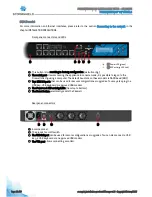
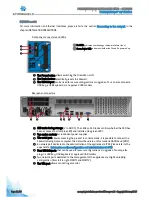
Page 20: ...sible to log on to the Firewall directly using a computer The default baud rate on these models is 9600 baud 8N1 3 Two USB 3 0 ports that can be used for secure configurations or upgrades You may also...

Page 21: ...r the SSD has been accessed blue LED on the right and installed green LED on the left Rear panel connectors 1 Two ports dedicated to the management of the appliance or a High Availability configuratio...

Page 22: ...bottom blue LED and installed top green LED 2 Two mains sockets for redundant power supplies 3 The serial port allows accessing the product in console mode it is possible to connect the Firewall direc...

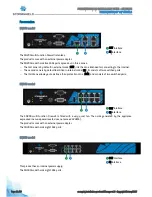
Page 23: ...nnecting to the Internet The second zone is by default identified in internal mode IN It consists of two switched ports The third zone allows you to define a third protection zone DMZ and consists of...

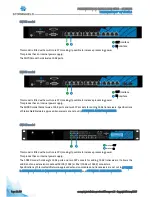
Page 24: ...0 model holds twelve 1GbE ports and two SFP sockets for adding 1GbE transceivers Specifications of Stormshield Network approved transceivers are set out in APPENDIX E FIBER TRANSCEIVERS SN910 model 1I...

Page 25: ...alled in a RAID configuration The SN3000 model offers ten 1GbE ports and allows the addition of two extension modules with RJ45 1GbE or fiber 1GbE or 10GbE connectors Specifications of Stormshield Net...

Page 26: ...UT definition The OUT 1 or External network port is reserved for the modem or Internet router Access to this interface is blocked by default then you will not be able to access the configuration inter...

Page 27: ...cording to the volume of traffic Right LED SPEED Yellow On Media speed negotiated at 1 Gbps Green On Media speed negotiated at 100 Mbps Off Media speed negotiated at 10 Mbps SN2000 and SN3000 models F...

Page 28: ...ft LED LINK Green On Link established between the Ethernet port and the connected appliance 100 Mbps Off Ethernet port switched off or link not established with the connected appliance Right LED ACTIV...

Page 29: ...y default a green LED lights up when the link is established and blinks according to the volume of the traffic SN910 SN2000 and SN3000 models equipped with a 1Gbps extension module and SFP transceiver...

Page 30: ...installation all unauthorized access to the Firewall has to be avoided NOTE Ensure that the cables do not obstruct passageways to prevent them from being pulled out or the product from falling Your S...

Page 31: ...and SN6000 appliances are sold with a set of rails A fastening system for placing the appliance in a rack in the form of a rack mount shelf can be included by special order for SN150 SN200 and SN300 m...

Page 32: ...ibed in SN2000 SN3000_rack mounting and SN6000 _rack mounting These documents are delivered with the SN2000 3000 and SN6000 products and are available in the Document base section in your Secure area...

Page 33: ...vent of an accidental power cut the product will automatically start up once it is powered up again NOTE For SN3000 and SN6000 models 48V DC power supply modules may be provided separately upon reques...

Page 34: ...proved SFP 1Gbps or SFP 1Gbps 10Gbps transceivers available in the catalogue For the choice of the type of network cable according to the network port and the selected connectors see the APPENDIX D EX...

Page 35: ...configuration interface on Stormshield Network Firewalls can be accessed via a web browser and benefits from the latest breakthroughs in user friendliness and simplicity of use It is compatible with...

Page 36: ...kstation can either be linked directly to the Firewall s internal interface or connected to the local network which is itself connected to the Firewall s internal interface For a direct connection of...

Page 37: ...he IP address 10 0 0 1 and the subnet mask 255 0 0 0 Network configuration of your client workstation If DHCP has not been enabled on your client workstation or for manual configurations modify the Ne...

Page 38: ...s for the 3 LEDs Online Status and Power to light up NOTE When you hear 8 consecutive beeps you will be able to insert a USB key containing a configuration if necessary Console mode will display the f...

Page 39: ...lows authenticating the portal via a certificate thereby assuring the administrator that he is indeed logged in to the desired appliance This certificate can either be the appliance s default certific...

Page 40: ...efinition of this password must observe the best practices described in the User Guide in the chapter Welcome under the section User awareness sub section User password management available at http do...

Page 41: ...rk products It aims to improve a better understanding of how they work Go to the Knowledge base in your Secure area Assistance In the event of a hardware issue on your Firewall or if one of the elemen...

Page 42: ...ck on Shut down the Firewall Then wait for several minutes until the Power LED goes out SN2000 SN3000 and SN6000 To shut down your Firewall press once on the ON button For SN2000 and SN3000 models the...

Page 43: ...mshield Network products registered in this area Select the product for which you wish to retrieve the license by clicking on the product s serial number Details of the license will be displayed NOTE...

Page 44: ...o the Firewall NOTE The Online and Status LEDs will blink throughout the entire initialization phase 2 consecutive beeps except on SN150 models and the lighted up Online LED indicate the end of the pr...

Page 45: ...and or until you hear an audible signal The reset procedure will automatically be launched After a few minutes the initial settings will be recovered and the Firewall will reboot SN6000 Model It is p...

Page 46: ...storage media such as a USB key or an external hard disk The type of SD card must be at least Class 6 and compliant with the SDHC standard The maximum memory size supported is 32 GB Initial connectio...

Page 47: ...The number of reports enabled can be increased on models that are equipped with hard disks or with the help of an SD card and by subscribing to the External storage option except SN150 Please refer to...

Page 48: ...ension modules 8 port 1 GbE copper module RJ45 connectors 1000 100 10Base T 4 port 1 GbE fiber module 4 SFP sockets supporting the following transceivers o SFP fiber transceiver 1000Base SX 1Gbps Ethe...

Page 49: ...supply Specific instructions on the location of modules are as follows Modules have to be inserted from left to right starting with the top row There must not be any empty slots between two modules in...

Page 50: ...t back the filler panel by screwing in the 2 knurled screws Reconnect the Firewall to the power supply Using the Power button on the front panel start the Firewall Inserting an extension module on SN6...

Page 51: ...er and the optic fiber are equipped with a connector plug When you plug this optic fiber into the transceiver remove the connector plugs and keep them away from dust for later use IMPORTANT Do not exc...

Page 52: ...widget On SN3000 and SN6000 models the RAID section in the Hardware widget informs you about the SMART status of the SSDs as well as the RAID status You may also log on to the appliance in console mo...

Page 53: ...w SSD which you would have obtained from your partner then type the following command to scan the newly inserted SSD nraid z Next type the command to rebuild the RAID nraid r Big Data Option If you ha...

Page 54: ...from the 48VDC source Next on the module remove the protective cover 1 then use a screwdriver to disconnect the three supply wires 2 Remove the module push the release lever sideways toward the extra...

Page 55: ...urce green AC mains blue 48VDC blinking SN3000 running module installed and connected to a power source green AC mains blue 48VDC not blinking module installed and not connected to a power source red...

Page 56: ...supply plug in the supply cable s connector 1 Verify that the connector is locked in place by pulling it gently Each PSU module is equipped with a light showing its state two colours green red Module...

Page 57: ...certain components and controlling appliances control reboot interruption etc Settings When starting the product once the Stormshield logo appears press del to access the BIOS Next go to the section...

Page 58: ...nistration password immediately in the menu Configuration Users You are further advised to place the IPMI interface on a dedicated administration network If necessary the following Supermicro document...

Page 59: ...Page 59 59 snengde_installation product SN range v1 2 Copyright Netasq 2015 PRESENTATION AND INSTALLATION GUIDE SN RANGE documentation stormshield eu...

Reviews: