STOLZENBERG TT 1200 Operating Manual Download Page 6

4.3.2  Control system electronics / Software

4.3.2.1  Operation / Description of symbols

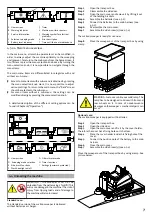
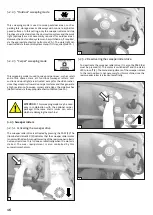
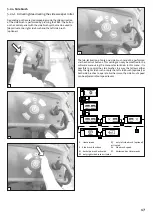
The  menu  selection  knob  is  the  central  control  element  of  the 
electronic  control  system.  Turn  and  press  the  knob  to  navigate 
through the menu and to make adjustments.

4.3.2.2  Control panel button

Shortcut buttons

With the shortcut buttons (see Figure, position 2 to 5) it is 
possible to quickly activate or deactivate the side brushes (2) 
and the fan (3) as well as manual filter cleaning (4), without the 
need for the user to direct his view and concentration away from 
the sweeping area. The horn mounted inside the machine can be 
activated via the horn button (5). 

WARNING: 

Only use the horn as a warning or emergency signal!

"Press-And-Sweep" Switch (PASS)

The  "Press-And-Sweep"  Switch  (1),  which  allows  use  of  the 
machine at the activation of a single button, is positioned in the 
centre  and  surrounded  by  the  shortcut  buttons.  If  the  PASS  is 
pressed, the machine will start with the configuration previously 
stored  in  the  PIN-protected  settings  menu  (I)  ("standard" 
sweeping mode). This function is programmed to respond to the 
respective  application  environment  and  thus  significantly 
reduces improper operation of the sweeper by the operator while 
allowing  a  reproducibility  of  the  application.  The  following 
settings  can  be  specified  in  any  combination:  Sweeper  rollers 
on/off, side brush right on/off, side brush left on/off, fan on/off, 
filter vibrator manual/automatic, working light on/off.

The control system is designed in a way to allow other functions to 
be (de)activated via the main menu or shortcut buttons, after the 
PASS  has  been  pressed. 

IMPORTANT:

  Activated  or  deactivated 

functions  and  settings  will  be  cleared  when  the  machine  is 
restarted!  For  a  permanent  adaptation  of  the  PASS  function 
(standard  configuration),  please  contact  your  local  service 
technician.

Functions of the status LEDs

The  LEDs  (6)  mounted  below  the  shortcut  buttons  indicate  the 
status  of  each  function.  If  sweeper  rollers,  side  brushes,  fans 
and/or  filter  vibrators  are  turned  on,  the  LED  below  the 
corresponding function glows permanently (A). If the function is 
deactivated (via the shortcut button or the control electronics) the 
respective LED (B) is dark. Should an electrical problem arise in the 
circuit of the sweeper roll, side brush, fan or filter vibrator, the LED 
will  begin  to  flash  (C).    Electrical  problems  include  overload, 
disconnected  plug,  defective/blown  fuse,  defective  motors  or 
cable breaks.

4.3.2.3  Home screen of the control system

The home screen (A) is displayed after turning the key switch. 
This overview provides all the relevant information for the 
operator, such as selected sweeping mode (1), battery indicator 
(2), timer (3) and total machine run-time (4). By turning the 
menu selection knob clockwise, the service indicator appears 
and displays the time until the next machine service by a 
qualified and authorized dealer.
Should there be an electrical problem with the sweeper rollers, 
side brush, fan or filter vibrator, a warning symbol (5) appears in on 
the right side of the home screen. By turning the menu selection 
knob, the  warning  indicator  (B)  appears  with  information  about 
the origin of the circuit error.

The control system is programmed to return to the home screen 
(A) if the menu selection knob is not used for 20 seconds ("time-
out  function").  This  ensures  that  all  relevant  parameters  and 
information are always visible to the operator.

6

select/confirm

Switch menu

2

1

5

4

3

6

Summary of Contents for TT 1200

Page 1: ...Operating Manual GB htttp www stolzenberg de TT 1200...

Page 2: ...2...

Page 3: ...rvicecentre General safety instructions 2 1 Contents Thisoperatingmanualcontainsinstructionsforusingthesweeper Our products are constantly being improved It was therefore not possible to include const...

Page 4: ...nothaveroadusehomologation WARNING ATTENTION DANGER THE DESCRIBED INSTRUCTIONS MUST BE OBSERVED WEAR PROTECTIVE GOGGLES WEAR PROTECTIVE GLOVES WEAR BREATHING PROTECTION WARNING ATTENTION DANGER AREA R...

Page 5: ...lock 19 Press And Sweep Switch PASS 7 Steering wheel 20 Side brush switch and status LED 8 Seat 21 Sweeper roller status LED 9 Sweeper roller s 22 Fan switch and status LED 10 Side brush 23 Filter vib...

Page 6: ...MPORTANT Activated or deactivated functions and settings will be cleared when the machine is restarted For a permanent adaptation of the PASS function standard configuration please contact your local...

Page 7: ...ine parameters can be modified in order to always adjust the machine optimally to the sweeping environment To return to the main menu from the home screen it is sufficient to press the menu selection...

Page 8: ...direction 5 it can be released from the bracket The opening of the side door 6 is now possible and provides access to the interior of the machine This is where the separated battery connection is loca...

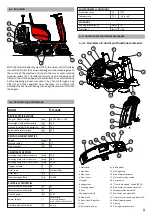
Page 9: ...8 13 12 9 7 9 10 11...

Page 10: ...2 1 4 4 5 2 Inserting the batteries If there are no batteries in the machine they must initially be inserted and connected as described in the following 5 7 10 6 3...

Page 11: ...10 11 12 9 13 14 11 8...

Page 12: ...etween gel and acid batteries which have different discharge curves and shutdown thresholds To ensure correct battery indication and the proper discharge protection it is therefore necessary to define...

Page 13: ...eeting now appears in the displayandthestatusLEDslightuponce 5 Themachineisnowin transfermode 5 1 2 Selection of the driving direction The driving direction switch on the left side of the control pane...

Page 14: ...ne make sure that the parking area is at ground level not inclined and dry To switch off the machine first press down on the break 1 and engage the parking brake 2 3 Subsequently turn the key switch c...

Page 15: ...ypressingthePASS A Home screen D3 Outside mode D Sweeping mode selection D4 Carpet mode D1 Custom mode D5 Exiting the sub menu D2 Indoor mode A D5 D D1 D2 P D3 P D4 P P The following functions are sto...

Page 16: ...te a high resistance To sweep corners and edges the side brushes de activatedviatheappropriateshortcutbutton seeCh 5 2 3 Sweeper rollers 5 2 3 1 Activating the sweeper drive The sweeper roller drive i...

Page 17: ...ormed via the shortcut buttons This setting can only be modified in the software menu using the menu selector knob In this menu it is possible to control the side brushes in a way that allows either o...

Page 18: ...brought into the rest position to prevent deformation of the side brush bristles which would have a significantly negativeeffectonthesweepingresult 5 3 1 Dust suction applications The dust suction sy...

Page 19: ...tched off in order to prevent the direct re suction of dust already shaken off the filter The fan starts to run independently againafterthevibrationprocedure 1 2 5 3 3 2 Filtervibrationfunctions The f...

Page 20: ...machine when the hopper is not inserted Never remove the hopper when the machine is turned on Dirt particles such as e g stones could be taken up by the sweeper rollers and thrown out of the machineat...

Page 21: ...supplied by the machine manufacturer Use of other chargers may fundamentally damage the batteries and result in an increased risk of explosion 5 5 1 Charging with an external charger The charger port...

Page 22: ...battery capacity the chargingprocessisterminatedautomaticallybythecharger ATTENTION DANGER The shutdown function can only be ensured for the charger supplied by the machine manufacturer Use of other...

Page 23: ...ot be cleaned using high pressure or water jet as these can cause damage There is a danger of short circuit orotherseriousdamage IMPORTANT Do not use aggressive cleaning agents ATTENTION Personal prot...

Page 24: ...wires etc check side brooms and remove blockages main brooms without function check proper assembly of main brooms check motor function unsatisfying filter performance side brooms are raising dust li...

Page 25: ...ac fan and remove blockages check electric connections check function of vac fan triggered fuse check root cause and fix it replace reactivate fuse vac fan with malfunction check and replace periodic...

Page 26: ...only They must not be misused as lifting points Serious injuries and damage to themachinemayresultifthisisnotobserved 26 11 TRANSPORT OF THE SWEEPER 8 PRODUCT IDENTIFICATION NAMEPLATE 9 ACCESSORIES A...

Page 27: ...rgerStra e15 17 D 49124Georgsmarienh tte Descriptionofthemachine TT1200E Yearofconstruction 2016 Machinetype Ride onsuctionsweeper ApplicableECDirectives ECMachineryDirective2006 42 EC ECLowVoltageDir...

Page 28: ...Manufacturer StolzenbergGmbH Co KG HamburgerStra e15 17 49124Georgsmarienh tte T 49 0 5401 8353 0 F 49 0 5401 8353 11 E service stolzenberg de Dealers 28 13 CONTACT...

Reviews: