24
AFTER SALES SUPPORT
1300 886 649
AUS
MODEL: STR-PGGC75 PRODUCT CODE: 10288 09/2019
Instructions
Before first use
• When your new gas cooktop has been professionally installed, please
take the time to read this manual thoroughly to familiarise yourself with the
appliance. Pay particular attention to the safety instructions on pages 5–7.
• Clean the cooktop surface as described in the “Care and cleaning” section.
• Check and ensure the cooktop is securely plugged into an appropriate wall
outlet and power is switched on to the outlet.
3
1
5
4
6
2
Fig. 14
Lighting and extinguishing a burner
• To light a burner, press down the control knob gently and turn it anticlock-
wise to the highest setting. Pressing down on the control knob will
commence sparks to all burners.
• Once the flame is lit, hold the knob down for approximately 15 seconds to
ensure it stays lit once released.
• Choose the desired flame level between the highest
5
and lowest
6
settings
by continuing to turn the control knob anticlockwise until the flame is at a
suitable level.
IMPORTANT:
The operating position MUST be between the
highest and lowest settings.
• To switch a burner off, turn the knob clockwise back to the Off
3
position.
• In the event of a burner flame being accidentally extinguished, turn off the
burner control and wait for at least one minute before reigniting it.
• After use, always turn the control knob to the Off
3
position.
NOTE:
You can use matches to light the burners in the event of a power failure.
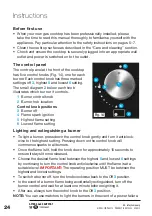
The control panel
The control panel at the front of the cooktop
has five control knobs (Fig. 14), one for each
burner. Each control knob has three marked
settings: off
3
, highest
5
and lowest
6
setting.
The small diagram
2
below each knob
illustrates which burner it controls.
1
Burner control knob
2
Burner hob location
Control knob positions
3
Burner off
4
Flame spark ignition
5
Highest flame setting
6
Lowest flame setting

