background image

STACK Digital Video Recorder

Installation

Users Guide

7

Standard Wiring Harnesses

Once a mounting position has been determined, the components 
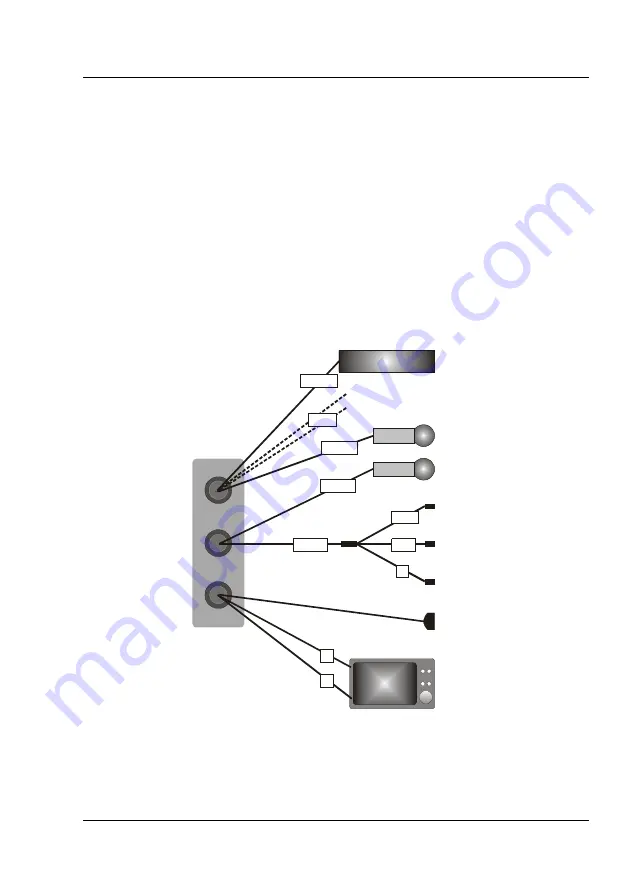
should be connected using the wiring harnesses supplied.  The figure 
below shows the standard electrical connections to the unit.  If you 
are using the DVR with a Stack Video Overlay system, you should 
have received specific wiring harnesses for that system.  The 
differences are described at the end of this chapter.  Please contact 
your Stack distributor if you need different wiring harnesses.

The wiring harnesses supplied by Stack are terminated with the most 
commonly used connectors.  If your equipment uses different 
connectors, you will need to obtain appropriate  adapters from a TV, 
video or electronics supplier.

Input

(yellow)

System

(red)

Monitor

(blue)

Bullet Camera

Microphones

Record Switch

Record Switch

Recording Lamp

Power 6.5 to 20 volts

PC Config Port

Monitor

Stack Digital

Video Recorder

Power supply for camera, mics etc

red

SW

RL

B

12V

CAM

V

A

CTL

left

right

white

Standard Electrical Connections

Summary of Contents for ST8380

Page 1: ...Part No ST542081 005 ST8380 Digital Video Recorder Users Guide ...

Page 2: ......

Page 3: ...unities to make video recordings in all kinds of harsh environments where ordinary video recorders cannot be used Stack is a registered trademark of Stack Limited Information in this publication is subject to change without notice and does not represent a commitment on the part of Stack Limited No responsibility is accepted for error or omission Copyright 2005 Stack Limited ...

Page 4: ...ers Action Replay Tachometers Performance Analysers Speedometers Boost Gauges Analogue Sensors Digital Sensors Who to contact in case of difficulty Stack and its approved Technical Agents provide a comprehensive help service to assist with your enquiries Contact your local Stack branch or Technical Agent a list of whom can be found on the Stack web sites United Kingdom Telephone Numbers Sales 0186...

Page 5: ...eleting Files 4 Using a New Removable Flash Disk 4 Playing a Recording 4 Before Making a Recording 5 Chapter 3 Installation 6 Standard Wiring Harnesses 7 Video Overlay Wiring Harnesses 10 Chapter 4 Operation 11 To make a recording 11 To play a recording 12 Operation with a new Flash Disk 14 Formatting a Flash Disk 14 Deleting Files 15 Corrupted Flash Disks 15 Chapter 5 Flash Memory Cards 17 Chapte...

Page 6: ...28 Chapter 7 Video and Data Systems 29 Synchronised Video Logger Systems 29 Video Overlay Systems 29 Manual recording status control 30 Recording Lamp 30 Recommended Vehicle System Power connections 31 Chapter 8 Troubleshooting 32 Chapter 9 Specifications 34 General 34 Appendix A Mounting Template 37 Appendix B Wiring Harness Diagrams 39 Standard Input Harness ST918067 39 S Video Input Harness ST9...

Page 7: ...nd temperatures The system is DC powered and has optional audio inputs at microphone or line level Typical Digital Video Recorder Application Originally introduced to complement our award winning range of motorsport products the DVR can be applied to a much broader spectrum of mobile engineering applications where protection from a harsh environment is required The DVR can be supplied with product...

Page 8: ...lity Real time video and audio to a PC Flash Disk This incorporates the ability to burn the date and time on to the recorded video Once a recording has been made the Flash Disk may be removed and played on a PC or laptop using a standard media player application Recordings may also be archived to DVD using standard DVD burning software ...

Page 9: ...mponents Quantity Description 1 Digital Video Recorder DVR ST8380 NTSC or ST8380 PAL 1 System Harness ST918066 ST918070 1 Input Harness ST918067 1 Monitor Harness ST918068 1 Record Switch 1 Recording Status Lamp Optional Components DVRs may be supplied with the following optional components Quantity Description 1 DVR to VS Harness ST900103 replaces both Input and System Harnesses 1 S Video Harness...

Page 10: ...u intend to keep transfer the file to your PC s hard drive and then perform a reformat For the remainder of this guide the use of the term Flash Disk shall be used to include a PCMCIA Card device too Using a New Removable Flash Disk The DVR will only operate with a Flash Disk formatted with a FAT32 File Allocation Table File System Before using a new disk check its File System by inserting it into...

Page 11: ... so that maximum disk space is available A reformat can only be achieved using a PC running Windows XP Right click on the disk icon in My Computer and select Format Ensure the File system is set to FAT32 choose the Quick Format option and then click Start Ensure any useful recordings have been archived before reformat Status LED Flash Card Slot Card Eject Button Door Catch ...

Page 12: ...ch Flash Card shown emerging The Stack Digital Video Recorder Now identify a suitable location for the DVR It can be mounted in any orientation but when looking for a location please bear in mind that there must be approximately 50mm clearance for the wiring harnesses at the back of the unit to ensure that the cables will not be bent too sharply There must also be enough space to remove the Flash ...

Page 13: ...ribed at the end of this chapter Please contact your Stack distributor if you need different wiring harnesses The wiring harnesses supplied by Stack are terminated with the most commonly used connectors If your equipment uses different connectors you will need to obtain appropriate adapters from a TV video or electronics supplier Input yellow System red Monitor blue Bullet Camera Microphones Recor...

Page 14: ...e Power B and B connector As a guide the system draws approximately 2 5 watts when recording The current drawn will increase as the voltage supplied becomes lower eg 210 mA approx at 12 Volts 390 mA approx at 6 5 volts and with whatever other equipment is connected using the two 2 1 power plugs Whilst the DVR is protected internally from over voltage you should provide a 3 amp fuse in the B connec...

Page 15: ...onnected to the R red microphone input If audio recording is not required it may be disabled to extend the record time see page 22 The DVR provides a status output to indicate the system is recording Connect the optional Recording Status Lamp to the RL connector This is active low pull down to ground when recording is OK and can be used to drive a LED with up to 50mA max see wiring schematic below...

Page 16: ... Monitor Harness to the audio input on your monitor Video Overlay Wiring Harnesses If connection of the DVR to a Stack Video Overlay system is required then a specific harness should be supplied for that purpose The Input Harness and the System Harness are replaced by a single harness which allows direct connection between the DVR and the Stack V VS Module With this harness the signal from the cam...

Page 17: ...re is enough disk space available or preferably reformat the Flash Disk Disk space may be checked on a PC or by making a trial recording and viewing the DVR s status LED located inside the water tight door as described below Reformatting may be achieved using a PC See page 14 for more information regarding formatting options To start recording close the Record Switch The LED will flash fast red fo...

Page 18: ...l of the PC Configuration software Static red Unable to record as video and disk not present faulty or full Or system fault Flashing green External Recording Status Lamp also illuminated Recording OK The longer the green flash the greater the disk space remaining With an empty disk the LED will flash for approx 3 seconds With 50 disk capacity remaining the LED will flash 1 5 sec on 1 5 off With 10...

Page 19: ...ecorder Files DVR video files are MPEG 2 compliant and filenames begin with FB and have a MPG extension The files are given sequential numbers starting from 0001 With a standard Windows configuration they will be seen as Windows Media Player files see above To play simply double click the file and it will be displayed Due to the slow read speed of Flash Disks better results are usually obtained by...

Page 20: ...icking the disk icon in My Computer If the disk was supplied as FAT16 reformat to FAT32 using Windows XP s format utility to select the File System see Formatting a Flash Disk below Formatting a Flash Disk Important If using a new Flash Disk please ensure it has a FAT32 File System See Operation with a new Flash Disk above To format the disk using Windows XP right click on the disk icon in My Comp...

Page 21: ...perform a reformat of the removable disk In summary to regain Flash Disk space do not delete files Remove files for archiving and then reformat the Flash Disk as described above Corrupted Flash Disks If the disk is removed or if power is disconnected from the DVR during a recording it is possible the disk may become corrupted or the files could be incomplete In this case run Windows Scan Disk rout...

Page 22: ...ACK Digital Video Recorder 16 Users Guide Select the Tools tab and under Error checking click Check Now The Check Disk dialog will now be shown Check Automatically fix file system errors and click the Start button ...

Page 23: ...ording it is essential that Flash Cards have a sustained write speed of 16 or faster If the card is too slow video will play back with missing frames This problem can be alleviated by recording at a lower video quality see page 22 Compact Flash Cards can be used with an adapter Compact Flash Card to PCMCIA adapter Compact Flash Digital Video Recorder Using a Compact Flash Card via an Adapter Impor...

Page 24: ... by clicking the Write Config button PC Connection Ensure your PC has a suitable serial Com port Some PCs are no longer supplied with dedicated serial ports In this case a USB to Serial Adapter should be used obtainable from PC shops Install the DVR Configuration Utility which can be found on the CD ROM supplied with the DVR system Once installed connect the 9 way D type cable on the System Harnes...

Page 25: ...ke up the DVR by briefly toggling the Record Switch or by switching the DC power off and then back on to establish a connection Re Scan Click this button to cause your PC to search for COM ports This is particularly useful if you have a USB to RS232 adapter which isn t connected permanently to the PC This should only be used when the DVR is not connected since it will disrupt communications Lock C...

Page 26: ... the unlikely event that the DVR s internal set up has become corrupted Once this action has been performed the Configuration Utility will check to see if the set ups are the same between the DVR and the PC If they are different the following dialog box will pop up You should select the Read the DVR s configuration line and click OK to read the default settings into the PC This dialog will pop up ...

Page 27: ...ration Users Guide 21 System Information This screen shows the serial numbers of the DVR and the PC Configuration Utility software It also gives an indication of the amount of Flash Disk space which has been used System Information Screen ...

Page 28: ... the system The Highest setting is similar to DVD quality The software shows an estimate of the record time at the bottom of the screen depending upon configuration Video Input Configures the system to either NTSC or PAL with either the standard composite or S Video YC input enabled If the system is to be used with monochrome cameras only the best performance will be achieved by setting the input ...

Page 29: ...SIF 352 x 288 352 x 240 Always test that the recordings which are made will play correctly on your video equipment Many DVD players will not play back correctly unless the recordings were made at Full Resolution Audio Setup Allows you to configure the microphone inputs for gain and sensitivity If you uncheck AGC Enabled Active Gain Control you can adjust the gain manually Uncheck Enable Audio if y...

Page 30: ...Record Switch is switched on ie when the contacts on the external switch are closed As soon as the Record Switch is switched off contacts opened the DVR stops recording The DVR takes approximately two seconds to start recording from the instant the Record Switch is activated Record Start Record Stop not currently available This recording mode is not available in the current version of the Digital ...

Page 31: ...configured for Triggered Recording of 30 seconds duration with no re trigger As soon as the Record Switch is switched on its contacts close the DVR will start recording It will continue to record for 30 seconds no matter how long or how many times the Record Switch is operated during that period See Triggered Record Notes on page 26 Re Trigger on Going Active 0 Record Input Recording Time Seconds ...

Page 32: ...plete the DVR will continue to record The DVR takes approximately two seconds to start recording from the moment the Record Switch is switched on In Triggered Mode the recording timer starts when the recording actually starts Power Control Set the time of inactivity in seconds after which the DVR should power down ie change to low power stand by mode The DVR will power back up when the Record Swit...

Page 33: ...play Set up Screen If you are using the DVR with a Stack Video Overlay System you should specify a Time and Date Position which does not obscure the vehicle data being shown on the picture If you have a Stack Synchronised Video System it would be best to select Off to prevent the time and date being displayed If you do decide to show the time and date you MUST NOT select the Top or Near Top positi...

Page 34: ... s internal clock with that on the PC eg to cope with changes due to Summer Time etc Time and Date Set up Screen To set the DVR s internal clock simply click the Set Time Date button This operation uses the current PC clock so before uploading the time and date ensure the PC clock is correct and adjust it if necessary ...

Page 35: ...art of a data overlay system that does NOT include a recorder then the V VS will need to be configured with an action to start the DVR recording Automatic recording start control The recording status of the DVR is automatically controlled by the V VS module Shown is a test based on ESPD Engine RPM which causes a Start log command when the Engine speed is greater than the specified RPM The Start Lo...

Page 36: ...rding The V VS module s recorder control output is wired in parallel with the DVR record switch such that either the V VS output or the DVR record switch can cause the DVR to start recording To stop the DVR recording both the V VS output and the DVR record switch must be off to stop recording Recording Lamp The DVR recording status output is directly connected to both the DVR Recording Lamp and th...

Page 37: ...ine to be switched off before the power to the Stack system This is necessary so that the system can detect that for instance the Engine Speed RPM has fallen to zero and will have sufficient time to stop the DVR from recording before power is removed from the Stack system Important Failure to stop the DVR from recording before the power is removed will cause the video recording in progress to be l...

Page 38: ...your PC s hard drive and then perform a reformat See page 14 Video files are corrupted or missing The DVR was switched off before recording finished Ensure recording has finished before switching off the DVR Use Windows Check Disk utility to recover damaged recording files See page 15 Windows Media Player will not play DVR files DVR files have a MPEG 2 format and Windows Media Player can only play...

Page 39: ...ideo standard selected Check that the DVR is configured for video of the same standard as the video source NTSC or PAL This can be checked using the DVR Configuration Utility which will report both how the DVR is configured and also the standard of the video source Communications is lost between the PC and the DVR The Re Scan button was clicked on the Program Setup tab Click the Read Config button...

Page 40: ...mm Case Material Black hard anodised Aluminium Weight 290g without Flash Card Electrical Connectors Souriau Composite glass fibre loaded Plastic 5w plugs sockets Fixed 8STA0X0635PN Plug Red 8STA0X0635SA Socket Yellow 8STA0X0635SB Socket Blue Free mating part 8STA6X0635SN Socket Red 8STA6X0635PA Plug Yellow 8STA6X0635PB Plug Blue Recording time See Table 2 Configuration Interface Serial RS232 Confi...

Page 41: ...rable 4x Quality settings Variable bit rates 4 8Mb s User Configurable 4x Quality settings Compression Ratio 1 12 to 1 24 in 4 ranges Transport Stream Program Stream PS Group of Pictures GOP 19 Factory Configurable Audio Channels 2 In 2 Out Analogue Input 1 0 V RMS 0dBV gain 3 to 30dBV Analogue Output 1 0 V RMS 0 dBV Input Impedance 10 kOhms Output Impedance 100 Ohm Resolution 16 bit Sampling Rate...

Page 42: ...rature range 20 to 70ºC 4 to 160F Storage temperature range 40 to 80ºC 40 to 175F Sealing IP67 Vibration 20 G 3 axis 12 hours each Shock 50 G 15 mS Altitude 30000 feet with reduced temp spec 20 to 50ºC Humidity 0 100 RH EMI Emissions EN55025B CISPR25 EMI Immunity EN55024B Specifications are for the Digital Video Recorder only When combined with the media the specifications will be reduced to the l...

Page 43: ...STACK Digital Video Recorder Specifications Users Guide 37 Appendix A Mounting Template Use the template on the next page for mounting the DVR Remember to leave room for card insertion and removal ...

Page 44: ...Appendices STACK Digital Video Recorder 38 Users Guide 68 5 mm 140 3 mm 93 0 mm M3 x 5 deep 6 places ...

Page 45: ... Harness ST918069 1 2 3 4 5 INPUT S Video In AS 5 J yellow VGND CAM MIC R Y C 1 2 1 2 12v Power out 2 1 Power plug Mic In R RCA Phono Plug 1 2 12v Power out 2 1 Power plug 1 2 3 4 1 2 3 4 5 INPUT Video In BNC Plug AS 5 J yellow VGND CAM MIC R VIDI SV 12v Power out 2 1 Power plug Mic In R RCA Phono Plug 12v Power out 2 1 Power plug N c ...

Page 46: ...lug Mic In R RCA Phono Plug 1 2 12v Power out 2 1 Power plug 1 2 3 4 5 6 7 8 9 10 11 12 13 14 15 V Module 15w MIL 1 1 2 2 3 4 5 SYSTEM GND B MIC L RO RI Control Power MSS 4 R AS 5 J red Mic In L RCA Phono Plug 1 2 3 4 RI RO GND B Video Controller SwCraft 8w Skt 1 2 3 4 5 6 7 8 DSW1 DSW2 SO P DSW3 VGND CAM MICR MIN Rx Tx LANC LCV VID I VID O 3 Peak Switch On Off Switch Record Switch Lamp CAM VGND n...

Page 47: ...MSS 4 R AS 5 J red Mic In L RCA Phono Plug 1 2 3 4 Power Control Harness ST918070 Control Power MSS 4 P 1 2 3 4 RI RO B GND B GND Record Lamp Record Switch Monitor Configuration Harness ST918068 1 1 2 2 3 4 5 MONITOR VGND AUD O RX VID O TX 1 2 Audio Out L R RCA Phono Plug RS232 Config DB 9 AS 5 J blue Video Out RCA Phono Plug 2 3 5 ...

Page 48: ...td either direct or via the distributor with this completed form Please Note Returning a part without this form and RAN will lengthen the repair times and possibly increase the cost of the repair For a current list of distributors log onto the Stack websites at www stackltd com or www stackinc com click on the Where to buy tab at the top of the home page and select Distributors To Contact Stack Lt...

Reviews: