background image

Customer Service 1-888-707-1880 


Email: [email protected] 


IMPORTANT 

ELECTRICAL INSTRUCTIONS


WARNING! 

NEVER 

remove any cover without first disconnecting AC power. If voltage varies by ten percent (10%) or more, the 

performance of your elliptical may be affected. Such conditions are not covered under your warranty. If you suspect 

the voltage is low, contact your local power company or a licensed electrician for proper testing. 

NEVER 

expose this elliptical to rain or moisture. This product is NOT designed for use outdoors, near a pool or spa, 

or in any other high humidity environment. The temperature specification is 40 degrees C, and humidity is 95%, non-

condensing (no water drops forming on surfaces). 


Circuit breakers: 

Avoid AFCI/GFCI circuit breakers if possible. These breakers may trip occasionally during use 

because of the high inrush currents from the elliptical drive motor. This condition is an issue with all elliptical and other 

products with large motors or electric heating elements like ovens. 

New laws in your area may require these breakers. If you do have these breakers and outlets in your home and are 

experiencing nuisance tripping, you should check to see if there are any other devices plugged into the same circuit 

like fluorescent lights with electronic ballasts, coffee maker, space heater, etc. Optimally the elliptical should be the 

only device plugged into the circuit. 

Our ellipticals have surge suppressors built in to help avoid nuisance tripping. We have tested several AFCI/GFCI 

breakers and outlets with our products that do not trip when only the elliptical is connected. Brands we have tested 

are: Eaton (Cutler Hammer Series), Leviton (Smart lock pro) and Schneider Electric (Canadian home series). 


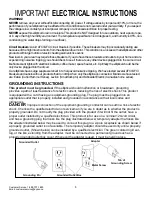
GROUNDING INSTRUCTIONS 


This product must be grounded. 

If the elliptical should malfunction or breakdown, grounding 

provides a path of least resistance for electric current, reducing the risk of electric shock. This product 

is equipped with a cord having an equipment-grounding plug. The plug must be plugged into an 

appropriate outlet that is properly installed and grounded in accordance with all local codes and 

ordinances. 

DANGER


Improper connection of the equipment-grounding conductor can result in a risk of electric 

shock. Check with a qualified electrician or serviceman if you are in doubt as to whether the product is 

properly grounded. Do not modify the plug provided with the product if it will not fit the outlet; have a 

proper outlet installed by a qualified electrician. This product is for use on a nominal 120-volt circuit, 

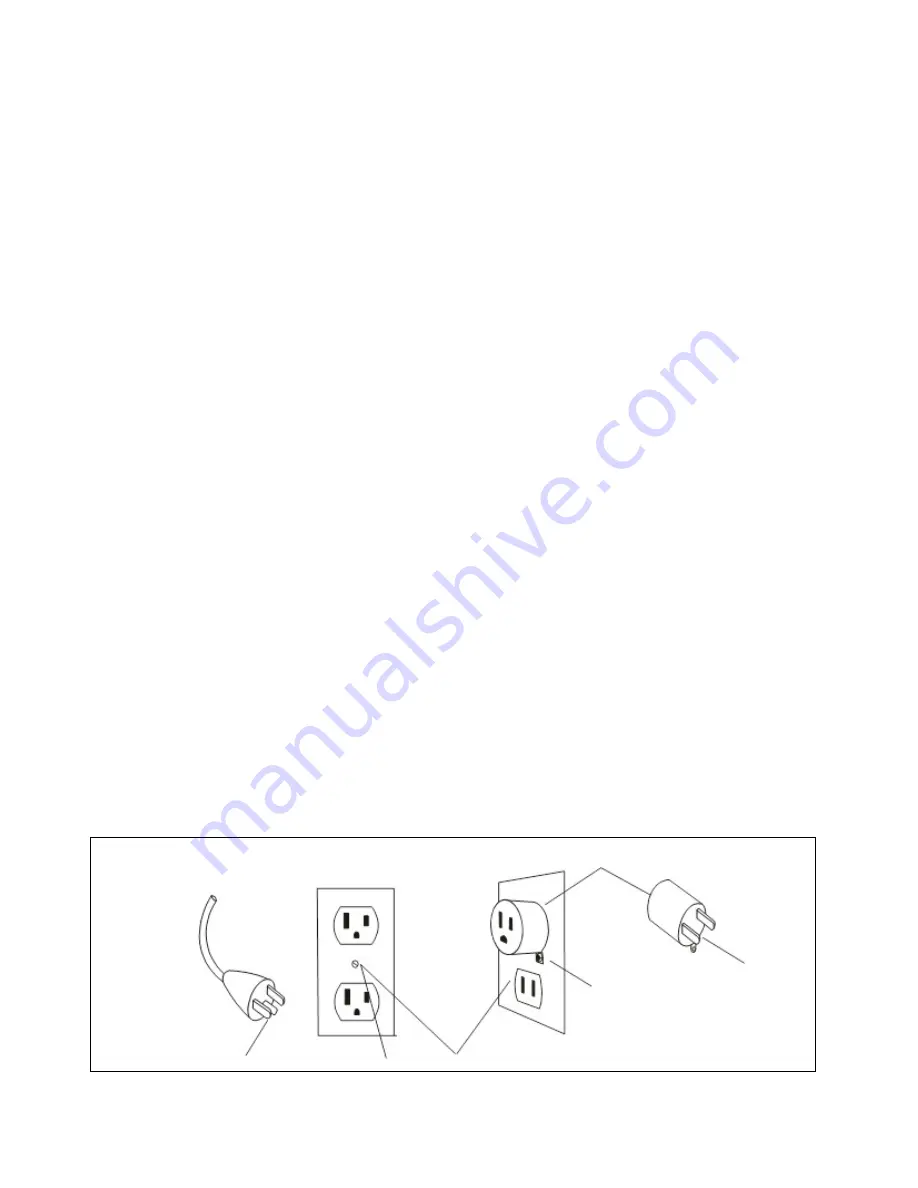
and has a grounding plug that looks like the plug illustrated below. A temporary adapter that looks like 

the adapter illustrated below may be used to connect this plug to a 2-pole receptacle as shown below if 

a properly grounded outlet is not available. The temporary adapter should be used only until a properly 

grounded outlet, (Shown below) can be installed by a qualified electrician. The green colored rigid ear-

lug, or the like, extending from the adapter, must be connected to a permanent ground such as a 

properly grounded outlet box cover. Whenever the adapter is used, it must be held in place. 


Grounded Outlet


Grounding Pin


Grounded Outlet Box


Adapter


Metal Screw


Tab of 

Grounding Screw


Summary of Contents for CE800 ENT

Page 1: ...Retain For Future Reference Owner s Manual Model No 16611008000 CE800ENT Assembly Operation Adjustments Parts Warranty CAUTION Read and understand this manual before operating unit...

Page 2: ...ly Instructions 9 Operation of Your Console 16 Using a Heart Rate Transmitter 39 General Maintenance 40 Exploded View Diagram 41 Parts List 42 Getting On Off Your Elliptical 45 Training Guidelines 47...

Page 3: ...ier to remedy Please take a moment at this time to record the name of the dealer their telephone number and the date of purchase below to make any future needed contact easy We appreciate your support...

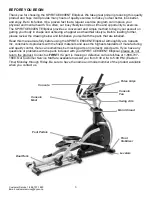
Page 4: ...e drawing below and familiarize yourself with the parts that are labelled Read this manual carefully before using the SPIRIT CE800ENT Elliptical Although Dyaco Canada Inc constructs its products with...

Page 5: ...amage the surface of your floor Keep the elliptical exerciser indoors away from moisture and dust 7 No changes must be made which might compromise the safety of the equipment 8 It is recommended to ha...

Page 6: ...s Do not operate where aerosol spray products are being used or where oxygen is being administered Sparks from the motor may ignite a highly gaseous environment Never drop or insert any object into an...

Page 7: ...ts with our products that do not trip when only the elliptical is connected Brands we have tested are Eaton Cutler Hammer Series Leviton Smart lock pro and Schneider Electric Canadian home series GROU...

Page 8: ...y or household power supply that could damage elliptical components Unplug the elliptical during an electrical storm as a precaution Use caution while participating in other activities while pedaling...

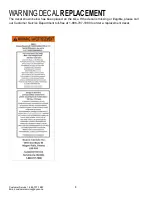
Page 9: ...ustomerservice dyaco ca 8 WARNING DECAL REPLACEMENT The decal shown below has been placed on the bike If the decal is missing or illegible please call our Customer Service Department toll free at 1 88...

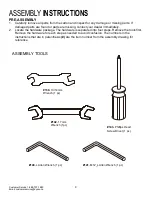
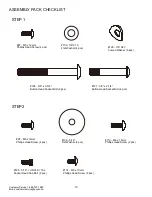
Page 10: ...your dealer immediately 2 Locate the hardware package The hardware is separated into four steps Remove the tools first Remove the hardware for each step as needed to avoid confusion The numbers in the...

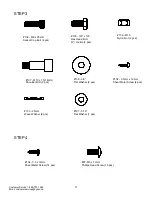
Page 11: ...X19 Flat Washer 4 pcs 129 3 8 X23 Curved Washer 6 pcs 128 3 8 x 3 3 4 Button Head Socket Bolt 6 pcs 106 5 16 Flat Washer 2 pcs 126 5 16 UNC18 15L Socket Head Cap Bolt 2 pcs 119 M6 x 15mm Phillips Head...

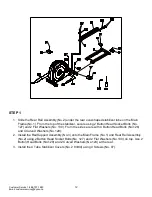
Page 12: ...3 4 Hex Head Bolt W Loctite 2 pcs 136 M10 Nylon Nut 2 pcs 137 M10 x 1 5 14mm Shoulder Bolt 2 pcs 138 3 8 Flat Washer 2 pcs 134 3 5 x 12mm Sheet Metal Screw 14 pcs 97 M5 x 12mm Phillips Head Screw 16 p...

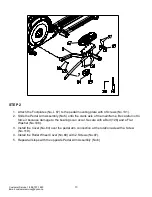
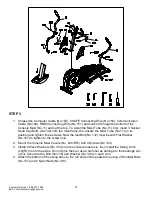
Page 13: ...ocket Bolts No 127 and 2 Flat Washers No 130 From the side secure with 4 Button Head Bolts No 128 and 4 Curved Washers No 129 2 Install the Rail Support Assembly No 3 onto the Main Frame No 1 and Rear...

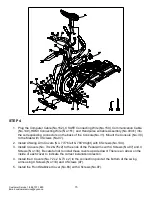
Page 14: ...mbly No 5 onto the crank axle of the mainframe Be careful not to force it because damage to the bearings can occur Secure with a Bolt 126 and a Flat Washer No 106 3 Install the Cover No 64 over the pe...

Page 15: ...the Mast Tube No 11 on its position and tighten three screws Now the last Bolt No 132 must be with Flat Washer No 107 to tighten to the screw hole 2 Mount the Console Mast Covers No L80 R81 with 4 Sc...

Page 16: ...h 4 Screws No 97 2 Install 4 Swing Arm Covers No 77 76 left 78 79 right with 6 Screws No 134 3 Install 4 Covers No 74x2 75x2 to the ends of the Pedal Arms with 4 Screws No 97 and 4 Screws No 134 Be ca...

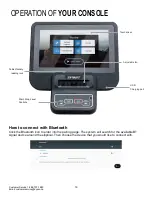
Page 17: ...ith Bluetooth Click the Bluetooth icon to enter into the pairing page The system will search for the available BT signal device around the elliptical Then choose the device that you would like to conn...

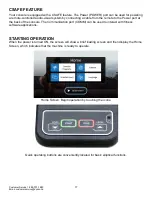
Page 18: ...emote to the Power port at the back of the console The Communication port COMM can be used to interact with fitness software applications STARTING OPERATION When the power is turned ON the screen will...

Page 19: ...Start button to begin This will initiate the Quick Start mode In Quick Start the Time will count up from zero all workout data will start to accrue and the workload may be adjusted manually by pressi...

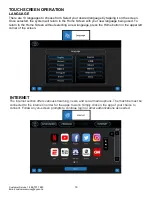
Page 20: ...with your new language being used To return to the Home Screen without selecting a new language press the Home button in the upper left corner of the screen INTERNET The Internet section offers variou...

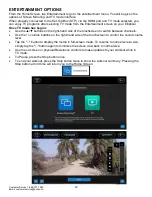
Page 21: ...gun Use the buttons on the right hand side of the touchscreen to switch between channels Use the volume buttons on the right hand side of the touchscreen to control the sound volume level Tap the butt...

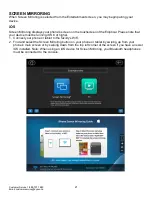
Page 22: ...of the Elliptical Please note that your device must be running iOS 8 or higher 1 Connect your phone or tablet to the facility s WiFi 2 Find and select the Screen Mirroring button on your phone or tab...

Page 23: ...the QR code or search for Spirit Mirroring in the Google Play store on your phone or tablet 3 Download the app 4 Open the Spirit Mirroring App and select the device name Then click Start Mirroring to...

Page 24: ...ill Fat Burn Cardio HIIT Interval Heart Rate Custom Constant Power and Fitness Test To select and start a preset program 1 Select a program by tapping it on the screen then press Enter to begin Custom...

Page 25: ...Customer Service 1 888 707 1880 Email customerservice dyaco ca 24...

Page 26: ...e view simply tap the Simple button at the bottom of the screen This view shows a muscle activation profile for the current workout an overview of the Resistance profile as well as the elapsed Distanc...

Page 27: ...d view simply tap the Dashboard button at the bottom of the screen This view shows a virtual dashboard mimics a typical Elliptical display with information that corresponds with the current workout Me...

Page 28: ...Customer Service 1 888 707 1880 Email customerservice dyaco ca 27 MANUAL The level of resistance is controlled by the user Increase or decrease levels at any time during your workout...

Page 29: ...g this program up to a maximum effort which lasts for 10 of the total workout time then a gradual regression of resistance back to approximately 10 of maximum effort FAT BURN This program follows a qu...

Page 30: ...build up your heart muscle and increase blood flow and lung capacity INTERVAL This program takes you through high levels of intensity followed by recovery periods of low intensity This program utiliz...

Page 31: ...djusts when the speed is changed Choose either faster pedalling at a lower resistance level or slower pedalling at a higher resistance level HEART RATE The default value is 65 of your projected rate m...

Page 32: ...s the Enter key to begin customizing the program with your personal data or just press the Start key to begin the program with the default settings 2 The window will show the corresponding level profi...

Page 33: ...rsonal data and you are asked for and the number of intervals you want to do The default is 10 and the range available is 3 to 15 One interval equals 1 Sprint and 1 Rest segment 2 Next is entering the...

Page 34: ...rate reaches 85 of maximum at any time during the test or your heart rate is between 110 bpm and 85 at the end of two consecutive stages At the end of the test a VO2max score will be given VO2max stan...

Page 35: ...HR 120 HR 120 135 HR 135 3rd stage 1350 kgm min 1200 kgm min 1050 kgm min 1200 kgm min 1050 kgm min 900 kgm min 1050 kgm min 900 kgm min 750 kgm min Workload chart for female or de conditioned male 1s...

Page 36: ...rops below 48 rpm or goes above 52 rpm the console will emit a steady beeping sound until you are within this range You may scroll through the various data readings by pressing the Display button unde...

Page 37: ...38 32 35 30 31 26 28 below average 37 41 35 39 31 34 29 31 26 29 22 25 poor 30 36 30 34 26 30 25 28 22 25 20 21 very poor 30 30 26 25 22 20 VO2max Chart for females and de conditioned males 18 25 26...

Page 38: ...er your age during programming the console will perform this calculation automatically Entering your age is used for the Heart Rate control programs After calculating your Maximum Heart Rate you can d...

Page 39: ...as follows Rating Perception of Effort 6 Minimal 7 Very very light 8 Very very light 9 Very light 10 Very light 11 Fairly light 12 Comfortable 13 Somewhat hard 14 Somewhat hard 15 Hard 16 Hard 17 Ver...

Page 40: ...ole to maintain good strong reliable readings Wearing the transmitter immediately against bare skin assures you of proper operation If you wish you may wear the transmitter over a shirt To do so moist...

Page 41: ...en the bolts sufficiently I cannot stress this point enough 90 of calls to the service department for noise issues can be traced to loose hardware b The crank arm nut needs to be retightened If squeak...

Page 42: ...Customer Service 1 888 707 1880 Email customerservice dyaco ca 41 EXPLODEDVIEWDIAGRAM...

Page 43: ...Drive Pulley 1 29 K500054 Flywheel 1 30 N040002 Magnet 1 31 RZEYE0360 21 Console Assembly 1 32 E011211 500mm_Sensor W Cable 1 33 E010463 300mm_Wire Brake Coil Harness Red 1 34 E010462 600mm_Connecting...

Page 44: ...nt Handle Bar Cover R 1 79 P180049 I1 Rear Handle Bar Cover R 1 80 PP100050 I1 Console Mast Cover L 1 81 PP100051 I1 Console Mast Cover R 1 82 P060252 A1 25 25 15T_Rubber Foot Pad 2 83 P060089 I1 Rear...

Page 45: ...t Head Cap Bolt 2 127 J021009S2 ZJ 3 8 2 1 4 _Button Head Socket Bolt 4 128 J021015L ZJ 3 8 UNC16 3 3 4 _Button Head Socket Bolt 6 129 J220004 Z1 3 8 23 2 0T_Curved Washer 6 130 J210003 Z1 3 8 19 1 5T...

Page 46: ...t foot on the left Foot Pedal and get secure 5 Lift your right foot over the machine and place it on the right Foot Pedal Get balanced and begin your workout Important To get off come to a complete st...

Page 47: ...dyaco ca 46 MOVING YOUR ELLIPTICAL The elliptical can be easily moved from room to room 1 Move to the rear of the machine and ensure swing arms are even Squat down then grasp the handle of the rear S...

Page 48: ...e stretching of muscles and tendons to maintain or increase suppleness and provides increased resistance to muscle injury or soreness Cardio Respiratory Endurance is an essential component of physical...

Page 49: ...er Stretching should be included in both your warm up and cool down and should be performed after 3 5 minutes of low intensity aerobic activity or callisthenic type exercise Warm Down or Cool Down Thi...

Page 50: ...ogram Remember the target is a guide not a rule a little above or below is just fine Two final comments 1 don t be concerned with day to day variations in your pulse rate being under pressure or not e...

Page 51: ...ssive clothing that causes you to perspire more than you normally would while exercising gives you no advantage The extra weight you lose is body fluid and will be replaced with the next glass of wate...

Page 52: ...r neck Next rotate your head back for one count stretch your chin to the ceiling and let your mouth open Rotate your head to the left for one count and finally drop your head to your chest for one cou...

Page 53: ...d your toes Reach down as far as you can and hold for 15 counts HAMSTRING STRETCHES Sit with your right leg extended Rest the sole of your left foot against your right inner thigh Stretch your toe as...

Page 54: ...Inc service companies use of parts other than original Dyaco Canada Inc parts or external causes such as corrosion discoloration of paint or plastic alterations modifications abuse misuse accident imp...

Page 55: ...s manufactured and distributed by Dyaco Canada Inc spiritfitness ca solefitness ca xterrafitness ca dyaco ca products everlast html dyaco ca UFC UFC home html spiritfitness ca johnnyg html trainorspor...

Reviews: