14
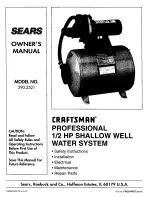
Product output fitting.
Back view of instrument panel
Use accumulator port to connect the
pressure gauge with the supplied
1/4”
black nylon tubing. Tubing must be
pressure rated to 150 PSI (10 BAR).
Product Flow Meter
Pressure Gauge
Product Water Plumbing and Pressure Gauge Tube Installation
Product Sampling Valve:
Mount using the
supplied plastic straps.
Note: the handle points
in the direction of flow.
Product to tank:
Route the product water
from the valve into the top of a vented
tank. Install a tee in the water fill or tap a
pipe thread into an inspection port.
DO NOT!
feed the product into a
vent line, manifold, or the bottom
of the tank. Make sure that there is no
restriction in this piping.
Pressure in the
product tubing must never exceed 5psi
(.3bar)
, running or stopped, or the
membrane will be permanently damaged.
Sampling Tap
for testing the
product water.
Use the supplied
1/4”
black tubing for the
product water plumbing.
!
Summary of Contents for VENTURA 150
Page 2: ...2...
Page 4: ...4...
Page 6: ...6...
Page 13: ...13 Installation Notes...
Page 15: ...15...
Page 16: ...16 John Guest Super Speedfit Fittings...
Page 26: ...26 Operation...
Page 27: ...27...
Page 54: ...54 Insert pdf here after conversion to pdf...
Page 56: ...56 Exploded Views Part Numbers...
Page 57: ...57...
Page 63: ...63 Parts HP CYL 3 4R...
Page 64: ...64 PL MTS 3 8X1 2B HP CYL SST HP CYL CCA SO HPP ECCB HP CYL EC HP CYL R HP CYL PT Parts...
Page 65: ...65...
Page 69: ...69...
Page 71: ...71...
Page 74: ...74...