Connecting to a LAN (LAP)
Procedure
1.
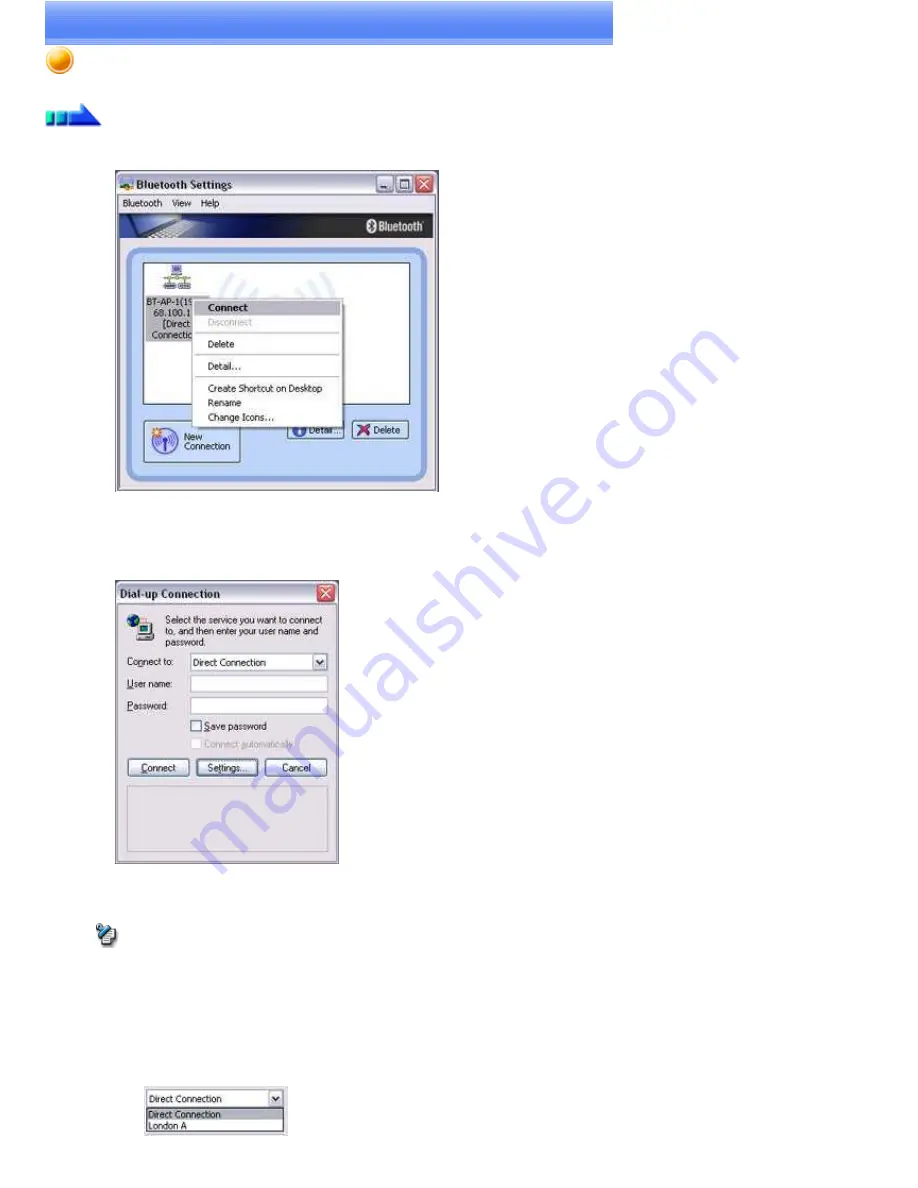
Right-click on the connection icon in the [Bluetooth Settings] window, and then click on [Connect]
The [Dial-up Connection] window will appear.
2.
Confirm that "Direct connection" has been selected under [Connection Destination], and then click on the [Connect] button
A connection will be initiated.
Note
o
This is an example of what happens when you use "Direct connection" as a connection name under "Connect to access point." If
a name different from the connection name is used, that name will appear under [Connection Destination].
o
Please simply click on [Settings] if no user name or password have been entered (i.e., if those fields have been left blank)
o
Please change the connection destination if a different connection name (for a dial-up connection) appears in [Connection
Destination].
Related topic→"
Changing the default connection destination
"
Page 425
Summary of Contents for VGN-BX563B - VAIO - Pentium M 1.73 GHz
Page 10: ...Relatedtopics Exchanging files with PCs and PDAs Page 10 ...
Page 54: ...Click on the Yes button in the disconnection confirmation dialog boxthat appears Page 54 ...
Page 67: ...Page 67 ...
Page 81: ...An image of the received faxwill be displayed Related topic Sending a fax Page 81 ...
Page 95: ...An image of the received faxwill be displayed Related topic Sending a fax Page 95 ...
Page 112: ...Page 112 ...
Page 139: ...Please click on the OK button to close the message and repeat the procedure Page 139 ...
Page 157: ...Page 157 ...
Page 197: ...An image of the received faxwill be displayed Related topic Sending a fax Page 197 ...
Page 218: ...An image of the received faxwill be displayed Related topic Sending a fax Page 218 ...
Page 223: ...Please click on the OK button to close the message and repeat the procedure Page 223 ...
Page 231: ...Click on the Yes button in the disconnection confirmation dialog boxthat appears Page 231 ...
Page 254: ...Page 254 ...
Page 294: ...Page 294 ...
Page 301: ...Page 301 ...
Page 327: ...Page 327 ...
Page 361: ...Page 361 ...
Page 366: ...The mouse will be connected Page 366 ...
Page 370: ...The new icon will appear Page 370 ...
Page 372: ...Page 372 ...
Page 378: ...Page 378 ...
Page 404: ...Page 404 ...
Page 427: ...Click on the Yes button in the disconnection confirmation dialog boxthat appears Page 427 ...
Page 440: ...Page 440 ...
Page 454: ...An image of the received faxwill be displayed Related topic Sending a fax Page 454 ...
Page 468: ...An image of the received faxwill be displayed Related topic Sending a fax Page 468 ...
Page 485: ...Page 485 ...
Page 512: ...Please click on the OK button to close the message and repeat the procedure Page 512 ...
Page 530: ...Page 530 ...
Page 570: ...An image of the received faxwill be displayed Related topic Sending a fax Page 570 ...
Page 591: ...An image of the received faxwill be displayed Related topic Sending a fax Page 591 ...
Page 596: ...Please click on the OK button to close the message and repeat the procedure Page 596 ...
Page 604: ...Click on the Yes button in the disconnection confirmation dialog boxthat appears Page 604 ...
Page 627: ...Page 627 ...
Page 667: ...Page 667 ...
Page 674: ...Page 674 ...
Page 700: ...Page 700 ...
Page 738: ...Page 738 ...


